When Windows Phone 7 is released, users will be able to enjoy the fact that the hardware requirements for the phone include an accelerometer. Some applications are naturally inclined to work well with accelerometer input. Imagine a “Labyrinth” style game where you can now just rotate or tilt the device instead of simulating the tilting of the table using some buttons or sliders? Just rotating the device from portrait to landscape can re-flow the screen in the right orientation without the user selecting their preferred orientation.
In this blog post we will talk about the different ways you can use the accelerometer API in Windows Phone 7. We also include a class called AccelerometerHelper that uses the Microsoft supplied managed API and provides a variety of data for you to experiment with and find the right solution for your application. There are two major usages of the accelerometer:
- Orientation relative to our planet Earth (assuming the device is being held steady)
- Detecting movement of the device relative to the initial point (assuming you know the orientation).
The AccelerometerHelper class adds two high level functions for filtering of the data and calibration of the accelerometer.
Before we jump into the helper class, let’s take a look at the Windows Phone 7 managed accelerometer API. It’s pretty simple. There is a class called Accelerometer that is in the Microsoft.Devices.Sensors namespace. You create a new instance of the Accelerometer and then set up an event handler for the ReadingChanged event. Call the Start() method and you will start getting these events:
private void SetupAccelerometer()
{
_sensor = new Accelerometer();
_sensor.ReadingChanged += OnSensorReadingChanged;
_sensor.Start();
}
private void OnSensorReadingChanged(
object sender,
AccelerometerReadingEventArgs e
)
{
}
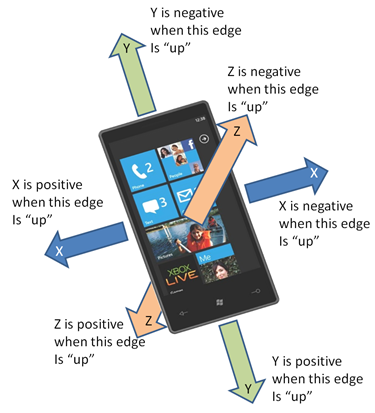
The AccelerometerReadingEventArgs contains the X, Y, and Z accelerometer readings from the sensor on the phone and a timestamp. The values are expressed in G-forces (1G = 9.81 m/s2), so a value of 1.0 means that the corresponding axis is being pulled with the same force as the gravity in Paris (the oh-so obvious center of the gravitational universe, hi Greg!). For example, if Z is -1.0, then the device is lying flat, face up, on a perfectly flat surface. If Z is 1.0, then the device is lying flat, faced down. Here is a diagram showing all the corresponding values:
There is something very important to note, however. Getting a value of 1.0 is not going to happen all the time. Earth’s gravity doesn’t roll that way. You may be at the Mystery Spot, you may be on top of a very tall mountain, or your hand may be trembling enough that there are some extra forces on the device. The accelerometer has some error tolerance, so you will want to experiment around with the cumulative margin of errors for the max/min values if your application needs to know these sorts of things. The AccelerometerHelper does not provide this functionality.
Now keep in mind that you will get those events often. Fifty times per second, to be exact. That means you are going to be getting a lot of data. The data you get will be noisy because of the nature of the accelerometer sensor on the device. Even with the device sitting on a table, minding its own business, the numbers coming in will have some variance. Additionally, there will be some calibration problems due to the nature of manufacturing tolerances (and users possibly dropping their phones a few times). Some devices will also come with edges that are not exactly flat. This means setting the device on a table may not result in a “level” reading. For applications using orientation, they need to really know that when the X and Y values are 0, the device is “leveled” (if “leveled” means the device is lying flat. If “leveled” means on edge then Z is 0, and either X or Y is 0). A level application is a perfect example of this.
With this short preamble, let us now look at the AccelerometerHelper class. It provides methods to calibrate the accelerometer and smooth the noisy 50 Hz data stream that the underlying Accelerometer class is generating. The AccelerometerHelper class provides a ReadingChanged event, which uses AccelerometerHelperReadingEventArgs. I think the class speaks for itself. Here is the class’s signature:
/// <summary>
/// Accelerometer Helper Class, providing filtering and local calibration of accelerometer sensor data
/// </summary>
public sealed class AccelerometerHelper: IDisposable
{
/// <summary>
/// New raw and processed accelerometer data available event.
/// Fires every 20ms.
/// </summary>
public event EventHandler<AccelerometerHelperReadingEventArgs> ReadingChanged;
/// <summary>
/// Singleton instance of the Accelerometer Helper class
/// </summary>
public static AccelerometerHelper Instance { get; }
/// <summary>
/// True when the device is “stable” (no movement for about 0.5 sec)
/// </summary>
public bool DeviceStable { get; }
/// <summary>
/// Persistant data (calibration of accelerometer)
/// </summary>
public Simple3DVector ZeroAccelerationCalibrationOffset { get; }
/// <summary>
/// Accelerometer is not present on device
/// </summary>
public bool NoAccelerometer { get; }
/// <summary>
/// Accelerometer is active and reading value when true
/// </summary>
public bool Active { get; set; }
/// <summary>
/// Release sensor resource if not already done
/// </summary>
public void Dispose();
/// <summary>
/// Indicate that the calibration of the sensor would work along a particular set of axis
/// because the device is “stable enough” or not inclined beyond reasonable
/// </summary>
/// <param name=”xAxis”>check stability on X axis if true</param>
/// <param name=”yAxis”>check stability on X axis if true</param>
/// <returns>true if all of the axis checked were “stable enough” or not too inclined</returns>
public bool CanCalibrate(bool xAxis, bool yAxis);
/// <summary>
/// Calibrates the accelerometer on X and / or Y axis and save data to isolated storage.
/// </summary>
/// <param name=”xAxis”>calibrates X axis if true</param>
/// <param name=”yAxis”>calibrates Y axis if true</param>
/// <returns>true if succeeds</returns>
public bool Calibrate(bool xAxis, bool yAxis);
}
The AccelerometerHelperReadingEventArgs provide the current values (see the next section “A Look at Data Smoothing” for an explanation of these values):
/// <summary>
/// Arguments provided by the Accelerometer Helper data event
/// </summary>
public class AccelerometerHelperReadingEventArgs : EventArgs
{
/// <summary>
/// Raw, unfiltered accelerometer data (acceleration vector in all 3 dimensions) coming directly from sensor.
/// This is required for updating rapidly reacting UI.
/// </summary>
public Simple3DVector RawAcceleration { get; set; }
/// <summary>
/// Filtered accelerometer data using a combination of a low-pass and threshold triggered high-pass on each axis to
/// elimate the majority of the sensor low amplitude noise while trending very quickly to large offsets (not perfectly
/// smooth signal in that case), providing a very low latency. This is ideal for quickly reacting UI updates.
/// </summary>
public Simple3DVector OptimalyFilteredAcceleration { get; set; }
/// <summary>
/// Filtered accelerometer data using a 1 Hz first-order low-pass on each axis to elimate the main sensor noise
/// while providing a medium latency. This can be used for moderatly reacting UI updates requiring a very smooth signal.
/// </summary>
public Simple3DVector LowPassFilteredAcceleration { get; set; }
/// <summary>
/// Filtered and temporally averaged accelerometer data using an arithmetic mean of the last 25 “optimaly filtered”
/// samples (see above), so over 500ms at 50Hz on each axis, to virtually eliminate most sensor noise.
/// This provides a very stable reading but it has also a very high latency and cannot be used for rapidly reacting UI.
/// </summary>
public Simple3DVector AverageAcceleration { get; set; }
}
The Simple3DVector is just a nice class that puts X, Y, and Z into the same object, along with some handy math functions.
A Look at Data Smoothing
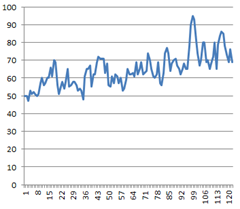
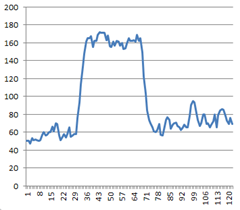
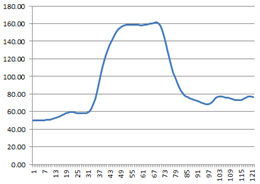
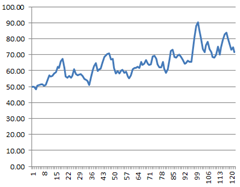
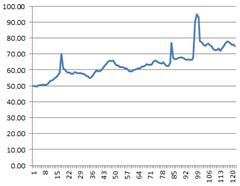
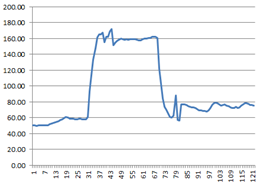
Remember that the data from the accelerometer come in fast and furious at 50 times per second. The important thing to understand is how you want your application to react to this data stream. How you want your application to react depends on your application scenario. Some applications will want to have a very “nimble” feel, where small changes in the accelerometer value have immediate results. Games come to mind here. Other applications will want to have a very “steady” feel, where minute changes are ignored unless they trend over time from Value A to Value B. Let’s look at two graphs of raw data that we recorded from a device. The first graph trends from a low number to a high number. The second graph rapidly switches from one range of numbers to another, and then back. In real life, the trending graph is from a device that the user slowly tilts in one direction, and the second graph is from a device where the user rapidly tilts the device and then quickly resets the device. For the sake of simplicity, we show only one axis in the graph. The reader can extrapolate to all 3 axes:
Note how choppy the raw values are. If you have an application that shows the value of the accelerometer as numbers, those numbers will appear to be jumping all over the place. Perhaps this is what you want (highly doubtful, since it’s so noisy). But if you want to add some fluidity to the numbers so they seem to move in a more sequential fashion, then you will need to do some math stuff called signal processing.
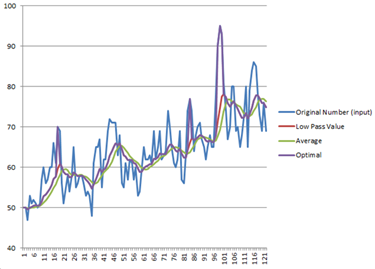
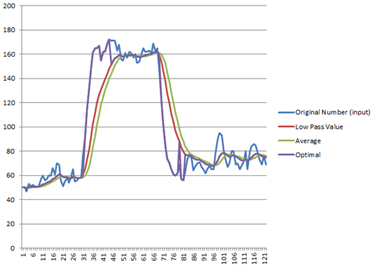
Let’s first look at using the running average of the past five samples. By averaging the past five readings, the value is much, much smoother. But you can see in the second graph that the change in reading is now detected much later due to the smoothing. Therefore any application that needs to respond quickly to the change (like a car racing game), the latency will make the game play difficult. For the first graph (which has trending data versus sudden changes), this looks pretty nice.
Averaging is one method to smooth out noisy signals. Another method is to use something called a “Low Pass Filter”. A simple low pass filter is described by the formula below:
On = On-1 + α(In – On-1)
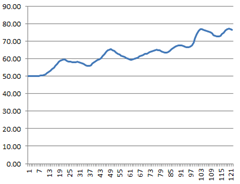
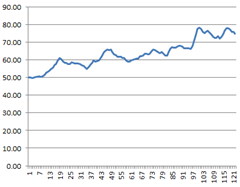
O is the output (filtered value) and I is the input (raw value), and α is a “coefficient” with a value between 0 and 1. If the coefficient is 1, the output is exactly the same as the input. If the coefficient is 0, the output is always the initial number. Those are the boring cases, the more interesting cases are when the coefficient is somewhere in between. The lower the coefficient, the more smoothing goes on. This formula gives you a single number to twiddle to get the smoothing effect you want. Let’s now look at the two graphs again, filtered with the low pass filter using a coefficient of 0.5:
And now, let’s use a coefficient of 0.15:
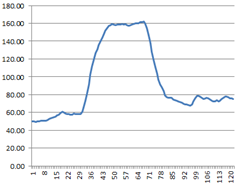
As you can see, the resultant signals are pretty smooth, but there is still latency in the second graph. We need to find a way to smooth the data when it is bound to a range, but take the big changes immediately. We’ll call this the “Optimal” value. There are lots of ways to do this, but the AccelerometerHelper takes the simple approach of checking the delta against a threshold. If the delta between the average value and the raw value is beyond a threshold, then the raw value is used, otherwise the low pass filter value is used. Here are the two graphs using this “Optimal” algorithm:
Just in case you don’t have graph overload, here is a composite graph showing all the different algorithms at once:
If you would like to play around with the coefficients and thresholds, you can find an Excel spreadsheet in the downloadable for this blog post. It has a sample of actual data taken from a device, and you can play around with the coefficients to see the effect on the data.
Calibration
Just what does calibrating the accelerometer mean? As an application, you do not have the ability to write system settings, so any calibrations you make will be only applicable at your application level. The AccelerometerHelper class “calibrates” the accelerometer by actually calibrating itself. You, the user, are expected to lay the device flat on a surface, then press a button whose event handler calls the Calibrate method for the X and Y axis. Calibration on the Z axis is not relevant. The method signature looks like this:
/// <summary>
/// Calibrates the accelerometer on X and / or Y axis and save data to isolated storage.
/// </summary>
/// <param name=”xAxis”>calibrates X axis if true</param>
/// <param name=”yAxis”>calibrates Y axis if true</param>
/// <returns>true if succeeds</returns>
public bool Calibrate(bool xAxis, bool yAxis)
You notice that the return value indicates success or failure. That’s because the Calibrate method checks the CanCalibrate method first to see if calibration is possible. If the device is tilted such that the X or Y values are nowhere near 0, then CanCalibrate will return false. Also, if the device is moving around a lot, CanCalibrate will return false. Your application can call CanCalibrate is response to the ReadingChanged event and modify the UI of your application accordingly. For example, a Level application could enable/disable the calibrate button to correlate to the CanCalibrate value.
If the Calibrate method proceeds to actually “calibrate”, then the average X and/or Y values of the accelerometer are used to build a vector. That vector is the negative of the current values. When added together, you get a vector with 0, 0, 0 for the x, y, z values. So the raw values from the Accelerometer class are combined with the compensation vector and the resultant values are run through the filters above. In addition, the calibration vector is saved away in the built-in IsolatedStorageSettings.ApplicationSettings with key names of “AccelerometerCalibrationX” and “AccelerometerCalibrationY”. This is nice because the user will usually only need to calibrate once per app and be done.
Orientation
In addition to the AccelerometerHelper class, there is also an OrientationHelper class we’ve written. It gives you information on all six of the device orientations for the 3 dimensions, as well as “Unknown” in case the device is not close enough to any of the orientations that a true orientation can be determined (or if the device is in motion, and the accelerometer values are rapidly changing). You get an event which tells you the new orientation and the previous orientation.
/// <summary>
/// Possible orientations for the device
/// </summary>
public enum DeviceOrientation
{
Unknown,
ScreenSideUp,
ScreenSideDown,
PortraitRightSideUp,
LandscapeRight,
LandscapeLeft,
PortraitUpSideDown
}
/// <summary>
/// Arguments provided on device orientation change events
/// </summary>
public class DeviceOrientationChangedEventArgs : EventArgs
{
/// <summary>
/// Current (new) orientation of the device
/// </summary>
public DeviceOrientation CurrentOrientation { get; set; }
/// <summary>
/// Previous (before this current update) orientation of the device
/// </summary>
public DeviceOrientation PreviousOrientation { get; set; }
}
Your app just gets itself a reference to the singleton object, and sets up the event handler, it literally cannot be any easier than this code. The Dispatcher.BeginInvoke bit is only required if you need the HandleOrientation method (which you implement) to run on the UI thread. That depends on your application design.
DeviceOrientationHelper.Instance.OrientationChanged +=
orientationHelper_OrientationChanged;
. . .
/// <summary>
/// Called on orientation change from orientation helper
/// </summary>
/// <param name=”sender”>Event sender</param>
/// <param name=”e”>Event arguments</param>
private void orientationHelper_OrientationChanged(object sender, DeviceOrientationChangedEventArgs e)
{
Dispatcher.BeginInvoke(() => HandleOrientation(e));
}
Dave Edson and Greg Hogdal (who wrote this post) are both software developers on the Windows Phone 7 Applications Platform team at Microsoft. We are working towards making your Windows Phone 7 development experience as easy and fun as possible!

