

One of the difficulties of web apps is that when your users aren’t in the browser, there is no way to engage with them. There are a number of promising proposed standards, such as service workers and web notifications, but engaging users with a web app remains a challenge today. However, Hosted Web Apps offer a number of ways to accomplish this.
An advantage in moving to a Hosted Web App is the access that you have to native Windows features that allow you to reach out and pull the user back into your app experience. Let’s take a look at a few of these features now, but keep in mind there are lots more features to be used in a similar fashion.
Set Up Your App to Use Windows APIs
In order to access Windows APIs, you’ll need to expose the APIs for the pages from which you intend to call them. In short, you’ll want to declare it in your manifest. If you’re building the app from command line with ManifoldJS, then your manifest should include the following:
[code language=”csharp”]
{
"mjs_api_access": [{ "match": "*://www.mysite.com/*", "access": "all", "platform": "windows10" }]
}
[/code]
If you’re building your app in Visual Studio, then you’ll want to add a corresponding Content URI rule:

Understanding the Activation Object
When we talk about finding ways to engage users, we often run into conditions when the app is launched by a means other than clicking on the Start Menu tile. Some scenarios, like being launched from a background task, from a toast notification, or from Cortana, often need to take advantage of launch data to determine what to do once opened. This is what we call the “activation object,” which can be checked any time the app is launched.
Note: Windows APIs need to be exposed on this page for Windows object to exist. See above.
Here is a sample that listens for a app activation:
[code language=”csharp”]
Windows.UI.WebUI.WebUIApplication.addEventListener(‘activated’, function(args) {
if (args.kind === Windows.ApplicationModel.Activation.ActivationKind.voiceCommand) {
var results = args.result;
if (command === ‘open’) {
details = results.semanticInterpretation.properties.section[0];
switch (details) {
case "Cartoons":
redirect = "https://your.ownsite.com/categories/Cartoons";
break;
case "Action":
redirect = "https://your.ownsite.com/categories/Action";
break;
case "Drama":
redirect = "https://your.ownsite.com/categories/Drama";
break;
case "Comedy":
redirect = "https://your.ownsite.com/categories/Comedy";
break;
default:
redirect = "https://your.ownsite.com/";
}
window.location.href = redirect;
}
}
});
[/code]
This “args” object contains all of the necessary information, such as the type of activation or, in the case of voice activation, the text used to activate the app and the command that it matches from the Voice Command Definition (VCD) file. You can read more about implementing the VCD and Cortana in a Hosted Web App in our previous post. The activation object can be useful to tell your Hosted Web App to navigate to one URL or another, and even pass data into the page.
Live Tiles
One of the unique features of Windows that allows you to draw a user back into your app is the use of Live Tiles. Live Tiles are a way to display data to a user on the Start menu (or Start screen) app tile.
Here’s a great example of the Fox News app displaying a live tile:

Live Tiles can be built from one of the many Live Tile Templates, or by creating your own template. In the following example, we’ll use a standard template and generate the Live Tile with some JavaScript on the page.
Step 1
Feature detection to make sure the user is running a Hosted Web App.
[code language=”csharp”]
if (typeof Windows !== ‘undefined’&&
typeof Windows.UI !== ‘undefined’ &&
typeof Windows.UI.Notifications !== ‘undefined’) {
//feature detect to run the code
//your code goes inside this condition
}
[/code]
Step 2
Create the tile notification content. See the Adaptive Tile Templates documentation for more info.
[code language=”csharp”]
var tileContent = new Windows.Data.Xml.Dom.XmlDocument();
var tile = tileContent.createElement("tile");
tileContent.appendChild(tile);
var visual = tileContent.createElement("visual");
tile.appendChild(visual);
var bindingMedium = tileContent.createElement("binding");
bindingMedium.setAttribute("template", "TileMedium");
visual.appendChild(bindingMedium);
var peekImage = tileContent.createElement("image");
peekImage.setAttribute("placement", "peek");
peekImage.setAttribute("src", "https://unsplash.it/150/150/?random");
peekImage.setAttribute("alt", "Random demo image");
bindingMedium.appendChild(peekImage);
var text = tileContent.createElement("text");
text.setAttribute("hint-wrap", "true");
text.innerText = "Demo Message";
bindingMedium.appendChild(text);
// TODO: Add other tile size bindings, like Wide and Large
[/code]
Step 3
Create the tile notification, which will update the Live Tile.
[code language=”csharp”]
var notifications = Windows.UI.Notifications;
var tileNotification = new notifications.TileNotification(tileContent);
notifications.TileUpdateManager.createTileUpdaterForApplication().update(tileNotification);
[/code]
The tile content may be the high score from a game or the latest news items, it all depends on your app. The tile will continue to cycle through the content even when the app has closed. View the entire code sample on GitHub.
Notifications
Notifications also use Windows APIs that can be called from JavaScript to activate. Like Live Tiles, notifications can be created from a template or built using your custom template. Our sample will start from one of the many templates you can choose from and will display a toast notification. We’ll break the code down into a few steps for clarity.
Step 1
Feature detection to make sure the user is running a Hosted Web App .
[code language=”csharp”]
if (typeof Windows !== ‘undefined’&&
typeof Windows.UI !== ‘undefined’ &&
typeof Windows.UI.Notifications !== ‘undefined’) {
//feature detect to run the code
//your code goes inside this condition
}
[/code]
Step 2
Create the toast notification content. See the Interactive Toasts documentation for more info.
[code language=”csharp”]
var toastContent = new Windows.Data.Xml.Dom.XmlDocument();
var toast = toastContent.createElement("toast");
toastContent.appendChild(toast);
var visual = toastContent.createElement("visual");
toast.appendChild(visual);
var binding = toastContent.createElement("binding");
binding.setAttribute("template", "ToastGeneric");
visual.appendChild(binding);
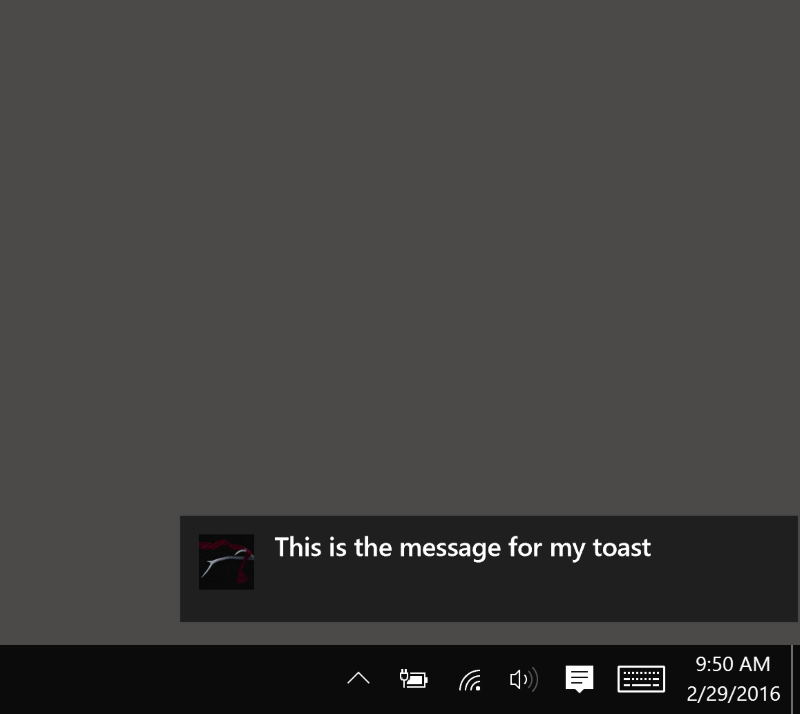
// Title text
var text = toastContent.createElement("text");
text.innerText = "This is the message for my toast";
binding.appendChild(text);
// TODO: Add up to two more text elements
// Override the app logo
var appLogo = toastContent.createElement("image");
appLogo.setAttribute("placement", "appLogoOverride");
appLogo.setAttribute("src", "https://unsplash.it/150/150/?random");
appLogo.setAttribute("alt", "random graphic");
binding.appendChild(appLogo);
[/code]
Step 3
Create the toast notification and display it.
[code language=”csharp”]
var notifications = Windows.UI.Notifications;
var toast = new notifications.ToastNotification(toastContent);
notifications.ToastNotificationManager.createToastNotifier().show(toast);
[/code]
The toast notification will display as soon as the “.show(toast)” is called. View the entire code sample on GitHub.
Running a Background task
Live Tiles and toast notifications are a great way to bring the user back into the app, especially when they are triggered by a push notification or from an event that runs in the background.
Hosted Web Apps, like any Universal Windows Platform app, have the ability to run background tasks scheduled by the system. The background task JavaScript code must live in the package, and it must be specified in the Manifest.
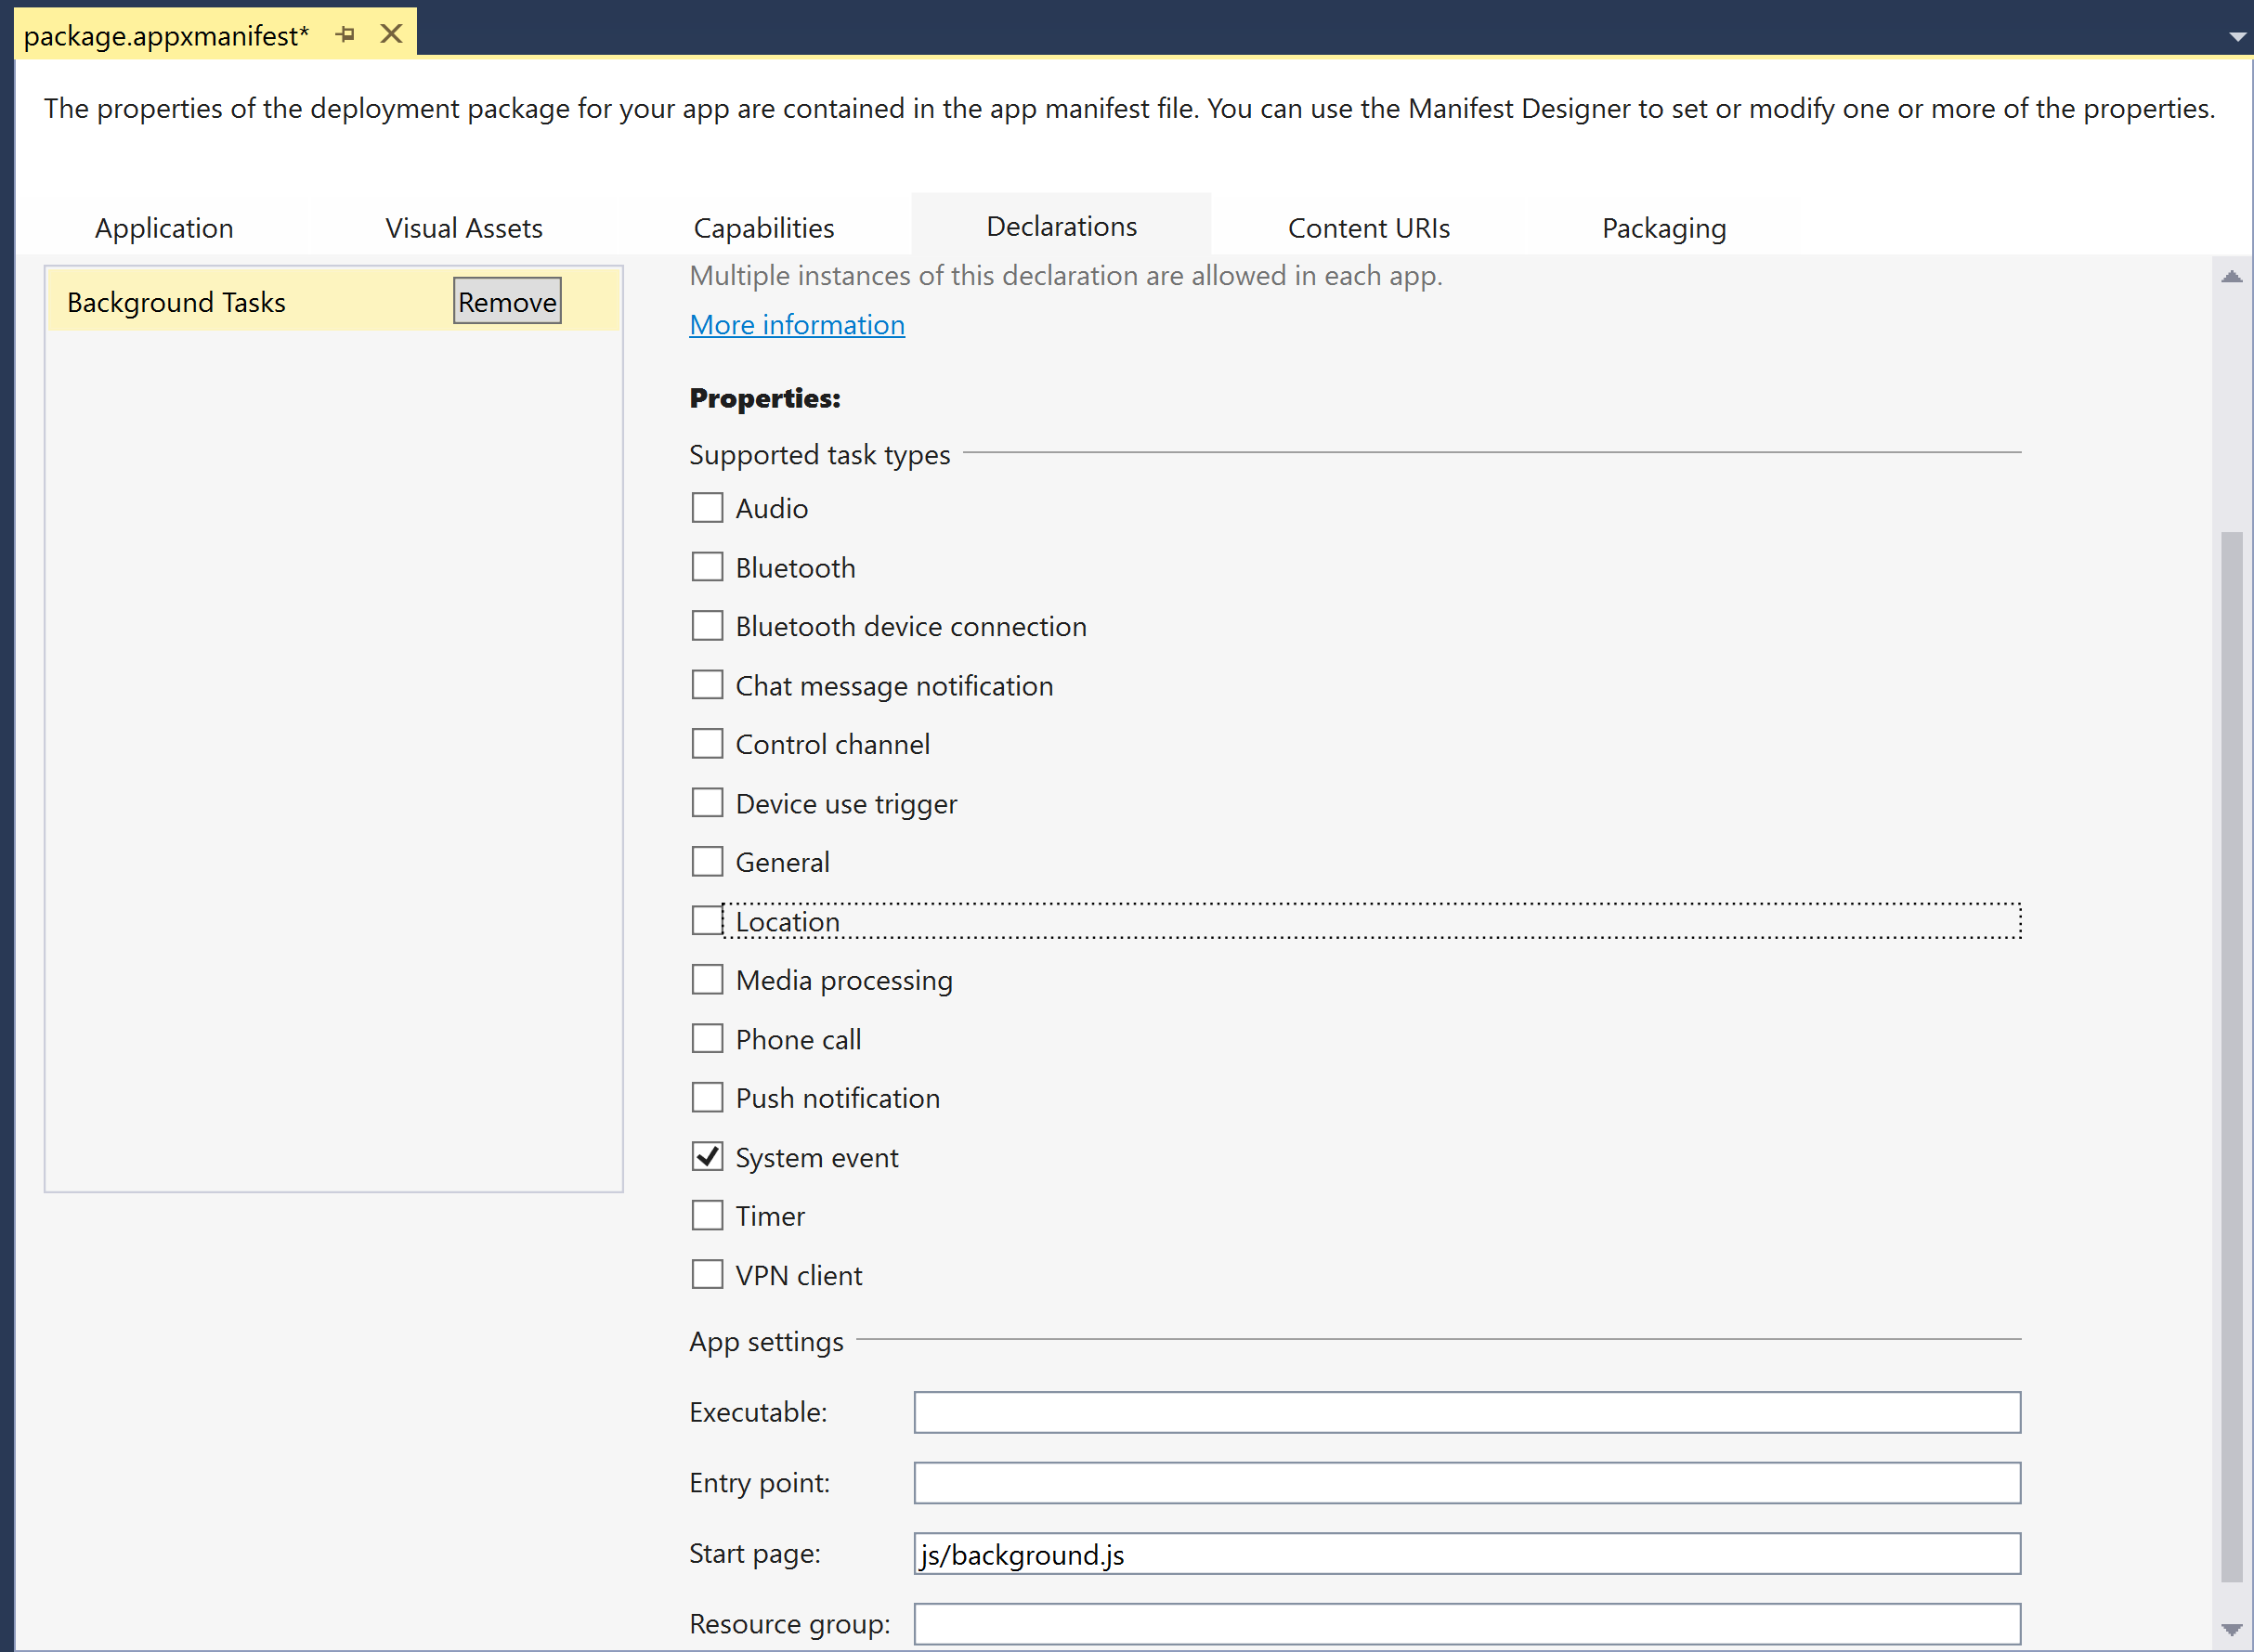
Whether you are using ManifoldJS from the command line, or you are building your app in Visual Studio, you’ll need to update the Windows app manifest (XML) to specify the file that contains the background task. In Visual Studio, the task can be added via the “Declarations” tab in the manifest. Choose background task, then specify your activity (systemEvent notification for this sample).
If you are updating the XML directly, you’ll add the following as a child of the “application” node:
[code language=”csharp”]
<Extensions>
<Extension Category="windows.backgroundTasks" StartPage="js/background.js">
<BackgroundTasks>
<Task Type="systemEvent" />
</BackgroundTasks>
</Extension>
</Extensions>
[/code]
There are two parts to get a background task up and running. The first is to register the background task, which can be run from one of the JavaScript files on your site. You might be registering multiple background tasks in your app (e.g. push messages, system events) so it’s recommended to make a reusable registration function, like the following:
[code language=”csharp”]
function RegisterBackgroundTask(taskEntryPoint, taskName, trigger, condition) {
//
// Check for existing registrations of this background task.
//
var taskRegistered = false;
var background = Windows.ApplicationModel.Background;
var iter = background.BackgroundTaskRegistration.allTasks.first();
var hascur = iter.hasCurrent;
while (hascur) {
var cur = iter.current.value;
if (cur.name === taskName) {
taskRegistered = true;
break;
}
hascur = iter.moveNext();
}
//
// If the task is already registered, return the registration object.
//
if (taskRegistered == true) {
return iter.current;
}
//
// Register the background task.
//
var builder = new background.BackgroundTaskBuilder();
builder.name = taskName;
builder.taskEntryPoint = taskEntryPoint;
builder.setTrigger(trigger);
if (condition != null) {
builder.addCondition(condition);
}
var task = builder.register();
return task;
}
[/csharp]
This method will first check to make sure your task isn’t already registered, as you don’t want to pile on background tasks that will bog down your app and the system. If it doesn’t find the task registered by name, it will then register it with the system. We’ll initiate this registration function with a call like the following:
[code language="csharp"]
var systemTrigger = new Windows.ApplicationModel.Background.SystemTrigger(Windows.ApplicationModel.Background.SystemTriggerType.timeZoneChange, false);
RegisterBackgroundTask(‘js\background.js’, ‘mytestBGTask’, systemTrigger, true)
[/code]
We pass in the four required parameters:
- background entry point (i.e. the JavaScript file)
- task name
- trigger that will fire the task
- whether the request is active and not cancelled
The second part of the background task is what you actually want to run in the background. Once this system trigger fires, which in this case, is when the user changes time zones, the contents of background.js will be executed.
In our case, we can simply fire a notification to the user that they changed time zones or update a live tile showing the same. The Windows Dev Center has a number of detailed documents about both background tasks and background tasks from push notifications.
Interact with the world using NFC
Running your web app as a Hosted Web App gives you access to hardware APIs, such as Bluetooth and NFC that are inaccessible from the browser. These types of APIs allow you to interact with the world around you and can be added with just a few lines of code. They can also be combined with background tasks so your app doesn’t even need to be running to take advantage of them.
To access NFC in your web app, you’ll first need to enable this feature in the app manifest. This can be done through the capabilities tab of the manifest in Visual Studio, or by updating your manifest XML with the following:
[code language=”csharp”]
<Capabilities>
<Capability Name="internetClient" />
<DeviceCapability Name="proximity" />
</Capabilities>
[/code]
You can then listen for the events, just like you do for DOM events, by setting up listeners. The first thing you’ll want to listen for is when the device comes in contact with NFC, and when it departs. There are events for both of these:
[code language=”csharp”]
var proximityDevice = Windows.Networking.Proximity.ProximityDevice.getDefault();
if (proximityDevice != null) {
proximityDevice.addEventListener("devicearrived", function (dataObj) {
console.log(‘I have arrived at the device’)
}, false);
proximityDevice.addEventListener("devicedeparted", function (dataObj) {
console.log(‘i have departed from the device’);
}, false);
}
[/code]
When your device comes in contact with NFC, you’ll then have the opportunity to read the data from the NFC chip, or pull the ID from the chip and use it to establish a connection to the device via Bluetooth or Wi-Fi direct.
There are a number of great quick-start guides on the Windows Dev Center that walk you through the details. All of these can be used right from inside your Hosted Web App. Don’t forget you may also want to handle your NFC connection from background task.
Since your app might not always be running when the NFC chip is contacted, you can set up a custom protocol to launch your app. The NFC-connected chip will then launch the custom protocol for your app. To do this, update the manifest by adding a new declaration of protocol in your manifest. You can update your manifest XML file with the following:
[code language=”csharp”]
<Extensions>
<uap:Extension Category="windows.protocol" StartPage="js/background.js">
<uap:Protocol Name="nfcapptest">
<uap:Logo>imagesStoreLogo.png</uap:Logo>
</uap:Protocol>
</uap:Extension>
[/code]
In the scenario above, we’re having the protocol launch a background JavaScript file, but you can also have it launch your app directly. This will provide you with an activation object that can then be caught:
[code language=”csharp”]
function onActivatedHandler(eventArgs) {
if (eventArgs.detail.kind == Windows.ApplicationModel.Activation.ActivationKind.protocol)
{
// TODO: Handle URI activation.
// The received URI is eventArgs.detail.uri.rawUri
}
}
[/code]
You can then use the data passed in the activation object to navigate to a particular page in your Hosted Web App and even pass data into the page itself.
Conclusion
It’s a misconception that web apps have limited functionality and can’t handle complex features. With Hosted Web Apps, you have access to background tasks, notifications, and hardware like Bluetooth and NFC to build rich features into your app. Let these samples above inspire you to reach outside your app and engage more deeply with your users.
Additional resources
Be sure to check out the other posts in our series:
- Keeping your Hosted Web App secure
- Building a media-centric Hosted Web App
- Building a Great Hosted Web App
Written by Jeff Burtoft (@boyofgreen), Principal Program Manager for TED Services & Devices