I am amazed by the image quality that’s possible with today’s 4K digital cinema cameras. It’s like watching full-res images from a DSLR playing back at 24 fps on the big screen, 4K footage is just stunning. Seeing 4K footage on the big screen got me thinking about 4K displays and 4K video on a PC. With 4K displays just coming to market, I think it’s time to examine how this technology will impact our PC experiences in the not-so-distant future.

From the RED 4K Demo Reel projected in 4K – plenty of resolution and detail for a 70’ screen as shown here
With this post, I’ll provide an introduction to running 4K displays with Windows 8 and demonstrate end-to-end 4K video screening/editing with the HP Z820 RED Edition PC.
After shooting some 4K and 5K footage with the RED EPIC camera, I wanted to evaluate the footage with a 4K projector or display. This started my quest to experiment first-hand with 4K display technology on Windows. With some research and with the help of friends at Toshiba, I was able to borrow a Toshiba Regaza 55X3 55” 3D 4K Ultra-high-definition television. This TV is not available in North America and may not be appropriate for a real post-production environment, but it’s great for to use for my needs as a technology demonstration on Windows 8.
When the TV arrived, I had two thoughts:
- How am I going to connect it to a PC? and
- How will this 4K display work with a multi-mon setup?
4K resolutions are supported with HDMI 1.4a, but I didn’t know what graphics hardware would meet this specification. After some research I found that both the latest round of NVIDIA Kepler-based cards and the latest AMD RADEON series cards (including the RADEON 7970) support 4K output! So, connecting a 4K display to a Windows PC was going to be easier than I had originally thought.
I installed Windows 8 on the Z820 RED Edition PC and decided to use the NVIDIA GeForce GTX 660 Ti card for display output since it supports HDMI 1.4a. After the graphics card was installed and configured I connected the Toshiba 4K TV using the HDMI port. I also connected two Samsung Series 9 WQHD (2560 x 1440) 27” displays as well, one via a DVI port, and the other via Display Port.
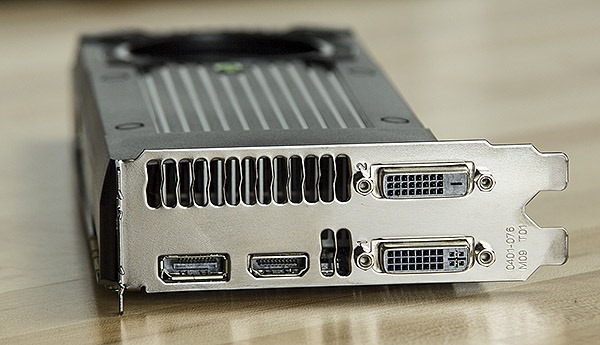
The NVIDIA GeForce GTX 660 Ti supports up to four displays simultaneously
TA-DA! It worked. 15.6 million pixels at my disposal! It was such a beautiful sight, I just had to sit down and stare it for a while. I remember reflecting:
“People will debate the need for 4K TVs at normal TV viewing distances, but having a large 4K monitor for photos, video, and app UI is crazy-awesome”.
Imagine being able to see images from your DSLR at near 100% magnification and 55” diagonal scale… WOW.
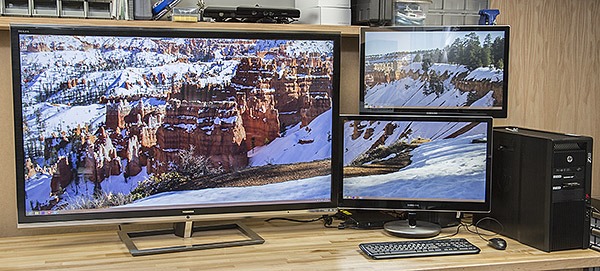
Panoramic picture of Bryce Canyon spanning 3 displays – check out how small the keyboard and mouse look!
Since I was using a low-tech improvised support system for the 27” displays, the result was a staggered setup. I accounted for this by adjusting the stacked positions of these displays in the screen resolution settings dialog:
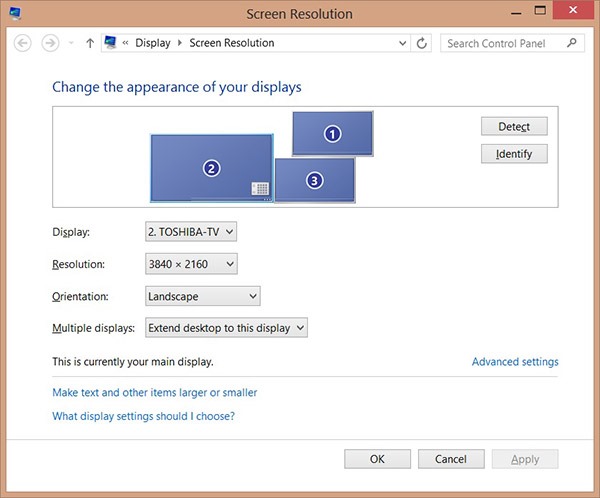
Adjusting relative monitor positions in the Screen Resolution settings dialog
This fine tuning resulted in cursor and UI continuity from one display to another. I noticed with this setup that the “spanning” feature for multi-monitor wallpaper works well even when running a non-conventional display array like this one.
Now that I had the display situation figured out, it was time to put the Z820 RED Edition through its paces. I started by plugging a REDMAG SSD into the integrated REDMAG drive on the front panel of the PC. I launched REDCINEX PRO, and browsed the content of the SSD. I validated that the footage would playback at 100% magnification and full quality using RED ROCKET acceleration. Excellent.
I then launched Premiere Pro CS6 and created a 4K project. I added a 4K REDCODE RAW file to the timeline, and in the “Source Settings” dialog, I was able to activate the option to use the RED ROCKET card. After a few minutes of UI shop-keeping in Premiere Pro CS6, I had a nice layout with project and settings management dialogs spanning the two WQHD displays, and the “Program Monitor” (preview window) filling up the 4K display. With quality set to 100%, and magnification set to 100%, I started playback on the timeline. After only about one second of queuing time the footage started to play smoothly in 4K. It’s hard to describe adequately without being able to see it in person- this capability rocks! The following diagram will give you a high-level overview of what’s happening end-to-end to make this demonstration is possible.
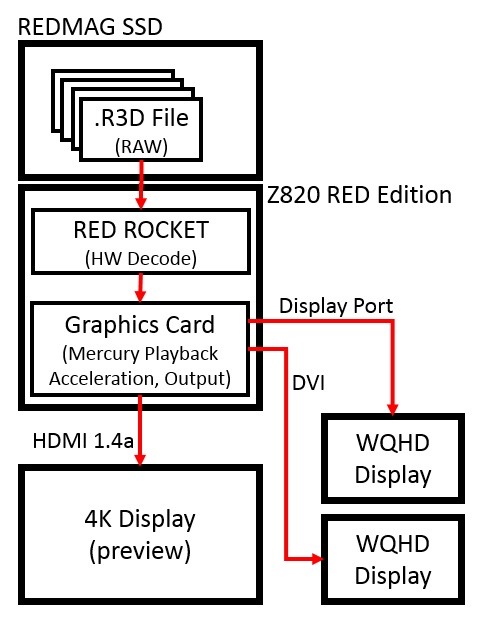
Demo setup: Z820 RED Edition end-to-end 4K footage screening
You can see in this diagram how data flows all the way from the REDMAG SSD (which was taken directly from a RED EPIC camera) to the 4K display. I won’t go into deep detail here, but under the covers the following is happening:
- The REDCODE RAW files are made available via eSATA just like an internal storage device (fast!)
- The REDCODE RAW file is decoded on the RED ROCKET card into a format that can be manipulated in Premiere Pro
- The NVIDIA graphics card is used for accelerated playback in Premiere Pro CS6
- The 4K video data (preview) is output via HDMI 1.4a to the 4K display
At the same time, other parts of the Premiere Pro UI are being output to the two WQHD displays. Hard to imagine that all this works so well with a ~$300.00 video card! Of course, I should highlight this is an early adopter geek enthusiast tech demo, not a fully-supported hardware configuration. As of today, the NVIDIA GeForce GTX 660 Ti video card is not on the Premiere Pro CS6 officially supported graphics card list on adobe.com.
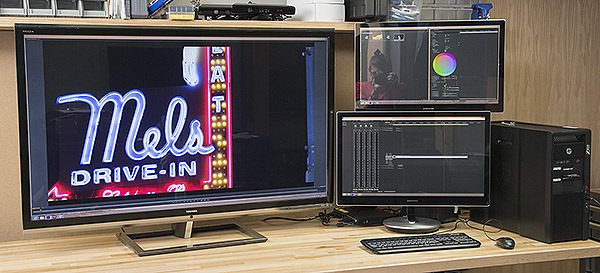
Adobe Premiere Pro CS6 running on 3 displays
While this display setup may not be a “turn-key” solution for video professionals, what it does show is that Windows 8 supports 4K displays and 4K multi-mon scenarios well.
I have been using Adobe CS6 on Windows 8 with great results (including Premiere Pro CS6) for a while including on the Z820 RED Edition configuration documented in this post. As an FYI, the Adobe CS6 family of creative apps are officially supported on Windows 8, as you can read about on adobe.com. Once the displays were properly connected and configured, I observed stable and reliable graphics performance with this 3-display setup. Since you can’t see this setup in person, I wanted to include a picture that shows just how big the Windows 8 Start Screen is on a 55” display compared to an 11.1” laptop:
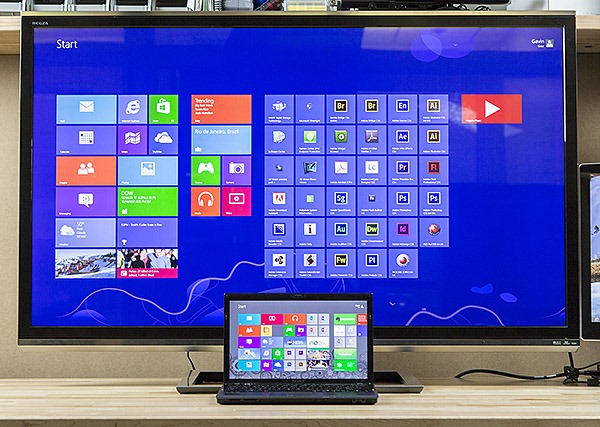
Windows 8 Start Screen: 55” side-by-side with 11.1”
This was my first experience with 4K display technology, and I’m really looking forward to exploring other aspects of ultra-high resolution displays with Windows. I’ll be sure to share my experiences!
I also shot a quick video that shows the end-to-end 4K screening demonstration and the 3-display setup documented in this post:
Stay informed, follow me on Twitter!
