With Marketplace recently launching in 13 new markets, it’s more important than ever to have a globalized, localized app that can reach as many of your customers as possible – but doing so can seem daunting. This blog post seeks to demystify the process and help enable you to write a truly global app.
What is a globalized app?
A globalized app displays things like dates and money in a way that’s familiar to a user. If you have a calculator app, some people will expect to see a dollar sign, and others will expect a euro. Or even more important, consider a financial app where a difference between a period in one country/region and a comma in another can change the currency amount by a factor of ten! Dates also differ by country/region – sometimes the month comes before the day, sometimes after. By globalizing your app, it’ll feel natural to your customers, no matter where they are.
Globalizing your app is fairly straightforward, and can be done using the CultureInfo class. Check out How to: Build a Globalized Application for Windows Phone for a code example of how to use it.
This blog post will mostly focus on localizing your app – a meaty topic that can be tricky to understand.
What is a localized app?
You can think of a localized app as one that’s been translated into one or more languages. There’s a few things you can localize in your app:
- App Text – menu headings, help text, etc.
- App Description – seen in the marketplace
- App Title – appears in the application list and on the app title
- Application Bar text – if you include an Application Bar
Do I have to localize my app to publish in multiple markets?
No – the two actions are separate. When you submit your app to App Hub, you’ll eventually reach a Pricing page where you can choose where your app will be published. You can either select specific markets or ‘Worldwide distribution’ to include them all.
It’s important to understand that this is the only way you can choose where your app is published. Localizing your app is a separate process, and has no impact on where your app ships.
As a note, there are certain countries/regions that have stricter than usual content guidelines. If you decide to publish your app in these marketplaces, make sure you’ve read requirement 3.10 listed at Content Policies. Also keep in mind that your app must pass certification for all markets you choose – this means that if you choose ‘Worldwide distribution’, your app must pass certification for all of the supported markets. If you have trouble passing certification for certain markets, an option is to unselect those markets on the Pricing page.
If that’s the case, why should I localize my app?
Because you want customers around the world to enjoy – and use – your app.
Let’s say you write an app in English, and publish it worldwide. Even if they can physically see your app in their marketplace, someone who can speak and read only Spanish won’t be able to understand your app description, and your app likely wont be useful to them. By localizing your app into the Spanish language, that customer would be able to use and understand your app.
When would I not want to localize my app?
There are a couple of cases where it might not make sense to localize:
App Title
Localizing your app title is often a good thing. Say you’ve created a calculator app, and the title is something obvious like ‘Calculator’. By localizing your app title into French (France) and calling it ‘Calculatrice’, someone in the French marketplace will easily know what your app is.
On the other hand, what if your app title is your company name, such as ‘Contoso App’? In this case your name is your branding – you don’t necessarily want to localize that into other languages, because you’re promoting your app under, and as, your company name.
Language-specific apps
Usually, you’ll want to localize your app into multiple languages so you can reach the most customers. But what if, for whatever reason, you decide you only want to ever target a certain group of customers in a certain market? For example, you’ve written a Spanish news app that you want to market only to Spanish-speaking customers in Spain. In this case, you can save time and energy by not localizing your app into other languages.
That being said, even if your app only supports one language, it’s still a good idea to structure your app so that it can be easily localized into other languages in the future.
I’m sold – how do I localize my app?
Localization includes multiple tasks – there are primarily four areas to consider, but we’ll mostly focus on localizing app text.
App Title
The app title appears in the application list on the app tile. You can localize your app title by creating a resource-only DLL file for each language. How to: Localize an Application Title for Windows Phone has a full write-up of how to do this.
App Description
You’ve created an app, you’ve localized your app text into multiple languages, and you’re ready to submit to App Hub. During the ingestion process, App Hub detects which languages you support and will prompt you to enter a language-specific description (and some other metadata) for each language you support.
Be sure that each description matches the language in question, as otherwise you’ll fail certification. For example:
Application Bar
When it comes to localization, the Application Bar is handled differently than other controls in your app. If you include an Application Bar in your app, you can localize the text labels on each button. How to: Build a Localized Application for Windows Phone has a code example at the bottom of the page that you can use to do this. Also check out BindableApplicationBar on CodePlex for a third party solution. But before dealing with your Application Bar, you’ll need to understand how to localize your app text, which brings us to…
App Text
App text is essentially any text that appears in your app except for the app title or Application Bar text.
How to I localize my app text?
Let’s start with the most common case, and then move on to some edge cases. Basically, rather than hard-coding your text into a specific language in XAML, we’ll localize your app text by using data binding to obtain the localized values of a word or string from a resource file.
To localize your app text, you’d do the following:
Specify the Neutral Language
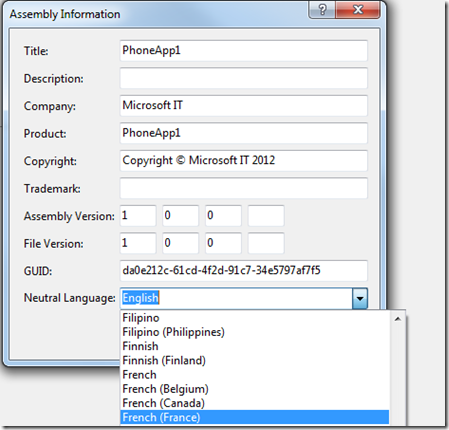
Decide the language you want to be the ‘default’ for your app. This language in Visual Studio is known as the neutral language.
By default, Visual Studio sets the neutral language to the language you choose when installing the SDK.
This is important to understand because App Hub assumes that your neutral language is your default language. If you install the SDK with language set to English, unless you change the neutral language, any app you create will have its neutral language set to English. You need to make sure you change the neutral language to whatever your default language actually is.
This language has to be supported by Windows Phone, meaning it’s listed in the Display languages table at Culture and Language Support for Windows Phone. If you choose something else that’s not listed at the Culture and Language Support topic, you’ll fail certification.
To set the neutral language in Visual Studio, open the project properties, click the Application tab, and then click Assembly Information.
For in-depth coverage on how to change the neutral language, see How to: Build a Localized Application for Windows Phone.
Create Resource Files for Each Language
Create a resource file for each language that you plan on supporting.
- You’ll first set up your default resource file, AppResources.resx. Your strings in this file have to be the same language of what you chose for your neutral language in step 1, or you’ll fail certification.
- Every other language besides your default is set up in its own file, labeled with the correct “culture name”. For example, if you plan on supporting Spanish (Spain), you’d name your AppResources file ‘AppResources.es-ES.resx’. For a full list of culture names you can use, see Culture and Language Support for Windows Phone. To learn more about how culture names are constructed, see the CultureInfo class. Put your language strings into each resource file, translated into that language.
Replace Hard-coded Text with Data Binding
Replace hard-coded text in your app and use data binding to reference values from your resource files.
<TextBlock x:Name=“PageTitle” Text=”{Binding Path=AppResources.String1, Source={StaticResource LocalizedStrings}}” Margin=”9,-7,0,0″ Style=”{StaticResource PhoneTextTitle1Style}”/>
For in-depth coverage on how to create these resource files, see How to: Build a Localized Application for Windows Phone.
What happens if I don’t localize in some languages? Can those users read my app?
Yes. For example, let’s say you’ve written an app in French (France). You want all of your text to be in French most of the time, but there’s one or two strings you want to be different just for people with the Spanish (Spain) display language set.
You’d do the following:
- Set your neutral language to ‘French (France)’
- Create a default AppResources.resx file and put your strings, in French, in the file
- Create a AppResources.es-ES.resx file (es-ES is the culture name of Spanish (Spain))
- Put only the selective strings in there that you want to be different for people with the Spanish (Spain) display language setting
So, what happens if someone with the Spanish (Spain) display language setting opens up your app? What about someone who is using English (United States) or any other display language?
Windows Phone uses the following algorithm to determine what text to display:
- What display language is set on the device?
- Is there a resource file in the app that matches that display languages?
a. If yes:
A. Is the string in the app located in the resource file?
i. If yes:
I. Show the translated string
ii. If no:
I. ‘Fall back’ to the default language, in this example, ‘French (France)’, and show that string instead. In our example, this means that someone with English (United States) set will see the French (France) string, because there is no AppResources.en-US.resx file with a corresponding string.
a. If no:
A. ‘Fall back’ to the default language, in this example, ‘French (France)’, and show that string instead.
Notice that the same fall back behavior happens if either the resource file is missing entirely, or if the string isn’t found in the file.
Based on the above algorithm, someone with the Spanish (Spain) display language set will only see a Spanish string if you’ve set that string up in the AppResources.es-ES.resx file. If not, you’ll see the default (French) equivalent since it’s set as the neutral language.
Likewise, if someone has English (United States) or any other display language set, they will only ever see the French strings, since there are no resource files or strings set up for those display languages.
How do I localize for specific regions?
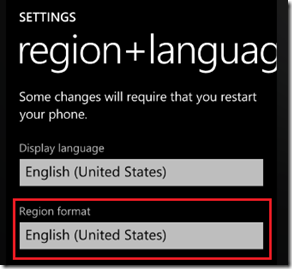
Most languages have multiple regions associated with them. For example, there’s the Spanish language, but there’s different versions of it depending on region, such as Spain and Mexico. Each display language supported on Windows Phone is a specific combination of language and region, such as Spanish (Spain) or French (France). Where it gets tricky is that a user can control both their display language and the ‘Region format’ – and Region format shows far more options than the supported display languages.
Since not all strings are the same between language regions, what if you have an app that you want to localize for both the supported display language Spanish (Spain), and the unsupported Spanish (Mexico)?
Technically, you can do this by following steps similar to what you did in the previous example:
- Choose Spanish (Spain) for your neutral language since it’s the supported display language of the two, and add those strings in your default AppResources.resx file
- Create a new resource file for Spanish (Mexico), which has a culture code of es-MX. You’d create AppResources.es-MX.resx, and put your Spanish (Mexico) strings in there.
Note: You can find a large list of culture codes at the National Language Support (NLS) API Reference page.
Seems like it would work, right? The problem is, even if the user has set their Region format to Spanish (Mexico), your AppResources.es-MX.resx file will not load. This is because Windows Phone will look for a resource file that matches whatever the user has selected for their display language, it will not look for a file based on the Region format.
There’s a workaround that lets you get around this, you’ll just need to add one line of code to the Application_Launching method of App.xaml.cs:
AppResources.Culture = CultureInfo.CurrentCulture;
By using this code, your app will show text from the resource file matching the Region format of the phone, not the display language. Like always, if you don’t have a resource file that matches, the fall back process happens.
You can use this workaround to target any language region, as long as a user is able to select it on the settings page.
Make sure you choose the right neutral language!
Even with this workaround, for certification reasons, you need to make sure that the neutral language you choose is a supported display language.
Are regional descriptions supported on App Hub?
Let’s say you submit the Spanish app we’ve been talking about to App Hub – you have Spanish (Spain) set up as your neutral language, you’ve created a regional file for Spanish (Mexico), and you have the right code in your app so the regional strings will display.
App Hub will only detect one language – Spanish. It maps this language to the display language we support, in this case, Spanish (Spain). You’ll notice on App Hub that on the Pricing page, you’ll be prompted to add a description and metadata for ‘Spanish (Spain)’, with no option to input different info for Spanish (Mexico).
How do I localize for a language that isn’t supported?
We’ve talked through localizing for a region that a user can select on the phone, using Region format. But what about cases where you can’t select the language or region at all?
For example, you decide to write an Icelandic news reader app. Even though Icelandic isn’t officially supported on Windows Phone, the text would display in Icelandic to the user, because the phone supports the right fonts. But your app will fail certification because it must be localized in at least one supported display language. What to do?
There’s a workaround for this, too. If you plan on shipping an app that is written in a language we don’t support, and it’s not available in Region format, you can do the following:
1. Hard code your app to be written in the unsupported language, if you don’t plan on supporting more languages in the future. OR, create your default AppResources.resx file and put your unsupported language strings in there, if you plan on supporting more languages in the future or will support additional languages in your submission.
2. Set your neutral language to one of the supported display languages. For example, ‘English (United States)’.
3. On App Hub, you will be prompted to input metadata and a description for the neutral language you chose (for the above example, you’ll be prompted for English). You must include the following three items in the ‘Detailed description’ field to pass certification:
- A note, such as ‘The language of this application is [unsupported language name]’. This note must be written in the same language as the neutral language. For example, if you chose ‘English (United States)’ as your neutral language, the note must be written in English (United States). This note must be the first item in the ‘Detailed description’ field.
- Your app description, in the same language as the neutral language.
- Your app description, in the unsupported language.
At the risk of making things sound even more complicated, you can technically do this one other way. Let’s say you already have a news reader app that’s localized into many languages, and you want to add support for Icelandic (an unsupported language). You can still do this, you’ll just need to set up an additional resource file, using any one of the supported display languages you don’t plan on localizing for, and go through the same metadata/description steps on App Hub.
Other localization resources
- If you’re porting an app from Windows Phone OS 7.0, take a look at this blog post by Mike Francis. He calls out some common errors you might run into when submitting your app to App Hub.
- If you’re localizing for any English variant, be aware that App Hub refers to them by different names than what’s listed in the supported display languages table. See this Support post for more info.
- And of course, there are also the MSDN docs.


