

I have some good news about the Windows command line console, conhost.exe. In this blog post, I’m joined by our two console developers, Michael Niksa and Paul Campbell. We’d like to give you an overview of what’s been changed since the console was last updated. You can check out the improved console today in the Windows 10 Technical Preview.
The changes discussed here are just the start of the console updates we are working on for Windows 10, but we hope you’ll like them. Let’s start with a quick look at the architectural mods and then get into the new features.
Architecture update
Many people consider CMD, PowerShell, or their favorite alternate command line as the console, but it is more subtle than that. Each of these are character-mode applications that run within conhost.exe, the console host, otherwise known simply as the console. The console is responsible for accepting keyboard and mouse input, drawing text to the screen, providing memory buffers and presenting an API for apps to use.
The changes I’ll discuss today apply to conhost.exe, the window that manages input and output for character-mode applications. Since Windows Vista, all console functionality has lived in this single conhost executable. Under the covers, the architecture has changed a bit. The primary function of Conhost.exe now is to load either a DLL containing the original console or one that contains our new code.
Many applications have come to depend upon the current console functionality. If you discover an application that isn’t compatible with our additions, don’t worry. You can switch back to the old console host very easily. Later in this post, I’ll describe how to enable or disable new behavior selectively or all at once. Note that if you are running a 16-bit NTVDM app on an x86 machine, we always redirect back to the legacy console host.
Finally, we’ve made a handful of internal changes to the row buffer and drawing logic to accommodate some new features.
You may be wondering about cmd.exe, the popular console application responsible for batch file scripting. There have not been any changes to cmd.exe for this Technical Preview release of Windows. I encourage you to watch this space, however, as making improvements there is on our roadmap.
About settings
Settings in the console are stored in an interesting manner: The title of the window of the console represents where the settings are stored in the registry. A tree is built under HKCUConsole with one sub-key for each window title. New window titles are sometimes created through scripts, different apps or by using the TITLE command at the prompt. When a setting is changed, a new per-title value is created only if it is different than the default.
If the console window is launched by a shortcut, any setting changes are stored within the shortcut file itself. If a shortcut (.lnk file) is copied to another machine, the settings will be maintained when that shortcut is launched from another PC.
When a console window is launched, settings are applied in a specific order:
- A global setting that determines whether the new console features are enabled is applied
- Default console settings are loaded from the HKCUConsole registry key
- Any differences between the default settings and per title registry settings override those above
- When launched from a shortcut, any settings stored within that shortcut override or supplement all settings above
Console updates
Over time we have had repeated requests for certain fundamental console improvements, things that users of other consoles take for granted. This release takes that first step and addresses several of these. So, what have we done?
Window resize
Long ago, 80 characters wide was just fine. Today’s monitors go slightly beyond 800×600 resolution. Wouldn’t it be great if you were able to just grab the edge and pull the console window wider? We agree with you, and now you can do just that. If you attempt to stretch the window width greater than the existing buffer size, we assume that you wanted to make the buffer bigger as well without all that messing around with the Properties dialog. Conversely, shrinking the window width will attempt to shrink the buffer size back down again to the smallest available size that will hold what you already have in the buffer. We’ll only show you the scroll bars if you set the dimensions manually or if the longest line of text in the buffer is wider than the window.
Word wrap
Word wrap is probably something you’ve heard of, unless the Windows console is the only app you’ve used for the last 20 years. Yes, we’ve added it. The architectural changes we made allow us to deal with the fact that the console loses all context to the text when it is placed into the buffer. Where does a line actually end? In examining the old code base, our console developers found that if we kept track of when conhost.exe itself forces a line wrap upon resizing, we can easily unwrap it correctly when growing the window or pasting the text elsewhere. Sometimes the little things matter. If Console API’s were used to change text in a buffer, we assume that the app knows best and leave the text how it was inserted originally.
Line selection
You run a script, build some code, and get an error listing some path. So you grab the mouse and try to select that path to copy it out. The mouse selects the region as a box (block mode) instead of line by line as you may expect. So now you need to paste the copied text into Notepad and fix it up.
Not anymore. By default, click-and-drag selection (and standard selection shortcut keys) will understand and select line by line. If you need to select in block mode, simply hold down the ALT key when starting a selection. In line selection mode, copy operations will unspool the lines of text when placing them onto the clipboard; you no longer have to remove the line breaks.
Improved keyboard editing and selection
Selecting text with the keyboard is a really common operation and our console now joins the party. We have bound a number of common selection and editing commands to keyboard shortcuts. Our code tries to avoid interfering with console applications that may also use those keys. These programs typically disable line input, processed input and echo input modes via the SetConsoleMode() API. If running in this “raw” mode, the application handles the key combinations and our shortcuts will not apply. For more information, check out the Windows Dev Center topic on High-Level Console Modes.
Console keys and key combinations that are not explicitly described below will continue to function as they have in previous versions of the console.
Text selection keys
These combinations interoperate with the mouse so you can start selecting with the mouse and continue with one of these commands, or vice versa.
| Selection Key Combination | Description |
| SHIFT + LEFT ARROW | Moves the cursor to the left one character, extending the selection. |
| SHIFT + RIGHT ARROW | Moves the cursor to the right one character, extending the selection. |
| SHIFT + UP ARROW | Selects text up line by line starting from the location of the insertion point. |
| SHIFT + DOWN ARROW | Extends text selection down one line, starting at the location of the insertion point. |
| SHIFT + END | If cursor is in current line being edited
Else Selects text from the insertion point to the right margin. |
| SHIFT + HOME | If cursor is in current line being edited
Else Extends selection to the left margin. |
| SHIFT + PAGE DOWN | Extends selection down one screen. |
| SHIFT + PAGE UP | Extends selection up one screen. |
| CTRL + SHIFT + RIGHT ARROW | Extends the selection one word to the right. * |
| CTRL + SHIFT + LEFT ARROW | Extends the selection one word to the left. * |
| CTRL + SHIFT + HOME | Extend selection to the beginning of the screen buffer. |
| CTRL + SHIFT + END | Extend selection to the end of the screen buffer. |
| CTRL + A | If cursor is in current line being edited and line is not emptySelects all text after the prompt.ElseSelects the entire buffer. |
* Selecting one word at a time is augmented by the values in the WordDelimiters registry key. See the table of registry keys near the end of this post for details.
Editing keys
As I mentioned above you can now copy and paste text with the keyboard. When copying text, don’t worry that CTRL + C has always been the BREAK command. It will still send the break signal to the running application when no text is selected. The first CTRL-C copies the text and clears the selection, and the second one signals the break.
| Editing Key Combination | Description |
| CTRL + V | Paste text into the command line. |
| CTRL + INS | Copy selected text to the clipboard. |
| CTRL + C | Copy selected text to the clipboard. |
| SHIFT + INS | Paste text into the command line. |
| CTRL + X | Cut selected text to the clipboard.This is not yet implemented. |
| Any Key when Text Selected | Delete text (and replace with key if appropriate) – not yet implemented |
Mark mode keys
These keys function in mark mode. You can enter this mode by right-clicking anywhere in the console title bar and choosing Edit->Mark from the context menu, or via the new shortcut combination, CTRL-M. In the legacy console, mark mode always resulted in block mode text selection. While in mark mode, you will need to hold down the ALT key at the start of a text selection command to leverage block mode in the new console. The selection key combinations detailed above are all available in mark mode. Please note that CTRL + SHIFT + ARROW operations select by character and not by word while in mark mode.
| Mark Mode Key Combination | Description |
| CTRL + M | Enter “Mark Mode” to move cursor within window. |
| ALT | In conjunction with one of the selection key combinations, begins selection in block mode. |
| ARROW KEYS | Move cursor in the direction specified. |
| PAGE KEYS | Move cursor by one page in the direction specified. |
| CTRL + HOME | Move cursor to beginning of buffer. |
| CTRL + END | Move cursor to end of buffer. |
History navigation keys
| Navigation Key Combination | Description |
| CTRL + UP ARROW | Moves up one line in the output history. |
| CTRL + DOWN ARROW | Moves down one line in the output history. |
| CTRL + PAGE UP | Moves up one page in the output history. |
| CTRL + PAGE DOWN | Moves down one page in the output history. |
| CTRL + HOME | Move cursor to beginning of buffer.Not implemented |
| CTRL + END | Move cursor to end of buffer. <end of command input line>Not implemented |
Other keys
| Other Key Combination | Description |
| CTRL + F | Open “Find” dialog. |
| ALT + F4 | Close the console window. |
High DPI awareness
Historically, console windows were not entirely usable at high resolution, especially with high-DPI displays like the Surface Pro or others available today. Starting today, if you select one of the TrueType fonts for your console window we automatically scale the font size per-monitor to an appropriate size. We’re leveraging the new SetProcessDpiAwareness() API introduced in Windows 8.1. Take a look here for more information.
One issue we have is that the Terminal font (chosen when “Raster Fonts” is selected from the Font tab in command properties) doesn’t scale proportionally with DPI and various display resolutions. As such, we leave the scaling alone for this font.
Transparency
Console windows can now be semi-transparent. The console window was implemented a long, long time ago when graphics and rendering models (the original GDI, in our case) didn’t support transparency as well as they do today. As a result, we had to compromise and adjust the transparency of the entire window for this release. Just the client area would be better, but we’re taking what we can get for now!
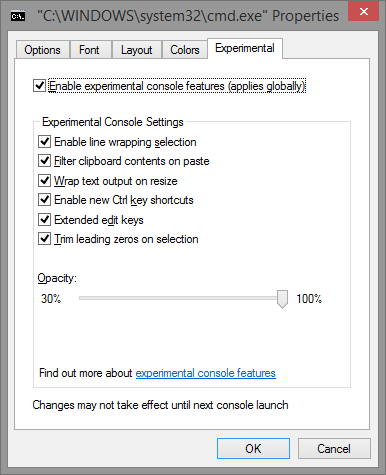
You can adjust the alpha value via the Experimental tab in the console properties dialog or adjust it on the fly for any console window:
| Transparency Combinations | Description |
| CTRL + SHIFT + Plus (+) | Increase transparency. |
| CTRL + SHIFT + Minus (-) | Decrease transparency. |
| CTRL + SHIFT + (Mouse) SCROLL UP | Increase transparency. |
| CTRL + SHIFT + (Mouse) SCROLL DOWN | Decrease transparency. |

We found out the hard way in internal experimentation that we needed a minimum opacity to prevent “where’d my console go?” pranks. So no trolling your friends: we set the minimum opacity of a window to 30%.

A few other things
- When pasting via the mouse in quick-edit mode or with the keyboard shortcuts, there are a couple of caveats you’ll want to be aware of. By default, TABS are removed when pasting and smart quotes are changed to regular quotes.
- The default line buffer height has been increased to 9000 lines.
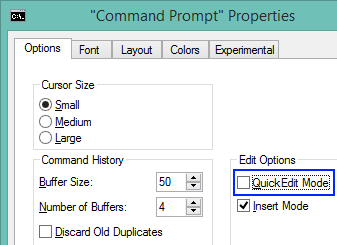
- One of the top requested changes we’ve received over the years is to have quick-edit mode enabled by default. Tada! Some console applications that use theReadConsoleInput() API to receive and react to mouse events, however, may not work with quick-edit turned on. This default is easy to change from the options tab in the console properties dialog. Simply uncheck the box and you’ll be happy again.
Enabling or disabling new console functionality
The new console may not work for all applications and use cases, so we’ve provided a method to revert back to the legacy console. This is a global setting that applies to all console windows launched after changing it. Several other settings specific to the new console can also be modified via the console properties dialog. For this Technical Preview release, we have added an experimental tab and it’s from here that you have the opportunity to make changes. For instance, by unchecking the “Enable experimental console features…” checkbox, the legacy console will be launched going forward.
Note: These UI changes are typically not in effect until the next console launch.
Enable / Disable via the registry
These features can also be toggled on/off via registry settings as shown below:
[HKEY_CURRENT_USERConsole] – all DWORD values
| Registry Key | Description |
| ForceV2 | 1 for new console features, 0 to disable new console. |
| LineSelection | 1 to enable line selection, 0 for block mode only. |
| FilterOnPaste | 1 to enable new paste behavior. |
| LineWrap | 1 to wrap text on resize operations. |
| CtrlKeyShortcutsDisabled | 0 to enable new key shortcuts, 1 to disable. |
| ExtendedEditKeys | 1 to enable a full set of keyboard selection keys, 0 to disable. |
| TrimLeadingZeros | 1 to trim leading zeroes on double-click selection, 0 to keep them. |
| WindowsAlpha | Adjust opacity between 30% and 100%: 0x4C to 0xFF -or- 76 to 255. |
| WordDelimiters | By default, only the space character is used when selecting text word-by-word with CTRL + SHIFT + ARROW keys. Set this REG_SZ value to contain all the characters you wish to treat as delimiters. |
Tell us what you think!
Well, that’s it for now. I hope you enjoy trying out the new console features. Head on over to the Console topic in the WPDev UserVoice forum to comment. We are eager to hear your feedback!