

This article is specifically for Windows 10 UWP application packaging. The instructions below may be used to package Windows 8 UAP applications but Step 6 should be ignored.
If you’re a publisher developing your app in-house, stop here. If you’re a 3rd party development vendor who has been given access by your publisher to their Store account credentials, no need to read further. In both of these cases, assigning multi-user account access and packaging your app for the publisher’s Store account is well-documented and straightforward. This article is for developers who need to package an app but are unable to get access to the publisher’s Dev Center account. In this scenario, you’ll have to take some manual steps to ensure that the information in the appxmanifest.xml file matches what the publisher has configured in their Store account. Read on.
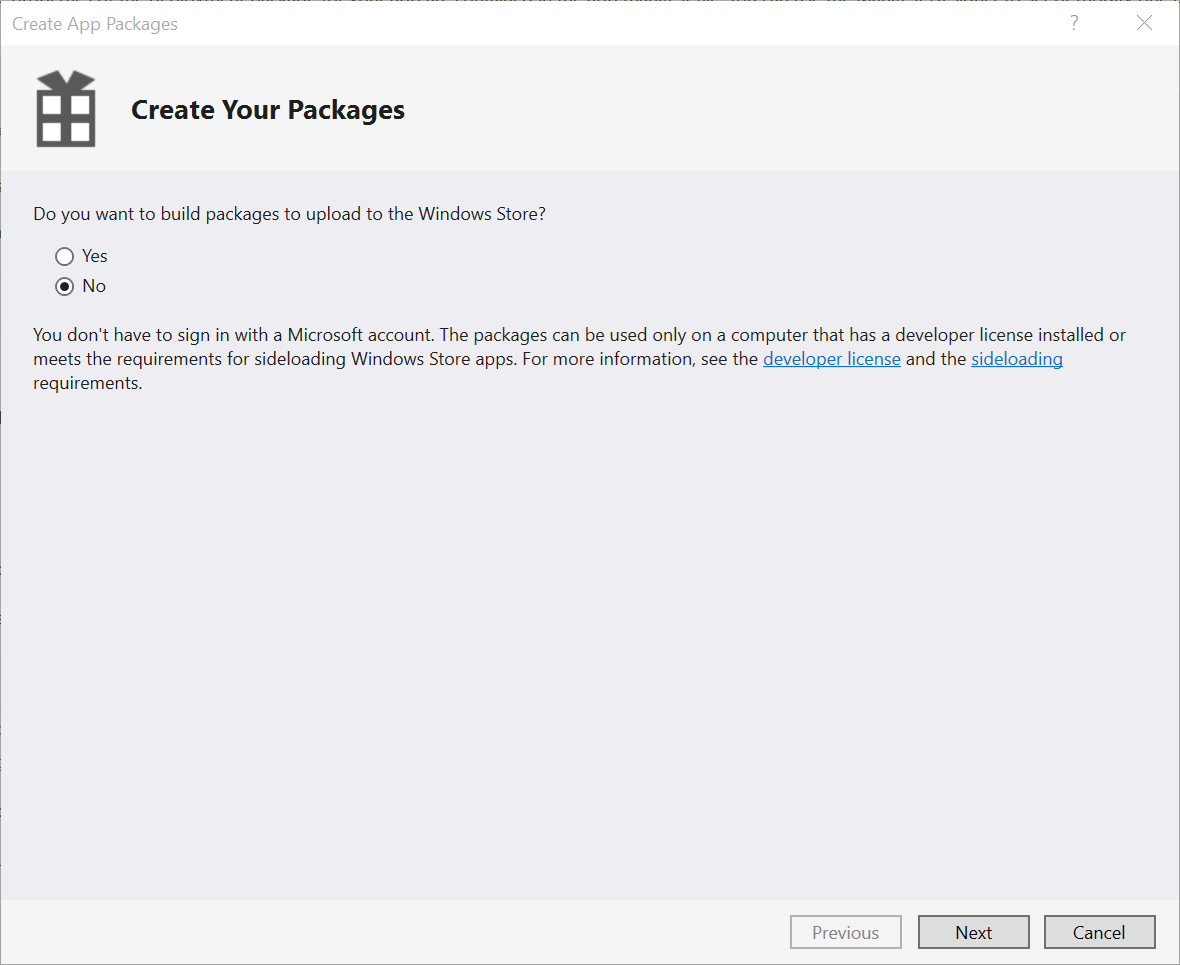
Packaging your Windows Store application using Visual Studio’s built in “Create App Packages” wizard is a straightforward and easy way to automatically configure your app’s appxmanifest.xml file with the correct app and publisher ID information for the Store. When you launch the wizard (Project > Store > Create App Packages…) you are asked “Do you want to build packages to upload to the Windows Store?”
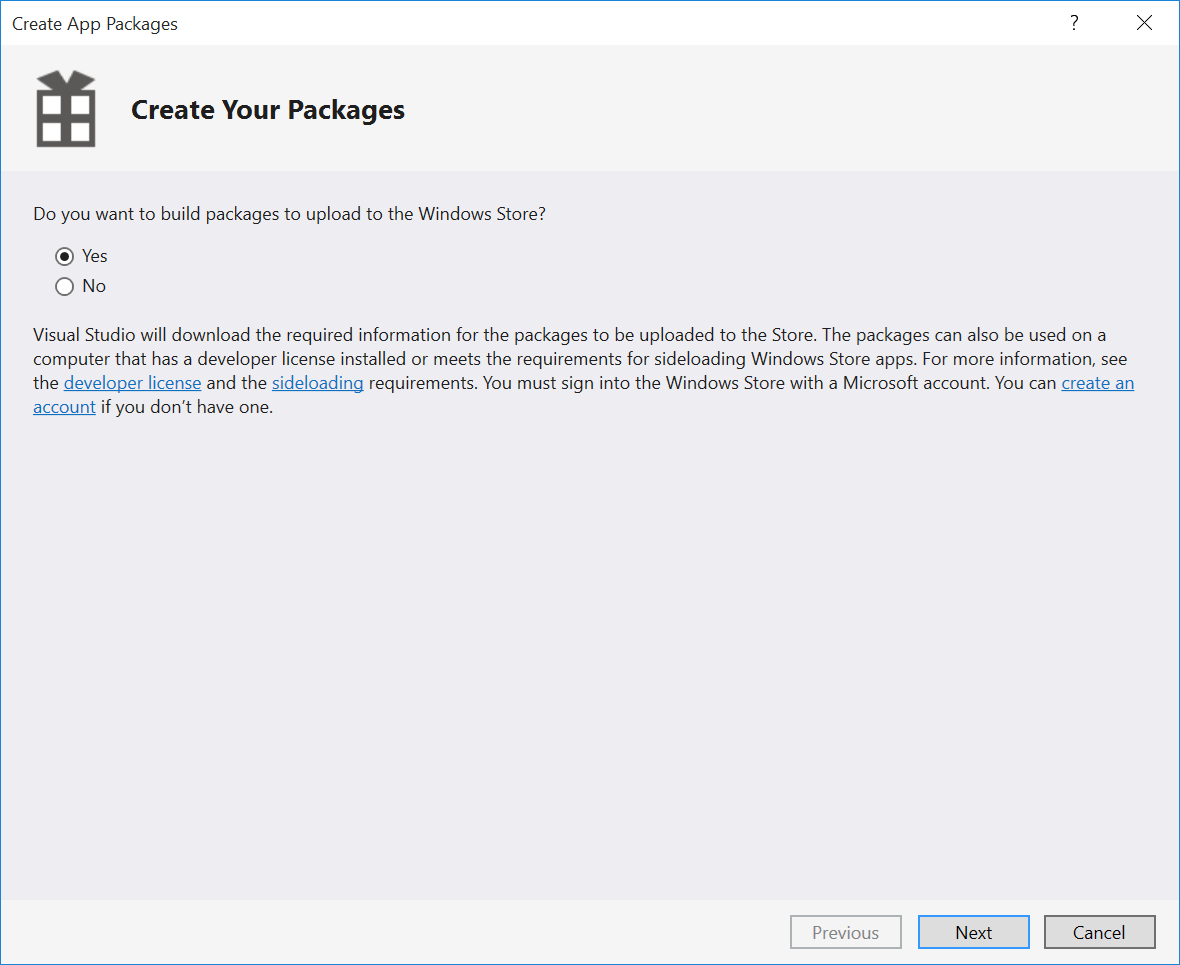
If you select “Yes,” you’re prompted to enter in your Store (aka Dev Center) account credentials.
This is how Visual Studio associates the app with your publisher account so that it can pull down all the correct information from the Store to automatically populate the appxmanifest.xml. However, what if you don’t have access to the publisher’s Store account credentials? It’s common for a publisher to hire a 3rd party vendor to develop their application but retain the Store publishing processes in-house. In this case, the vendor is expected to deliver the packaged app to the publisher who then uploads it to their Store account separately. The “gotcha” in this scenario is that when the publisher attempts to upload the package to their Store account, Microsoft will reject the package with errors because it doesn’t include the correct publisher and app information in the appxmanifest.xml file.
The Create App Packages wizard clearly states that you need to sign into the Store account. Your only other option is to select “No” and you’re told you can only use the resulting package “…on a computer that has a developer license installed…”

Fortunately, there’s a work-around! Developers can ensure the app is configured with the correct publisher and app information without having to sign into the publisher’s Store account. This does, however, require that the publisher delivers specific information to the developer that they will manually insert into the Visual Studio Manifest Designer before proceeding with the Create App Packages wizard.
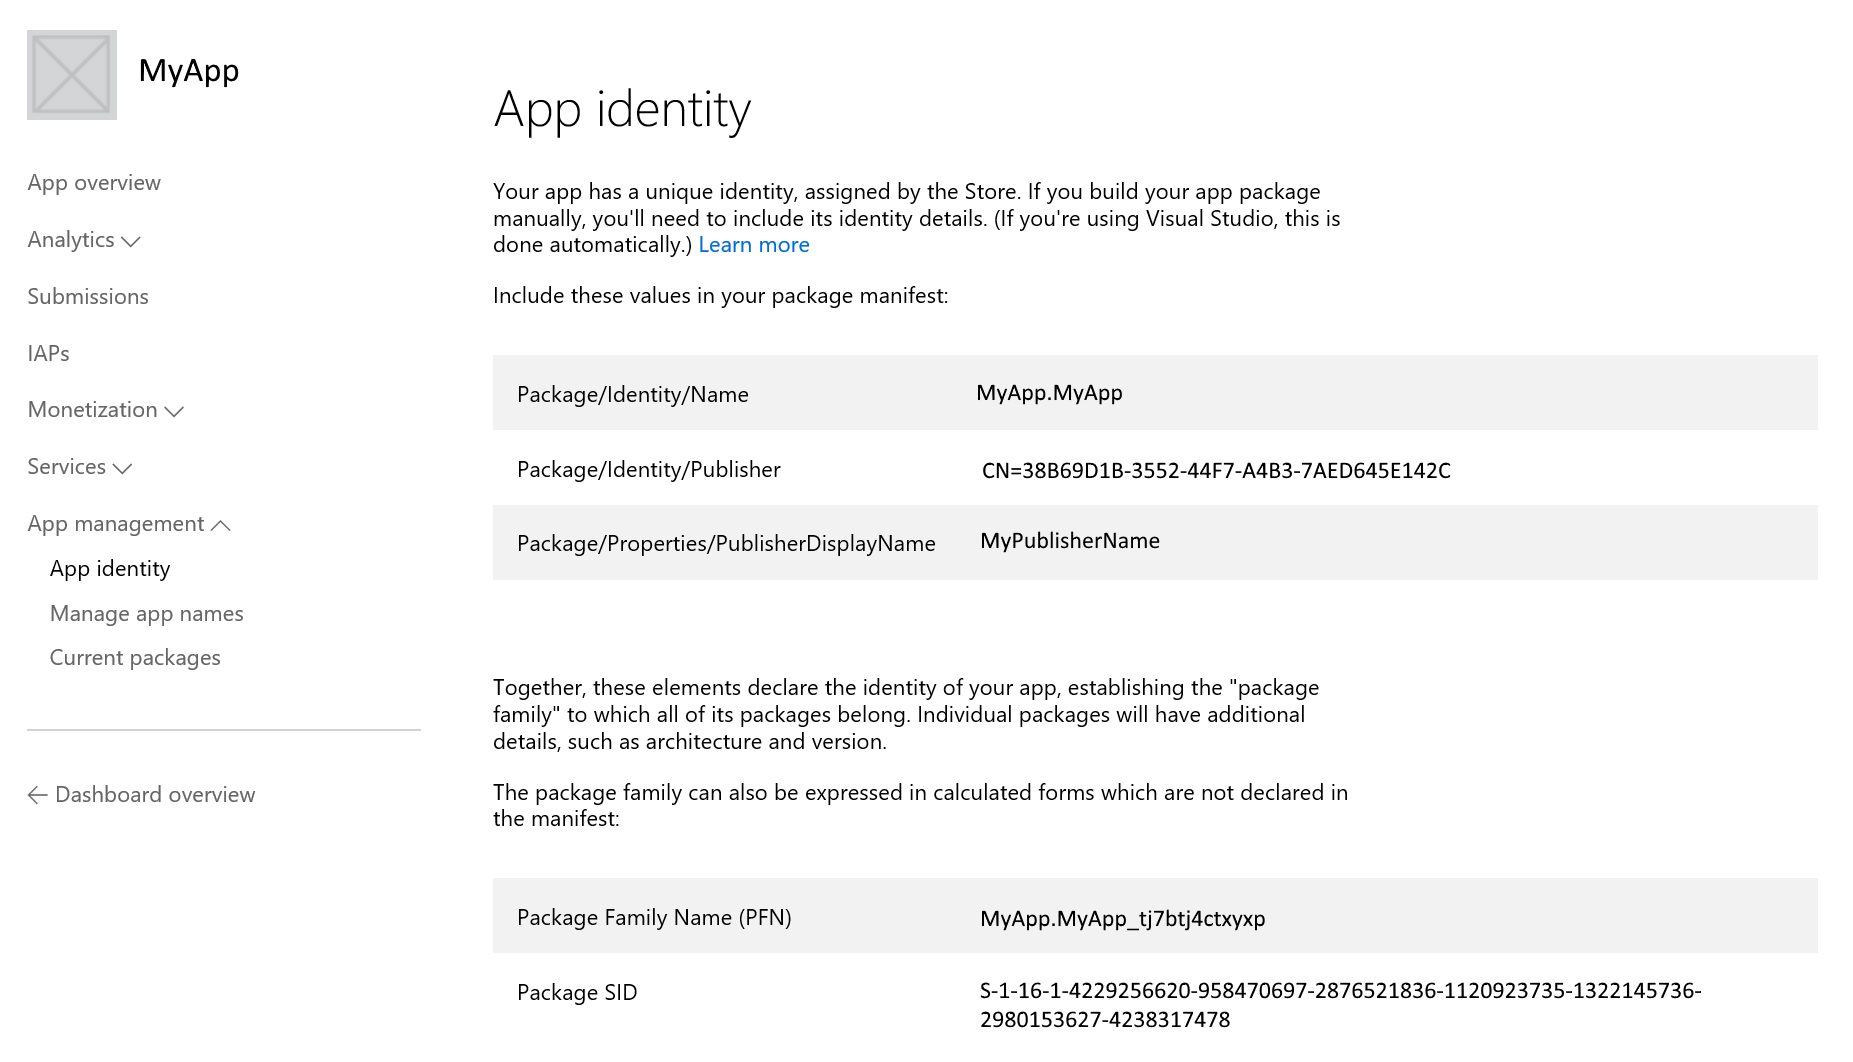
Step 1. After the publisher has reserved an app name, have them send you a screenshot of the Dev Center app identity page.
They will log into the Dev Center and navigate to the App Overview for the app. Once there, they’ll choose the App Identity item under App management on the left menu:
Step 2. You will open the solution in Visual Studio and view the Manifest Designer for the project (Note: the Manifest Designer opens when you open the package.appxmanifest file, not when you choose the “view code” option). Go to the “Packaging” tab. Click on the “Choose Certificate” button in the “Publisher” field of the form. The dialog below opens.

Step 3. Choose to “Create test certificate…” in the dialog.
Step 4. Enter the Package/Identity/Publisher string (without the “CN=”) you received from the publisher in Step 1 into the “Publisher Common Name:” field. No need to enter a password since this is only a temporary cert used just to get the correct publisher ID to populate the manifest. (Note: When the app has been uploaded to the Dev Center, the Store will automatically strip out this signing signature and will replace it with the Store signature anyways.)
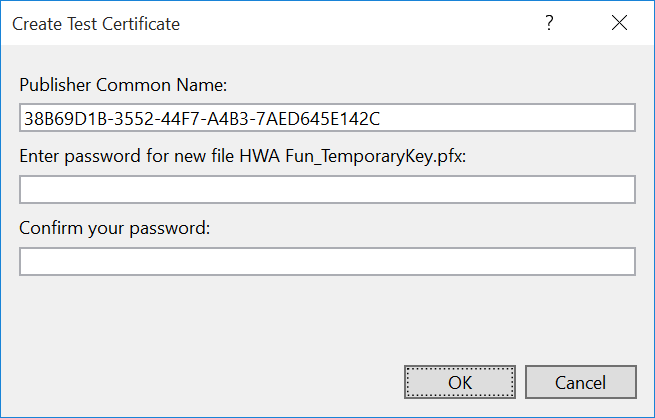
On hitting “OK” you may get a message asking if you want to replace the existing [YourProjectName]_TemporaryKey.pfx file on the machine. Choose yes.
You should now see the proper “Publisher:” value.
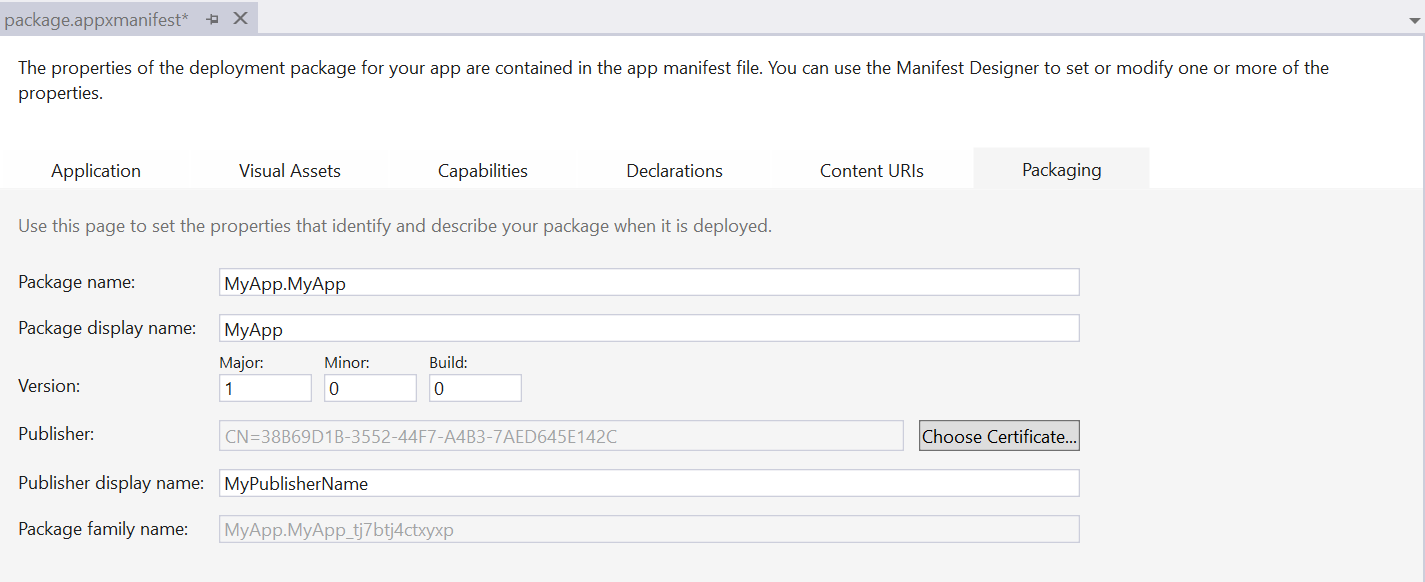
Step 5. Populate the rest of the fields:
- “Package name:” = “Package/Identity/Name” value in the screenshot from Step 1.
- “Package display name:” = “Name” value from Step 1.
- “Version:” – whatever you want it to be. Just make sure that it is higher than any packages you’ve already uploaded to the Store for your target Device Family and architecture. Otherwise, users who already have your app installed won’t get the update. More details on app versioning are available here.
- “Publisher:” – per Step 4 this should be the “Package/Identity/Publisher” value and is automatically populated from the Subject attribute of the signing cert you created in Step 4.
- “Publisher display name:” = “Package/Properties/PublisherDisplayName” value from Step 1.
- “Package family name:” – gets automatically populated as a combination of the “Package name:” and a hash of the “Publisher:” value.
After making these changes, save the “Package.appxmanifest” file.
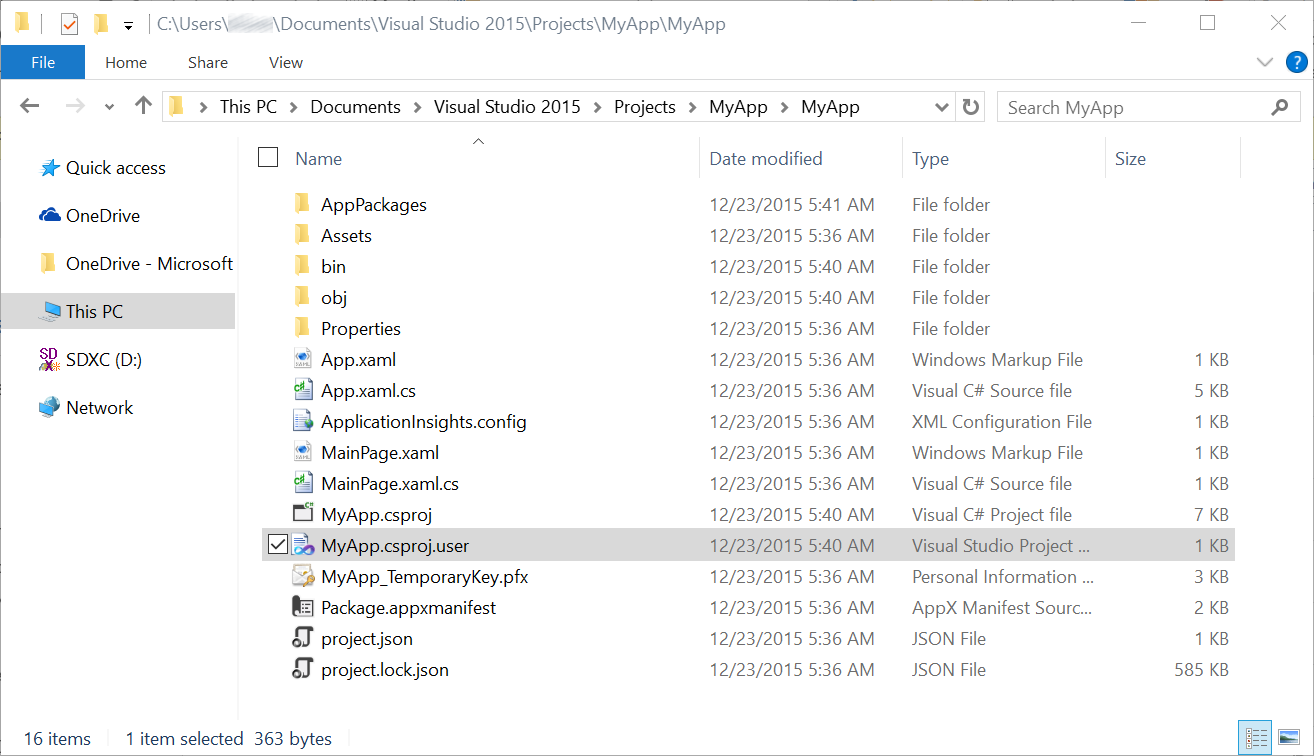
Step 6. In order to force the Create App Packages wizard to build the required “.appxupload” file for the Store, you need to make a simple modification to the “*proj.user” file in your project. Navigate to your project folder as shown below and open the file with Notepad. (Note that the “*proj.user” file is only created after you’ve packaged your project for the first time, so make sure you’ve built a debug package with the wizard before trying this step.) Add the following tag as a child within the <PropertyGroup> element and save the file:
[code language=”xml”]<UapAppxPackageBuildMode>CI</UapAppxPackageBuildMode>[/code]
Step 7. After saving the file, go to Project > Store > Create App Package. Make sure you select “No” since you’ve manually set the publisher/app manifest values already.
Step 8. Proceed to build the release packages for the architectures you want to release to. To check that the appxmanifest.xml was created with the appropriate values, unzip the .appx package and open the appxmanifest.xml file.
Following these simple steps, you’ve now created an .appxupload package that the publisher can upload successfully to their Store account. When the Store does its automatic check of the manifest values no errors should be thrown and the package should show up on the Packages page for the app. We hope this article has been helpful. Additional information on packaging your apps for the Windows Store can be found on the Windows Dev Center.
Post written by Tim Harader, Sr. Program Manager at Microsoft