

What are Microsoft Passport and Windows Hello?
You might hear Microsoft Passport and Windows Hello mentioned in the same breath. Windows Hello is the biometrics system built into Windows—it is part of the end-user’s authentication experience. Microsoft Passport is a two-factor authentication (2FA) system that combines a PIN or biometrics (via Windows Hello) with encrypted keys from a user’s device to provide two-factor authentication.
If you sign into Windows 10 with fingerprint or face recognition, then you are already using Windows Hello. This advanced biometric interface enables you to use biometrics rather than the traditional username and password to log in to Windows. Windows Hello is an extensible framework, so while currently you can use fingerprints, facial recognition and iris scanning with it, supported biometrics can be expanded with new hardware.
Note: To enable Microsoft Passport and Windows Hello, the user simply clicks or taps Start > Settings > Accounts > Sign-in options, and selects the options they prefer. Users must have either their Microsoft Account or their Azure Active Directory account connected in Windows settings. After setting up a PIN, Microsoft Passport is available, and Windows Hello can be added to use biometrics.
When Windows Hello recognizes a user, it uniquely identifies and authenticates that user to access Windows on that device. What the user does not see is that Windows Hello releases a stored credential that is used as the second authentication factor by Microsoft Passport. But it isn’t just for logging in to Windows. It also provides a secure way for your app to authenticate an individual user on a specific device.
Note: Businesses can use Passport for Work with (Azure) Active Directory to add more robust management functionality to Microsoft Passport.
The code for implementing this has been made as easy as possible to encourage adoption by the dev community. You don’t need to have a deep understanding of encryption, biometrics, or Microsoft accounts; you don’t even need to know all that much about security to use these features to create a more secure app. Let’s take a look.
Before we get to the code, exactly how does this work?
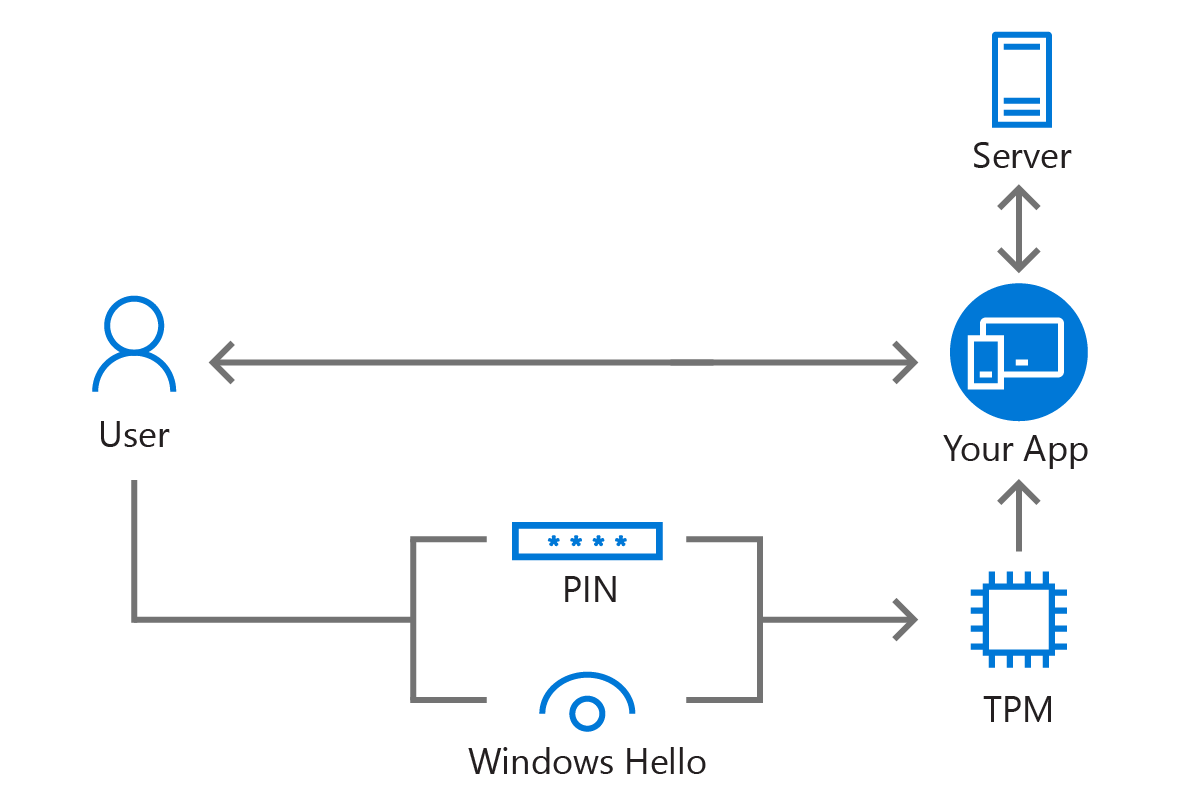
The trusted platform module (TPM) is the crucial working part of the security. TPM-chips assist in securely storing authentication keys for hardware based authentication.
Microsoft Passport takes the PIN or biometric information from Windows Hello (if available), and uses this information to have the TPM-chip generate a set of public-private keys. The PIN in question is safer than an ordinary PIN or password because it only works with a specific device. Also, the PIN can be of variable length, and may have additional requirements regarding length and complexity in businesses.
The private key remains secured by the TPM; it cannot be accessed directly, but can be used for authentication purposes through the Microsoft Passport API. The public key is used with authentication requests to validate users and to verify the origin of the message.
The following illustration shows how all the moving parts work with each other (see Figure 1).
But what if the user’s device does not have a TPM-chip? While using a TPM-chip is more secure and robust, Windows also contains an alternate software-based mechanism that will be used when no TPM-chip is available. This ensures that your app can function regardless of whether the user’s hardware has the TPM chip or not. An “attestation” can be retrieved for the key to validate whether or not the keys are protected by a TPM-chip and act accordingly (e.g. access to more secure features is only available when TPM-chip is used). Attestation is outside the scope of this blog post, but you can read more about it in the Microsoft Passport and Windows Hello whitepaper.
How you implement Microsoft Passport
To start using Microsoft Passport in your Windows 10 UWP app, you don’t need worry about writing custom code to create asymmetric encryption keys or handle user authentication with their credentials. Microsoft Passport APIs handle all of this so that you can focus on what your app does rather than on how to build your own security system.
First, you should prepare the server side of your app to accommodate the change of storing multiple public keys for each device of the same user, versus the traditional username and password. This is to make sure your app can handle however many devices the user uses your app with. Take a look at this simple database diagram for an example:
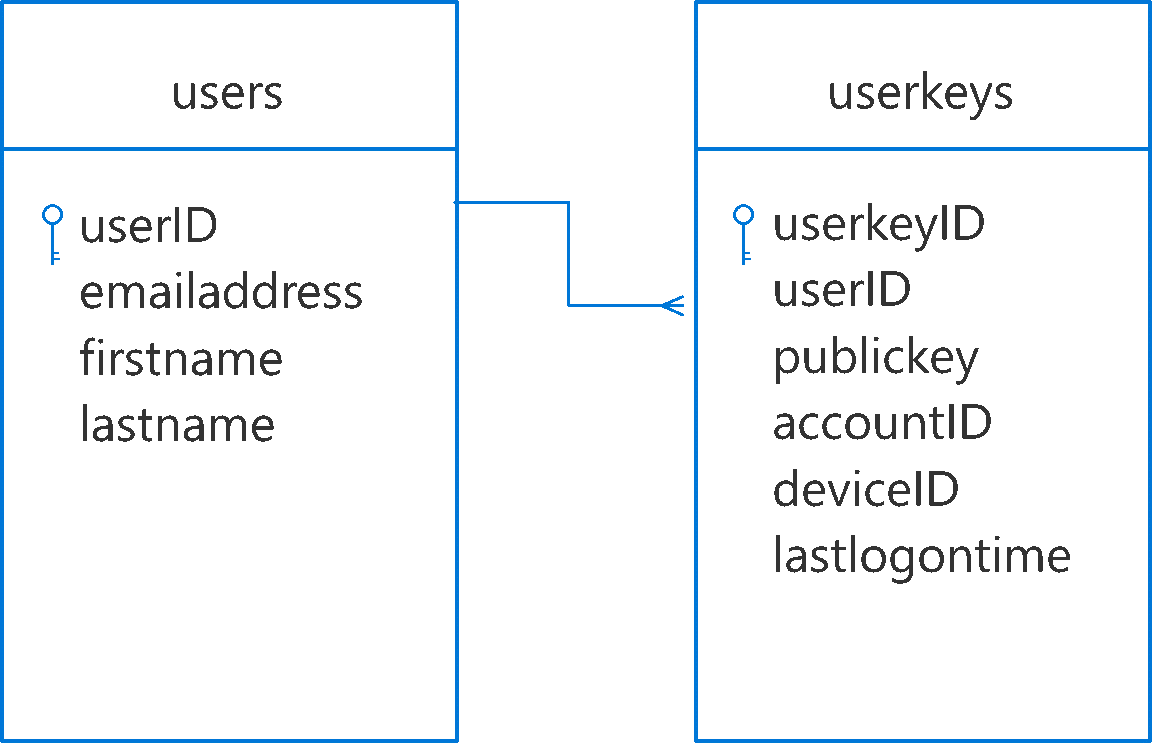
One table stores the user information, and it joins to another table that can hold multiple keys for each of their devices. Of course, you will likely need more information stored about your users. This is just a basic example.
On the client side of your app, the first step will be to make sure the user can use Microsoft Passport on their current device—they must have set up a PIN in Windows settings. You can check this with the KeyCredentialManager.IsSupportedAsync() method, which returns true if they are already set up.
[code lang=”csharp”]
// Check if the device is capable of provisioning Microsoft Passport key credentials and
// the user has set up a PIN on the device.
if (await KeyCredentialManager.IsSupportedAsync())
{
// Continue logic
}
[/code]
Note that all the code samples in this post are based on the Microsoft Passport sample app.
If the user hasn’t configured Microsoft Passport via the PIN, you should invite them to do so. However, to be flexible, design your system to allow for the possibility that they continue to use their existing username-password login if you’re migrating from an existing system to using Microsoft Passport.
You should also provide some interface for your user to unregister a specific device for use with your app. For instance, if they want to remove a device they no longer own. Typically, this would be implemented in a web interface that users can access or in an account settings overview accessible from the web and/or the app on other devices.
Once you’ve established that the user has a PIN, your app should create a credential key by invoking the KeyCredentialManager.RequestCreateAsync method. This will…
- prompt a dialog to request the user’s PIN or biometric
- authenticate the user on this device again
- create the asymmetrical public-private key pair
[code lang=”csharp”]
private async Task<IBuffer> CreatePassportKeyCredentialAsync()
{
// Create a new KeyCredential for the user on the device.
KeyCredentialRetrievalResult keyCreationResult =
await KeyCredentialManager.RequestCreateAsync(userId,
KeyCredentialCreationOption.ReplaceExisting);
if (keyCreationResult.Status == KeyCredentialStatus.Success)
{
// User has authenticated with Windows Hello and the key
// credential is created.
KeyCredential userKey = keyCreationResult.Credential;
return userKey.RetrievePublicKey();
}
else if (keyCreationResult.Status == KeyCredentialStatus.NotFound)
{
MessageDialog message = new MessageDialog("To proceed, Windows Hello needs to be configured in Windows Settings (Accounts -> Sign-in options)");
await message.ShowAsync();
return null;
}
else if (keyCreationResult.Status == KeyCredentialStatus.UnknownError)
{
MessageDialog message = new MessageDialog("The key credential could not be created. Please try again.");
await message.ShowAsync();
return null;
}
return null;
}
[/code]
With the key pair created, your app can request the public key with the RetrievePublicKey method and send it together with the user information to register or enroll the user with the server.
Once the user is registered, you can validate their access to the app’s service or data for subsequent logins. To do that, you create a “challenge” from your app’s server that will be signed by your client app via the RequestSignAsync method. The server validates the signature with the device’s public key. Take a look at the diagram below. It illustrates the backend authorization process (see Figure 4):
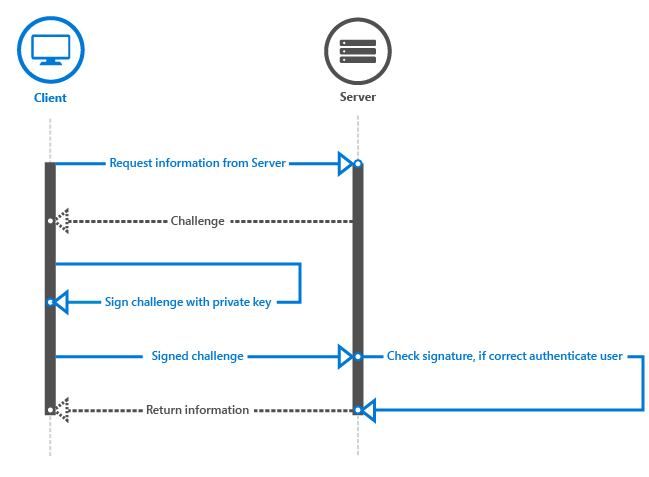
Note that the challenge that’s created by the server is something you have to implement for your specific situation, making sure it’s a secure challenge that prevents things such as replay attacks, man-in-the-middle, etc.
For each authentication request, the user will be presented with the Windows system UI to enter their PIN or use Windows Hello. This helps them feel confident that their credentials are being validated by Windows rather than third party software.
After successful signature validation, your regular authentication flow should apply, for example generating a token that is handed to the app to perform subsequent API calls with until the session expires.
Multiple devices and multiple users
Many people own multiple devices and expect to be able to sign into the same app from each of them. With a username-password system, there’s just one account per user. But with Microsoft Passport, you need to provide support for 2FA authorization on each device.
Since we’ve already designed our app to accommodate multiple keys per user, we need only register each new device with the proper keys. Doing this requires exactly the same code as registering the user’s first device: KeyCredentialManager.RequestCreateAsync. To more easily identify a specific device from the user’s other devices, you’ll likely want to store the device name or ID as well. We’ve already added deviceID to the example table in Figure 2. That may suffice, or you may want to add a new table that joins to our UserKeys table by deviceID.
How an extra device is enrolled is at the developer’s discretion, but a smart way would be to require validation on their already registered device to register the new one. Another mechanism, for more secure environments, might involve an SMS message or letter being sent to the user with a code they can use to validate.
Another scenario to consider is multiple user accounts on the same device; users may share a device. For example, if a family shares a tablet for entertainment purposes but each maintains their own user account, they will need to individually register the device with their account.
The GitHub Sample
In December, a sample app implementation for Microsoft Passport was published up on GitHub to demonstrate how this entire process works, including both the client and the server pieces. However, keep in mind that this Microsoft Passport sample is greatly simplified. It is not secure enough for a production environment—it’s just a rudimentary sample, not a prescriptive template.
The solution consists of three projects:
| Project | What it’s for |
| Client | This represents your app |
| Models | This is a portable class library that contains a classes shared between the Client and Server projects |
| Server | This imitation server stores user and device data in memory |
This sample enables you explore the actual flow from the client to the server and back, as well as how specific interactions work.
Wrapping Up
User security is a top priority, but hopefully this has given you some insight into how Microsoft Passport and Windows Hello can reduce complexity for your implementation. To hear more about using Windows Hello and Microsoft passport in your app, check out this video on Channel 9. You can also see the code in action using the Microsoft Passport GitHub sample. We also suggest the Microsoft Passport and Windows Hello whitepaper, which covers all of this information in greater depth and describes scenarios, such as how to authenticate against your services with Microsoft Passport, how to convert from an existing username/password system, and how to use attestation information for a higher level of security.