

A key part of being productive is having great tools. For developers, this can make the difference between a successful app that delights our users and a project that never got off the ground.
In our last post, we talked about writing a UWP app that connects to the Azure IoT Hub. We said that we’re far from done in our mission to make cloud connectivity easy and accessible. So we went back to work and built a tool that we think you’re going to love.
Say hi to Connected Service for Azure IoT Hub
Previously, connecting to Azure IoT Hub involved getting the connection string from the Azure Portal, feeding that to another tool such as the iothub-explorer to create a device identity, then using the device-specific connection string in your code. You also needed to figure out what API to pass this connection string to, and so on.
To make this process simpler, we built a new tool – the Connected Service for Azure IoT Hub, a Visual Studio extension that takes away the hassle of dealing with connection strings and other error-prone details.
You can download the extension from the Visual Studio Gallery here: http://aka.ms/azure-iot-hub-vs-cs-vs-gallery. Simply click the Download button and follow the prompts to install the extension.
The extension supports C# and C++ languages, but we’re looking at supporting other project types in the future.
Get connected
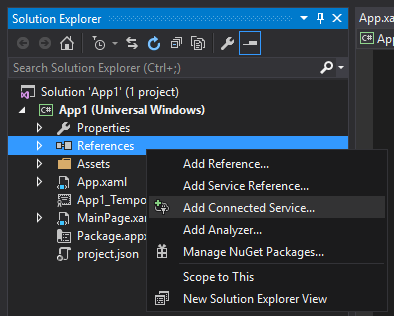
To connect your app to an instance Azure IoT Hub, right-click the References node of your project in Solution Explorer and select Add Connected Service…:
In the next window, choose Azure IoT Hub:
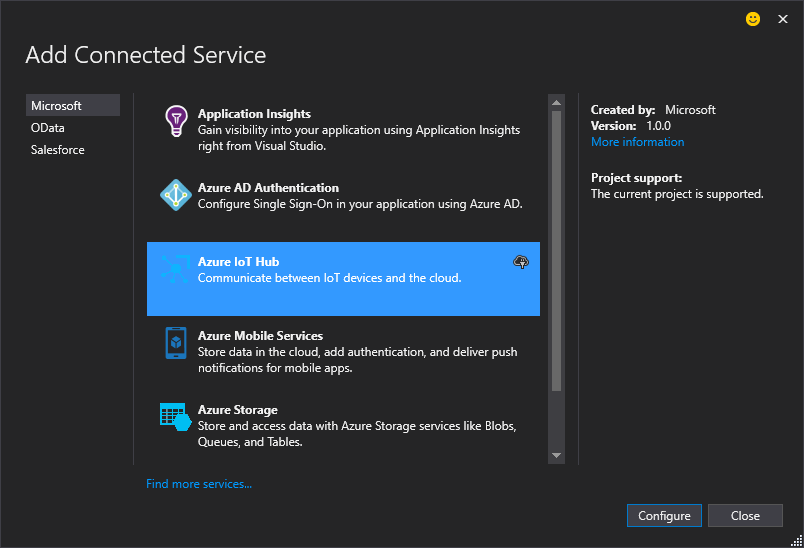
Now, click Configure. You’ll need to pick an existing IoT Hub (or click Add to create a new one):

Finally, you’ll be asked to pick one of the devices associated with your IoT Hub:
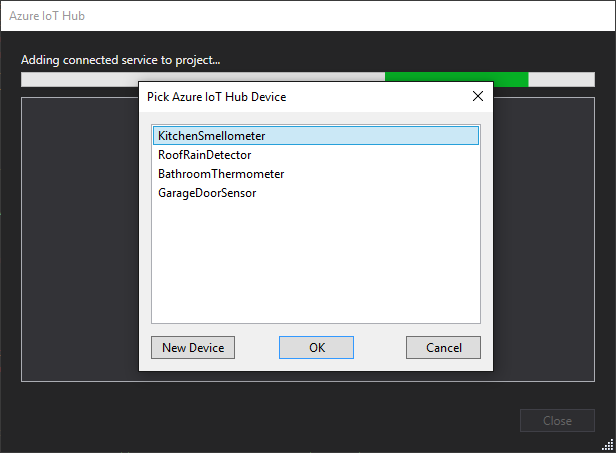
If you don’t have any devices, the list will be empty; click New Device to create a new one.
After you click OK, the extension will generate a new file, AzureIoTHub.cs, and add it to your project.
The code
take a closer look at the generated code in AzureIoTHub.cs. The file contains a class, AzureIoTHub with two static functions, SendDeviceToCloudMessageAsync and ReceiveCloudToDeviceMessageAsync.
The functions create a device client and send a simple message to the device specified in the connection string, which is also generated in the file:
[code lang=”csharp”]
public static async Task SendDeviceToCloudMessageAsync()
{
var deviceClient =
DeviceClient.CreateFromConnectionString(deviceConnectionString,
TransportType.Http1);
var str = "Hello, Cloud!";
var message = new Message(Encoding.ASCII.GetBytes(str));
await deviceClient.SendEventAsync(message);
}
[/code]
As you can see, the code in the generated functions is merely a starting point – unless your app really intends to send “Hello Cloud!” messages, you’ll want to modify this code.
Because the functions are static and take no parameters, you can call them from any place in your application, for example from the constructor of the MainPage:
[code lang=”csharp”]
public MainPage()
{
this.InitializeComponent();
AzureIoTHub.SendDeviceToCloudMessageAsync();
}
[/code]
That’s it, you just sent a message to your device! Similarly, you can invoke the other function, ReceiveCloudToDeviceMessageAsync, to receive a message sent to your device from the IoT Hub.
Did it work?
There are several ways to verify that your message has arrived at its destination. You could build a simple app as described in our previous post (scroll to the end of the post). Another option is to use the iothub-explorer tool (also introduced in that post):
iothub-explorer <yourConnectionString> monitor-events MyDevice
Wrapping up
We hope you find the Connected Service for Azure IoT Hub useful. As always, your feedback is welcome – leave your comments here or head over to our GitHub page and submit an issue.
Post written by Artur Laksberg, a principal software engineer in Windows