

https://channel9.msdn.com/Blogs/One-Dev-Minute/Use-the-Desktop-Bridge-to-Bring-Your-Apps-to-UWP
We are excited to announce that since then we’ve released a new version of the desktop app converter, adding support for great new features and fixing several issues to provide a more stable environment. To learn more about the improvements in the Desktop App Converter, please visit http://aka.ms/converter.
Today, we will follow up with a walkthrough of a concrete coding example that takes an existing desktop app and gradually migrates and enhances it with the Desktop Bridge into a full Universal Windows Platform (UWP) app that can run on all Windows 10 devices—such as Xbox One, HoloLens, phones, et cetera—and take full advantage of the platform.
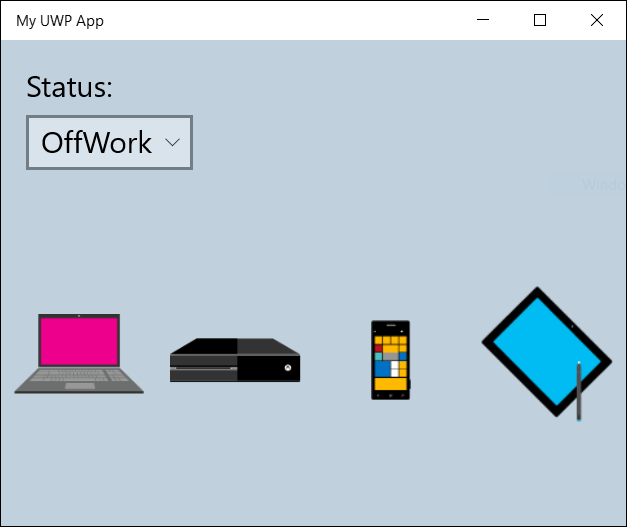
Our starting point is a simple Windows Forms app that keeps track of the user’s status by storing it in the registry. Essentially, we start with this:

[code lang=”csharp”]
private void cmbBox_SelectedIndexChanged(object sender, EventArgs e)
{
MyRegKey.SetValue("Status", cmbBox.SelectedItem);
}
[/code]
The code for this sample app, as well as the code for each of the steps along the journey across the bridge, can be found in our sample repo on GitHub. As we gradually migrate our app, it remains fully functional every step of the way and picks up additional features that will help keep users engaged.
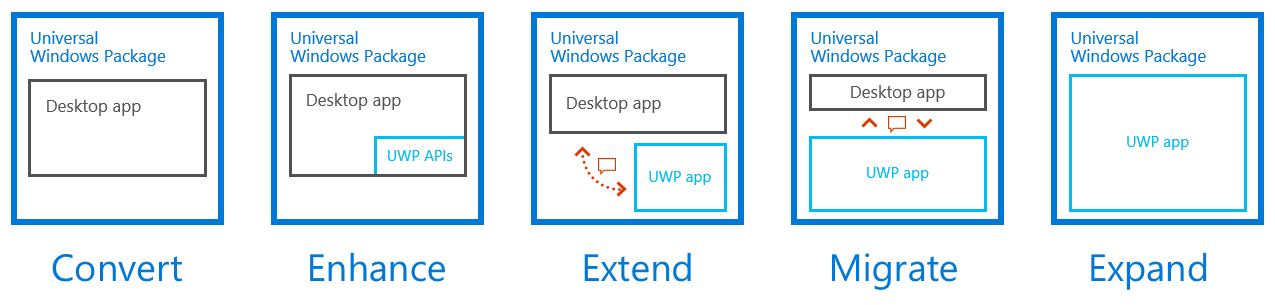
Step 1: Convert
As a first step to get our app on the bridge, we take it through the conversion process. There are a couple of options to do this initial step. For a simple app like this, which gets installed just by copying binaries, we can quickly perform a manual conversion as explained in this article on Dev Center and demonstrated in this sample on GitHub. Apps that are using a .MSI (or similar) installer should use the Desktop App Converter for the conversion process. Finally, there are several third party install tool providers who are in the process of adding support for the Desktop Bridge to UWP in their products, as well, such as Advanced Installer, FireGiantand InstallShield.
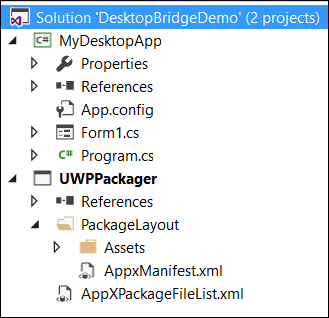
Once the conversion is complete, we want to test, adjust, and enhance our application in Visual Studio. For that, we can take advantage of the project type for UWP packaging, which the Visual Studio team recently introduced for Visual Studio 15 Preview 2 (see this post for details and instructions).
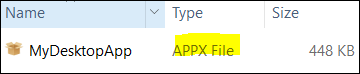
Now we can hit F5 and debug our application running within the UWP app model. With the conversion, a number of immediate platform benefits become available automatically, such as Start menu integration, clean install/update/uninstall, and distribution of the .appx package via your choice of distribution.

Step 2: Enhance
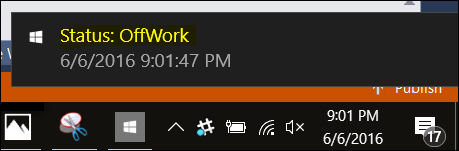
Now that we have brought our app into the UWP app model, an app identity (as specified in the appxmanifest.xml file) is added, which enables our app to call UWP APIs that were not available to our desktop application before. Let’s look at an example of how to add a Live Tile to our app. The goal is to update the tile on the Start menu whenever the user’s status changes:

[code lang=”csharp”]
private void comboBox1_SelectedIndexChanged(object sender, EventArgs e)
{
MyRegKey.SetValue("Status", comboBox1.SelectedItem);
// Update the apps live tile
XmlDocument tileXml =
TileUpdateManager.GetTemplateContent(TileTemplateType.TileSquare150x150Text03);
XmlNodeList textNodes = tileXml.GetElementsByTagName("text");
textNodes[0].InnerText = "MyDesktopApp";
textNodes[1].InnerText = "Status: ";
textNodes[2].InnerText = comboBox1.SelectedItem.ToString();
textNodes[3].InnerText = DateTime.Now.ToString("HH:mm:ss");
TileNotification tileNotification = new TileNotification(tileXml);
TileUpdateManager.CreateTileUpdaterForApplication().Update(tileNotification);
}
[/code]
Step 3: Extend
In addition to calling more UWP APIs, we can now also add UWP components to our app package to take advantage of other exciting UWP features. Examples of this include adding App Services, becoming a sharing target or a file picker, or adding background tasks.
With background tasks, an app can respond to triggers to execute code even when the app is not running—even if the device is in connected stand-by mode. This way, you can always keep your app up to date and create an experience of an app that is always alive. To illustrate this in our example, we want to use the TimeTrigger to periodically check the status and notify the user via a toast notification:
Now that your Winforms app has identity and runs in the UWP app model. You can declare background tasks in your manifest and register them from your code the same way a UWP can do today:
[code lang=”csharp”]
RegisterBackgroundTask("Timer", new TimeTrigger(15, false));
[/code]
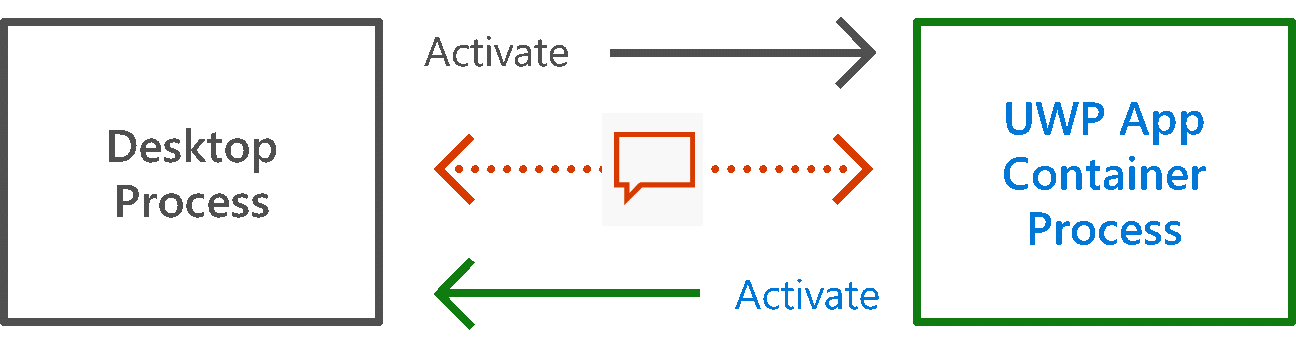
When the TimeTrigger fires, the system will invoke your registered background task in a UWP app container process and you can run code even if your app is not currently running:
[code lang=”csharp”]
public sealed class BgTask : IBackgroundTask
{
public void Run(IBackgroundTaskInstance taskInstance)
{
ShowToast("Status: " + currentStatus);
}
}
[/code]
Step 4: Migrate
To take advantage of UWP UI features such as a touch-friendly UI and smooth animations, let’s migrate the user experience of our project to a XAML front-end. In practice, the details of the UI migration depend on the Win32 UI framework your app has been using and the complexity of your UI. In this simple example, the changes are straightforward. In most real apps, however, this step will require more developer resources.
At this time, we can delete our now obsolete Windows Forms related UI code. However, we still want to keep around our desktop app process for our existing business logic (i.e. managing the app’s state via registry). To communicate between the two processes, we are using an App Service as communication pipeline.
[code lang=”csharp”]
private async void cmbBox_SelectionChanged(object sender, SelectionChangedEventArgs e)
{
ValueSet valueSet = new ValueSet();
valueSet.Add("StatusUpdate", cmbBox.SelectedItem.ToString());
if (App.Connection != null)
{
AppServiceResponse response = await
App.Connection.SendMessageAsync(valueSet);
}
[/code]
Step 5: Expand
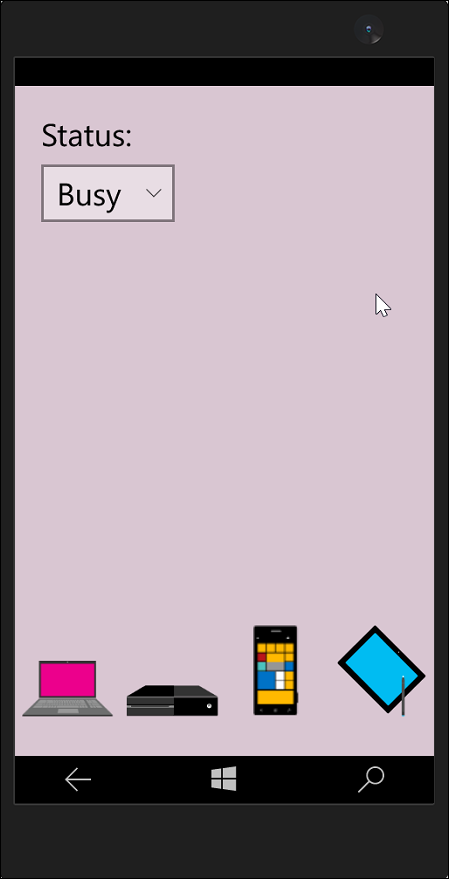
In the final step, we will now expand the reach of our application to all Windows 10 devices that run UWP apps by moving the last remaining pieces of code into the UWP app container process. To do so, we will replace the registry-based state with the UWP-compliant ApplicationData API. Thus, we can now deploy our app to phones, Xbox One, HoloLens and other Windows devices that run UWP apps.
[code lang=”csharp”]
private void cmbBox_SelectionChanged(object sender, SelectionChangedEventArgs e)
{
ApplicationData.Current.LocalSettings.Values["Status"] = cmbBox.SelectedValue.ToString();
}
[/code]
Conclusion
The Desktop Bridge offers an exciting path to migrate your existing desktop apps to UWP. It enables you to gradually move across the bridge at your own pace while keeping your existing code investments running at all times along the way.
As you explore the tools on current preview builds, we’re very keen to hear your experiences and feedback. The best place to make feature suggestions is on the Windows Developer UserVoice site. For questions and bug reports, please head over to the Developing Universal Windows apps forums.
Additional resources
- Desktop conversion for UWP apps on Dev Center
- Build 2016 breakout session – Bringing Existing Desktop Applications to the Universal Windows Platform by John Sheehan, Peyman Zanjani
- Build 2016 pre-record session – Bringing Desktop Apps to the UWP Using Desktop App Converter by David Tepper, Avneet Singh
- Channel 9 Live interview – John Sheehan, David Tepper, Stefan Wick
Written by Stefan Wick, Principal Program Manager Lead for the Desktop Bridge