

Web developers are used to making difficult choices on which tools and libraries they can use based on the operating system they’re actively working on. The WSL was designed and built by the Windows Kernel Team and delivered in partnership with Canonical, to help Windows 10 developers use the rich Linux developer ecosystem and tools alongside the great tools they are already using in Windows, without having to boot into another operating system or VM. This is definitely a “by developers, for developers” Windows 10 feature, specifically designed to remove a bit of friction from developers’ daily workflow.
In this post, I’m going to show you a few of the features of WSL that I personally find very interesting, as well as point you to some resources to help you learn more. First, I’ll show the integration of staple commands like ssh for working with Linux servers and devices. Second, I’ll demonstrate the ability to use Bash scripting to automate tasks in a very natural way. Third, I’ll have a little fun with the great command-line compilers, other tools and the *nix compatibility offered, and play a little NetHack. Finally, I’ll show you the ability to use existing Python and other scripts available on the web.
Windows is my primary operating system and development environment, and has been since Windows 3.0 on my first 286. Nevertheless, I’ve always had Linux servers or devices kicking around my place. From IoT devices such as the Raspberry Pi and dedicated router/gateway devices to Minecraft servers, they tend to collect on the shelves and corners in my office. One thing I always need to do is manage and configure these Linux computers easily from my main workstation.
Managing Servers and Devices
I currently run a headless Ubuntu Minecraft server from my house. It was my Christmas present to my 10-year old son this past year, but it has turned out to be my toy as much as his (ok, more my toy). I used to use a few client apps to manage it from my primary Windows 10 PC, but now I just use command-line ssh from within Bash on Windows 10. Using apps like PuTTY and Tera Term are fine of course, as is using the great tools that come with Cygwin, but I wanted a truly native and natural experience that just flowed well. Cygwin always felt to me a bit like ordering stir-fry at a pizza place. It was fine, but the execution just didn’t feel right for the environment.
I have the public/private key pairs set up using ssh-keygen and ssh-copy-id from the WSL, so to ssh, I simply type:
[code]
$ ssh <username>@<server>
[/code]
I created an alias which makes that quicker. This is a standard Linux/Bash feature:
[code]
$ alias mc=’ssh <user>@<server>’
[/code]
Now, to get to the Minecraft server I simply type “mc” at the Bash prompt in Windows 10.

This same approach works, of course, with any Linux-based web or database servers or even Raspberry Pi and similar IoT devices you may be using as part of your solution.
Being able to cleanly secure shell from a console prompt is just a convenience and a preference. However, once you get used to working directly in the shell, in a full environment which includes staples like apt, node, Ruby, Python, and others, you open up all sorts of possibilities for automation.
Remote Scripting
Let’s say you have a whole bunch of Linux devices or servers, and you want to execute a remote command on them. Assuming you’ve already set up your public/private key pairs, you can simply execute remote ssh commands from Bash.
For example, to see when the last reboot time was on a remote server, you would type this:
[code]
$ ssh <user>@<server> ‘last -x|grep reboot’
[/code]
That secure shells to the server and executes the last -x command, and searches for the lines containing the word “reboot.” When I run it against my Ubuntu Minecraft server, I get this result:
[code]
reboot system boot 4.4.0-28-generic Thu Jul 7 08:14 still running
[/code]
That’s a single server. If you have a list of servers, you can automate that part as well. I’ve created a file named servers.txt in my home directory on WSL. It contains a bunch of Linux server/device names — one per line. I then read that file from a script I created in my home directory on WSL.
After years of working with devices like the Raspberry Pi, I’m a nano kind of guy (on VMS I was an LSEdit person), so this is what the script looks like in my favorite console editor:

You can, of course, use vim or emacs or any other editor that works in an Ubuntu console session.
The language used is Bash script (also called Bash shell script). To execute the script, I simply type:
[code]
$ ./foreachserver.sh ‘last -x|grep reboot’
[/code]
And it will iterate over each server/device in the file and execute that command remotely over ssh. This is a very simple example, of course, but you can extend to redirect in local scripts or other useful commands. The Bash scripting language is rich enough so that you can accomplish most remote administration tasks using it. You can also extend it with other applications you download to the WSL or the remote computers.
What if you want to use local Windows files and resources with your workflow with other Linux computers? Or, what if you do not use Linux at all? Is Bash capable of working with local Windows files and resources, or is it a completely isolated environment?
Working with Windows files
The WSL has access to your PC’s file system through /mnt/<drive letter>/ directories (or mount points). For example, your C: and D: root directories in Windows would be available through /mnt/c/ and /mnt/d/ respectively in the WSL. This can be useful when you want to incorporate your Windows project files, downloads or other files into a Linux/Bash-based workflow.
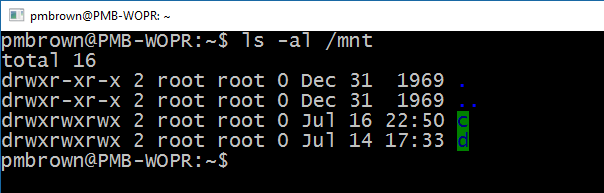
Those map to the SSD and mechanical drive I have on the PC:

These are logical mountings, so they don’t currently show up when you use commands like mount in the shell. But they work as you would expect them to. For example, from within Windows, I placed a text file named test.txt in the root of my C drive. I can access it from WSL like this:

During the Build Tour, we wanted to make sure the demos all worked without internet access (you never know what venue networking will be like). So to make sure the Bash / WSL demo would work for the Git portion, and to demonstrate accessing Windows files on the local PC, I set up a local repo at C:gitNetHack on the Windows PC. To clone that within WSL, I executed the following:
[code]
$ git –clone file:///mnt/c/git/NetHack
[/code]
That command line told git to use the file:// protocol and to clone the repo located in /mnt/c/git/NetHack. You can access all of your Windows files in a similar fashion.
Warning: As with any console, you can modify/delete files in your Windows file system from Bash if you’re not careful. For example, you can do something like the below and end up wiping out a good bit of your Windows installation, assuming the Windows account you’re running under has rights to do so:
[code]
$ rm -rf /mnt/c/ <strong>[DO NOT DO THIS]</strong>
[/code]
I bring this up because Linux commands are new to many of us, whereas Windows console commands are not.
The magic that makes this file system integration happen is called DrvFs. If you want to learn more about the file system and how it works in WSL, the WSL team put together a great blog post with all the details.
Of course, file system access is only part of the story. Many development tasks involve accessing remote resources over HTTP or other network protocols.
Making HTTP Requests
It’s often helpful to make a REST or other HTTP (or FTP) call from a script or command line rather than from a compiled program or web page. Just like most Linux distros, WSL includes standard utilities like curl and wget for making HTTP and other networking calls. For example, here’s the REST call to GitHub to get my profile information, using curl:
[code]
$ curl -i https://api.github.com/users/Psychlist1972
HTTP/1.1 200 OK
Server: GitHub.com
Date: Wed, 13 Jul 2016 02:38:08 GMT
Content-Type: application/json; charset=utf-8
Content-Length: 1319
Status: 200 OK
…
{
"login": "Psychlist1972",
"avatar_url": "https://avatars.githubusercontent.com/u/1421146?v=3",
"url": "https://api.github.com/users/Psychlist1972",
"name": "Pete Brown",
"company": "Microsoft",
…
}
$
[/code]
You can combine this with Bash scripting to create quick test clients for REST APIs, or utilities to ping web pages on servers and report back status. It’s also great just to download a file from the web; you could simply redirect the output to a file rather than view it on-screen:
[code]
$ curl -i https://api.github.com/users/Psychlist1972 > pete.json
[/code]
I’m also a PowerShell user, and have even created some interesting extensions to use Windows 10 MIDI in PowerShell and also to fix some file corruption that was happening to users of certain sound recording hardware. As a longtime .NET developer and fan, I will continue to use and extend PowerShell as it makes sense for my projects. But PowerShell isn’t the right environment to run all those Bash and Linux-focused open source utilities and examples out on the web today. I want to use the easiest and most friction-free way to accomplish any task, and sometimes, that means doing it in Bash.
I’ve barely scratched the surface here on Bash, Bash scripting, and the tasks you can accomplish from the shell. So far, I’ve been talking about utility work that is useful but ancillary to development. What about doing actual development and compilation from within WSL? I demonstrated that as part of the Build Tour.
Bash at the Build Tour – NetHack
Earlier this summer, speakers from Microsoft went around the world demonstrating some of the cool new developer features in Windows and the Microsoft Cloud. As part of that, we wanted to demonstrate the WSL in a fun way, but also in a way that developers would relate to.
I personally wanted to show using git and some traditional console development tools. When I wrote the Bash demo, I included the basics (“Hello World” in Python and Ruby), but wanted to show something a bit more off the beaten path.
I thought back to my time in college, when we bounced back and forth between Unix (DEC Ultrix and SunOS) and VAX/VMS. At the time, Unix was almost exclusively a command-line first environment. At my school, most X users at the handful of graphics workstations just opened multiple terminal sessions in different windows, but with super-cool moon phase wallpaper in the background. The majority of students used VT-220 terminals for their sessions (the school wasn’t far from Boston, so we had a lot of DEC equipment).
At the time, there were two big games that all of the computer science majors were playing: MUDs (lpMUD and the brand new at the time DikuMUD, primarily) and NetHack. NetHack and other Roguelikes have been considered to be some of the most influential games in history, being the precursors to the many dungeon crawl and role-playing games we enjoy today.
NetHack has a long history and today contains more than a hundred thousand lines of decades year old *nix code, as well as modern additions. The game itself uses curses (or its replacements) for terminal interaction, requires lex and yacc (or flex and bison) and cc (or gcc), and a slew of other developer tools to build.
It’s written in C and includes a number of heavily scripted configuration utilities written for the Bourne shell. I figured it would be a good and fun test to exercise the developer capabilities of WSL and Bash on Windows 10. Due to the use of curses (libncurses on Linux and WSL), it would also help to demonstrate the capabilities of the terminal emulation built into the Windows 10 console window.
Back in the day, building NetHack from source took forever on our time-sliced Ultrix server. Now it takes a minute on my PC and it’s all done. I love progress. There are easy ways and hard ways to configure and compile NetHack on Linux or WSL. To save you some time, I’ll walk you through the easy approach.
Prerequisites
First, update your WSL environment to make sure you are pointing to the latest catalog of software and also have the base install up to date. It’s generally a good idea to do this before installing new packages.
[code]
$ sudo apt update
$ sudo apt upgrade
[/code]
Then, install the essential developer tools. The easiest way to do this is to use the build-essential package. This includes almost every console program a Linux developer would need to build apps in C/C++.
[code]
$ sudo apt install build-essential
[/code]
This will take a few minutes. If you want to be more surgical, you can separately install gcc, gdb, make, flex, bison and the other tools called for in the NetHack docs. But if you’re a developer, you’ll probably want the other tools at some point. The build-essential package takes the guesswork out of the toolset installation.
Next, install git. As you can imagine, it’s as easy as:
[code]
$ sudo apt install git
[/code]
Just like with Linux, you can add a git PPA to get a more recent version, but this one will do for what we’re doing here.
And finally, we want to have curses (ncurses, actually) installed for the console screen interaction:
[code]
$ sudo apt install libncurses-dev
[/code]
Once you’ve completed those steps, you’re ready to get building NetHack.
Building NetHack
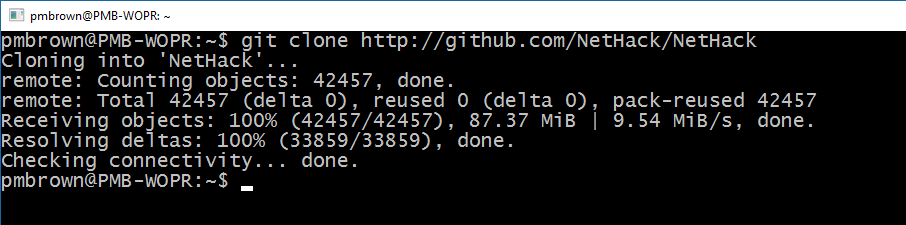
The official NetHack repo is on GitHub. First, we’ll grab that and put it in a subfolder off our home directory.
[code]
$ cd ~
$ git clone http://github.com/NetHack/NetHack
[/code]
Because NetHack supports so many different operating systems, you’ll need to do some basic configuration to tell it that we’re using Linux on the command line and substituting free and open source tools for Unix classics like gcc for cc.
As I had mentioned, there are a number of ways to do this. Someone was thoughtful enough to encapsulate much of the configuration in a hints file. Trust me here, using the hints file will save you hours of headache in configuration versus the steps described on the GitHub repo. It’s not immediately obvious how to use the hints if you look at the README files or other documentation, so here you go:
[code]
$ cd NetHack/sys/unix
$ ./setup.sh hints/linux
[/code]
That will set up the makefile to use the right tools, libraries and paths for Linux. The setup scripts are non-trivial shell scripts that do a lot of configuration; I’m happy to report they work perfectly in WSL. If you’re curious about shell scripting, be sure to crack them open in your favorite editor.
Then, the final build:
[code]
$ cd ~/NetHack
$ make all
[/code]
After the build, you’ll want to create the install. This is really just about copying the executable to a known location:
[code]
$ make install
[/code]
That will then leave you with a folder named ~/nh. Nethack is located in the ~/nh/install/games directory and is simply called nethack. To run it, navigate to that directory (or type the full path) and type:
[code]
$ cd ~/nh/install/games
$ nethack
[/code]
Once you do that, the screen will clear and you’ll get prompted to start playing NetHack. Note that everything done here is just as it would be done on a vanilla Ubuntu Linux installation; nothing Windows-specific was needed.
Playing NetHack
Given the limitations of a console game and the complexity of NetHack, it may take a bit to get into it. To say it is a little cryptic at first would be an understatement, but I’ve never met a developer who shied away from a good challenge.
The navigation keys are the same as those used in VI(M), so HJKL for Left, Down, Up and Right respectively. To exit, you can find the stairs up on the top level and use them, or hit Control-C to force quit the game.
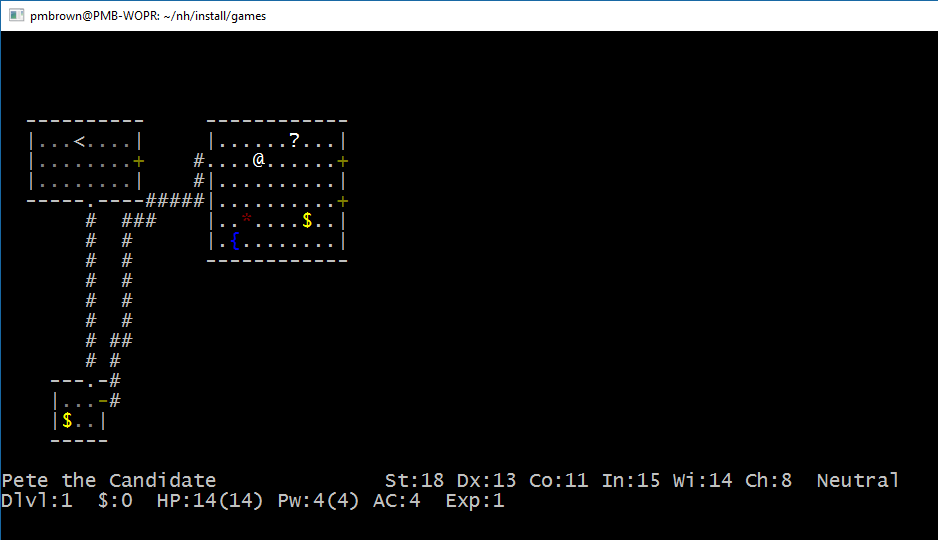
In NetHack, you are the @ symbol. Each level is made up of rooms, corridors, doors, and both stairs up and down. Monsters, treasure, and items are represented as various ASCII characters that you’ll become familiar with as you play. As is the norm with Roguelikes, there is no saving and you only get one life. If you die and play again, the dungeon is randomly re-generated and the items become scrambled.
The point of NetHack is to survive the dungeons, collect gold and items and kill as many monsters as you can. There are goals well beyond that, but you’ll need to play for a while (or read up) to discover them. Rules loosely follow Dungeons & Dragons rules for weapons, skills, etc.
Here’s a screen shot of NetHack with three rooms and two corridors visible. The stairs up are in the top-left room, and I’m currently in the top right room, along with some treasure and other items.
If you don’t have color in your version, create a file named ~/.nethackrc and put the following in it:
[code]
OPTIONS=color:true,dark_room:true,menucolors:true
[/code]
Aside: If ASCII character graphics aren’t your thing, but you like the concept, search for “roguelike” in the Microsoft Store and enjoy the more visual games in this popular genre.
Sure, NetHack is an ancient code base, most dear to those of us of a certain age. However, building it exercises a significant number of important developer tools and features of *nix operating systems, and also the terminal emulation. It’s great to see that all of it, from gcc, gdb, make, bison, and flex to more modern git, works on WSL today.
If you’d like to see the above demo as done at the Build Tour, watch this keynote from the Build Tour Canada. The WSL demo starts at around 6:20 in. (And yes, it’s Windows Subsystem for Linux, despite what I said in that video.)
https://channel9.msdn.com/Events/Build/Build-Tour-2016-Toronto/Keynote
I hope you enjoy your excursion into the dungeons of NetHack!
C and C++ are great, as are all these classic developer tools. You can even do a lot with plain Bash scripting. But many developer tasks involve scripting languages like Python.
Python
You can find example Python scripts all over the web, which implies that Python is both popular and useful to many developers. Most of those examples, of course, assume you are running Linux. In the past, this meant running them in a Linux installation either on another machine, a VM or boot option, or making any required changes necessary to run them using the Windows distributions of Python.
These aren’t insurmountable problems by any stretch, but in the day-to-day life of a developer, little bits of friction like this add up. With WSL, you always have a compatible Python-capable subsystem and shell available to you, without having to step out of your zone.
To install the latest development version of Python and the python package installer “pip,” execute the following at the Bash shell prompt:
[code]
$ sudo apt install python-pip python-dev
$ sudo pip install –upgrade pip
[/code]
Now that Python is installed, I wanted to show how you can grab a typical Linux Python example from a site and work with it directly. I went over to the Activestate Python recipe site and picked the top Python example. Ok, I lied. The top one is for printing names of integers, and that didn’t sound super exciting, so I picked the second one: Tetris. I figured you all see enough practical Python every day, so I’m going to go for another game.
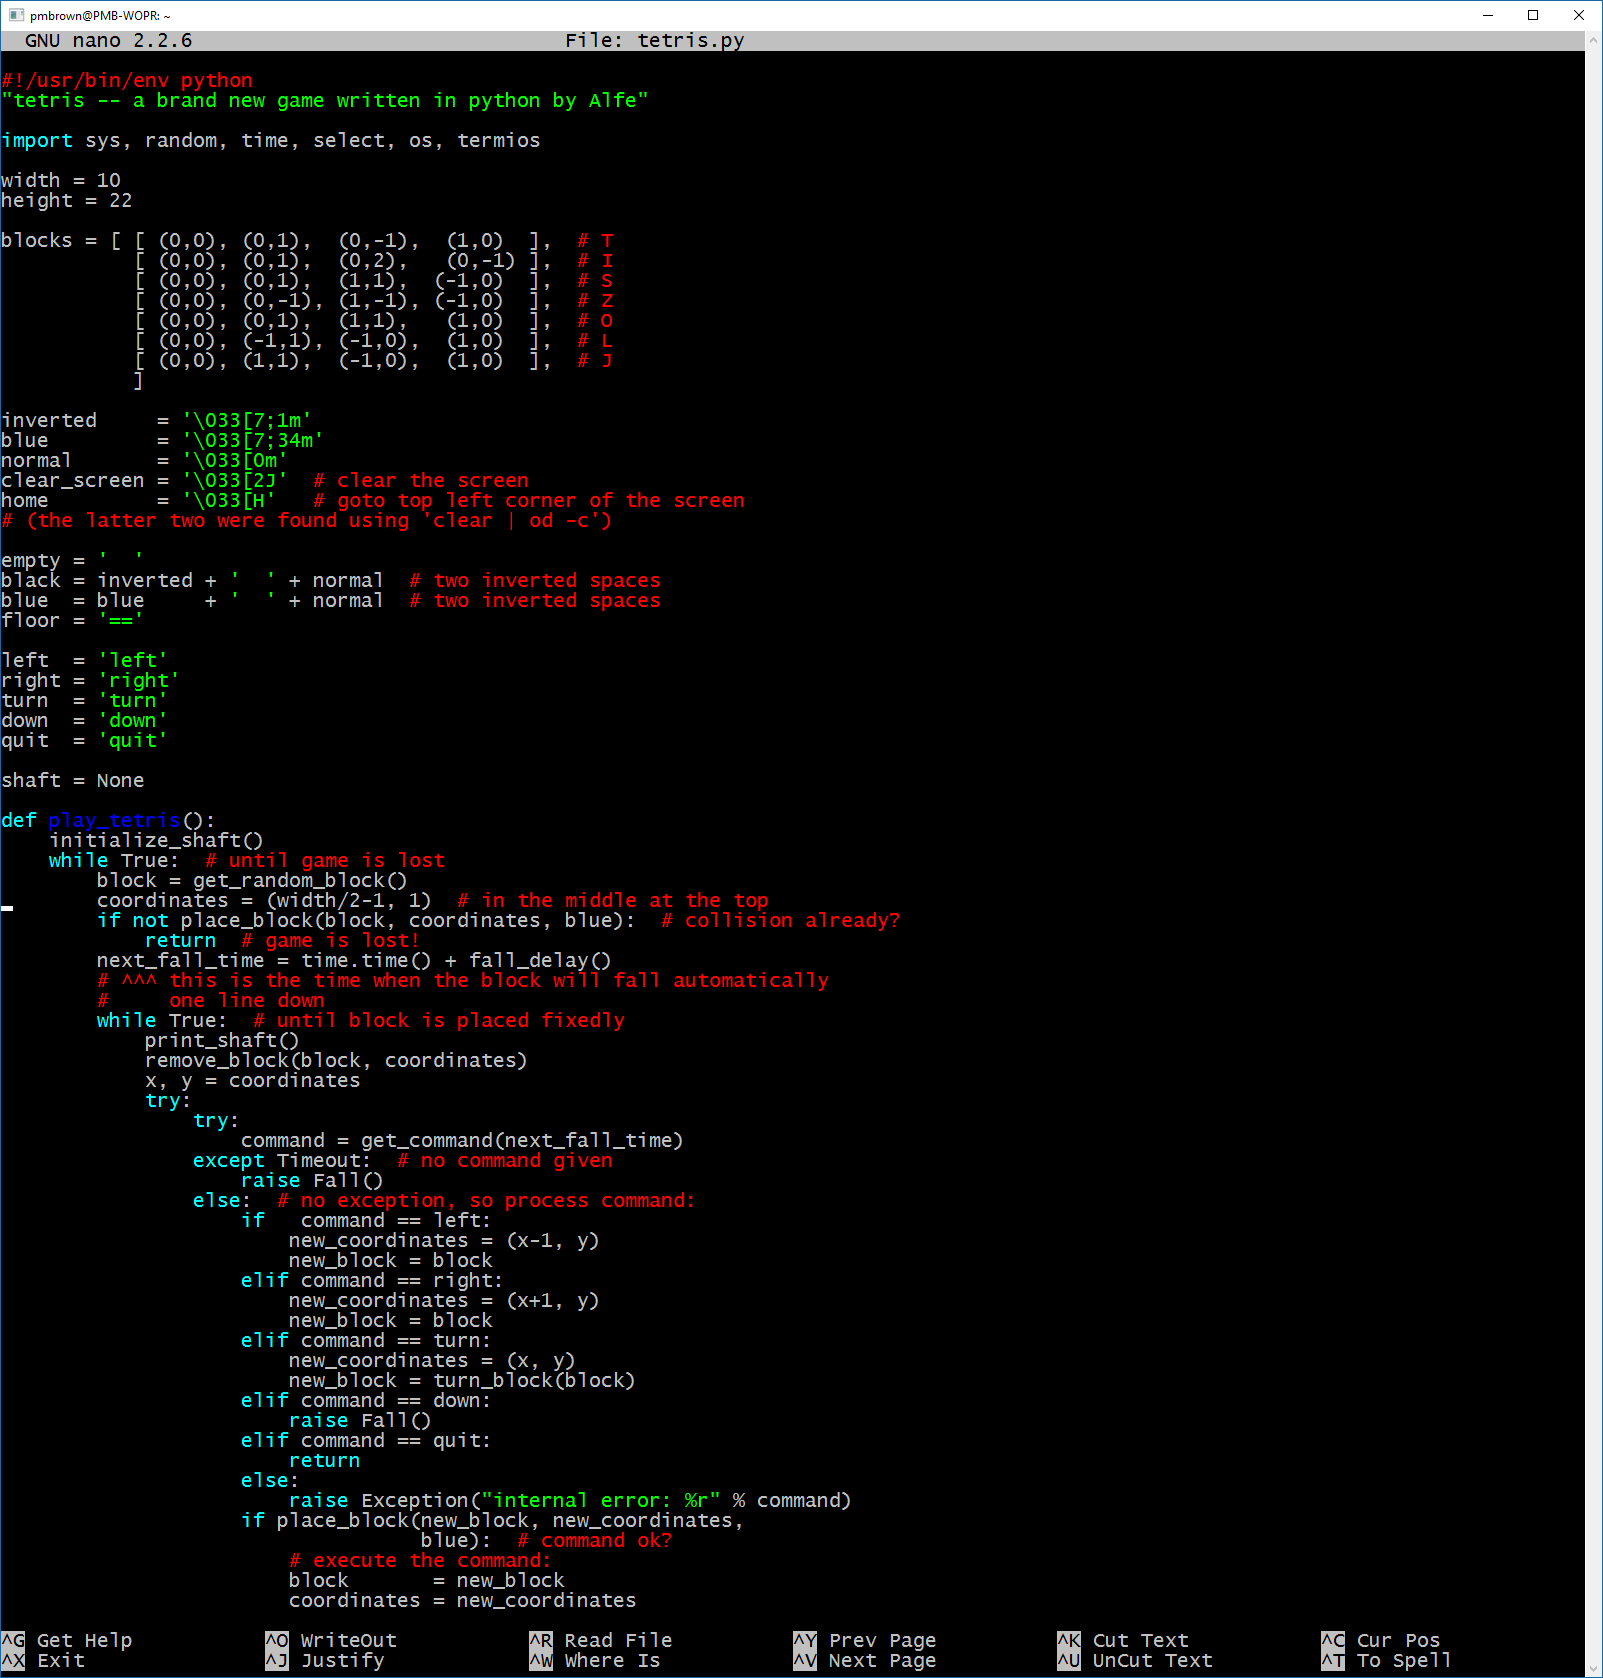
I opened nano, copied the 275 lines of Python code right from the page in my browser on Windows, pasted them into nano in my WSL console window, saved as tetris.py and then simply executed:
[code]
$ python tetris.py
[/code]
That immediately cleared the screen and brought up a basic Tetris application. As was the case with NetHack, you use the same VI-standard movement keys. (Back in the days before the mouse and WASD keys for movement, the right hand was on the keyboard HJKL keys.)

As I mentioned, you can of course run Python on Windows without WSL. However, for quick utilities and samples, being able to run a Linux Python example without changes simply by pasting in some code from a known source is a big productivity boost for developers.
That’s the point, really. It’s not about replacing other Windows-native tools such as Python, PowerShell, C# and more. It’s about removing friction when you just need to get stuff done quickly and efficiently in a modern development workflow.
Between Bash, Python and all the native command-line Linux development tools, WSL has my Linux workflow needs covered. It’s not a Linux server or even a full Linux client. Instead, it’s exactly what I need to reduce some day-to-day friction and make developing on Windows even more productive and enjoyable.
Resetting your WSL Environment
Feel free to experiment. If you damage your WSL installation, it’s easy enough to reinstall. Be sure to keep copies of anything important.
[code]
C:> lxrun.exe /uninstall /full
C:> lxrun.exe /install
[/code]
How are you using Bash and the WSL?
We hope having WSL, and Bash in-particular, on Windows 10 helps you be a little more efficient and removes a bit of friction from your day-to-day development tasks.
How are you using the WSL on Windows 10? How would you like to use it?
The team is doing a lot of work to ensure WSL is a great console tool for developers. If you have feedback or run into issues, we recommend checking the GitHub issues page as well as the UserVoice Feedback and voting site. We’d really like to hear from you.
Additional References and Further Reading
Linux shell scripting is a huge topic and there are lots of great tutorials on the web. If you’re not already familiar with it and want to learn more, most any Bash tutorial will work for you. Here’s one to start with.
Here are some additional references you may find helpful:
- Build Tour videos
- Bash Scripting 101
- WSL Home
- WSL Overview
- WSL FAQ
- WSL System Calls
- Scott Hanselman’s video on how to run WSL
Oh, and of course, to learn more about NetHack, visit the main NetHack site.