

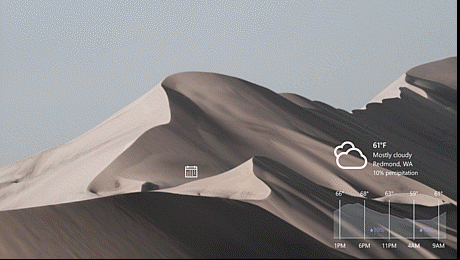
The Composition APIs also provide something you probably have never had access to before: the ability to create high-performing, low-level manipulation-driven custom animations like the one shown above. In the same way that we that want our visuals to be fast and smooth, we want our touch interactions to be sticky and responsive. Moving a visual with a finger or a digital pen should result in the visual element clinging to us no matter how fast we push and pull it across the display.
Even if a motion looks good, it also needs to feel good under the finger. It needs to maintain the illusion that we are interacting with a real object. It ought to possess the proper physics so that when we drag a visual across the screen and let go, it continues with the proper inertial movement. Similarly, user controls should provide the right amount of resistance when we pull and release them.
A fast and fluid animation system
The Visual Layer supports both keyframe animations as well as expression animations. If you have worked with XAML animations before, then you are probably already familiar with how keyframes work. In a keyframe animation, you set values for some property you want to change over time and also assign the duration for the change: in the example below, a start value, a middle value and then an ending value. The animation system will take care of tweening your animation – in other words, generating all the values between the ones you have explicitly specified based on the easing function you select. Whether Linear, or a Cubic Bezier, the animation system will use that to determine the values when interpolating.
[code lang=”js”]
CubicBezierEasingFunction cubicBezier = _compositor.CreateCubicBezierEasingFunction(new Vector2(.17f, .67f), new Vector2(1f, 1f));
ScalarKeyFrameAnimation blurAnimation = _compositor.CreateScalarKeyFrameAnimation();
blurAnimation.InsertKeyFrame(0.0f, 0.0f);
blurAnimation.InsertKeyFrame(0.5f, 100.0f);
blurAnimation.InsertKeyFrame(1.0f, 0.0f);
blurAnimation.Duration = TimeSpan.FromSeconds(4);
blurAnimation.IterationBehavior = AnimationIterationBehavior.Forever;
_brush.StartAnimation("Blur.BlurAmount", blurAnimation);
[/code]
A keyframe animation is a fire-and-forget mechanism that is time based. There are situations, however, when you need your animations to be coordinated and driving each other instead of simply moving in synchronized fashion.

In the animation above (source code), each gray gear is animated based on the animation of the gear preceding it. If the preceding gear suddenly goes faster or reverses direction, it forces the following gear to do the same. Keyframe animations can’t create motion effects that work in this way, but expression animations can. They are able to do so because, while keyframe animations are time based, expression animations are reference based.
The critical code that hooks up the gears for animation is found in the following code sample, which uses the new Expression Builder Library—an open source component released alongside of the Creators Update to construct expression animations. The expression below says that the animation should reference and be driven by the RotationAngleInDegrees property of the Visual that is indicated by the parameter “previousGear”. In the next line, the current Visual’s RotationAngleInDegrees property is finally animated based on the value referred to in an expression.
[code lang=”csharp”]
private void ConfigureGearAnimation(Visual currentGear, Visual previousGear)
{
// If rotation expression is null then create an expression of a gear rotating the opposite direction
var _rotateExpression = previousGear.GetReference().RotationAngleInDegrees;
// Start the animation based on the Rotation Angle in Degrees.
currentGear.StartAnimation("RotationAngleInDegrees", _rotateExpression);
}
[/code]
But if an animation can be driven by another animation, you may be wondering, couldn’t we also drive an animation with something more concrete like user input? Why, yes. Yes, we can.
The beauty of the ScrollViewer ManipulationPropertySet
Driving an animation from a ScrollViewer using XAML-Composition interop is fairly easy. With just a few lines of code, you can enhance the visuals of a pre-existing ScrollViewer control with a CompositionAnimation by taking advantage of the GetScrollViewerManipulationPropertySet method on the ElementCompositionPreview class. Using an animation expression, you can tie your animation to the Position of your ScrollViewer component.
You would use this technique if you wanted to add a parallax effect to your XAML or to create a sticky header that stays in place as content scrolls beneath it. In the demo illustrated below (source code), a ScrollViewer is even used to drive a parallax effect on a ListView.
Adding parallax behavior to a XAML page can be accomplished in just a few lines.
[code lang=”csharp”]
// Note: We’re not using the ScrollViewer’s offset values directly. Instead, we use this PropertySet which holds the position values of the ScrollViewer in real-time.
var scrollPropSet = _scrollProperties.GetSpecializedReference<ManipulationPropertySetReferenceNode>();
var startOffset = ExpressionValues.Constant.CreateConstantScalar("startOffset", 0.0f);
var parallaxValue = 0.5f;
var itemHeight = 0.0f;
var parallax = (scrollPropSet.Translation.Y + startOffset – (0.5f * itemHeight));
_parallaxExpression = parallax * parallaxValue – parallax;
_parallaxExpression.SetScalarParameter("StartOffset", (float)args.ItemIndex * visual.Size.Y / 4.0f);
visual.StartAnimation("Offset.Y", _parallaxExpression);
[/code]
The even more beautiful InteractionTracker
Driving expression animations with a ScrollViewer is extremely powerful, but what if you want to drive animations using touch gestures that aren’t limited to a pan/zoom gesture? Additionally, when using the ScrollViewer’s manipulations, your animations are linked to the UI thread responsiveness and can lose that buttery-smooth feel when the UI thread gets bogged down.
What if you want to pull items toward you with your finger, as in the demo below (source code), or animate multiple flying images across and into the screen as happens in the demo at the top of this post (source code)?
In order to achieve these effects, you would use the new InteractionTracker and VisualInteractionSource classes. InteractionTracker is a state machine that can be driven by active input. InteractionTracker also maintains a series of properties like Position and ScalePosition as part of maintaining the state. This is what you hook up to your animations. The VisualInteractionSource class, on the other hand, determines what kind of input you will use to drive your InteractionTracker and also when to start handling input (touch in particular).
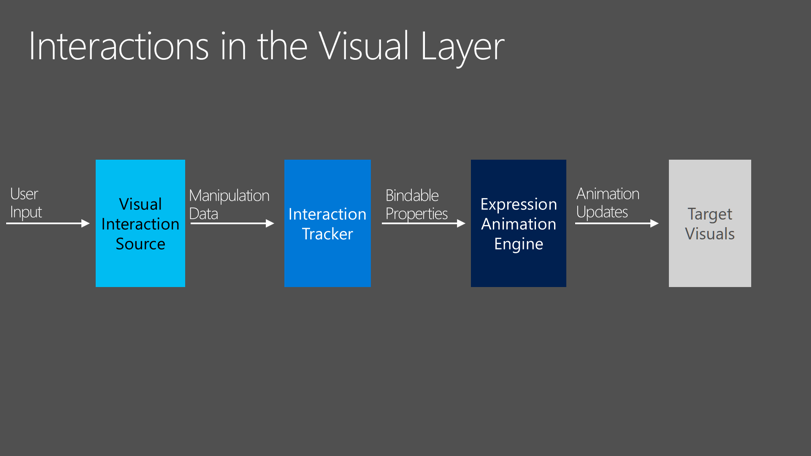
The following sample code demonstrates a basic implementation of an InteractionTracker. The viewportVisual is simply the backing Visual for the root element on the page. You use this as the VisualInteractionSource for the tracker. In doing so, you specify that you are tracking X and Y manipulations. You also indicate that you want to track inertial movement.
[code lang=”csharp”]
_tracker = InteractionTracker.Create(_compositor);
var interactionSource = VisualInteractionSource.Create(viewportVisual);
interactionSource.PositionXSourceMode = InteractionSourceMode.EnabledWithInertia;
interactionSource.PositionYSourceMode = InteractionSourceMode.EnabledWithInertia;
_tracker.InteractionSources.Add(interactionSource);
[/code]
Hooking the tracker up to an expression animation works basically the same way as hooking up a gear Visual to another gear Visual, as you did earlier. You call the CreateExpressionAnimation factory method on the current Compositor and reference the Position property of the tracker.
[code lang=”csharp”]
ar positionExpression = _compositor.CreateExpressionAnimation("-tracker.Position");
positionExpression.SetReferenceParameter("tracker", _tracker);
contentVisual.StartAnimation("Offset", positionExpression);
[/code]
This code uses the InteractionTracker’s position to produce a smooth animation for the Offset of the Visual. You can also power your Blur and Opacity animations for your other Visuals as well. This will have a result where all three animations work together, with values based on how far the user dragged their finger, to result in an amazingly fluid visual experience. Run the demo and try it for yourself (source code).
Those are the basics of driving any animation from any input. What you do with this amazing new power is entirely up to you.
Wrapping up
Expression animations and Visual Layer Interactions are both topics that can become very deep very fast. To help you through these deeper waters, we highly recommend the following videos and articles: