

Shoot like a pro: 7 tips from photographer Stephen Alvarez
National Geographic photographer Stephen Alvarez is on an assignment to capture the seven natural wonders of the world – using Lumia smartphones. Earlier this year he went to Rio de Janeiro to capture the picture-perfect city using our flagship smartphones – the Nokia Lumia 1020 and Lumia 1520.
Here are Stephen’s seven top tips and a video on how to make the most of the camera features on Lumia to produce sharp, correctly exposed and breathtaking pictures.
Keep it clean
Shooting in a hot, humid environment can make your smartphone pretty grimy. Sand, dust, sunscreen, and the heat can easily lead to a dirty lens and blurry photos. To keep your pictures looking fresh and sharp make certain that your lens is clean. I carry a pretreated lens cloth that I picked up at my optometrists office but any soft, clean cloth will do.
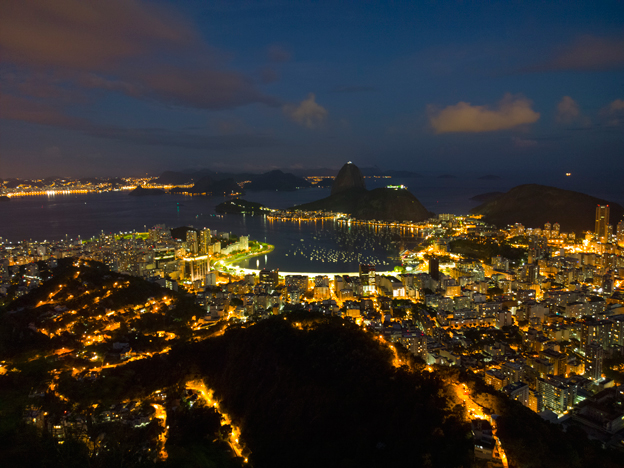
Capture the city glow
You might think that the perfect time to see a city like Rio is just as the sun goes down. That is a beautiful time to look at the city, but for me there are a few moments after the sun goes down but before it is completely dark when cities are at their most beautiful. You want to wait for the lights of the city to come on but still have enough light from the fading sunset to see. Generally it is about 30-45 minutes after sundown. But be careful hanging out at lonely overlooks after dark!
Low light
Both the Lumia 1020 and Lumia 1520 excel in low light. Not only do the sensors work well when it gets dark but they have stunning image stabilizers so even at slow shutter speeds your pictures can come out sharp. But if you want to shoot when it is really, really dark try a tripod. The Lumia 1020 has a camera adaptor with a standard tripod mount on the bottom. It makes shooting on 3 legs very easy. With the Lumia 1520 I use a universal smart phone bracket. You don’t need a great big professional tripod, try one of the light small models.
Share your photos
The smartphone’s ability to share images is a game changer. I share pictures that I make on the street all the time, with family, with friends but mostly with the people I am taking photos of. There is nothing better than making an interesting image of someone, and then sending to them immediately by text, email or social networks e.g. Instagram. It is a great way to make friends.
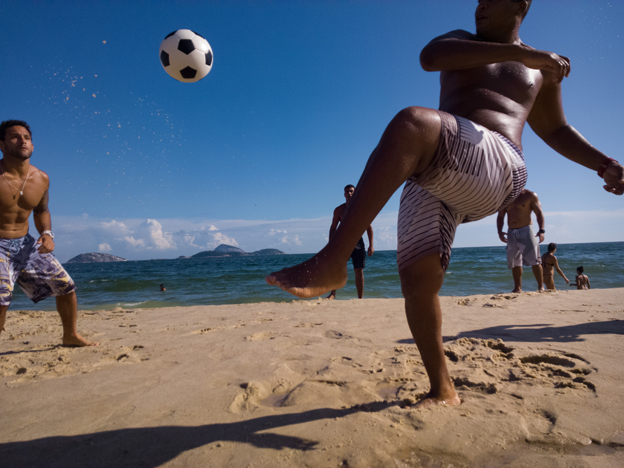
Speed things up
When shooting a fast moving sport like beach football I want the camera to fire as quickly as possible. So often I will use the manual controls to set the focus to where the action will be happening. This saves the camera from having to decide where to focus and the picture taking process happens that much faster.
This trick also works well when I’m shooting landscape. And I don’t have to worry when I’m done shooting as the camera will return to autofocus all by itself.
Bracket, bracket, bracket
Even for an experienced photographer like me, sometimes it is hard to tell what the correct exposure is. Balancing the light and dark areas to come up with the perfect exposure can be hard to do on the back of the phone screen. In those situations I bracket my exposures just like I do on a DSLR.
In fact the phone will do it for me. You can select “bracketing” from the menu within Nokia Camera. There I set the number of photos and how much I want the camera to under and over expose. Usually I will have the camera shoot three photos at -1EV to +1EV. That shoots one frame “properly” exposed, one frame under exposed and another frame over exposed. Later I can pick which one looks best. I can also set the bracketing up to shoot -2EV and -3EV. This saves a lot of fiddling with the camera controls.
Shoot it raw
I am still amazed that Nokia makes smartphones that will shoot a raw file. What is a raw? It is simply all the data that the sensor produced making the photograph. Why on earth would anyone want that? Well most of the data that any camera sensor collects gets discarded in between capturing the image and displaying it on the back of the screen. The reason is that the sensor can collect much more info than can be easily displayed. This is true of a high end DSLR and true of any smartphone.
What the Lumias do that no other smartphone does is let me keep all that extra info so I can make a high-resolution conversion from it later. Making that conversion I can decide to change white balance, exposure, contrast, sharpening or reach deeply into the shadow areas and have all that extra sensor data to work with. The camera still automatically produces a fantastic jpg file to view and share.

Raw is excellent for working with programs like Adobe Lightroom. If you are a journalist like me and ever have to prove that the image you are showing is exactly what the camera saw, raw is important. Of course it would also be useful if you were simply trying to prove that your Hogzilla trophy image was real.
If raw is more than you’d like to deal with, the standard jpg images that come out of the Lumias will blow you away just like the phone that produces them.
Did you find Stephen’s tips helpful? Let us know and share your own tips too in the comments below.