Overview
This article guides you through the process of creating a custom pinned Tile that links to your website. This helps you control your brand when users pin your site to their Windows Phone Start screen. This works on phones running Windows Phone 7 and Windows Phone 8.
Step 1: Create an image to use as the pinned Tile
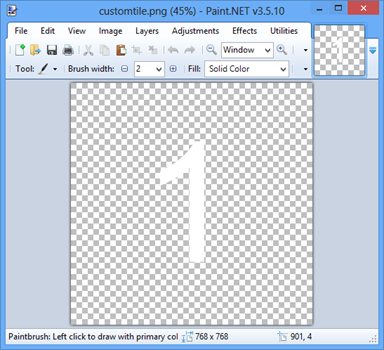
First, you’ll need a square image to represent your website and use as a pinned Tile on the phone. Windows Phone 8 devices support high-definition screens up to 768 pixels wide, so we recommend using an image that’s 768 x 768 pixels to get the highest quality on Windows Phone 8. But, you can use a lower resolution image if you choose to.
Tip: If you make your image background transparent, the theme color that the user has set for their phone shows through as the background for your image. This can provide a nice blend of the user’s theme preference with the Tile image you’ve chosen to use.
The following image shows a simple Tile image with the number “1” and a transparent background.
Step 2: Add a hidden overlay on your website to trigger the Tile
Next, you want to add a layer to any location where you want to prompt the user to pin the Tile to their Start screen. For example, you can set this on the home page of your website. To do this, you add a fixed-position <div> that is hidden initially, and which references the custom Tile you created in step 1. In the following code example, you can see that I’ve set the value for background-color to Highlight. This means that your Tile image will pick up the theme color from the phone if you made the background of your Tile image transparent in step 1. If you didn’t, then the background color value in <div> will show only in the area below the Tile itself.
You can add some text or a graphic beneath the overlay that indicates to the user that they need to use the menu in Internet Explorer for Windows Phone to select Pin to Start. You can change the color property to any color if you use text.
Here’s an example:
<div id=”TileOverlay” onclick=”ToggleTileOverlay()” style=’background-color: Highlight; height: 100%; width: 100%; top: 0px; left: 0px; position: fixed; color: black; visibility: hidden’>
<img src=”customtile.png” width=”320″ height=”320″ />
<div style=’margin-top: 40px’>
Add text/graphic asking user to pin to start using the menu…
</div>
</div>
Step 3: Add a link to display the overlay
Next, you want to add a link to display the overlay that you created in step 2, which initially is hidden. In the following code example, we use a simple text link, but you can use any clickable element.
<a href=”javascript:ToggleTileOverlay()”>Pin this site to your start screen</a>
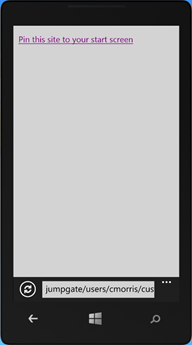
Here’s what the example looks like on the phone:
Tip: Because Pin to Start functionality is only available on Windows Phone, you should be sure to detect Windows Phone [see blog post on UA detection] so you display this link only to one of these devices and not to any other kind of smartphone. You might also want to provide a way for users to hide the link in case they have already pinned your site to their Start screen, or if they just don’t want to see it anymore.
Step 4: Add JavaScript to toggle the overlay
You can add some simple JavaScript to the <div> block you created in step 2 to toggle the overlay visibility. Note that the <div> we use here also has an onclick handler that calls the same function, so the user can dismiss the overlay with a single tap.
<script type=”text/javascript”>
function ToggleTileOverlay() {
var newVisibility = (document.getElementById(‘TileOverlay’).style.visibility == ‘visible’) ? ‘hidden’ : ‘visible’;
document.getElementById(‘TileOverlay’).style.visibility = newVisibility;
}
</script>
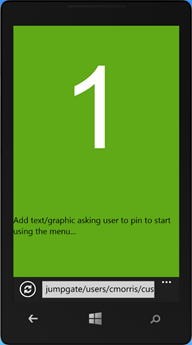
Now, if you tap the link you created in step 3 you see the overlay. For example:
Step 5: Try out your new custom Tile
That’s it! Once the overlay is shown, tap the menu bar (‘…’) and then Pin to Start to add your custom Tile to your own Start screen.
Et Voilà!


