In-app purchase is rapidly becoming the leading way to grow app revenue. Now, you can add it to apps and games that run on Windows Phone 8.
Today I want to share key ideas to consider when using in-app purchase in your app, and describe at a high level how to add in-app purchase to your code, based on my experience of adding in-app purchase to some of my apps.
What is in-app purchase?
In-app purchase gives your app the capability to sell digital content and digital services inside your Windows Phone app. Windows Phone 8 offers a consistent purchase experience on the phone and safe handling of personal information, both of which contribute to a confident purchase experience for the user. As an app developer, in-app purchase gives you a familiar API, reliable payout, in-app product management tools, and geo-distributed services. These all add up to providing you with meaningful commerce from within an app.
Not only does in-app purchase increase the possibility that your apps will make more money, in-app purchase also will save time: by using in-app purchase I can simply unlock some functionality in apps based on customer in-app purchase, and then no longer maintain two versions of every app—a free/lite version and a paid version.
Also, by moving to a pure free model, I expect more people to use my games. I still have the option to monetize enhanced or premium content and features within the app using in-app purchase.
You can use in-app purchase for digital content and digital services. The Windows Phone 8 in-app purchase API gives you access to two types of digital transactions:
|
|
Consumables: The app user can buy the item as many times as they want. This might be game currency, movie rental, access to digital magazines for six months, for example, or cloud storage for a month. |
|
|
Durables: Buy once and own forever. These might be new game levels, country maps, or game items. |
Key features of in-app purchase on the Windows Phone platform
Windows Phone in-app purchase delivers a comprehensive commerce platform that includes the following important benefits for developers and consumers:
- A familiar, easy-to-use purchase experience, available in 191 countries/regions
- Integration of purchases with the PIN-secured Windows Phone Wallet for a range of payment options including credit card, PayPal, Microsoft gift card, and Mobile Operator billing with select operators
- A hardened commerce platform: server-signed receipts provide the developer with high-confidence, portable proof of purchase
- Common namespace and Interface Definition Language (IDL) between the Windows Phone Store and the Windows Store, which simplifies porting apps between platforms
- Flexible keyword support to help categorize products for sale
How to integrate in-app purchase in your app
I’ve found that adding in-app purchase to an app is fairly straightforward, and can be done in less than an hour. What takes more time is defining what is offered through in-app purchase in your app, and then modifying the code to support those enhancements.
There are four steps I follow to add in-app purchase:
- Understand and define the features that I want to monetize. For example, I am adding hints to my Laser Link game so players who want a little help playing the game have the option to purchase hints about how to solve a puzzle. I added a button to ‘get more hints’, which launches the ‘purchase now’ API to purchase the in-app item.
- Add in-app purchase to my code to unlock content after a successful purchase. I added code to detect whether hints were available, and to show the purchased puzzle hints in the game. I also had to define whether I wanted to include all the hints inside the app and ‘unlock’ it upon purchase, or to have the content stored on a remote server.
- Resubmit the updated XAP in Dev Center.
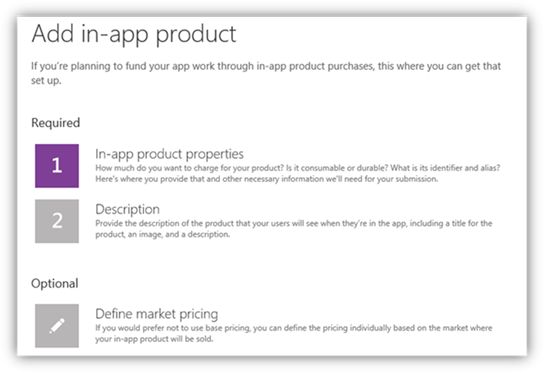
- Add the in-app products in Dev Center.
Screenshot of Dev Center – Adding an in-app product
When the app is in production, the Dev Center will show the purchase history data of in-app items that are being sold. It is very useful to see which in-app items are most popular!
As a developer, you can add in-app purchase to a Windows Phone 8 app, as well as to Windows Phone 7 code that runs on a Windows Phone 8 device. For Windows Phone 7 code, you must include error handling to detect when the app is running on a Windows Phone 7 device, and not show the in-app purchase experience (it will not be available in the phone).
In summary, I modify my app, and then I use the Microsoft in-app infrastructure to deliver the in-app purchase experience to my customers:
|
I provide |
Microsoft provides |
|
|
How do I add in-app purchase to my code?
Let’s say you will be adding only one in-app product in Dev Center, with the tag name ‘morehints’. You will need to do the following:
- During initialization, get the license information, and then enable or disable features if the user has already purchase them:
licenseInformation = CurrentApp.LicenseInformation;
if (licenseInformation.ProductLicenses[“featureName”].IsActive)
{
// The user can access this feature.
}
else
{
// The user can’t access this feature.
} - In the app UI, when the user chooses ‘purchase now’, try to execute the purchase:
function BuyFeature()
{
if (!licenseInformation.ProductLicenses[“morehints”].IsActive)
{
try
{
// The user doesn’t own this feature, so
// show the purchase dialog.
await CurrentProduct.RequestProductPurchaseAsync(“morehints”, false);
// the in-app purchase was successful
}
catch (Exception)
{
// The in-app purchase was not completed because
// an error occurred.
}
}
else
{
// The user already owns this feature.
}
}
You can do much more with in-app purchase, for example, you can get a listing of all the in-app products available, validate if an in-app product is durable or consumable, or validate authenticity of a purchase through the proof-of-purchase receipt.
What is the user experience for in-app purchase?
Developers need to present the list of items that are available for sale in their app.
|
|
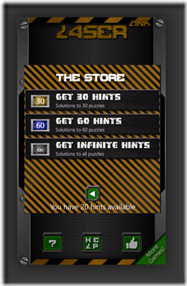
In my app, for example, after the player chooses to buy more hints, the phone shows the different options available to the user: from ‘packs’ of 10 hints, up to ‘unlimited hints’. If the player chooses to buy one of these ‘hint packs’, the phone shows a ‘buy screen’ similar to the one used to purchase apps, from which the player can choose the payment instrument to use or add a new one, and then either buy or cancel the purchase. The player can use any payment method available in their market, and they can protect the Wallet with a PIN. For example, my kids can play the game, but can’t purchase items through in-app purchase without my permission, because they don’t have access to the PIN. When this purchase process finishes, the game returns to the screen that has the ‘get more hints’ button, and adds hints to my ‘bag of hints available’ depending on the success of the purchase. |
Creative ways to add in-app purchase to your app
Are you are thinking of adding in-app purchase to your app and game? Here are some in-app purchase ideas:
- Optimize an existing Windows Phone 7 app: Identify the ‘premium’ value of the app and sell it as a ‘premium pack’, or add new ‘enhanced’ content that is suited for in-app purchase.
- Dynamically change the number of in-app items in your app without updating an app. Have your app query all items that match a predefined keyword and then display that list. This way, you can add or change in-app items after the app is published without resubmitting your app. For example, you might have a ‘small bag of gold’ and a ‘large bag of gold’, and in the future add a ‘medium bag of gold’, without making changes to the app.
- Use the in-app product 3000 character Tag for more flexibility. For example, you may use the Tag to provide a description of the product, or define characteristics like duration or items included.
- Simplify how you manage large quantities of similar in-app items. If you need to sell similar items at different prices, submit one in-app item for each price level. For example, if you have hundreds of eBooks for sale in your app, you could submit ‘pricebooktier1’ at $0.99, ‘pricebooktier2’ at $1.99, etc., and then inside the app set the price tier to offer for each eBook.
- Optimize price per market. In-app items can have different prices per market, and even be free. This way you can price each in-app product however is best for each country or region, using the techniques from my previous blog post. You can even have an in-app item that’s free in some countries/regions and paid for other countries/regions!
- Create promotions or discounts. Change the price of an in-app item for a holiday season, or lower the price when sales are slow.
- Share in-app items purchased between Windows Phone and other Microsoft platforms. Create your own system to uniquely identify your users, display privacy disclaimers, and possibly offer single in-app purchase across devices. You would have to manage this yourself, but it can be a powerful way to give users the incentive to purchase items in any of your apps—for example, in an eBook—and give players the ability to use the item in your Windows Phone 8 app and in your Windows Store apps, with a single purchase.
- Sell custom postcards. The in-app purchase policies allow selling a physical copy of content entirely in the phone. I’m thinking this could include, for example, postcards (take the picture in the phone, write the text in the phone, and then the app would sell ‘sending a postcard’ with this image and text).
Next steps
In-app purchase opens up additional monetization opportunities for both new and existing apps. Determine whether this is a useful capability for your app, and carefully balance the value that is included in the app, versus the value and price of each in-app purchase item. The opportunity is significant – some estimates point to over $1 billion dollars being transacted through in-app purchase in 2011.
To determine if this capability makes sense for your apps, you’ll want to check out these materials:
- The In-app purchase presentation that was shared at Build
- The Channel 9 talk on adding in-app purchase to an app
- The Windows Phone app policies 2.1 and 2.13 to see what you can do with in-app purchase in your app
- The detailed MSDN and Dev Center in-app purchase documentation to begin developing
- The Intro to In-app Purchase on WP8 webcast
I’d like to hear how you’ve added in-app purchase capabilities to your app.


