This blog post was authored by Andrew Byrne, a Senior Content Developer on the Windows Phone Developer Content team.
– Adam
Sometimes I need data to test my app in the emulator. The Windows Phone 8 emulator is a powerful tool, but it doesn’t have the kind of data I need—a temporary, test data set that I won’t actually ship with the app. Today’s post explores one way to do this.
Let’s start with a little background. I have an app that uses images from the user’s photo library, contacts, and music library to create lock screen background images. Testing on a real device is my preferred way to test, and it trumps most other options. But I make an exception when I need to move quickly through initial, iterative testing. However, I couldn’t get far on the emulator with this app because I didn’t have enough test data.
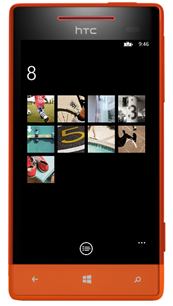
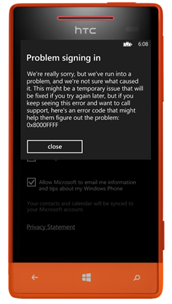
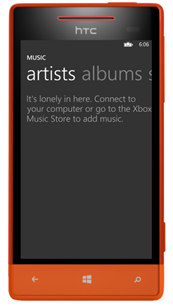
The following screenshots show the standard emulator state of the photo library, contacts, and music library.
|
|
|
|
|
Photos |
Contacts |
Music |
The emulator comes with eight standard images in the Sample Photo folder. While that’s a starting point, I really need to test with a larger number of images.
The Windows Phone 8 emulator has no contacts data and I can’t add my Microsoft account to load my contacts. The music library is just as empty.
For those of you familiar with Blend for Visual Studio, in Blend there’s a New Sample Data command that’s useful when you are prototyping, before you’ve written any code at all. Another Blend feature is Sample Data from Class, which is design-time only. Neither of these approaches suits my needs. In my case, I want to test with specific images at runtime. I am populating my data model with this data, not binding to it directly from the UI. So I am using a ‘sample data from developer’ approach which means I supply all test data, and I control when it is used.
Here’s the process I used to load temporary test data into the emulator:
1. Put the data you want to use for testing into a folder on your dev machine. For example, I created a folder called Test. As you can see in the following screenshot, I created a subfolder called albums to hold images of album covers, and a subfolder called faces for images of my contacts.
2. In Visual Studio, use File | Add Existing to add the Test folder and its contents to your solution, as illustrated in the following screenshot.
3. Select each file and make sure its Build Action is set to Content in the Properties pane. This means the file is included in the Content output group of your project, but won’t be compiled. It won’t be part of the binary you are building for your app, and it won’t affect your app size or its time to load and start on the emulator.
4. Set the property Copy to Output Directory to Copy always or Copy if newer. Using either setting ensures that the file is copied to the output and packaged with your app. Here’s an example:
At this point the test data will be copied into your app’s output directory when you build it. The data is part of the XAP package for the app. When you deploy the app to a phone or to the emulator, the installation directory of the app contains all of this test data, in the exact same folder hierarchy as you defined in Solution Explorer.
In my case, the project output folder contains the two folders in which I loaded my test data; the XAP file is 1.86 MB. I’m showing Debug mode output in the following screenshot, but at this point the same output would appear in Release mode.
I rename the XAP with the .zip extension so I can look inside. In the XAP (.zip) file I see the following:
My app package contains all my test data. In my case that translates to 160 images that make up 1.055 MB of the total compressed size of the app package. Nearly 57% of my XAP is taken up with test data that will never see the light of day in the published app! If the user is downloading my app on a slow network connection, this would be noticeable, and that’s not good.
Make sure your test data is deployed only in debug builds of your app
At this point, the test data is stored the app’s XAP file for both Debug and Release modes. To make sure it only exists when testing in Debug mode, do the following:
1. Open the project file for your project—the .csproj or .vbproj file in your solution
2. Locate your test data in that file. There will be one Content element for each file you added to the project.
3. Add a Condition attribute to each Content element. Here’s an example:
<Content Include="Testalbumsrawalbum103.jpg" Condition="'$(Configuration)' == 'Debug'">
        <CopyToOutputDirectory>Always</CopyToOutputDirectory>
</Content>
In this example, the compiler only includes album103.jpg as Content in my project if the Configuration it is building is Debug.
4. Add this attribute to all Content elements for each test file in your project file.
Now, when you build your app in Release mode, the test data won’t show up in the output and is not packaged in the XAP. In fact, in my case the XAP shrinks to roughly 717 KB. Not only will my customers be happier downloading my app at a reasonable size, but I also have a clean separation between my debug setup and my release setup. Test data I am interested in using as I debug my app isn’t part of the release build of my app.
Conditionally accessing test data
At this point, I have test data that shows up only when I build my app in Debug mode. What I want to do next is to make sure my app attempts to use this data only in Debug mode and, in my case, only on the emulator. Here are the important parts of my code that make this happen.
public async Task RefreshAsync(int maxCovers, bool random)
{
   bool usingTestData = false;
#if DEBUG if (Microsoft.Devices.Environment.DeviceType == DeviceType.Emulator) { LoadTestData(maxCovers, random); usingTestData = true; } #endif if (!usingTestData) { LoadRealData(maxCovers, random); }
The #if DEBUG … #endif conditional compilation statement wraps code that will run only when the project is built in Debug mode. The code inside that block then checks whether the app is running in the emulator. If it is, a call is made to LoadTestData, which uses the storage APIs to load the test images into my app. The usingTestData local variable is checked to see if test data is being used and, if not, then would proceed to load real data.
The following table summarizes all possible permutations of flow through the conditional code.
|
Debug |
Release |
|
|
Emulator |
Load test data |
Load real data* |
|
Phone |
Load real data |
Load real data |
I marked the Emulator/Release permutation with an asterisk because in that case I am back to square one – calling my real API to load real data, which is nonexistent on the phone. That’s okay because my core testing scenario is using test data on the emulator with a debug build of my app. You can change these conditions to suit your needs. For example, if you also want to load test data for your app in debug, when it runs on your phone, just remove the check for Emulator.
When the app is deployed, the test data will be found in the installation folder for the app. Luckily, I can access that folder in code, as illustrated in the following lines of code:
private async void LoadTestData(int maxCovers, bool random)
{
   _refreshing = true;
   var testImageFolder =
await StorageFolder.GetFolderFromPathAsync(Package.Current.InstalledLocation.Path + @"Testfaces");
   var images = await testImageFolder.GetFilesAsync();
I’m using the new Windows Runtime storage APIs in the proceeding code to access the installation folder, using the Package.Current.InstallationLocation.Path property.
So, that’s it. I now can use temporary test data during app development without shipping it with my app. This approach makes my early testing cycles using the emulator a lot more useful for my data-centric apps. I like it because I can define exactly what the expected test data will be and then step through my code in a very predictable manner.


![clip_image002[10] clip_image002[10]](http://blogs.windows.com/wp-content/uploads/sites/3/2013/07/clip_5F00_image00210_5F00_thumb_5F00_7191EE13.png)
![clip_image004[10] clip_image004[10]](http://blogs.windows.com/wp-content/uploads/sites/3/2013/07/clip_5F00_image00410_5F00_thumb_5F00_692E18BC.png)
![clip_image005[6] clip_image005[6]](http://blogs.windows.com/wp-content/uploads/sites/3/2013/07/clip_5F00_image0056_5F00_thumb_5F00_15D6D296.png)

