

These changes make Dev Center the single portal for all your advertising management as well as app management needs, so you now use Dev Center to:
- Promote your app using Microsoft Advertising
- Monetize your app using the Microsoft ad control and using ad mediation
- Update your app to use the latest version of the Microsoft Universal Ad Client SDK
- Create ad units
- Add video Interstitial ads
- Add ad mediation
- Make changes needed for existing apps
- Add Microsoft ads to apps using non-managed code (e.g. C++)
- Use ads in Windows 8.0 and Windows Phone 8.0 apps
- Selecting an ad size for your apps
- View ad impressions and ad revenue reporting
- Configure the ad targeting to support COPPA requirements
There are some differences to using Dev Center to manage ads vs pubCenter, so I’ll walk through how you now manage ads in Dev Center, and I will also describe three new features released this week:
- Enable auto-update of the Microsoft Ad SDK
- Updates to ad mediation: new ‘ranking’ ordering and new SDK timeout parameter
- Two new ad networks added to mediation: AdDuplex for UWP (Windows 10) packages, and adding Vserv for Windows Phone 8.1
1. Purchase ads to promote your app
Dev Center allows you to promote your app and drive installs using the “Promote your app” feature under the Monetization section of the app menu. To set up your ad(s), click “New campaign”, to design your ad, select your target audience, and set a monthly budget. Your campaign will then run at the set monthly budget until you pause or cancel it in Dev Center.
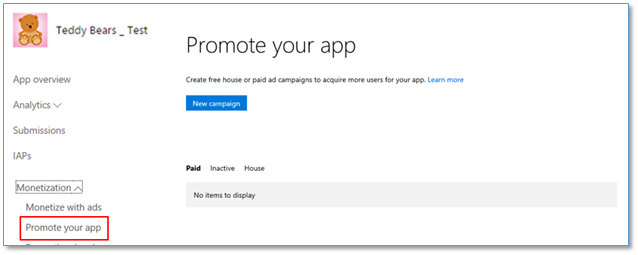
There are two types of ads you can create through ‘Promote your app’:
- Paid ads that show in Windows apps with the Microsoft Ad SDK
- Free house ads that show only in your own Windows apps
2. Configure ads and ad mediation, using the Microsoft Universal Ad Client SDK
The Microsoft Universal Ad Client SDK allows you to show ads in your app, and thus generate ad revenue. The Microsoft Advertising SDK and ad mediation SDK are both incorporated into one SDK.
The Microsoft Ad SDK works for all versions of Windows Store apps (8.0, 8.1 and UWP apps), and supports three capabilities:
- Show banner ads
- Show video interstitial ads (8.1 and 10 only)
- Manage mediation, i.e. show ads from third-party ad networks
This new all-in-one SDK is designed to be simpler to use, though it does work slightly differently from previous Microsoft Ad SDK versions.
Here are the core steps to adding banner ads to a managed app (e.g. C#/XAML):
- Download the Microsoft Universal Ad Client SDK.
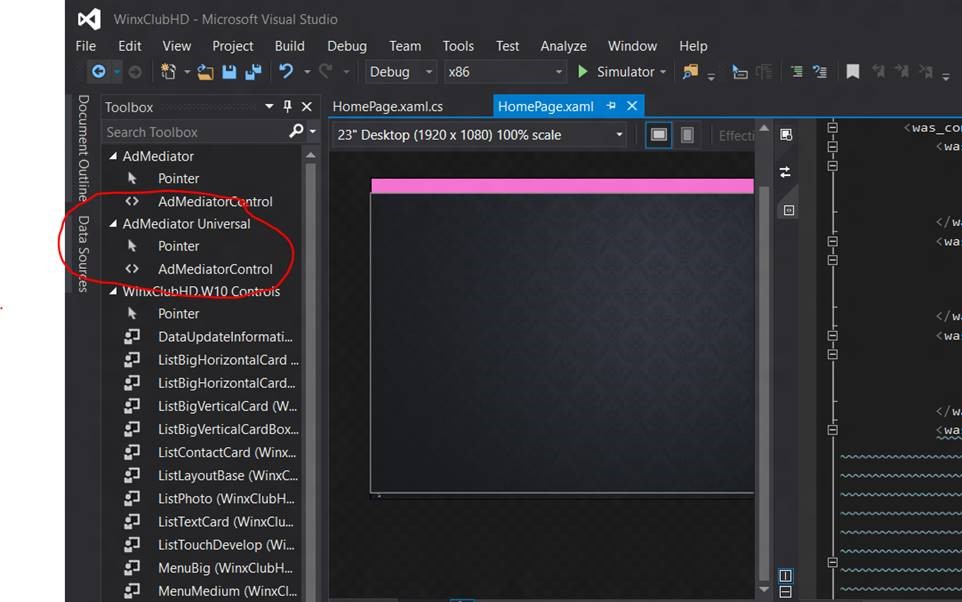
- In the XAML designer, drag the “Ad Mediation control” from the “Universal” section into your app. There’s no need to create an ad unit or create a pubCenter account.
- When creating UWP apps you might see 2 controls (the new Universal and the previous Windows 8.1 version). The control to use is the one in the “Ad Mediator Universal” section.
- Adjust the Width and Height of the Ad Control so it is one of the supported ad sizes.
That’s all. There’s no need to create a pubCenter account or manually track which ad unit is associated with which app, or create ad units for different ad sizes. Dev Center will automatically create the ad units and add them to your Dev Center account. As the ads show in your app, revenue will be accumulated and paid out to you at the end of each month. Dev Center will show the ad views and ad revenue in the “Advertising performance” report for each app.
If you only want to use ads from Microsoft Advertising, you don’t need to do anything else. If you choose to use ad mediation to manage multiple ad networks and increase fill rate and revenue, you will need to add the different ad networks and configure them. See section “Add ad mediation” below for more details.
Below I will walk through scenarios that require some different steps:
- Update your app to use the latest version of the Microsoft Universal Ad Client (NEW) Every few months there is an update to the ad SDK that provides new capabilities, fixes bugs and/or improves performance. To use the new capabilities, you had to download the SDK, install the code, and recompile and resubmit.
Starting today, this is no longer needed for UWP packages. With the release of the latest SDK update, the ad SDK is managed as an OS component, and gets updated automatically by the OS as long as there are no API or ad SDK behavior changes.This means that your apps will always utilize the most up-to-date, highest performance Microsoft Ad SDK. To take advantage of this capability:Download and install the Microsoft Universal Ad Client SDK.Rebuild and resubmit your UWP app.If you’re already using the Microsoft Universal Ad Client SDK, open your existing project and re-run the Connected Services to get the latest adapters (which are downloaded automatically from NuGet).For more information on the Microsoft Universal Ad Client SDK, view the MSDN documentation. - Create ad units
The new Microsoft Ad control does not require the manual creation of ad units, it is done automatically. However, there are still two scenarios where you will need to create a manual ad unit:- Using video interstitial ads
- Using older version of the ad SDK for previously created apps (and you don’t want to update the app to the latest version of the Ad SDK)
- Native and HTML/JavaScript apps
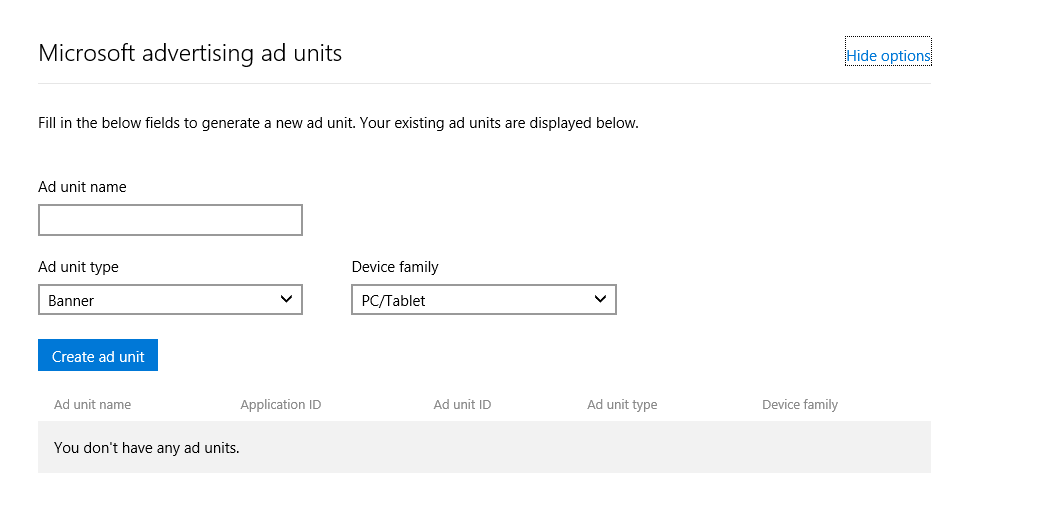
To manually create ad units in Dev Center, select the “Monetize à Monetize with ads”, menu and click the “Show options” link under “Microsoft advertising ad units”.
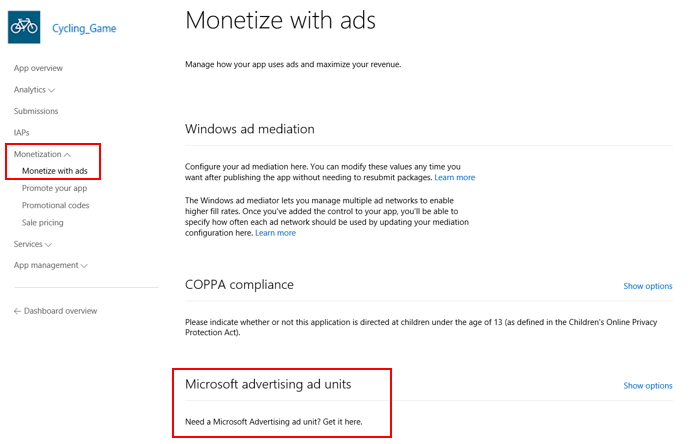
Then define a name for your ad unit, select your ad type, and specify the device family it will be used in. You’ll need to create a separate ad unit for each device family your app supports.
- Add video Interstitial ads
In addition to banner ads, video interstitial ads can be used to generate revenue through ads. Video interstitials are short video clips that take the full screen, and the app’s code determines when they are shown. This is a very useful solution for games that can show video between game levels. Video ads typically have much higher eCPM, at times generating as much as 10x the eCPM of a banner ad.Video ads require additional configuration and steps, as your code needs to detect the start and end of the video. To add video interstitials:- Download and install the Microsoft Universal Ad Client SDK.
- Create an ad unit in Dev Center, add the reference to your VS project, and call the appropriate APIs – you don’t need to use the XAML designer.
- This ad unit can ONLY be used for the video ad. For banner ads use the process described above.
- Add code to manage the instantiation, showing, and detection of success of video ads.
- Add ad mediation
Ad mediation allows you to maximize your banner ad revenue by showing ads from multiple ad networks and reach almost 100% fill rate. To do this, you have to configure ad mediation in your project, and then modify the ad network order and parameters in Dev Center.Once your app has multiple ad networks, you can optimize your which ads show in which markets. For example, you can define that in one market, only Microsoft shows up, and in another market other ad networks should be shown first.To add ad mediation to your app:- Download and install the Microsoft Universal Ad Client SDK.
- In the XAML designer, drag the “ad mediation control” into your app. There’s no need to create an ad unit or create a pubCenter account.
- Adjust the Width and Height of the Ad Control so it is one of the supported ad sizes.
- Set up accounts in each of the partner networks and create an ad unit.
- To configure ad mediation in your app, open Connected Services in Visual Studio, select the ad networks you want to use, and enter the required metadata.
- Test the app, and follow the ad mediation best practices.
- Submit the app.
- Modify the ad mediation configuration in Dev Center.
Ad mediation can be configured by percentage (e.g. each ad network is chosen first in the waterfall x% of time), or new configured by order (e.g. ad network A is #1 in the waterfall, if it fails, then ad network B is #2, then ad network C, etc.). This new waterfall feature allows you to set ad mediation to call better performing ad networks ahead of others.
Ad mediation is available for banner ads; it is not offered for video interstitial ads.
- Make changes needed for existing apps
You are not required to make any changes to existing apps using a previous version of the ad SDK, but you might want to consider doing so to take advantage of the simplified ads-in-app management. If you choose to do so, you’ll need to remove all references to the previous ad SDK from your app before installing the Microsoft Universal Ad Client SDK.- Uninstall all existing ad SDKs through the control panel.
- Download and install the Microsoft Universal Ad Client SDK.
- From your VS project(s), remove any existing ad reference(s).
- For 8.1 universal apps, you’ll need to remove from both Windows and Windows Phone projects.
- Re-add reference(s) to the latest SDK.
- For Silverlight only (Windows Phone 8/8.1):
- Reference the Ad Mediator, then visit Connected Services to NuGet install the latest bits.
- If you previously used AdControl without mediation and wish to continue that way, you can now safely remove the AdMediator reference and just include those from Microsoft.Advertising.
- For 8.1 universal solutions: Re-add the reference in both the Windows and Windows Phone projects.
- If you’re using other SDKs through ad mediation, re-add the metadata through Connected Services.
- For Silverlight only (Windows Phone 8/8.1):
- For Windows and Windows Phone 8.1 and UWP (except Silverlight), our code is now native so you must switch to use architecture-specific outputs.
- Code changes should not be required. The exception is for Windows Phone 8.1 XAML only, in which you’ll need to modify any existing namespace references in code:
- Old: Microsoft.Advertising.Mobile.UI
- New: Microsoft.Advertising.WinRT.UI
- Add Microsoft ads to apps using non-managed code
If your app is created using native code (e.g. C++), you will use the same Universal SDK, and access the same APIs. The only difference is that ad mediation is not available, only banner and video ads. - Use ads in Windows 8.0 and Windows Phone 8.0 apps
Windows 8.0 apps are not supported by the new SDK or any version of ad mediation. There is a previous Microsoft Advertising AdControl SDK that can be used, but the SDK is no longer updated. We recommend upgrading your app to Windows 8.1 or UWP to use the new ad SDK.For Windows Phone 8.0, follow the same instructions explained in this document for Windows Phone 8.1 and UWP apps, and make sure you run Connected Services to configure ad mediation before submitting the app. - Selecting an ad sizefor your apps
When adding the Ad control to your app, you have to select one of the supported sizes. The sizes for PC/tablet and phone are different, so be sure to select the size supported for the device where the app will run.Windows Desktop Windows Phone &
Windows Mobile250×250*
300×250
728×90
160×600
300×600300×50
320×50
480×80
640×100*The 250×250 size has limited demand, so we recommend selecting another size for maximum fill rate and eCPM.
If you create a UWP that will run across PC and Phone, your app will have to select the size of the ad SDK appropriate for the OS that is running the app. There are several options to do this, including validating the screen size, have a package for each OS, or check the OS at runtime by checking the Device Family.
3. View ad impressions and ad revenue reports
The integration of pubCenter into Dev Center brings some additional reporting capabilities, including reporting by app rather than ad unit. Analyzing your ad performance is simple in Dev Center, but it does work differently than in pubCenter. To view the new reports in Dev Center, follow these steps:
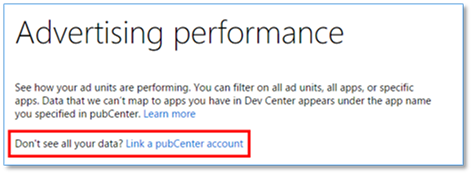
- Link your pubCenter account(s) to your Dev Center account
- If you have one pubCenter account and one Dev Center account with the same Microsoft account, your data will automatically populate in the “Advertising performance” section of Dev Center without any action from you. Move to Step 2
- If you have more than one pubCenter account, or use different Microsoft Accounts between the two, you need to link your accounts. See the Announcing the Microsoft Universal Ad Client SDK with support for video interstitial ads and ad mediation blog post from Microsoft Advertising for more details.
- Once your accounts are linked, all your previously created ad units will now will be linked to your account and will appear under the correct app unless you used the same ad unit in multiple apps (see step 3).
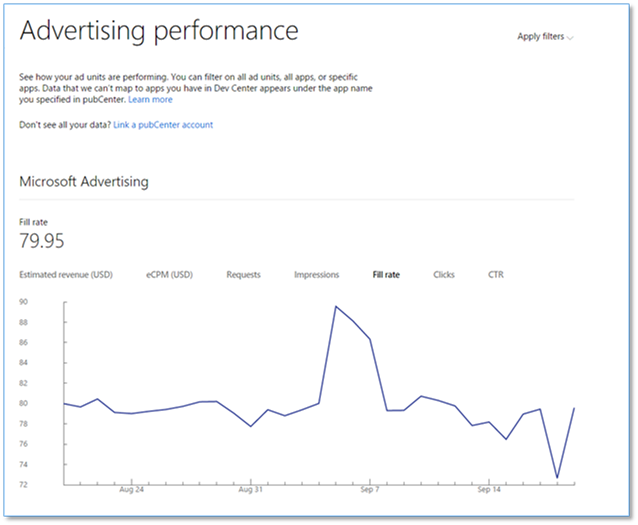
- View ad performance at the account level
- From the left hand navigation menu on your Dev Center dashboard, select “Advertising performance”. You’ll see same reports available in pubCenter, with some minor variations due to time differences.
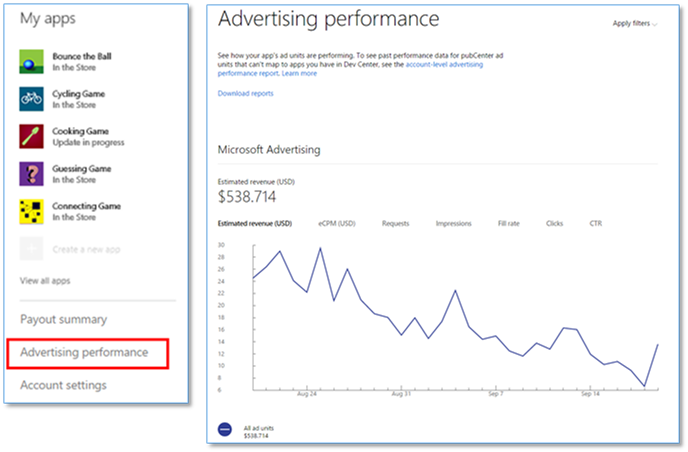
- From the left hand navigation menu on your Dev Center dashboard, select “Advertising performance”. You’ll see same reports available in pubCenter, with some minor variations due to time differences.
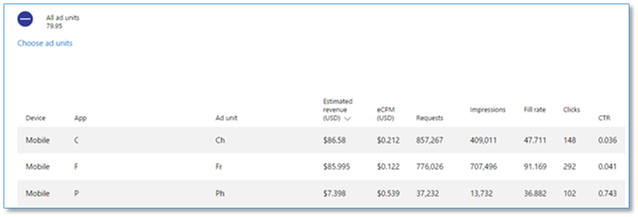
- View ad performance at the app level
- If you have been using one ad unit for each app or multiple ad units that only appear in one app, these ad units will automatically report under that app. You’ll see the total revenue for that app, or you can filter by ad unit.
- If you have ad unit(s) that are used in multiple apps, Dev Center will not report the revenue from the ad unit(s) under the apps. You will still be able to view the revenue for the ad unit(s) by selecting the ad unit name you specified in pubCenter. Simply select the ad unit name from the main ad performance report at the account level.
- View ad performance at the applevel
- Advertising revenue appears in the “Payout summary” menu in Dev Center.
- Payout will continue to be separate between apps and advertisement, though all payout reporting is shown in Dev Center
pubCenter will continue to be available for a few more months, to show the same reports and revenue information as you now can see in Dev Center. Once the Dev Center feature is fully functional, pubCenter will be closed down.
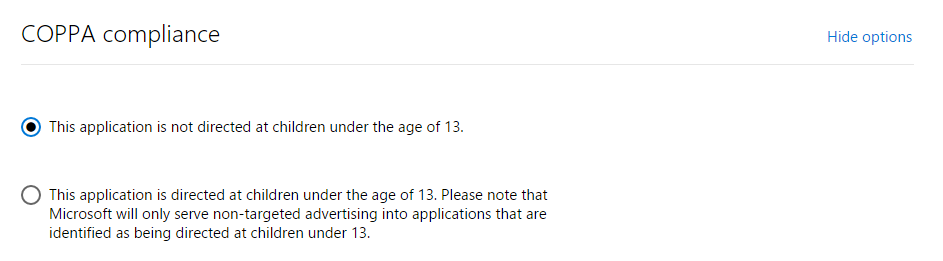
4. Configure the ad targeting to support COPPA requirements
The Children’s Online Privacy Protection Act (COPPA) compliance setting is now required for all apps using ads. COPPA requires developers using in-app advertising to indicate if their app targets children under 13, and advertising networks will then serve non-targeted ads in the app. If you have not manually selected a COPPA setting for your app, it is defaulted to the most appropriate value depending on the category of the app. You can view the default value or change this value under the “Monetization -> Monetize with ads” menu in Dev Center.
Developers may have other legal obligations under COPPA. You should review FTC’s guidance and consult with your legal counsel regarding COPPA obligations.
Integration of all the advertising capabilities into Dev Center is new, so please let us know if there are any issues (through support) or new features you’d like to see included in future releases (through user voice).