

If you’ve used an Arduino, you’re familiar with the concept of a shield. Each shield has a specialized purpose (e.g. a temperature shield, an accelerometer shield), and building a device with multiple shields can be complex, costly, and space-inefficient. Now imagine that you can use a low-cost Windows Phone as a compact set of shields. Your Arduino sketch would be able to access hundreds of dollars worth of sensors and capabilities in your Windows Phone through easy-to-use library calls.
This is exactly what the Windows Virtual Shields for Arduino library enables for developers. And that’s not the best part. This technology works for all Windows 10 devices, so you can use the sensors and capabilities on your PC and Surface as well. Also, the Arduino can offload computationally expensive tasks like speech recognition and web parsing to the Windows 10 companion device!
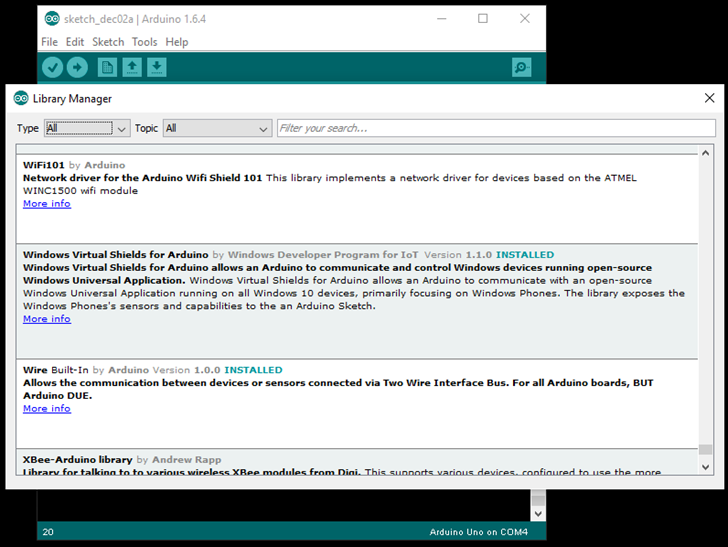
Now let’s take a closer look at the technology. You can find the Windows Virtual Shields for Arduino library on our GitHub page – this is the library that will be included on your Arduino sketch. You will also need to install a Universal Windows Application on your Windows 10 companion device to help surface the sensors and capabilities. This application can be downloaded from the Microsoft Store. Additionally, the open-source code for the Store application can be found here.
You can control the following sensors and capabilities from an Arduino using the Windows Virtual Shields for Arduino library:
Sensors:
- Accelerometer
- Compass
- GPS
- Gyrometer
- Light Sensor
- Orientation
Capabilities:
- Screen
- Touch
- Camera
- Microphone
- Notifications
- SMS
- Speech-to-Text
- Speech Recognition
- Vibration
- Web
Let’s take look at a simple sample
Now that you know what the Windows Virtual Shields for Arduino is, let’s talk about how to use the library.
Quick setup
The full setup instructions can be found here. Briefly, the software setup includes:
- Downloading the Windows Virtual Shields for Arduino library from the Arduino Library Manager in the Arduino IDE.
- Downloading the Windows Virtual Shields for Arduino Store application on your Windows 10 companion device from here.
- Connecting your Arduino to your Windows 10 companion device with a USB, Bluetooth, or network connection.
- Writing and deploying your sketch on the Arduino IDE.
Hello Virtual Shields
A skeleton “Hello World” application using Windows Virtual Shields for Arduino looks like this:
[code lang=”csharp”]
#include <ArduinoJson.h>
#include <VirtualShield.h>
#include <Text.h>
VirtualShield shield; // identify the shield
Text screen = Text(shield); // connect the screen
void setup()
{
shield.begin(); // begin communication
screen.clear(); // clear the screen
screen.print("Hello Virtual Shields");
}
void loop()
{
}
[/code]
As you can see, using a Virtual Shield is simple. In the sketch above, we include all necessary libraries and declare a VirtualShield object. We then declare a specific shield (Screen) object to represent the screen of the Windows 10 companion device in use. The program starts a serial communication, clears the screen of the Windows 10 companion device, and prints the line “Hello Virtual Shields” on the freshly cleared screen.

A glimpse at the architecture
Now that we’ve seen a simple sample, we can take a deeper dive into the architecture at play.
The communication between the Arduino library and the Microsoft Store app is done over a USB, Bluetooth, or network connection. The protocol uses JSON by making use of the efficient open-source library ArduinoJson. This is what a simple transaction looks like across the wire (Arduino on left, Windows 10 companion device on right):
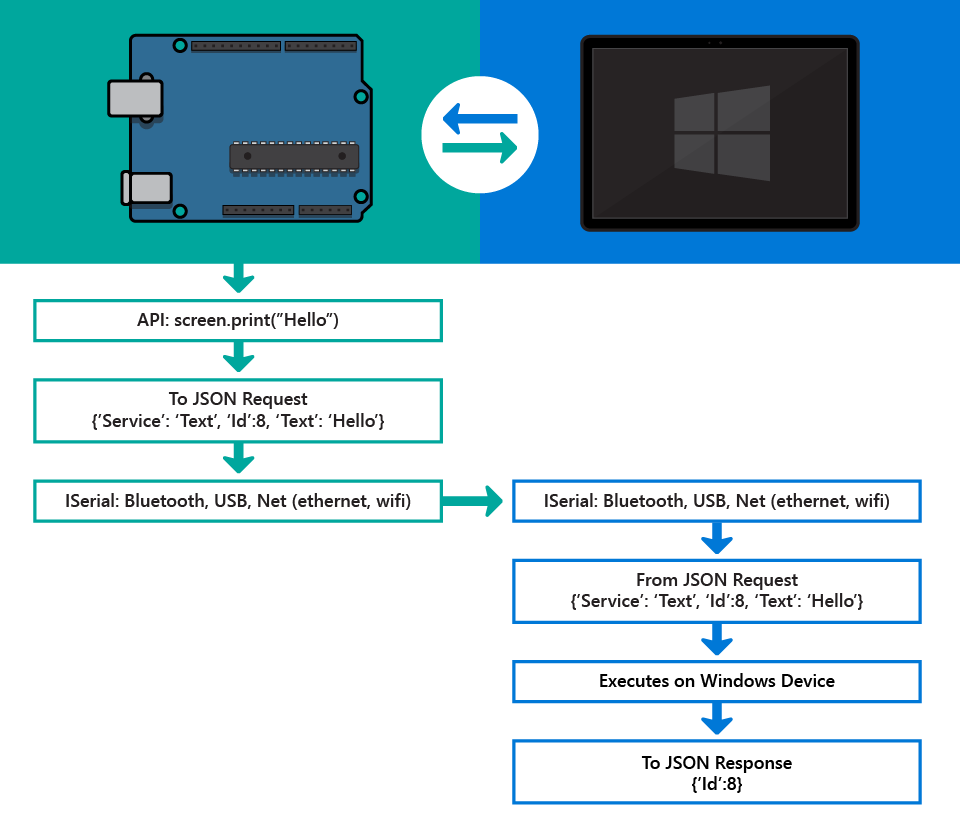
This is a simplified illustration of the basic communication enabled by Windows Virtual Shields for Arduino.
A more complex sample with sensors
Let’s take a look at a more realistic example that includes sensors. All sensors in the Windows Virtual Shields for Arduino library have the four functions listed below:
- get – This function is a one-time data request to a sensor. An example would be reading acceleration values off of an accelerometer.
- start – The start function begins a series of get calls, performed at a specified interval. The interval could be determined by time (read accelerometer data every second) or value change (report if the acceleration changes by 1 unit).
- onChange – This function is exactly like start, except it does not report a data reading the first time it is called. It will begin reporting based on a chosen time interval or change in sensor reading.
- stop – This function ends a running start or onChange
Working with GPS
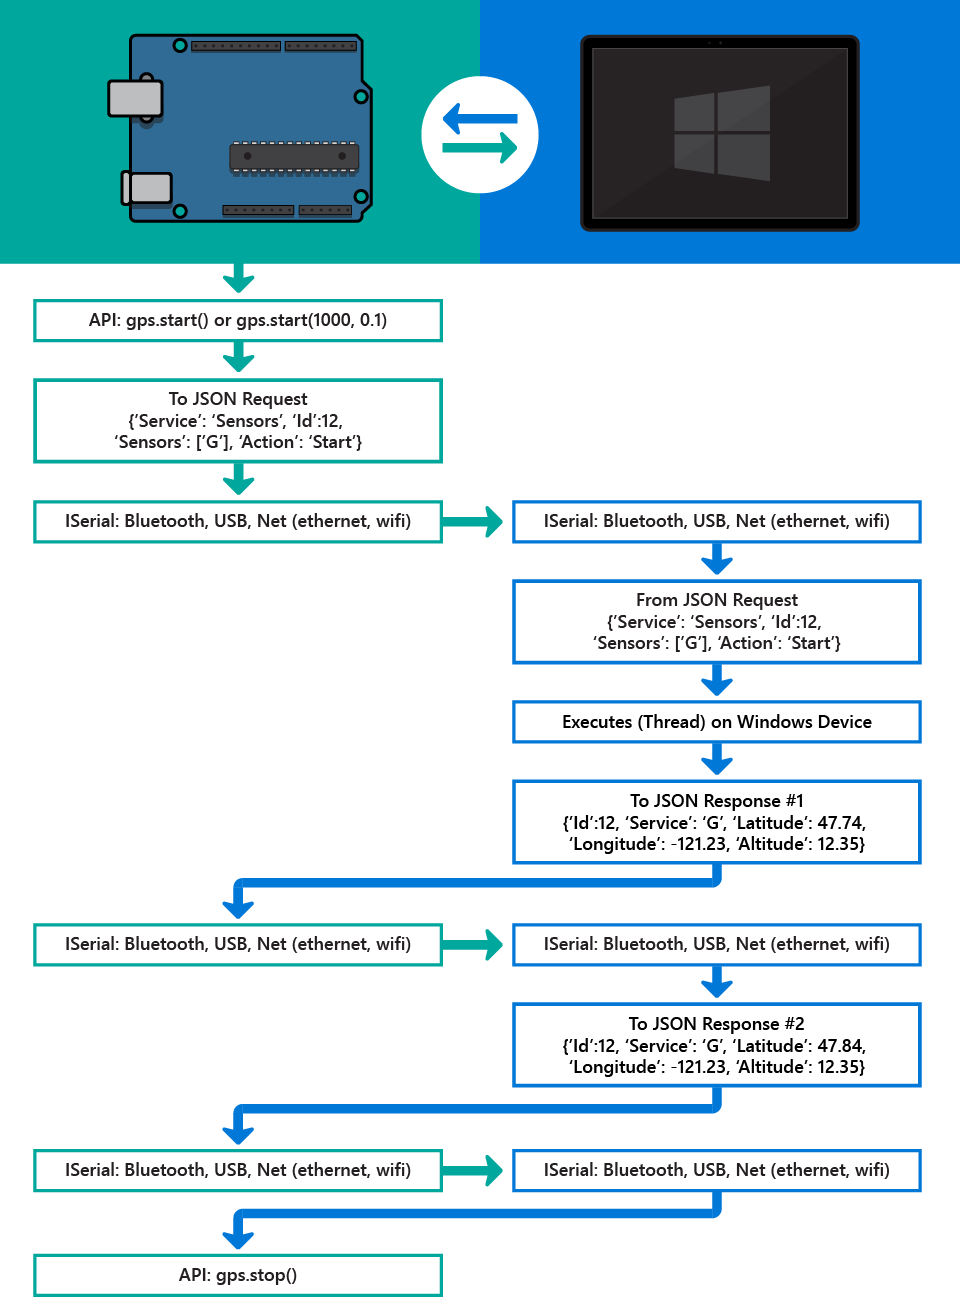
With a base knowledge of how sensors work in Windows Virtual Shields for Arduino, we can take a look at something more specific. The following sample will explore how to pull GPS readings from a Windows 10 device onto an Arduino.
The code for this example is seen below:
[code lang=”csharp”]
#include <ArduinoJson.h>
#include <VirtualShield.h>
#include <Text.h>
#include <Geolocator.h>
VirtualShield shield;
Text screen = Text(shield);
Geolocator gps = Geolocator(shield);
void gpsEvent(ShieldEvent* shieldEvent)
{
// If there is a sensor error (errors are negative)… display message
if (shieldEvent->resultId < 0) {
screen.printAt(3, "Sensor doesn’t exist");
screen.printAt(4, "or isn’t turned on.");
screen.printAt(6, "error: " + String(shieldEvent->resultId));
return;
}
String lat = String("Lat: ") + String(gps.Latitude);
String lon = String("Lon: ") + String(gps.Longitude);
screen.printAt(3, lat);
screen.printAt(4, lon);
}
void setup()
{
shield.begin();
screen.clear();
screen.printAt(1, "Basic GPS Lookup");
gps.setOnEvent(gpsEvent);
// Check GPS if reading changes by ~1/6 of a mile
gps.start(0, 0.01);
}
void loop()
{
shield.checkSensors();
}
[/code]
In setup, we initialize the gps.setOnEvent handler to call gpsEvent whenever a response is received. Then in loop, we start the GPS and call the function checkSensors. The call to checkSensors is required to start receiving responses and processing callbacks for any sensor or capability. Finally, the gpsEvent function prints latitude and longitude readings every time the GPS senses a shift greater than our specified delta (0.01 longitudinal/latitudinal degrees).
Here you can really start to see the power of Windows Virtual Shields for Arduino – it’s simple and easy to pull data from the Windows 10 companion device, and the device unifies a large collection of sensors and actuators that would otherwise be complex and costly.
A glimpse at the architecture
In the graphic below, we explore the underlying architecture of the GPS communication sample:
An end-to-end project
Now that we’ve seen how sensors and simple screen capabilities work with Windows Virtual Shields for Arduino, we can take a look at a more complete project.
Check out this simple Hackster.io project to see the library working in action.

A quick look at more complex capabilities
So we’ve sent text to a companion screen, and we know how to get sensor readings. That’s a good start! But we’ve just scratched the surface of what Windows Virtual Shields for Arduino is capable. In this section, we’ll take a brief glimpse at some of the more advanced capabilities that your Arduino can control on your Windows 10 companion device.
Graphics
Basic graphics instructions and events are handled the same as sensors. A rectangle instruction
(id = screen.fillRectangle(80,120,70,70, YELLOW)) would produce the following communication:
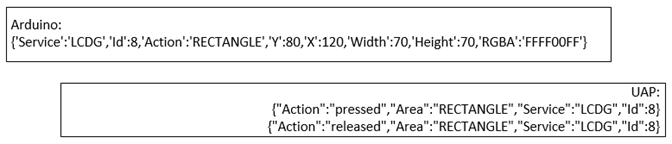
And pressing and releasing the rectangle on the Windows 10 companion device would send back events tied to id.
Speech
The speech functionality of Windows Virtual Shields for Arduino includes Text-to-Speech and Speech Recognition. Here we see another huge advantage of Windows Virtual Shields for Arduino – we can leverage the computational power and APIs of the Windows 10 companion device to enable speech scenarios.
Text-to-Speech is simple and can be initiated by a command such as speech.speak(“Hello World”). This particular command will make the Windows 10 companion device speak the words “Hello World”.
The Speech Recognition functionality returns an indexed list of choices. Issuing the request recognition.listenFor(“yes,no”) would return an event with where 1=”yes”, 2=”no”, or 0=unrecognized (negative values are error indicators). The event can also account for groupings, such as recognizing a variety of words (“yes”, “yeah”, “ok”) as the single option “yes”. Recognition can also handle open-text, but is limited to 100 characters due to the memory and buffer size of an Arduino.
Web
You can also use the web capability to retrieve a web page and parse it before returning a web event to Arduino. This is really useful, as most web pages are larger than the entire Arduino onboard memory. The parsing engine uses an abbreviated instruction set to fully parse a web page.
The following code retrieves a weather dump from NOAA as a JSON blob, then parses the JSON to retrieve the current weather.
[code lang=”csharp”]
String url = "http://forecast.weather.gov/MapClick.php?lat=47.6694&lon=-122.1239&FcstType=json";
String parsingInstructions = "J:location.areaDescription|&^J:time.startPeriodName[0]|&^J:data.weather[0]";
web.get(url, parsingInstructions);
[/code]
The event returns “Redmond WA|This Afternoon|Chance Rain”. As with speech, Windows Virtual Shields for Arduino moves expensive tasks to the companion device, allowing for more free memory on the Arduino.
Where we want to expand Windows Virtual Shields for Arduino
Windows Virtual Shields for Arduino has already come so far, but there are many ways in which we could improve the technology further. The great part is, the library is open-source – any developer interested in expanding this technology is more than welcome. All of the code is available from our GitHub page.
Let’s take a look at three areas we would want to expand upon, if time were no obstacle!
- First, we would add even more sensors and capabilities. NFC would make an excellent addition – this would enable scenarios like unlocking a door with your phone or transferring NFC payments. Others desired sensors and capabilities include: an Iris scanner (e.g. on a Lumia 950 XL); FM radio control; and device geofencing (rather than using the GPS and coding it yourself on Arduino). Also, Cortana would make an excellent addition.
- Next, we could improve existing sensors and capabilities. For example, GPS returns a latitude, longitude, and altitude, and the sensor can be triggered on a settable delta. However, that delta is singular and applies to all properties equally. If you wanted to monitor a small change altitude, but not latitude or longitude – or ignore a large change in altitude (e.g. a tall building), then the sensor system would need more than one delta to monitor.
- A third option would be to expand the scope. The Universal Windows Application currently connects to only one device at a time. We can imagine scenarios where multiple Arduinos can connect to a single app, such as in a home control systems (e.g. self-registering heating ducts opening/closing depending upon where you are).
And of course, there are countless other ways in which this technology can evolve. Explore it yourself, and see what you can build!
The World’s Largest Arduino Maker Challenge
Now that you’ve learned the ins and outs of Windows Virtual Shields for Arduino, it’s time to put your newly-learned skills to the test. The World’s Largest Arduino Maker Challenge would be a great opportunity to make use of the library.
The competition’s title is no overstatement – with more than 3,000 participants and 1,000 submitted project ideas in just the preliminary phase, this is truly the World’s Largest Arduino Maker Challenge. The contest is brought to you by Microsoft, Hackster.io, Arduino, Adafruit, and Atmel.
The parameters of the contest are simple – participants must develop a Universal Windows Application (UWA) that interfaces with an Arduino using a connection. Windows Virtual Shields for Arduino and Windows Remote Arduino are two recommended ways of establishing this connection. Check out the contest site for more details.
We hope you take this opportunity to learn more about the library and submit something great for the World’s Largest Arduino Maker Challenge! We can’t wait to see what you make!
Written by Devin Valenciano (Program Manager) and Jim Gale (Principal Software Engineering Lead) from Windows and Devices Connected Everyday Things team