

Windows Remote Arduino is an open-source Windows library that allows any Windows 10 device – be it a Windows Phone, Surface, PC, or even Raspberry Pi 2 – to remotely control an Arduino. The library enables developers to integrate their Arduino sensors into their Windows projects, as well as offload tasks too heavy or complicated for the Arduino to Windows.
You can find the Windows Remote Arduino library on our GitHub page in a repository titled “remote-wiring,” and you can learn more about Arduino here.
Windows Remote Arduino is capable of controlling the following Arduino functions:
- GPIO – Analog and Digital I/O
- Digital write
- Digital read
- Analog write (PWM)
- Analog read
- Setting pin mode
- Receiving events when pin values are reported or changed
- Send and receive data between devices over I2C
For advanced users, Windows Remote Arduino also enables custom commands via Firmata SysEx – more information can be found here.
A closer look at the technology
Now that we’ve seen a bit of what Windows Remote Arduino can do, let’s explore how the technology works. In this section we explain the thought process behind the design of the library, take a close look at the library’s structure, and review a simple code sample. Full hardware and software setup instructions can be found here.
Design Decisions
Let’s discuss the design of the Windows Remote Arduino API. Commands like pinMode and digitalWrite are so familiar to Arduino developers that rather than reinvent them, we chose to adhere to what is already familiar.
Our API was crafted to mirror the familiar Arduino Wiring API as much as possible. There are changes, of course, as the WinRT framework is fundamentally very different from the basic Wiring language used in Arduino sketches. However, with a bit of reorganization, it is possible to use the logic and commands of an Arduino sketch in a Windows 10 UWP app using Windows Remote Arduino.
After designing the API, a protocol was needed that would facilitate communication between Windows 10 and an Arduino – Firmata was the obvious choice. Firmata is a widely accepted open-source protocol that has been implemented in many languages, including Arduino Wiring. The Firmata library for Arduino is even included in the Arduino IDE by default.
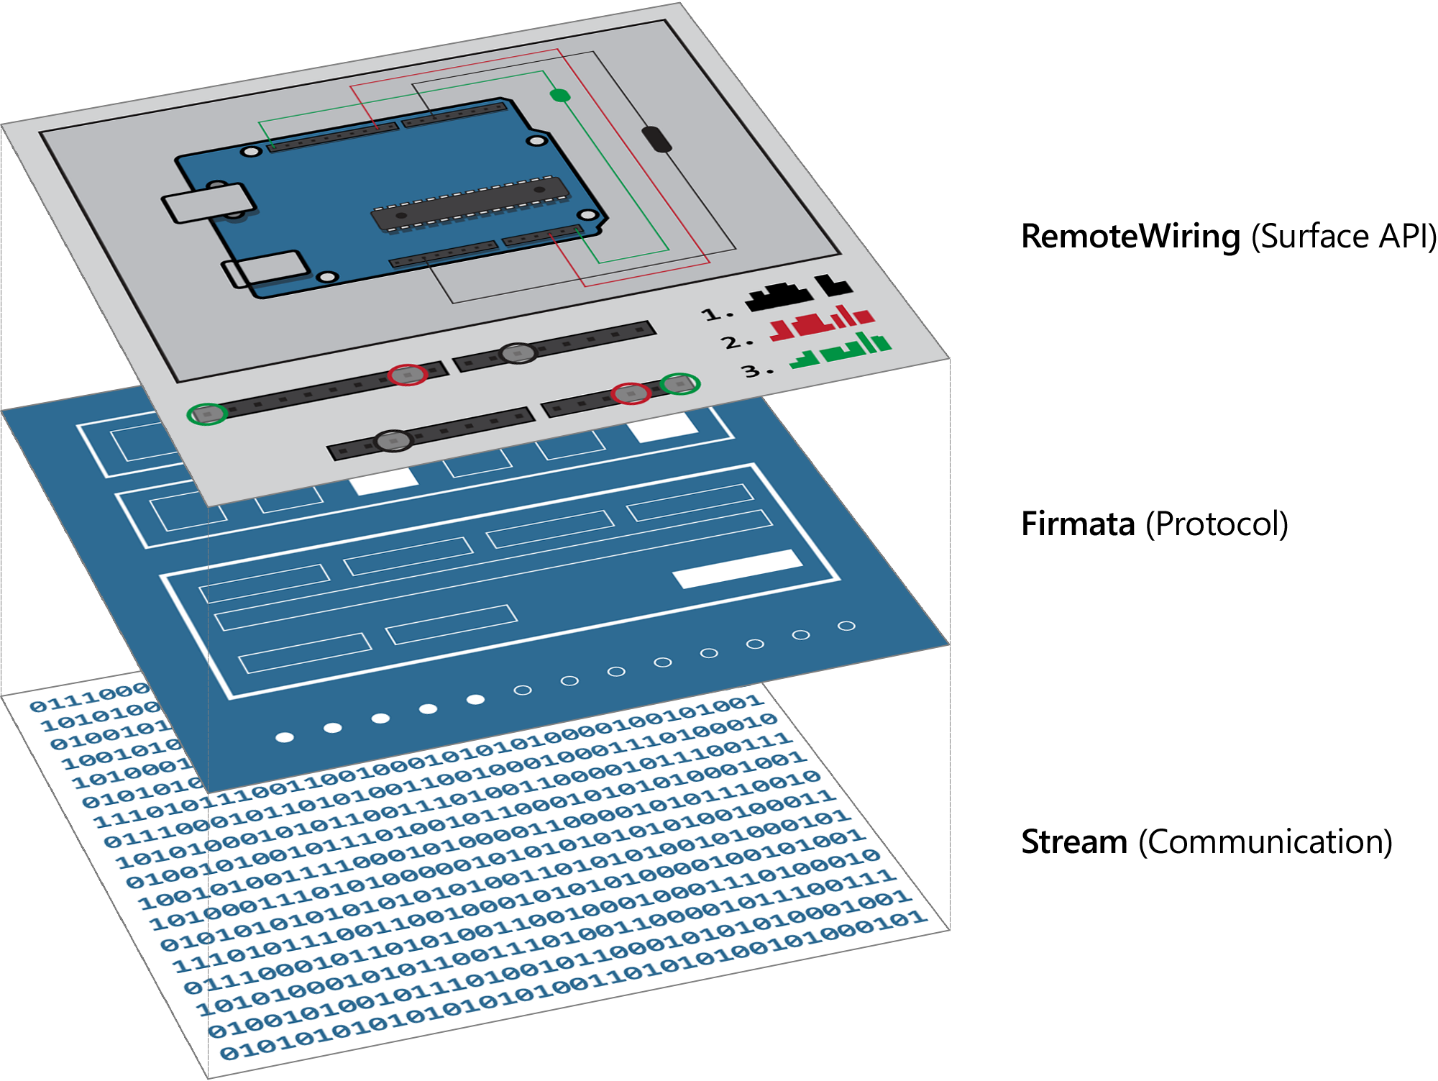
Architecture
With the above design decisions, the Windows Remote Arduino was built like a three-layer cake. Physical communication, as the bottom layer, is necessary to allow raw data to be exchanged between Windows and the Arduino device. Above the communication layer is the protocol layer, which decodes the raw incoming data into meaningful messages. On the very top is the surface API, which abstracts away all protocol messages and allows for remote control of the Arduino.
Development with the library
For all basic use cases, the RemoteDevice class contained within the RemoteWiring layer is the main layer that the developer will interact with. A RemoteDevice must be constructed with one of the IStream implementations (UsbSerial, BluetoothSerial, NetworkSerial, or DfRobotBleSerial) contained within the Stream layer. After invoking begin() on the Stream object, all remaining API calls are made through the RemoteDevice instance. A developer can set the modes or states of pins, read the values of digital or analog pins, initiate I2C communications to other devices, and even drive servos just by using this single class.
Advanced behaviors, such as SPI transactions, are also possible through SysEx commands. SysEx commands allow developers to write complex or custom code in the StandardFirmata sketch file that can be executed with Remote Arduino. There is a guide for these advanced behaviors on GitHub.
A look at the code
This section follows a simple sample that blinks an LED remotely using Windows Remote Arduino. A complete walkthrough for a similar project can be found at the Hackster post here. You can also check out the video below for a glance at what the sample enables:

For more information on setup, refer to the Get Started page and this guide on using Bluetooth with Windows Remote Arduino.
With setup complete, we can start a new Universal Windows Application project in Visual Studio and import the Windows Remote Arduino NuGet using the NuGet Package Manager. To repeat these steps:
- Open the Package Manager Console by clicking the “Tools” menu.
- Hover over “NuGet Package Manager.”
- Choose “Package Manager Console.”
- Enter Install-Package Windows-Remote-Arduino.
You can also search for and install the NuGet by selecting “Manage NuGet Packages for Solution” under the NuGet Package Manager menu and searching for “Remote Arduino” on the “Browse” tab.
With the NuGet installed, we transfer the code below to a fresh Visual Studio solution. Additional details are provided below this code section – any line or section marked with //(#) will be further analyzed.
[code lang=”csharp”]
public sealed partial class MainPage : Page
{
private RemoteDevice arduino;
private BluetoothSerial bluetooth;
public MainPage()
{
this.InitializeComponent();
bluetooth = new BluetoothSerial( "RNBT-5A60" ); //(1)
arduino = new RemoteDevice( bluetooth ); //(2)
arduino.DeviceReady += Arduino_DeviceReady; //(3)
arduino.DeviceConnectionFailed += Arduino_DeviceConnectionFailed; //(4)
bluetooth.begin(); //(5)
}
private void Arduino_DeviceConnectionFailed( string message )
{
Debug.WriteLine( message );
}
private void Arduino_DeviceReady()
{
arduino.pinMode( 13, PinMode.OUTPUT ); //(6)
loop();
}
private async void loop()
{
int DELAY_MILLIS = 1000;
while( true )
{
// toggle pin 13 to a HIGH state and delay for 1 second
arduino.digitalWrite( 13, PinState.HIGH ); //(7)
await Task.Delay( DELAY_MILLIS );
// toggle pin 13 to a LOW state and delay for 1 second
arduino.digitalWrite( 13, PinState.LOW ); //(7)
await Task.Delay( DELAY_MILLIS );
}
}
}
[/code]
- First, we construct our connection object. In this case, I provide the name of the Bluetooth device directly in the constructor as a string. You could also enumerate all devices by invoking the listAvailableDevicesAsync() function (which is available in the UsbSerial and DfRobotBleSerial classes), then construct a BluetoothSerial object by passing in one of the returned DeviceInformation objects. Other IStream implementations like UsbSerial and NetworkSerial have different function signatures for their constructor. For example, UsbSerial can accept a DeviceInformation object in its constructor, but also allows for VID and PID strings to be specified, and even VID only.
- Now we construct a RemoteDevice object by passing in an object which implements the IStream interface—in this case our BluetoothSerial object. The RemoteDevice constructor requires an IStream object. This is the communication stream that it will use to send and receive data. Valid options are BluetoothSerial, UsbSerial, NetworkSerial, and DfRobotBleSerial (for Bluetooth LE devices).
- Once we’ve constructed our RemoteDevice, we then initialize the object’s event handlers. This first line specifies a callback function that will be invoked when the connection and handshaking process is complete. This function must match the RemoteDeviceConnectionCallback delegate. In the example above, our handler (Arduino_DeviceReady) gets a single pin on the Arduino ready for use and then calls a loop() function (familiar from Arduino sketches).
- The next line specifies a callback function that is invoked if the connection process fails. This function needs to match the RemoteDeviceConnectionCallbackWithMessage delegate (one one Platform::String argument). In the example above, our handler (Arduino_DeviceConnectionFailed) writes an error message given by its single argument to the Debug console.
- Then, we begin the connection process by calling the begin() function (which may have different parameters given your connection choice). When invoked, the IStream class will either locate or use a provided DeviceInformation object depending on which constructor was used to create the class. Next, it will open the connection stream by invoking the necessary Windows APIs. When the connection is established, the RemoteDevice class will automatically begin the handshaking process with the device. This process involves sending a special type of Firmata protocol message called a “capability query,” which the device should respond to by listing all of the pins it has and their capabilities. When this message is completely received and correctly parsed, the RemoteDevice class will fire the DeviceReady event. In this case, the DeviceReady event will cause the Arduino_DeviceReady function from our example above to be invoked.
- This line will first verify that the pin and state are valid before sending a Firmata protocol message via the connected IStream class. This message will instruct the Arduino to switch a pin to the specified mode (in this case, pin 13 to “OUTPUT”). RemoteDevice will also cache the pin’s mode value to keep track of the state of the connected device.
- These two lines will first verify that the pin is valid and in the correct mode. If so, a Firmata protocol message will be sent using the connected IStream class that will instruct the Arduino to switch this pin to the specified state.
A more complex sample using Windows Remote Arduino
Now that you’ve seen a simple starter sample using Windows Remote Arduino, let’s take a look at something more complicated. Below is a video of an LED curtain powered by the Windows Remote Arduino technology – see how the library enables an Arduino to exceed its typical capabilities:

Where you can expand Windows Remote Arduino
Windows Remote Arduino already has many potential uses,and the library is open-source and available on our GitHub page – any developer interested in expanding this technology is more than welcome. Below are some details on how we would expand the library.
Adding SPI support
There are two communication methods – I2C and SPI – that microcontrollers typically use to communicate with other devices. This is commonly required for many sensors, shields, and other hardware that have their own MCUs. Each of these two methods have their pros and cons, and both are widely supported by on Arduino.
Currently, the Windows Remote Arduino library is dependent on the Firmata protocol in order to function. One of the cons of using Firmata is that there is no existing SPI support – SPI transactions are only possible with Windows Remote Arduino using advanced SysEx commands. To natively support SPI, we would need to update the Windows Remote Arduino library, and Firmata itself would have set SPI standards and update their implementation.
Fortunately, the three-layer architecture of the library would allow the Firmata layer to be swapped relatively easily with another protocol implementation. From there, the RemoteDevice class could be altered to accept the new protocol, or a fresh implementation of RemoteDevice could be written to utilize the new protocol layer.
We will always consider any pull requests submitted against the Windows Remote Arduino library. If you’re a developer with a bright new idea for the future of the library, hack away and let us know.
Links to explore further
There are several sources for more information on Windows Remote Arduino:
- To get started with the library and begin developing, check out our Get Started page.
- To check out the open-source repository, see the Windows Remote Arduino library on our GitHub page.
- To explore with Windows Remote Arduino using a custom UI, see the Windows Remote Arduino Experience app.
The World’s Largest Arduino Maker Challenge
Now that you’ve learned the ins and outs of Windows Remote Arduino, it’s time to put your newly-learned skills to the test. The World’s Largest Arduino Maker Challenge is a great opportunity to make use of the library.
The competition’s title is no overstatement – with more than 3,000 participants and 1,000 submitted project ideas in just the preliminary phase, this is truly the World’s Largest Arduino Maker Challenge. The contest is brought to you by Microsoft, Hackster.io, Arduino, Adafruit, and Atmel.
The parameters of the contest are simple – develop a UWP (Universal Windows Platform) app that connects with an Arduino. Windows Remote Arduino and Windows Virtual Shields for Arduino are two recommended ways of establishing this connection. Check out the contest site for more details.
We hope you take this opportunity to learn more about the library and submit something great for the World’s Largest Arduino Maker Challenge. We can’t wait to see what you make!
Written by Devin Valenciano (Program Manager) and Jesse Frush (Software Engineer) from Windows and Devices Connected Everyday Things team