


In part one of the Windows Bridge for iOS series, we created a simple to-do list app in Xcode and used the Windows Bridge for iOS to bring it over to Windows 10. In part two of the series, we went on a tour of Visual Studio for iOS developers. In part three, we used the Windows Bridge for iOS to convert an iOS calculator app created using Storyboards and Auto Layout to a Universal Windows Platform app that adjusts to various form factors on Windows 10.
Today, we discuss the various options that the Windows Bridge for iOS provides developers with, including controls in their converted UWP apps–whether UIKit, XAML, or some combination of both.
Getting Started
For today’s tutorial, you will need:
- A PC running Windows 10 with Visual Studio 2015 and the Windows Bridge for iOS installed.
- A Mac running Mac OS X 10.11 with Xcode 7 installed.
- A copy of the sample code.
A Note on XAML Interoperability
If you’ve been following the bridge project, you know that UIKit and XAML interoperability has been an important goal from the outset. The bridge uses the XAML compositor to manage your UIKit views and perform animations on them by linking CALayers to XAML elements. This approach, combined with our Objective-C® projections of Windows APIs, allows for some really cool stuff, like mixing and matching UIKit and XAML controls in the same view hierarchy with ease.
It’s important to note that whether you decide to use XAML components in Objective-C or stick with UIKit, you’re still creating native Windows interfaces. With the release of Windows 10, however, the implementation of various UIKit controls was looking a bit dated:
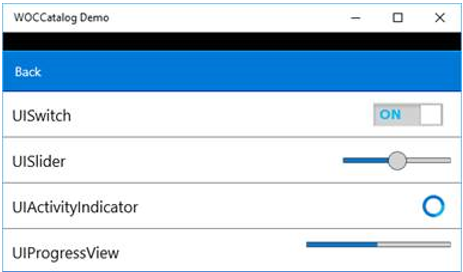
In the latest releases of the bridge, that same screen now looks like this:
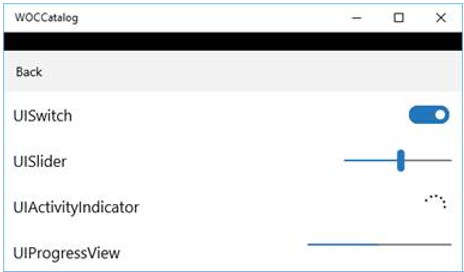
We matched iOS controls to their native Windows counterparts, so whether you use a UIKit UISwitch or a XAML ToggleSwitch, your control will look right at home on Windows 10.
These new controls are a work in progress, and for the time being, they rely heavily on bitmaps and thus won’t respond to customizations. (For instance, setting the background color on a UISwitch won’t work.) But we’re working on translating the designs into vector graphics so that in the future they’ll be fully polished and customizable.
Diving In
We are going to walk through a simple coded user interface example. We’ll first create an iOS app, then convert it to a UWP app, and finally, swap out the UIKit controls for XAML controls.
In Xcode, create a new Single View Application project and name it MixMatchUIKitXaml.
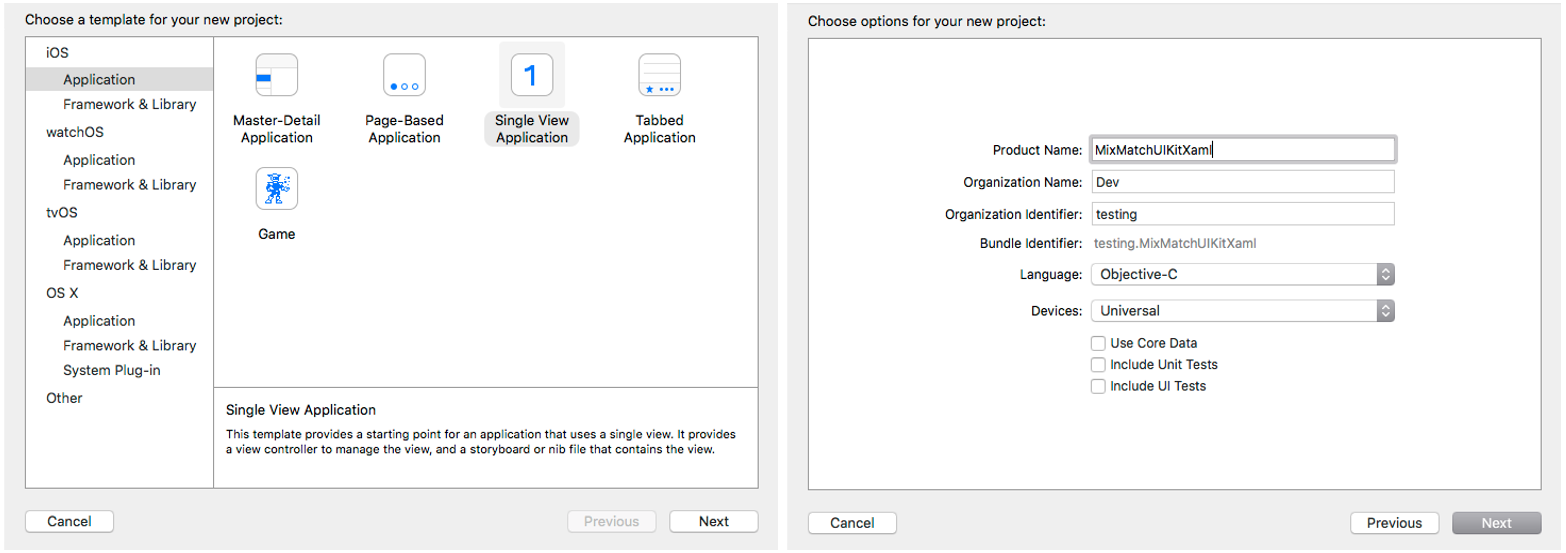
Pick out a good location to store your project files and then click “Create.” Xcode will do what it does and load up the blank Single View Application template and project structure as previously discussed.
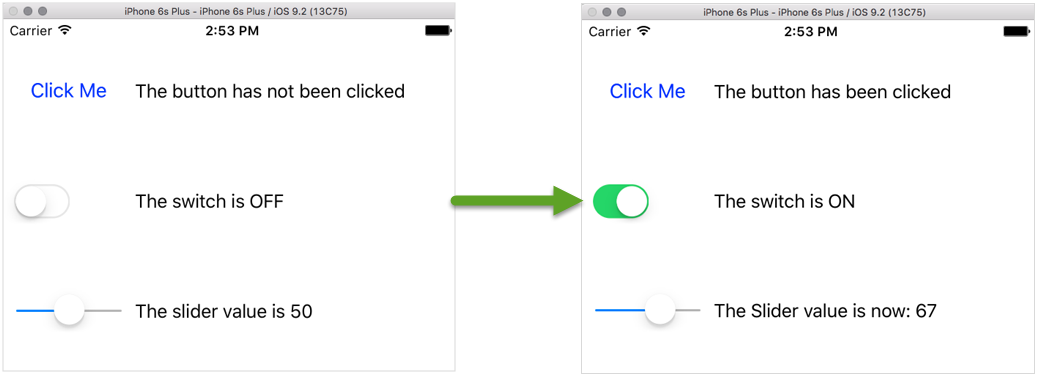
The app we are going to create is going to contain a UIButton, a UISwitch, and a UISlider. Clicking the button, flipping the switch, or moving the slider will update a corresponding UILabel.
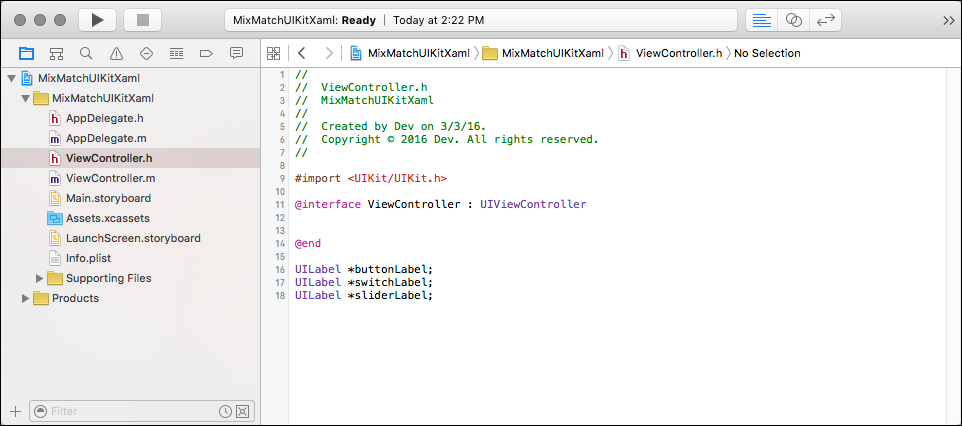
In ViewController.h, let’s define three UILabel variables.
Next, open ViewController.m, and let’s add a helper function for creating our UILabels.
[code language=”csharp”]
UILabel *createLabel(CGFloat x, CGFloat y, CGFloat width, CGFloat height, NSString *caption, UIColor *textColor, UIColor *backColor) {
UILabel *control = [[UILabel alloc] initWithFrame: CGRectMake(x, y, width, height)];
control.text = caption;
[control setTextColor:textColor];
return control;
}
[/code]
In the viewDidLoad method, let’s allocate and initialize our UIElements.
[code language=”csharp”]
– (void)viewDidLoad {
[super viewDidLoad];
UIButton *myButton = [[UIButton alloc] initWithFrame:CGRectMake(10, 50, 100, 30)];
[myButton setTitle:@"Click Me" forState:UIControlStateNormal];
[myButton setTitleColor:[UIColor blueColor] forState:UIControlStateNormal];
[myButton addTarget:self action:@selector(buttonAction:) forControlEvents:UIControlEventTouchUpInside];
[self.view addSubview: myButton];
buttonLabel = createLabel(120, 50, 300, 30, @"The button has not been clicked", [UIColor blackColor], [UIColor whiteColor]);
[self.view addSubview: buttonLabel];
UISwitch *mySwitch = [[UISwitch alloc] initWithFrame:CGRectMake(10, 150, 100, 30)];
[mySwitch addTarget:self action:@selector(switchAction:) forControlEvents:UIControlEventValueChanged];
[self.view addSubview: mySwitch];
switchLabel = createLabel(120, 150, 300, 30, @"The switch is OFF", [UIColor blackColor], [UIColor whiteColor]);
[self.view addSubview: switchLabel];
UISlider *mySlider = [[UISlider alloc] initWithFrame:CGRectMake(10, 250, 100, 30)];
mySlider.minimumValue = 0;
mySlider.maximumValue = 100;
mySlider.value = 50;
[mySlider addTarget:self action:@selector(sliderAction:) forControlEvents:UIControlEventValueChanged];
[self.view addSubview: mySlider];
sliderLabel = createLabel(120, 250, 300, 30, @"The slider value is 50", [UIColor blackColor], [UIColor whiteColor]);
[self.view addSubview: sliderLabel];
}
[/code]
Finally, let’s add our actionMethods to enable the button, switch and slider to update their corresponding labels.
[code language=”csharp”]
-(void) buttonAction:(id)sender{
if([buttonLabel.text rangeOfString:@"not"].location == NSNotFound){
buttonLabel.text = @"The button has been clicked again";
}
else{
buttonLabel.text = @"The button has been clicked";
}
}
-(void)switchAction:(id)sender{
UISwitch *theSwitch = (UISwitch*)sender;
if(theSwitch.isOn){
switchLabel.text = @"The switch is ON";
}
else{
switchLabel.text = @"The switch is OFF";
}
}
-(void)sliderAction:(id)sender{
UISlider *slider = (UISlider*)sender;
int progress = (int)slider.value;
NSMutableString *result = [NSMutableString string];
NSString *progressAsStr = [[NSString alloc] initWithFormat:@"%d",progress];
[result appendString:@"The Slider value is now: "];
[result appendString: progressAsStr];
sliderLabel.text = result;
}
[/code]
With everything completed, your ViewController.m file and project should look like the following:
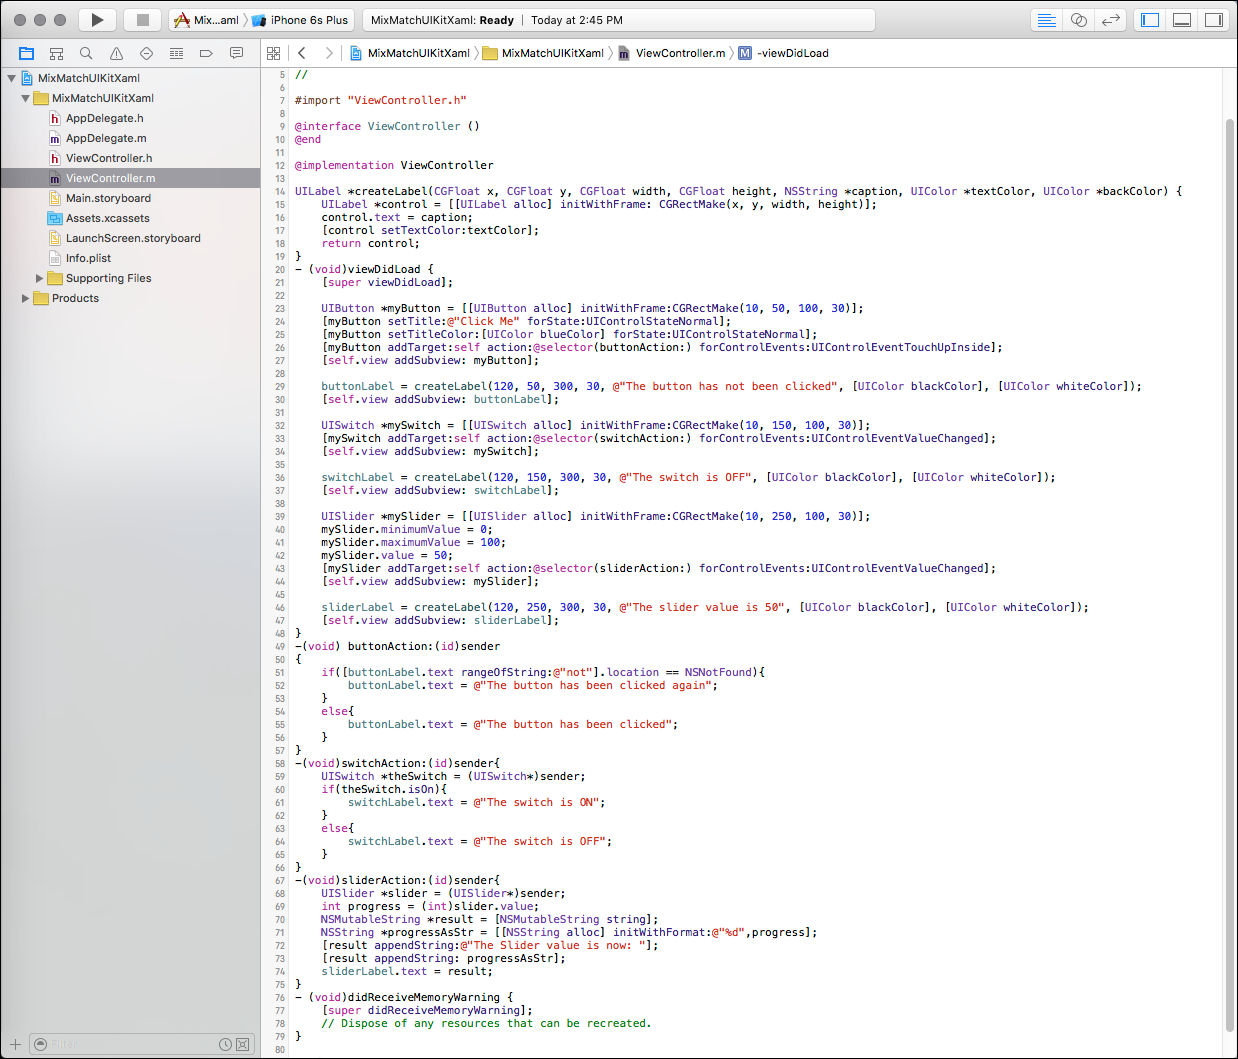
Perfect! Now, let’s build and then run the app in the Simulator and confirm that everything is working as expected.
Since we already have the Xcode project open, let’s add in the code for telling Windows how to scale responsively as discussed in more detail here and here. To do so, open your AppDelegate.m file and paste in the following code. This snippet uses the #ifdef and #endif preprocessor directives to check to see if the WINOBJC symbol is defined, giving us the ability to include Windows-specific code that will be ignored by Xcode and when we run the app on iOS.
[code language=”csharp”]
#ifdef WINOBJC
@implementation UIApplication (UIApplicationInitialStartupMode)
+ (void)setStartupDisplayMode:(WOCDisplayMode*)mode {
mode.autoMagnification = TRUE;
mode.sizeUIWindowToFit = TRUE;
mode.fixedWidth = 0;
mode.fixedHeight = 0;
mode.magnification = 1.0;
}
@end
#endif
[/code]
Great! Now save the Xcode project and copy the files over to your Windows machine.
Note: If you don’t have a PC, you can download one of the pre-built evaluation virtual machines from the Windows Bridge for iOS website. Download the package for your preferred virtualization environment and you’ll be up and running in no time. The package already includes Windows 10, Visual Studio 2015, and the iOS bridge.
Converting the Project
In previous posts, we’ve gone into detail on how to use the Windows Bridge for iOS and how it works, so we aren’t going to delve into that this time. Just run the MixMatchUIKitXaml Xcode project through the vsimporter tool and then open up the Visual Studio solution it created. When the solution opens, run the solution in the Simulator. Notice how everything is still functioning as expected.
Swapping Out Controls
Using the Windows Bridge for iOS, we can use UIKit and XAML controls interchangeably. To demonstrate, let’s swap out the UIButton with a XAML button. The first step is to add the following reference to your ViewController.h file.
[code language=”csharp”]
#import <UWP/WindowsUIXamlControls.h>
[/code]
Then, in ViewController.m, we’ll comment out the code for adding the UI Button and the buttonAction method and add in the code for adding the WXCButton, which is the iOS Bridge implementation of the XAML button. You’ll notice a slight difference in code needed to both allocate and initialize the control, add the event handler, and then add it to the main view, but the basic syntax is pretty intuitive.
[code language=”csharp”]
/*
UIButton *myButton = [[UIButton alloc] initWithFrame:CGRectMake(10, 50, 100, 30)];
[myButton setTitle:@"Click Me" forState:UIControlStateNormal];
[myButton setTitleColor:[UIColor blueColor] forState:UIControlStateNormal];
[myButton addTarget:self action:@selector(buttonAction:) forControlEvents:UIControlEventTouchUpInside];
[self.view addSubview: myButton];
*/
/*
-(void) buttonAction:(id)sender
{
if([buttonLabel.text rangeOfString:@"not"].location == NSNotFound){
buttonLabel.text = @"The button has been clicked again";
}
else{
buttonLabel.text = @"The button has been clicked";
}
}
*/
WXCButton *myButton = [WXCButton make];
myButton.content = [WFPropertyValue createString: @"Click Me"];
[myButton addClickEvent:^(RTObject *sender, WXRoutedEventArgs *e) {
if([buttonLabel.text rangeOfString:@"not"].location == NSNotFound){
buttonLabel.text = @"The button has been clicked again";
}
else{
buttonLabel.text = @"The button has been clicked";
}
}];
UIView *buttonView = [[UIView alloc] initWithFrame: CGRectMake(10, 50, 100, 30)];
[buttonView setNativeElement:myButton];
[self.view addSubview: buttonView];
[/code]
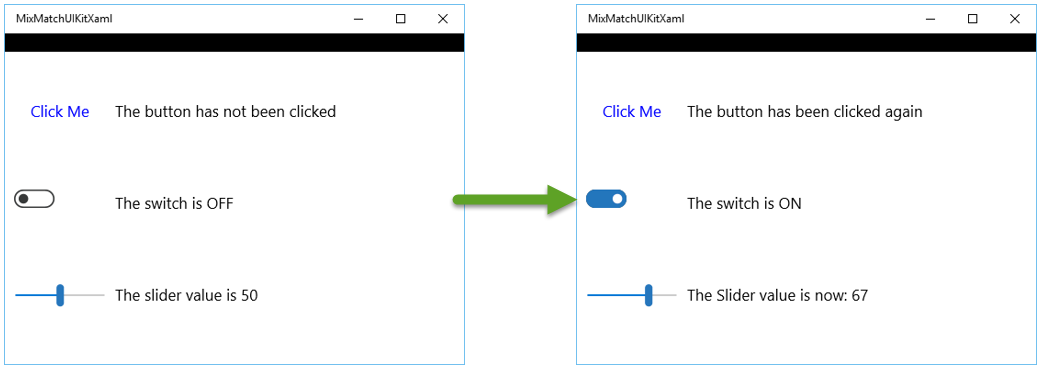
With the changes in place, let’s run the app again.
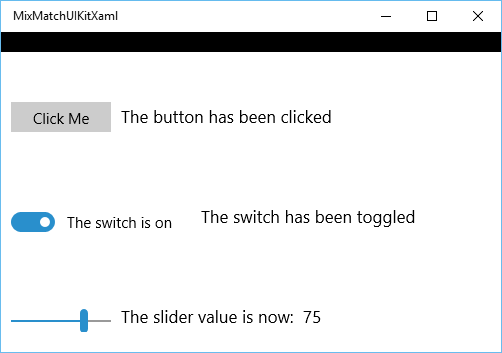
We now have a XAML button running inside our app, updating a UIKit Label control. Let’s quickly swap out the UISwitch and Slider controls as well.
[code language=”csharp”]
/*
UISwitch *mySwitch = [[UISwitch alloc] initWithFrame:CGRectMake(10, 150, 100, 30)];
[mySwitch addTarget:self action:@selector(switchAction:) forControlEvents:UIControlEventValueChanged];
[self.view addSubview: mySwitch];
switchLabel = createLabel(120, 150, 300, 30, @"The switch is OFF", [UIColor blackColor], [UIColor whiteColor]);
[self.view addSubview: switchLabel];
*/
/*
-(void)switchAction:(id)sender{
UISwitch *theSwitch = (UISwitch*)sender;
if(theSwitch.isOn){
switchLabel.text = @"The switch is ON";
}
else{
switchLabel.text = @"The switch is OFF";
}
}
*/
WXCToggleSwitch *mySwitch = [WXCToggleSwitch make];
mySwitch.offContent = [WFPropertyValue createString: @"The switch is off"];
mySwitch.onContent = [WFPropertyValue createString: @"The switch is on"];
[mySwitch addToggledEvent:^(RTObject *sender, WXRoutedEventArgs *e) {
switchLabel.text = @"The switch has been toggled";
}];
UIView *switchView = [[UIView alloc] initWithFrame: CGRectMake(10, 150, 300, 30)];
[switchView setNativeElement:mySwitch];
[self.view addSubview: switchView];
switchLabel = createLabel(200, 150, 300, 30, @"The switch has not been toggled", [UIColor blackColor], [UIColor whiteColor]);
[self.view addSubview: switchLabel];
/*
UISlider *mySlider = [[UISlider alloc] initWithFrame:CGRectMake(10, 250, 100, 30)];
mySlider.minimumValue = 0;
mySlider.maximumValue = 100;
mySlider.value = 50;
[mySlider addTarget:self action:@selector(sliderAction:) forControlEvents:UIControlEventValueChanged];
[self.view addSubview: mySlider];
*/
/*
-(void)sliderAction:(id)sender{
UISlider *slider = (UISlider*)sender;
int progress = (int)slider.value;
NSMutableString *result = [NSMutableString string];
NSString *progressAsStr = [[NSString alloc] initWithFormat:@"%d",progress];
[result appendString:@"The Slider value is now: "];
[result appendString: progressAsStr];
sliderLabel.text = result;
}
*/
WXCSlider *mySlider = [WXCSlider make];
mySlider.minimum = 0;
mySlider.maximum = 100;
mySlider.value = 50;
[mySlider addValueChangedEvent:^ (RTObject * sender, WUXCPRangeBaseValueChangedEventArgs * e) {
sliderLabel.text = [NSString stringWithFormat:@"The slider value is now: %.0f", e.newValue];
}];
UIView *sliderView = [[UIView alloc] initWithFrame: CGRectMake(10, 250, 100, 30)];
[sliderView setNativeElement:mySlider];
[self.view addSubview: sliderView];
sliderLabel = createLabel(120, 250, 300, 30, @"The slider value is 50", [UIColor blackColor], [UIColor whiteColor]);
[self.view addSubview: sliderLabel];
[/code]
Running the app, you’ll see that the XAML controls are now taking the place of the UIKit controls and are actively updating the existing UIKit labels. We have also added values to the “offContent” and “onContent” properties of the WXCToggleSwitch to demonstrate the capability to add content directly there in addition to being able to fire an event when toggled.
Adding Windows 10 Functionality to your App with a Live Tile
What is a UWP app without its very own Live Tile? Let’s add one. In ViewController.h, add the following references.
[code language=”csharp”]
#import <UWP/WindowsUINotifications.h>
#import <UWP/WindowsDataXmlDom.h>
[/code]
Now, in ViewController.m, let’s add a little code. Add in an #ifdef section (so the code will only execute in Windows) in the viewDidLoad method, we add a WUNTileUpdater (Windows.UI.Notifications.TileUpdater). Next, we’ll specify a tile template to use (WUNTileTemplateTypeTileWide310x150Text03) and then add some text to display. Finally, we’ll create a tile notification and tell the tileUpdater to update. The code should appear as follows:
[code language=”csharp”]
#ifdef WINOBJC
WUNTileUpdater* tileUpdater = [WUNTileUpdateManager createTileUpdaterForApplication];
WDXDXmlDocument* tileXml = [WUNTileUpdateManager getTemplateContent: WUNTileTemplateTypeTileWide310x150Text03];
WDXDXmlNodeList* tileTextAttributes = [tileXml getElementsByTagName: @"text"];
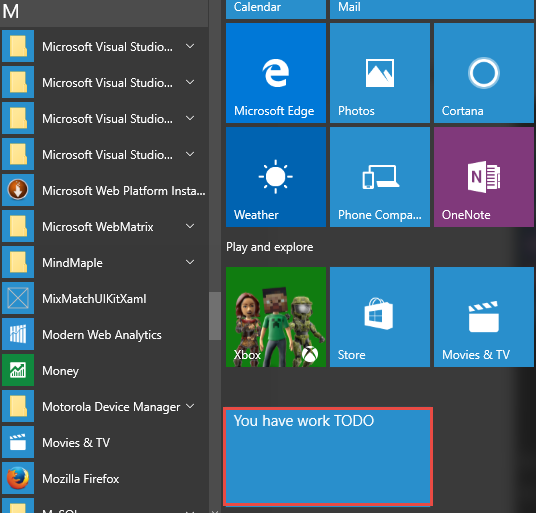
[tileTextAttributes item: 0].innerText = @"You have work TODO";
WUNTileNotification *notification = [WUNTileNotification makeTileNotification: tileXml];
[tileUpdater update: notification];
#endif
[/code]
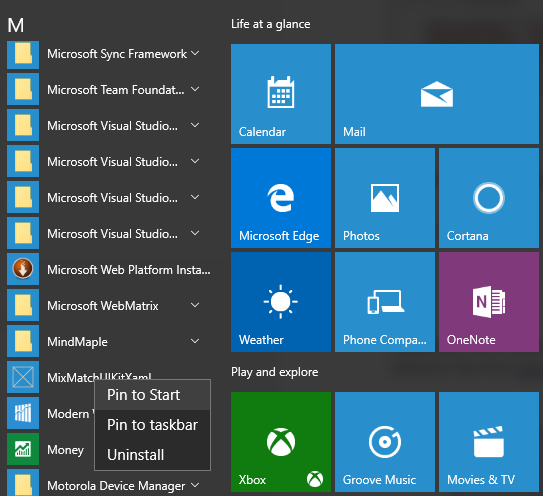
Run the app, open your start menu, and find the MixMatchUIKitXaml app. Right-click and select “Pin to Start.”
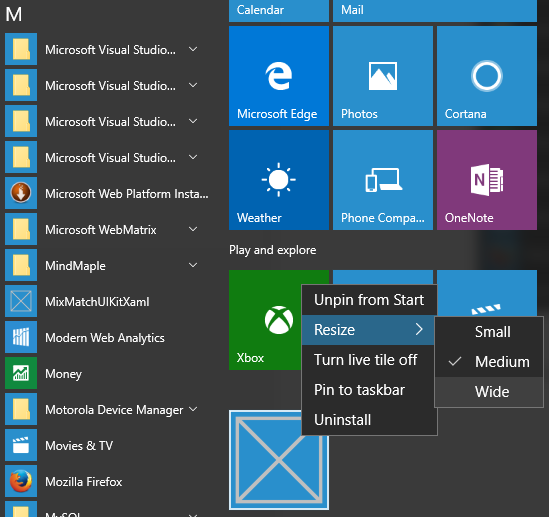
A “Medium” tile will be added by default. Our code is specific to the wide tile, so right-click your tile and select the “Wide” option.
And there you have it, your very own Live Tile for your converted iOS app.
Wrapping Up
In this post, we created a coded UI iOS app and then demonstrated how easy it is to swap out the UIKit controls for their XAML counterparts. We also demonstrated interoperability by showing how the XAML controls are to interact with UIKit controls within the app.
Lastly, we’d like to share a new resource immediately available to iOS and Android developers. This document shows how to map fundamental programming concepts that you are already familiar with to Windows, and drawing out the relationship between each pair. It will allow you to quickly take your existing knowledge and apply it to new Windows apps!
Additional Information can be found here so be sure to check out the first three posts in the series linked above: