

Today’s post is about the lifecycle of a UWP app, what should happen as an app transitions from one lifecycle state to the next, and techniques for making these transitions transparent to the user.
App states: not running, running, suspended
Traditional desktop applications have only two states: they are either running or they are not running. UWP apps have a third possible state called suspended. An app is suspended when a user minimizes it, or switches to another app. As far as the user is concerned the app simply appears to be running in the background.
What actually happens is that the app goes into a hibernation mode so that Windows is able to free up resources. The app’s threads are stopped, and the state of the app is held in memory. When the user returns to the app, it is quickly restored from a suspended state to a running state. The user isn’t aware that the suspension ever occurred.
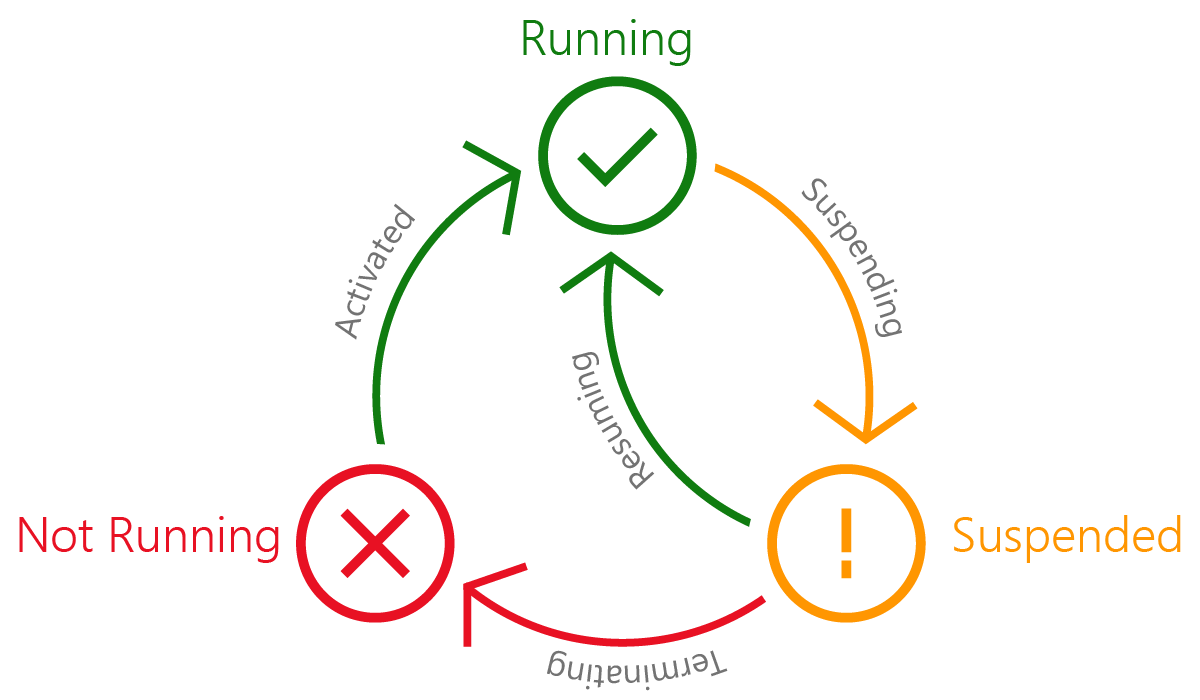
At times Windows 10 may determine that even in a suspended state, some apps are using too many resources. In this case, it may terminate some of these apps, effectively placing them into the not running state. What will happen when the user tries to switch back to a terminated app?
Without additional coding, it will appear to the user as if she has lost her place in the app, as well as all her information from the latest session.
You can keep this from happening to your user by handling the Application.Suspending event (there is no terminated event method, so this is the last point at which you can do something) and overriding the Application.OnLaunched method when the app picks up again. The coding pattern for managing potential app terminations only requires you to save off any useful data from the current user session. Then, if the app gets terminated, you restore this data with custom code once the app is relaunched by the user.
Handling suspending, termination, and closing
There are several ways that an app can leave the running state. We have already discussed a couple of these, but there are two additional scenarios. One occurs when an app is killed and goes from running à not running either because something has gone wrong with the app, like a crash, or because the user has forced the app to close down in the task manager. (Killed isn’t an official term, but is very convenient for remembering this lifecycle path.) The other occurs when an app is closed by a user using a close gesture while in tablet mode or clicking on the X when running over the desktop. In this case, the app is suspended and then automatically terminated.
We are here going to discuss scenarios in which an app is suspended and then terminated. In practice, this means we care if the app is terminated by the operating system (first scenario) and if the user intentionally closes the app (last scenario).
When an app is suspended, it invokes the Suspending event. Visual Studio’s UWP project templates automatically generate a handler for this event called OnSuspending in the App.xaml class. It is here that you should place code to save application state information just in case the app terminates.
If the app does not terminate following suspension, then no harm is done since the application state is never lost.
Similarly, if the app shuts down following a running state without suspension, you do not need to do anything. In fact, there is nothing you could do, since no lifecycle events are invoked.
Here is some example code demonstrating how to save state information. Since saving to a FileStream is an asynchronous process, you will note the addition of the async keyword to the default implementation of the OnSuspending method. Because the _store object used is a generic Dictionary, any sort of serializable data can be added to it for saving. For brevity, you are only adding a timestamp. (There’s also some code for something called deferral, which we’ll address later.)
[code lang=”csharp”]
private Dictionary<string, object> _store = new Dictionary<string, object>();
private readonly string _saveFileName = "store.xml";
private async void OnSuspending(object sender, SuspendingEventArgs e)
{
var deferral = e.SuspendingOperation.GetDeferral();
_store.Add("timestamp", DateTime.Now);
await SaveStateAsync();
deferral.Complete();
}
private async Task SaveStateAsync()
{
var ms = new MemoryStream();
var serializer = new DataContractSerializer(typeof(Dictionary<string, object>));
serializer.WriteObject(ms, _store);
var file = await ApplicationData.Current.LocalFolder.CreateFileAsync(_saveFileName, CreationCollisionOption.ReplaceExisting);
using (var fs = await file.OpenStreamForWriteAsync())
{
//because we have written to the stream, set the position back to start
ms.Seek(0, SeekOrigin.Begin);
await ms.CopyToAsync(fs);
await fs.FlushAsync();
}
}
[/code]
The suspending deadline and deferral
There is an implicit rule that the handler for the Application.Suspending event must finish within five seconds. This five-second rule is known as the deadline. Normally, with an async call, the current thread would return to the caller when it hits the await keyword. This would be bad in the code above, since the async save method is unlikely to have finished by the time control returns to the caller and the app gets suspended.
The GetDeferral method is a housekeeping method used for just this situation. It tells the system not to end suspension when the async call returns, but instead to defer suspension until either the Complete method is called or the five-second deadline arrives, whichever comes first. This means that GetDeferral does not actually buy you more time to finish your state save. It merely indicates how you are handling cleanup before suspension and ensures that you are given as much time as you need, up to a maximum of five seconds, to do this.
Because of the deadline, you should not try to do too much in the OnSuspending handler. One strategy for managing this time limit is to save data incrementally as the application state changes. New key-value pairs can be added gradually to your dictionary object in page navigation events. If you are using the MVVM pattern to manage state, you could even simply stash your view-models in the dictionary as a time saver.
If all else fails, it is possible to buy more time to finish your save operation by requesting an ExtendedExecutionSession, though there is no guarantee that the request will be honored. You can learn more about extended execution by visiting MSDN.
Handling the launch app lifecycle state
We have been working through the UWP lifecycle a bit backwards up to this point. There’s actually a good reason for this. Much of the information provided in the Application.OnLaunched method, it turns out, deals with how the app was previously closed.
Launch and resuming correspond to terminate and suspending, respectively. If an app moves from a suspended state back to a running state, the Application.Resuming event will be invoked. If an app is terminated or forcibly shut down, then Application.OnLaunched will be called.
OnLaunched is also called when an app is initially invoked from a tile. Inside the OnLaunched method, you need to perform initialization routines to get your application warmed up. This may include making network connections, allocating resources, or setting up the UI. Whatever needs to be set up behind the scenes when the app first wakes up should probably be set up no matter how the app closed previously.
[code lang=”csharp”]
protected override void OnLaunched(LaunchActivatedEventArgs e)
{
if (e.PreviousExecutionState == ApplicationExecutionState.Terminated)
{
//TODO: Load state from previously suspended application
}
}[/code]
The OnLaunched method receives a LaunchActivatedEventArgs object as its argument. This argument has an interesting property called PreviousExecutionState that tells you the last state of the application before it was launched.
- NotRunning tells you the app is being launched for the first time or that the app was previously killed in an unexpected way and you should just start the app as if it were being run for the first time. Nothing actually needs to be done to handle this situation, and you just start the app like normal.
- Terminated tells you that the app was previously suspended and then was shut down. In the world of the user, the user was multitasking and after a while decided to come back to the app. Unfortunately, the app had been suspended and then killed by the operating system in order to free up memory. The user, however, doesn’t know any of this and expects the app to be the way he remembers it when he put it aside earlier.
- ClosedByUser tells you that the user closed the app intentionally, for example by using the close gesture in tablet mode.
- Running and Suspended are the last two states and tell you that the app is being launched from a secondary tile when it has already been activated.
To make sure the user has the expected experience, you need to restore the state information that was saved before the app got suspended. The code below demonstrates how you reverse the routine you used in the Suspending handler.
[code lang=”csharp”]
protected override async void OnLaunched(LaunchActivatedEventArgs e)
{
if (e.PreviousExecutionState == ApplicationExecutionState.Terminated)
{
await ReadStateAsync();
var terminateDate = DateTime.Now;
if (_store.ContainsKey("timestamp"))
{
terminateDate = (DateTime) _store["timestamp"];
}
}
//… additional work logic
}
public async Task ReadStateAsync()
{
var file = await ApplicationData.Current.LocalFolder.GetFileAsync(_saveFileName);
if (file == null) return;
using (IInputStream stream = await file.OpenSequentialReadAsync())
{
var serializer = new DataContractSerializer(typeof(Dictionary<string, object>));
_store = (Dictionary<string, object>)serializer.ReadObject(stream.AsStreamForRead());
}
}
[/code]
You typically want to restore all the saved state for the app. This assumes, though, that the user is returning to the app after only a few minutes or a few hours at most. In fact, it could be much longer since the user last looked at the app—perhaps days.
Because you had the foresight to serialize the timestamp when the app was suspended, you can compare it against the current date and time to determine how long ago the app was terminated. If the gap is sufficiently long, it may actually make more sense to treat this app launch as if it is occurring for the first time.
Another possible value for the previous execution state, ClosedByUser, requires you to take some initiative in deciding what it means. This state comes about when the user has used the close gesture in tablet mode to end the application. This action suspends the app, ensuring that the OnSuspending method is called, and then terminates the app. Since the app has essentially gone through the same steps that lead to the Terminated state, the general guidance is to handle this lifecycle story in the same way.
On the other hand, if a user intentionally shut down an app, it would be reasonable for her to expect it to do a fresh startup when it is relaunched. If this makes more sense to you as a developer, then you may certainly treat ClosedByUser in this way.
Testing and debugging the lifecycle states
It’s a good idea to test the various states of your app’s lifecycle to make sure the app does what you expect. Visual Studio 2015 provides a Lifecycle Events control on the toolbar that lets you throw one of three lifecycle transitions: suspend, resume, or suspend and shutdown (terminate).

With this tool, you can debug your lifecycle management code to make sure it handles state changes correctly. You can also use it to validate your understanding of the lifecycle itself. For instance, you could find out what really happens when someone kills your app on a phone using the app switcher. Will the OnSuspending handler be called in this situation, or will the application simply die without letting you know? Let’s find out.

To test this, set a breakpoint inside the OnSuspending method. You then need to set the build target to a mobile emulator and run the app in debug mode. Select Suspend on the Lifecycle Events tool to confirm that the breakpoint is hit. Press F5 to continue past the breakpoint and select Resume on the tool to bring the app back into view.
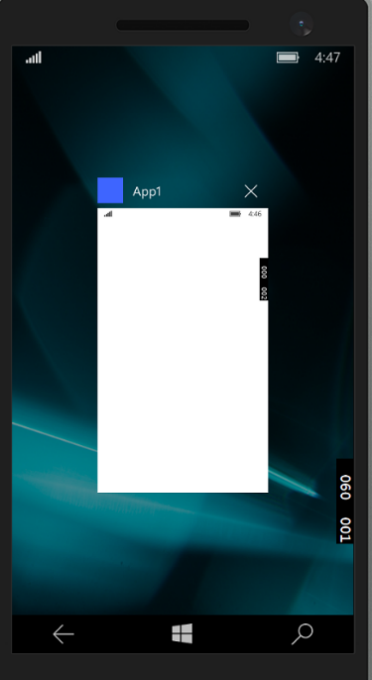
Now comes the fun part. Hold down the back button until the app shrinks in the mobile emulator’s screen. An X appears on the upper right corner of the app allowing us to close it. When the X is pressed, the breakpoint does not get hit this time.
This simple test tells you that the app doesn’t go into suspend mode when it is killed from the phone’s app switcher screen, but instead, it goes directly into a not running state.
You’ll find that there are times when you can’t quite recall how the UWP lifecycle works in every circumstance. In those situations, it often makes more sense to just test your assumptions with the debugging tools Visual Studio provides than to try figuring it out by combing through online articles. You may even find that you understand the UWP app lifecycle better when you test it out for yourself.
Handling resuming
When an app is suspended and then successfully returned to the running state, the Application.Resuming event is called rather than Application.OnLaunched. What should you do with Application.Resuming?
In many cases, you don’t have to do anything at all. Application.Suspending is generally used only to handle the possibility that the app may get terminated. If you want your app to be good UWP citizens, however, you may also use Application.Suspending to deallocate expensive resources as your app goes into hibernation. Expensive resources can include anything from images and sound files to devices. If you choose to do this, you’ll need to implement a handler for the Application.Resuming event and reinitialize those resources.
There’s one other exceptional circumstance to keep in mind for your UWP apps: when a user starts an app that has actually already been suspended, so the app calls the Application.Resuming event instead. This occurs when the app has been selected for prelaunch, which is for all intents and purposes transparent to the user.
Prelaunch happens if the device has sufficient resources and the app is determined to be frequently launched by the current user. To improve performance, apps selected for prelaunch are launched in the background ahead of time and then quickly suspended.
Because of prelaunch, the app’s OnLaunched method may be initiated by the system rather than by a user. This is then followed by a call to Application.Suspending. Then, when the user does try to launch the app, the Resuming event is invoked as well as the OnLaunched method.
Surprisingly, no additional steps are typically required to handle prelaunch. The lifecycle code we have already covered handles everything well enough. In some circumstances, though, such as when an app uses heavy resources at launch to create a visual impact, it may be useful to distinguish a prelaunch from a normal launch so the effort doesn’t go to waste.
The LaunchActivatedEventArgs object has a boolean property called PrelaunchActivated that indicates whether OnLaunched is responding to a real user or to the prelaunch optimization. This flag can be used to step over any actions that would go to waste when no one is around to see them. As with the standard lifecycle events, Visual Studio also makes it possible to test a prelaunch scenario. You can learn more about prelaunch on MSDN.
Wrapping up
The UWP lifecycle can seem intricate at first. In actual fact, however, the only two events you typically need to be concerned about handling are Suspending and Launched. Other flags, like PrelaunchActivated and ClosedByUser, are worth considering for edge cases but are not always essential. Remember, too, that if you start to suspect that those edge cases may be affecting your app, Visual Studio 2015 provides useful tools to help you test the lifecycle events and find out what is happening under the hood.