

In this post, we will take a look at the app detection and recognition features of the FamilyNotes app.
Using the face as a solution
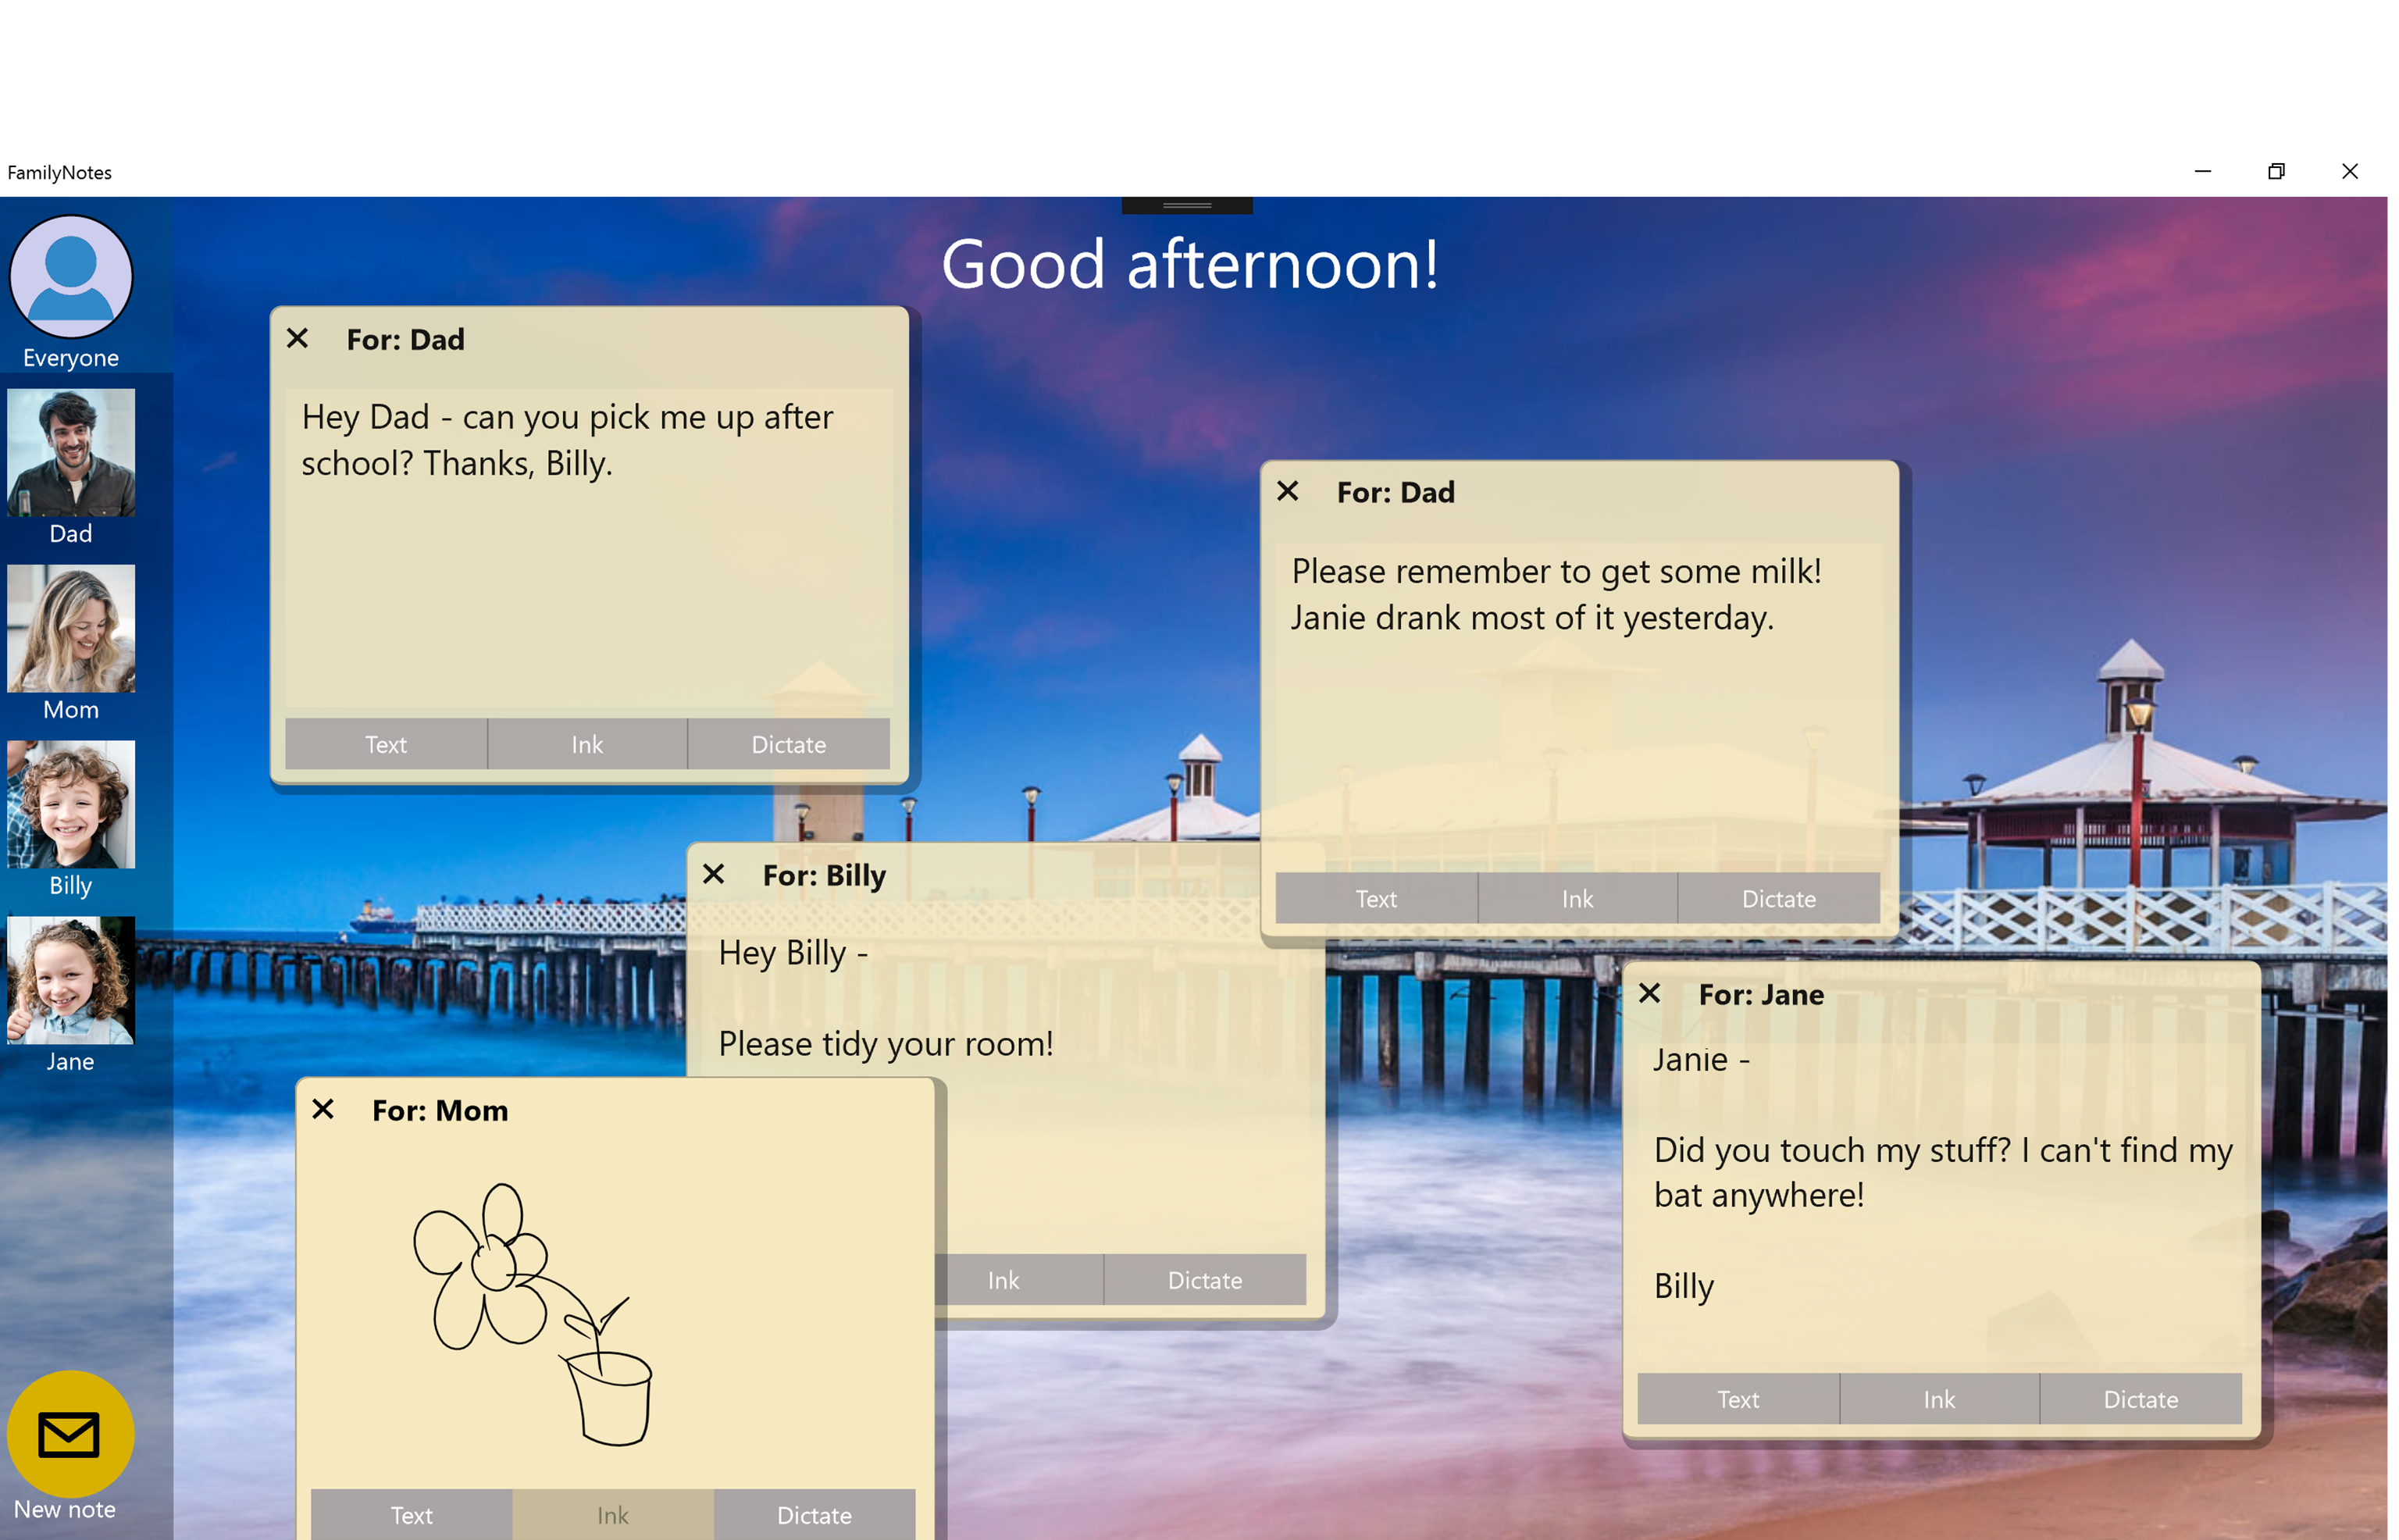
FamilyNotes provides an interface with which people can leave notes for one another on a shared noticeboard space. During the development process, an early learning was that once multiple people start leaving notes, the space becomes overwhelmed, since all notes will display at once.
Because of this, it became critical to find a way for users to more easily find the notes that were relevant to them specifically.
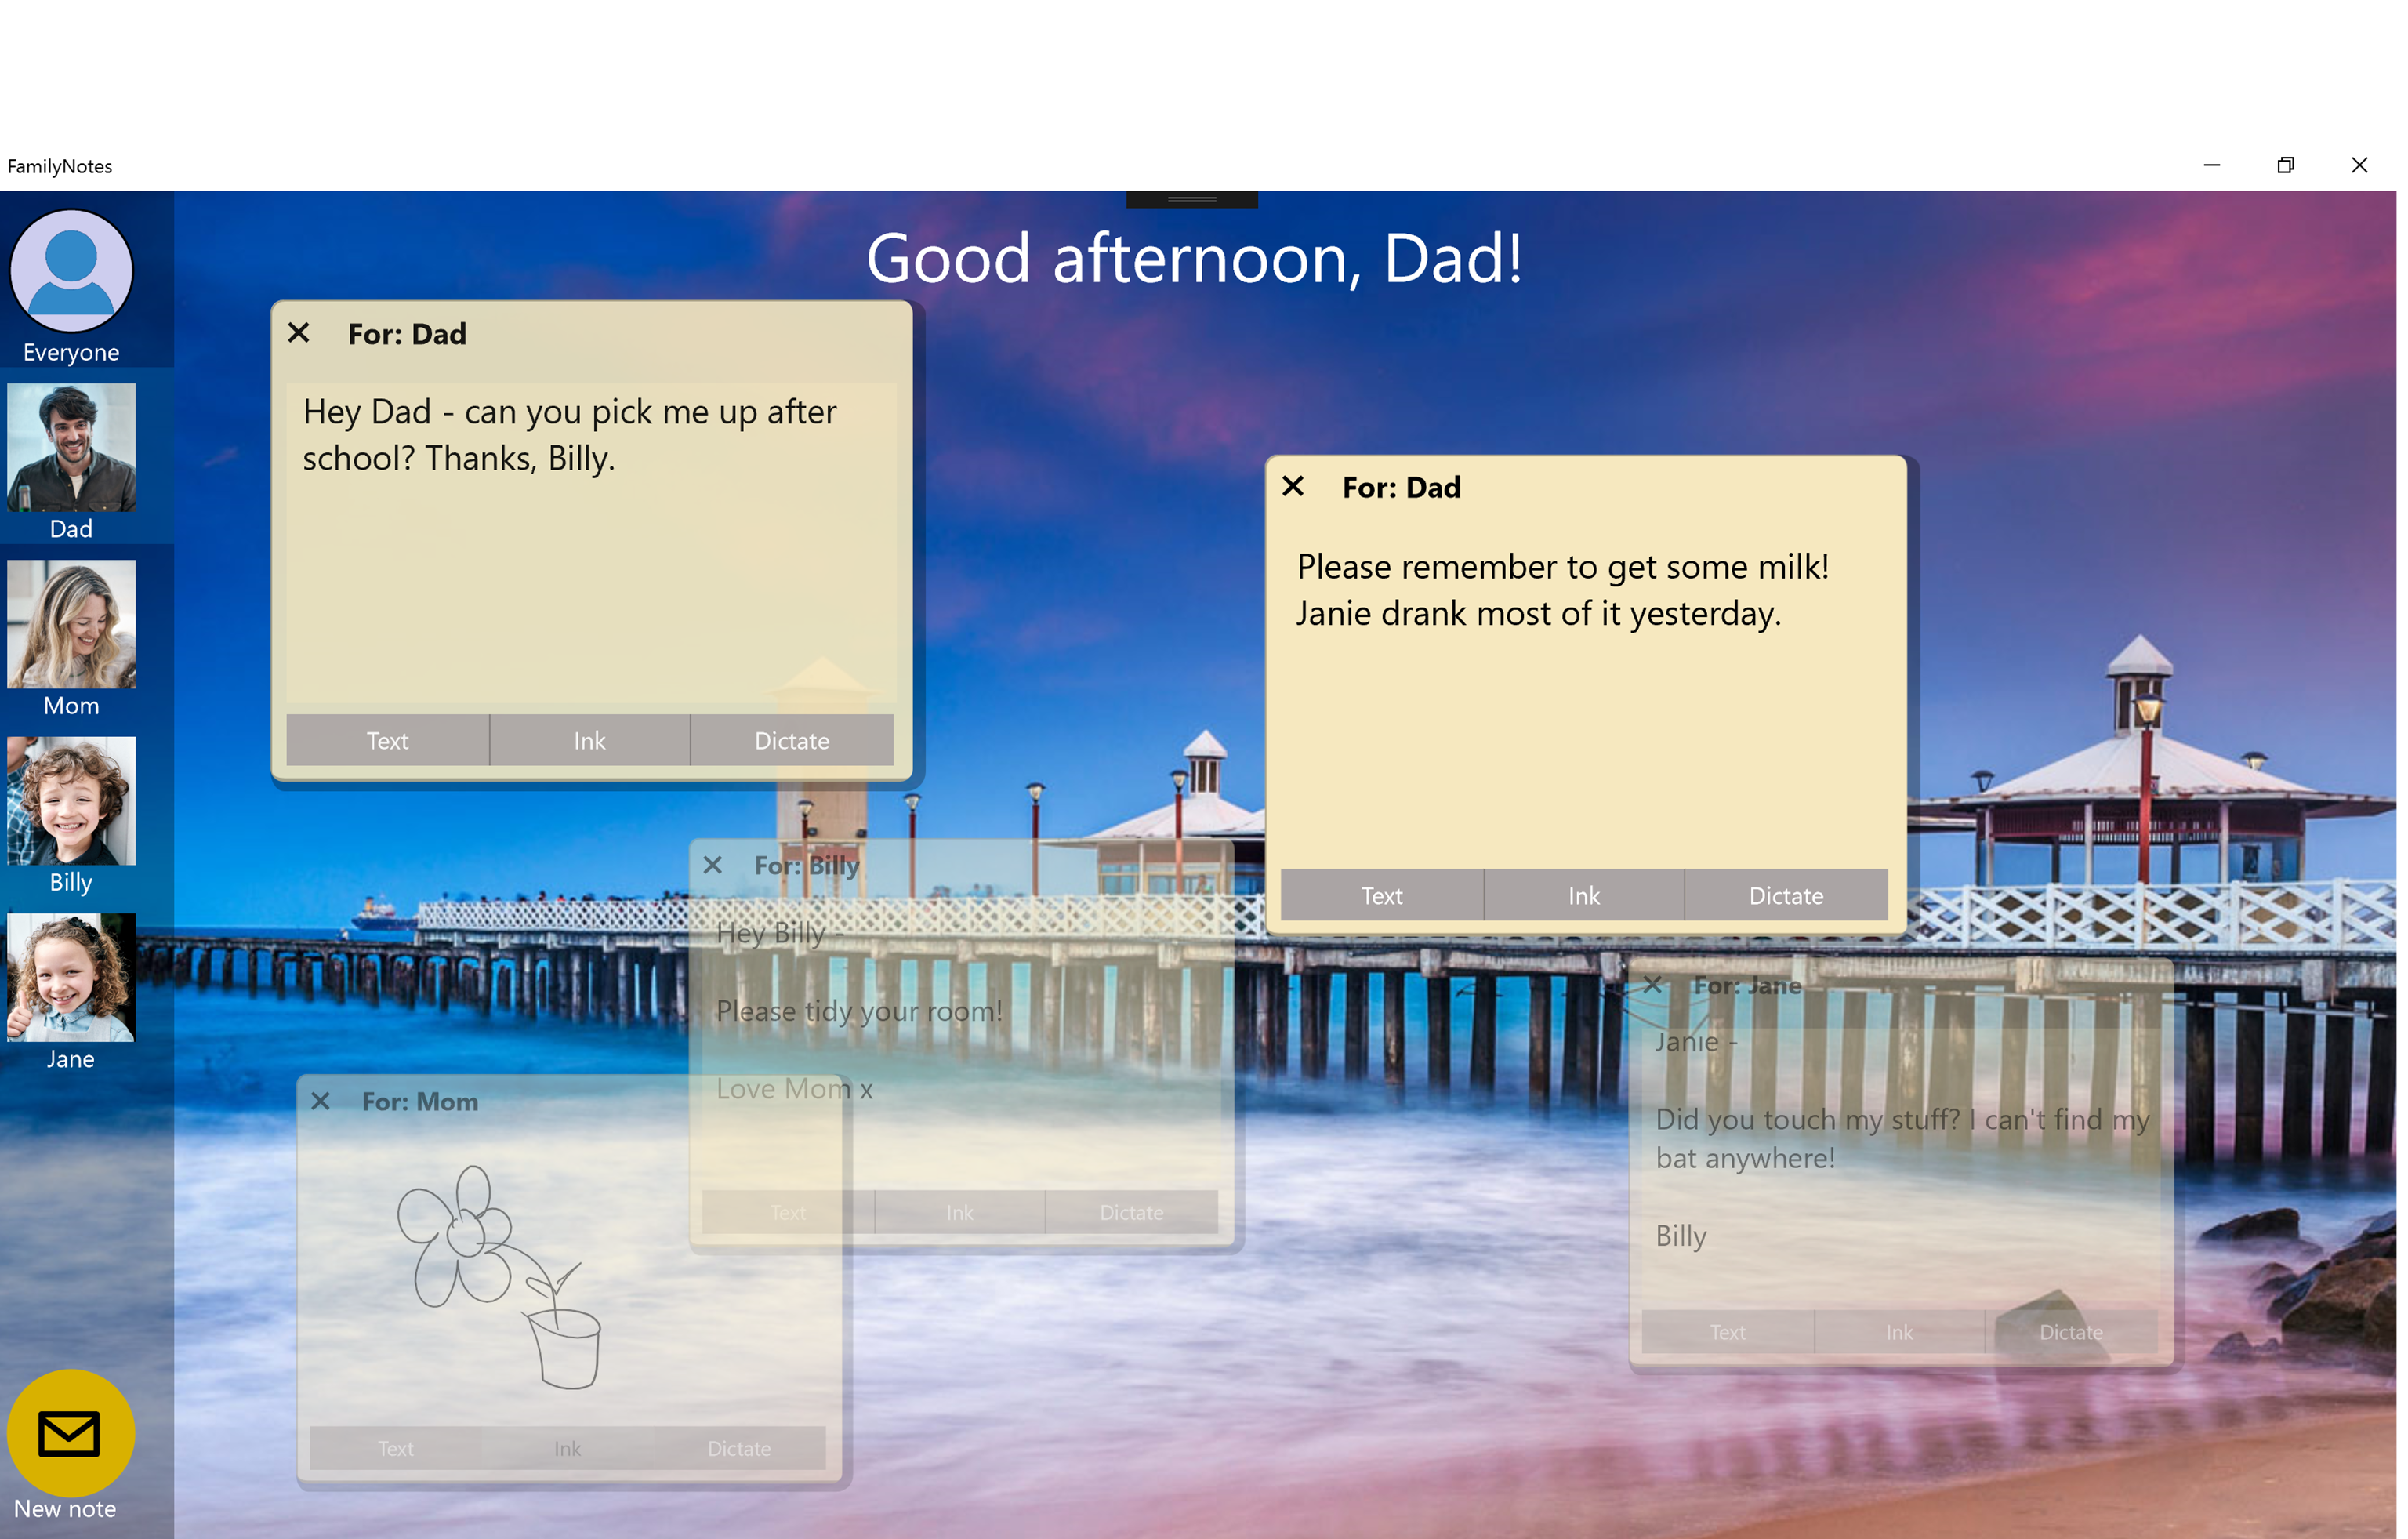
The initial solution was to allow users to apply a filter and have the app highlight the notes that are addressed to them. Notes addressed to “Everyone” would also appear in that case, since each user is a part of the set of Everyone. This basic filtering made it much easier to see the relevant notes for a given user.
However, a more elegant solution existed that we felt would better showcase some cool Windows 10 features—facial recognition.
Given the proliferation of cameras in devices, it made sense to enable the app to determine when a face was present and then attempt to identify the user based on that image. Upon successfully identifying the user in this way, the app could then apply the filter.
This approach, however, required the creation of some basic privacy safeguards.
A note on privacy
Apps should not record information silently without any notice to the user. The user should also always have the power to turn off that recording.
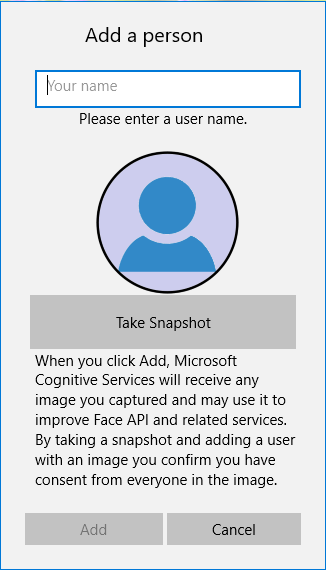
To address privacy concerns, FamilyNotes always informs the user when it is about to (1) capture an image and (2) submit an image to an external service. For example, when a user is added, a dialog appears to inform the user that all captured FamilyNotes user images will be stored and submitted to the Microsoft Face API.
This also happens when the face detection algorithm is running.
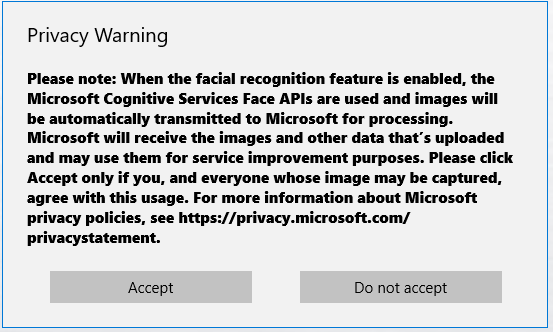
The app also continues to inform the user that facial detection is enabled and images captured for identify verification.

In addition to the warning dialogs, both the image capture and facial recognitions features need to be initiated by the user. Nothing happens in the background without direct user action.
FamilyNotes takes some basic steps, but for additional information related to privacy requirements for Microsoft Cognitive Services, see the Developer Code of Conduct for Cognitive Services. For additional information about user privacy requirements for apps on Windows in general, see the Windows Store Policies.
Getting set up with Microsoft Cognitive Services (MCS)
With just a few lines of code, Microsoft Cognitive Services (MCS) lets you build apps that enable natural and contextual interactions with APIs for computer vision, speech, language, search, and more. In this case, FamilyNotes makes use of the MCS Face API for face identification.
Note: Check out the other available services, if you have time!
To experiment with MCS, first sign-up for a free trial subscription. This subscription provides free keys for the assorted services, including for the MCS Face API.
Note: These keys do have some transaction limitations on them, which we will discuss more a little later, but you can upgrade to paid tiers later to unlock the restrictions if you want. For now, just be aware that you need a key in order to use these services in your app.
Once you have the key, you can use it to create a FaceServiceClient. That is done with the following line of code.
[code lang=”csharp”]
_faceClient = new FaceServiceClient(((App)Application.Current).AppSettings.FaceApiKey);
[/code]
Once you have a FaceServiceClient object, you can use it to interact with the MCS Face APIs to add user identification to your app.
For FamilyNotes, this entails identifying a user whenever a person is determined to be standing in front of the camera and, assuming a successful identification, filter the notes that are relevant to that specific user.
In order to do that, FamilyNotes first needs to collect an image for every user and submit those images to MCS for storage so that is has something against which to identify a user in future. After that, the app needs to be able to detect when a user is in front of the device camera, prompt the camera to take a picture of the user, and send that new image to MCS for comparison against its collection of user images. Once the user is identified, MCS can then filter the displayed notes so they are relevant.
Note: For additional guidance about getting started with the Face API, see this article on MSDN.
Seeding the collection
In order to perform any type of facial identification or verification, FamilyNotes will first prompt new users to provide images and then seed its collection of user images to MCS. Obviously, this must be done so that later images can be compared against the originals for the purpose of user identification. What may not be so obvious, however, is how future images are compared against the originals to arrive at successful user identification.
The MCS Face APIs allow for three methods of supporting facial identification: identification, similarity, and verification.
Identification and similarity both involve submitting an image to MCS, and MCS then evaluating which user in our collection is most likely to be represented in that image. With verification, the app submits two images and MCS lets the app know the likelihood that both images are the same person.
While any of these techniques could be used to achieve the desired effect, FamilyNotes uses the similarity method, since—among other things—the verification method would have meant more service transactions to repeatedly compare a detected face against each stored user image.
Note: For more details about the capabilities of the Face API, see this article on MSDN.
Because FamilyNotes uses the similarity method, it needs to collect an image for every user added to the app. Since only one image is required, FamilyNotes simply uses the CameraCaptureUI to take a snapshot. The CameraCaptureUI provides an easy way to capture photos with a lot of functionality already included, and in just a few lines of code:
[code lang=”csharp”]
CameraCaptureUI captureUI = new CameraCaptureUI();
captureUI.PhotoSettings.Format = CameraCaptureUIPhotoFormat.Jpeg;
captureUI.PhotoSettings.AllowCropping = false;
StorageFile photo = await captureUI.CaptureFileAsync(CameraCaptureUIMode.Photo);
[/code]
Note that FamilyNotes does not allow cropping. This was done intentionally to avoid a second dialog, thus streamlining the click-through process.
Once the user takes a snapshot and accepts it, the picture is stored in the photo variable. If no photo was taken, this variable will be null.
At this point, the user might cancel the process of adding a user, so as a precaution, the picture in a temporary location: the default one provided by the StorageFile. However, FamilyNotes needs to let the user see a preview of the image as their profile picture. In order to make that happen, an image source must be created from the StorageFile. The following code handles that conversion:
[code lang=”csharp”]
// Update the image
BitmapImage bitmapImage = new BitmapImage();
FileRandomAccessStream stream = (FileRandomAccessStream)await TemporaryFile.OpenAsync(FileAccessMode.Read);
bitmapImage.SetSource(stream);
image.Source = bitmapImage;
[/code]
Assuming that everything proceeds smoothly from here, the user will click on the button to add themselves as a user and the code will return to the main thread. From here, the file must be saved to a permanent location. The permanent location is based on the local directory of the app. In this case, FamilyNotes copies the file to a user-specific directory and then deletes the temporary file.
[code lang=”csharp”]
// Get or create a directory for the user (we do this regardless of whether or not there is a profile picture)
StorageFolder userFolder = await ApplicationData.Current.LocalFolder.CreateFolderAsync(("Users\" + newPerson.FriendlyName), CreationCollisionOption.OpenIfExists);
// See if we have a profile photo
if (dialog.TemporaryFile != null)
{
// Save off the profile photo and delete the temporary file
await dialog.TemporaryFile.CopyAsync(userFolder, "ProfilePhoto.jpg", NameCollisionOption.ReplaceExisting);
await dialog.TemporaryFile.DeleteAsync();
// Update the profile picture for the person
newPerson.IsProfileImage = true;
newPerson.ImageFileName = userFolder.Path + "\ProfilePhoto.jpg";
if (AppSettings.FaceApiKey != "")
{
await FacialSimilarity.AddTrainingImageAsync(newPerson.FriendlyName, new Uri($"ms-appdata:///local/Users/{newPerson.FriendlyName}/ProfilePhoto.jpg"));
}
}
[/code]
You will notice that after the file has been copied to a permanent location, there is a call to AddTrainingImageAsync. The FacialSimilarity class is a static class we created to control interactions with the Microsoft Face Similarity API. The static class is used to help control access to MCS and keep usage from exceeding free transaction limits.
For an app not worried about free transaction limits, usage of a static class likely wouldn’t be necessary. In the case of this particular call, when an image has been captured and a user added to the app, the image is added to a Microsoft Face API FaceList, which is a persistent list of faces detected from images submitted to the service. This allows faces to be saved in a FaceList that was created when the app launched and then referenced later for dynamic comparisons if the user enables facial recognition.
Determining user presence
Now that FamilyNotes has a collection of images, it can successfully initiate user detection and identification, provided it knows that a user is standing is in front of it and is ready to be identified. In this case, since the pictures should be taken in the background so that detection can be automatic without the user having to do anything, the CameraCaptureUI is not ideal. Instead, the app uses the MediaCapture API, which provides greater control over the process. This API grants direct access to the camera and enables direct interface.
The following code initializes the MediaCapture object, taking into account whether we are using the default camera or if one has been specified in the settings.
[code lang=”csharp”]
// Create MediaCapture and its settings
_mediaCapture = new MediaCapture();
var Settings = new MediaCaptureInitializationSettings();
// If we are using the default device, get it
if (IsDefaultCapture)
{
// Attempt to get the front camera if one is available, but use any camera device if not
var CameraDevice = await FindCameraDeviceByPanelAsync(Windows.Devices.Enumeration.Panel.Front);
if (CameraDevice == null)
{
Debug.WriteLine("No camera device found!");
return;
}
// Set the global camera device id
CameraDeviceId = CameraDevice.Id;
}
// Set the VideoDeviceId for the settings
Settings.VideoDeviceId = CameraDeviceId;
// Initialize MediaCapture
try
{
await _mediaCapture.InitializeAsync(Settings);
_isInitialized = true;
}
catch (UnauthorizedAccessException)
{
Debug.WriteLine("The app was denied access to the camera.");
[/code]
Once configured, the camera can then have a video effect added to the MediaCapture object that will detect the presence of faces and, using an event, regularly notify of the count.
We liked this method because it was simple to add to an existing MediaCapture object and took very little configuration. As shown in the following code, the FaceDetectionEffect is created and added to the MediaCapture object. A callback event is registered and configured to provide us with the count of detected faces every 33 milliseconds. Then the face detection is enabled, allowing us to know the number of faces currently in the camera stream.
[code lang=”csharp”]
// Create the definition, which will contain some initialization settings
var Definition = new FaceDetectionEffectDefinition();
// To ensure preview smoothness, do not delay incoming samples
Definition.SynchronousDetectionEnabled = false;
// In this scenario, choose balance over speed or accuracy
Definition.DetectionMode = FaceDetectionMode.Balanced;
// Add the effect to the preview stream
_faceDetectionEffect = (FaceDetectionEffect)await _mediaCapture.AddVideoEffectAsync(Definition, MediaStreamType.VideoPreview);
// Register for face detection events
_faceDetectionEffect.FaceDetected += FaceDetectionEffect_FaceDetected;
// Choose the shortest interval between detection events
_faceDetectionEffect.DesiredDetectionInterval = TimeSpan.FromMilliseconds(33);
// Start detecting faces
_faceDetectionEffect.Enabled = true;
[/code]
Note that the FaceTracker class could also be used for this purpose, as discussed in the Detect faces in images or videos topic on MSDN.
Facial detection logic
Now the images are seeded and FamilyNotes has a way to take pictures silently in the background when a face is detected. The next step is to take the pictures and submit them to the MCS APIs to try to determine which user is standing in front of the device.
It is not quite as simple as taking a picture, however. We need to have some logic to determine when to take pictures, and there are several things to consider.
- Multiple users might be standing in front of the camera at one time.
- There are limitations on how many submissions can be sent to the MCS with a free account, so we need to limit the number of verifications that our app submits. For free usage of the Face API, these limitations are both total transactions per month as well as a limited number of transactions per minute. Note: It is good practice to limit submissions, even even if you are not concerned with submission limitations.
- Users need to have a pleasant experience. FamilyNotes should filter notes for whomever is in front of the camera, but not every time someone happens to walk through the camera’s field of view.
- Users might manually set the selected user, which we do not want to override.
Due to these considerations, the app should not be snapping pictures all of the time and blindly sending them out for identity verification. Instead, the app needs a clearly defined state when it will take pictures and submit them for consideration.
In this case, for simplicity’s sake, FamilyNotes takes images and tries to identify users when only one face is detected. This resolves concerns about multiple users standing in front of the camera.
To limit our transactions and prevent collisions, we also don’t want to constantly take pictures and submit them for consideration. To get around these issues, the app enforces a 10-second timer. Once an image is taken, we set _holdForTimer and create a timer that will reset that parameter after 10 seconds. We also reset the timer whenever a user manually resets the filter to Everyone. If facial detection is enabled, we don’t want to be stalling on a timer when going back to an unfiltered state.
The following code demonstrates this logic.
[code lang=”csharp”]
// We are also going to take an image the first time that we detect exactly one face.
// Sidenote – to avoid a race-condition, I had to use a boolean. Just checking for _faceCaptureStill == null could produce an error.
if ((faces.Count == 1) && !_holdForTimer && !_currentlyFiltered)
{
// Kick off the timer so we don’t keep taking pictures, but will resubmit if we are not filtered
_holdForTimer = true;
// Take the picture
_faceCaptureStill = await ApplicationData.Current.LocalFolder.CreateFileAsync("FaceDetected.jpg", CreationCollisionOption.ReplaceExisting);
await _mediaCapture.CapturePhotoToStorageFileAsync(ImageEncodingProperties.CreateJpeg(), _faceCaptureStill);
if (((App)Application.Current).AppSettings.FaceApiKey != "" && FacialSimilarity.InitialTrainingPerformed)
{
var UserName = await FacialSimilarity.CheckForUserAsync(new Uri("ms-appdata:///local/FaceDetected.jpg"));
if (UserName != "")
{
OnFilterOnFace(UserName);
}
}
// Allow the camera to take another picture in 10 seconds
TimerCallback callback = (Object stateInfo) =>
{
// Now that the timer is expired, we no longer need to hold
// Nothing else to do since the timer will be restarted when the picture is taken
_holdForTimer = false;
if (_pictureTimer != null)
{
_pictureTimer.Dispose();
}
};
_pictureTimer = new Timer(callback, null, 10000, Timeout.Infinite);
}
[/code]
However, just because FamilyNotes takes an image when in the proper state, that doesn’t mean that the face APIs can determine on their own which user is in the photo. There are many reasons that a user might not be identified.
The actual facial identification logic occurs behind the CheckForUserAsync call. This function returns the name of the user detected. If no user was detected, it returns an empty string. If we have a user, the OnFilterOnFace will update the display to filter based on the detected user.
While this is a good first step, the app still needs to ensure it does not get stuck filtering the notes to the previous person who stood in front of the device. Imagine the poor user experience. If Eli walks up and filters his notes, then walks away, the notes stay filtered. Then, when Nikki comes up to the app, she will see the notes filtered for Eli. Since the logic for facial detection doesn’t filter if the app is currently filtering notes for a user, there is no way for Nikki to see her notes, even if she comes by hours after Eli has left.
There are a few possible ways to handle this. One way is to continue taking images and running them through facial detection. In this way, if another user were to step in front of the device, when the timer expires, the app would take another picture and filter on the new user. The downside to this approach is that the app would always be taking pictures, even if the same user continues to stand in front of the camera, which could increase the number of submissions to the MCS APIs.
Another approach is to keep track of the number of users in front of the camera, and if the app ever has 0 users detected, it could return to an unfiltered state. While this does handle the risk of remaining within our transaction limit, it means that it is impossible to transition immediately from one user to another.
FamilyNotes uses the second approach, despite the unsupported scenario. Since this is a sample that can be used by multiple people and this is one specific unsupported scenario, we decided that the contribution limit was a greater factor.
However, we did not want to immediately revert to an unfiltered state the first time that we detected 0 faces. That would be problematic since there can be false negatives as well as a small time window where someone might turn from the camera but still be present. To get around this issue, we created another timer that we kick of the first time 0 faces are detected. If the API ever detects a face, the app destroys the timer. Otherwise, when the timer expires, we revert to an unfiltered state.
[code lang=”csharp”]
// If we detect any faces, kill our no faces timer
if (faces.Count != 0)
{
if (_noFacesTimer != null)
{
_noFacesTimer.Dispose();
}
}
// Otherwise, if we are filtering and don’t have a timer
else if (_currentlyFiltered && (_noFacesTimer == null))
{
// Create a callback
TimerCallback noFacesCallback = (object stateInfo) =>
{
_dispatcher.RunAsync(CoreDispatcherPriority.Normal, () =>
{
OnFilterOnFace(_unfilteredName);
_noFacesTimer = null;
});
_noFacesTimer.Dispose();
};
// Set our timer
_noFacesTimer = new Timer(noFacesCallback, null, NoFacesTime, Timeout.Infinite);
}
[/code]
Conclusion
As you can see, multiple pieces need to be connected in order to enable facial detection. In addition to the technical limitations and considerations, there are also privacy concerns that you need to consider. Ultimately, however, you may choose to do things differently to get the same result in your app. Feel free to get creative!
Written by Dylan Birtolo and Joshua Partlow, Senior Content Developers for Windows & Devices Group