

If you missed the previous blog post, we looked at how you can deliver the best possible experience for your app in a responsive and scalable way so it can target all device form factors and provide a premium experience on the TV. Among other things, we covered how to take advantage of the controller and enable direction navigation, how to optimize for the couch viewing distance, ways to customize the focus visual to make it your own and much more.
And if you missed the live event, you can still watch videos of all of the sessions on the “App Dev on Xbox” event page on Channel 9.
Check out this Channel 9 demo using the Atmosphere app, and read on for the how-to.
Atmosphere
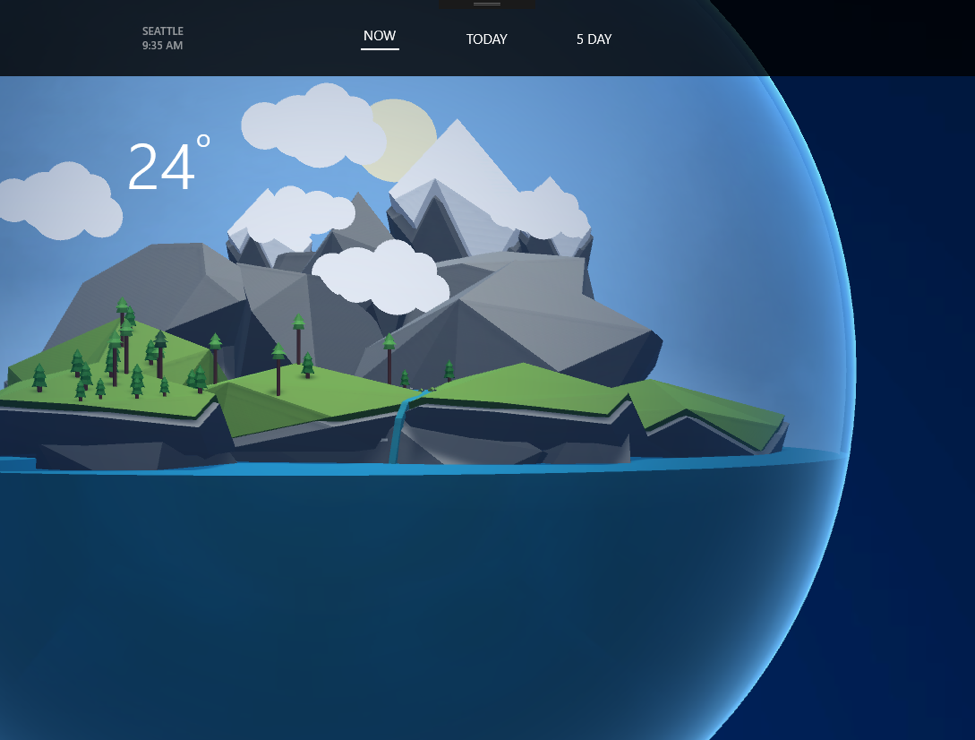
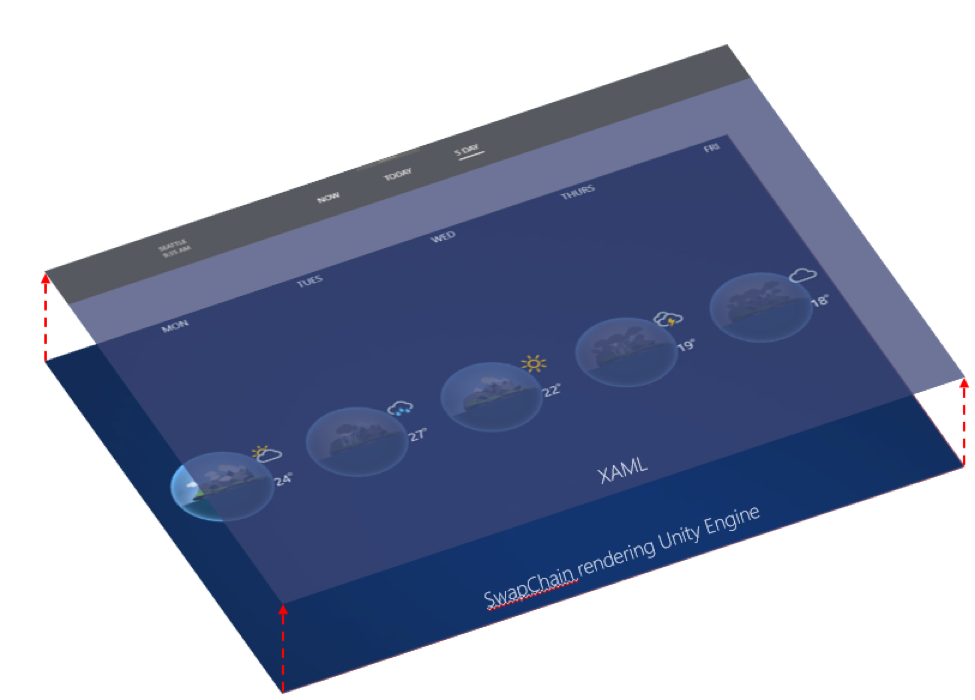
The Atmosphere app is a weather app that showcases the use of the popular Unity Engine in a normal Universal Windows Platform (UWP) application. It renders a 3D layer below a 2D XAML layer. The 3D world renders the weather with special effects like rain, thunder, clouds and so on for each day, and then the XAML User Interface (UI) layer communicates the information to the user. The app also showcases the use of app extensions that enable other developers to extend certain areas of the app – in this case, the extension provides music that matches the mood of the current weather. In addition, the weather service used by the app is exposed through an app service that enables other apps to use that weather information, as illustrated by Fourth Coffee (the news app experience from the previous blog post). Let’s dive in.
The Design of Atmosphere
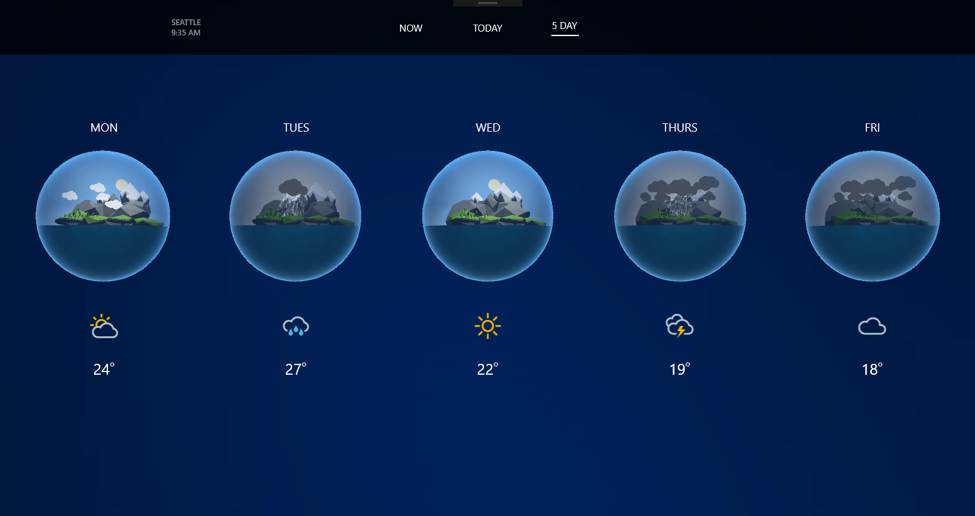
Atmosphere shows you what the weather is like using straightforward data and insightful visuals.
Numbers, short descriptions and icons tell users whether it’s cold or warm or windy outside. This leads to a clean and to-the-point design, so that people can gather its information as quickly and confidently as possible.
This is what most weather apps do, and it’s important.
Atmosphere also uses color, animation and 3D imagery to capture the emotion and personality of weather. Through subtle color changes and additional effects, like rain and shadows, the mood of weather is conveyed.
By combining clean visuals (through XAML) and smooth animations (with Unity), as well as the addition of weather-themed music, Atmosphere delivers a well-rounded experience that is simple and delightful.
This allows Atmosphere to apply itself across the platform, from cinematic viewing on the Xbox One to on-the-go weather updates on a phone, and everything in between.
Making your UWP work in three dimensions with Unity
Unity is a very popular 3D engine designed to develop 2D and 3D games and interactive experiences. The engine supports both C# and JavaScript as development languages and has a clean and beautiful editor. Unity supports exporting to a vast number of platforms, including UWP. It enables you to simply drag and drop 3D assets like models into your scene, position them around and write custom logic to develop the experience you want.
1. Creating worlds with Unity
How Atmosphere works is that we developed a generic world captured inside a glass-looking sphere, controlled by a class WorldController. Each world is essentially an instance of the WorldController.

It consists of a simple sphere that acts like the border of the world, and everything for each instance of the world happens within this border. For instance, we have the 3D models that represent the environment plus different weather effects that will be visible based on what type of weather we set the environment to in the WorldController instance.
Another class, called WeatherController, acts like the main class for controlling the Unity layer. This is what we expose to the UWP part of the application. The WeatherController controls each WorldController independently.
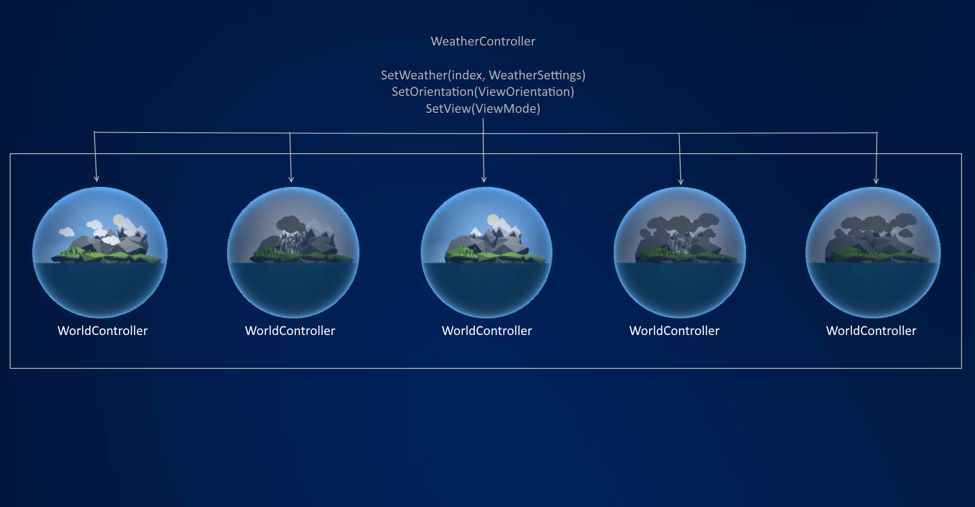
The functions we expose are: SetWeather(..), which sets the weather on one of the worlds; SetOrientation(..), which changes the orientation of the Unity layer so it matches the XAML layer; and lastly SetView(..), for positioning the worlds around in the canvas. Three views are needed: one for the close-up view, one for the detailed view and one for the 5-day forecast.
The positioning of the spheres on the screen can be done in many ways – we chose to manually distribute them on the screen based on the aspect ratio so it would be easier to align it with a XAML Grid on the UI layer.
2. Unity Interop
Since the 3D rendering layer will run on a different thread than the 2D XAML UI, we need to enable these two layers to communicate. This is done using static variables and functions, as well as events.
The first thing we do is fire an event called AssetsLoaded from the WeatherController class when Unity is ready and all the assets are loaded. We know this is true when the WeatherControllers Start() function is called automatically by Unity.
[code lang=”csharp”]
public static event EventHandler AssetsLoaded;
void Start()
{
if(AssetsLoaded != null)
AssetsLoaded(null, null);
}
[/code]
We can then catch this event in the UWP part of the app and write custom logic related to this.
WeatherController.AssetsLoaded += WeatherController_AssetsLoaded;
[code lang=”csharp”]
private void WeatherController_AssetsLoaded(object sender, EventArgs e)
{
…
}
[/code]
Since we defined SetWeather(..), SetView(..) and SetOrientation(..) as static functions, we can simply call them using WeatherController.SetWeather(..) from the UWP part of the application.
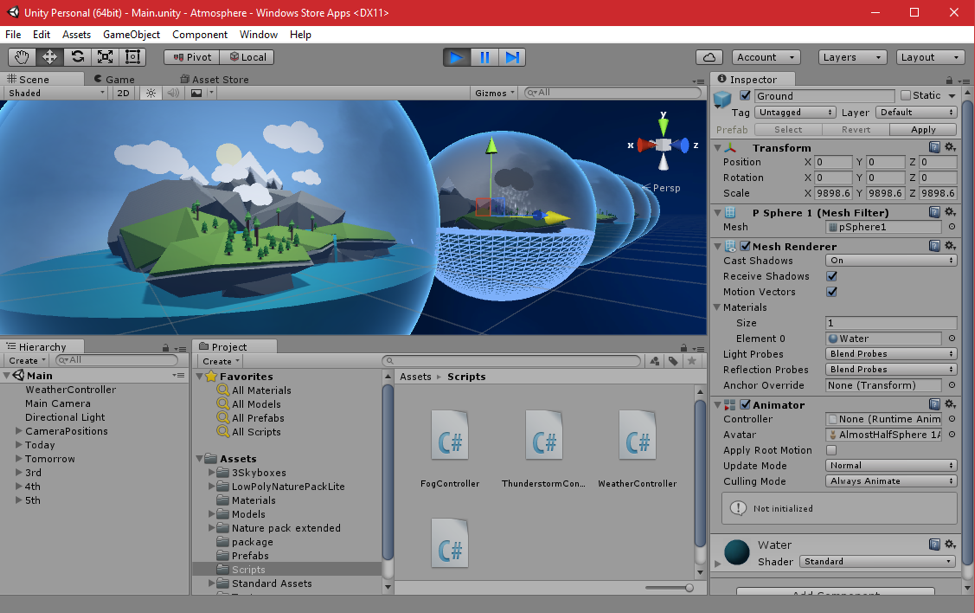
3. Exporting to UWP from Unity
Once we have this base logic in place, we can export it as a UWP from Unity. This is done from File -> Build Settings:
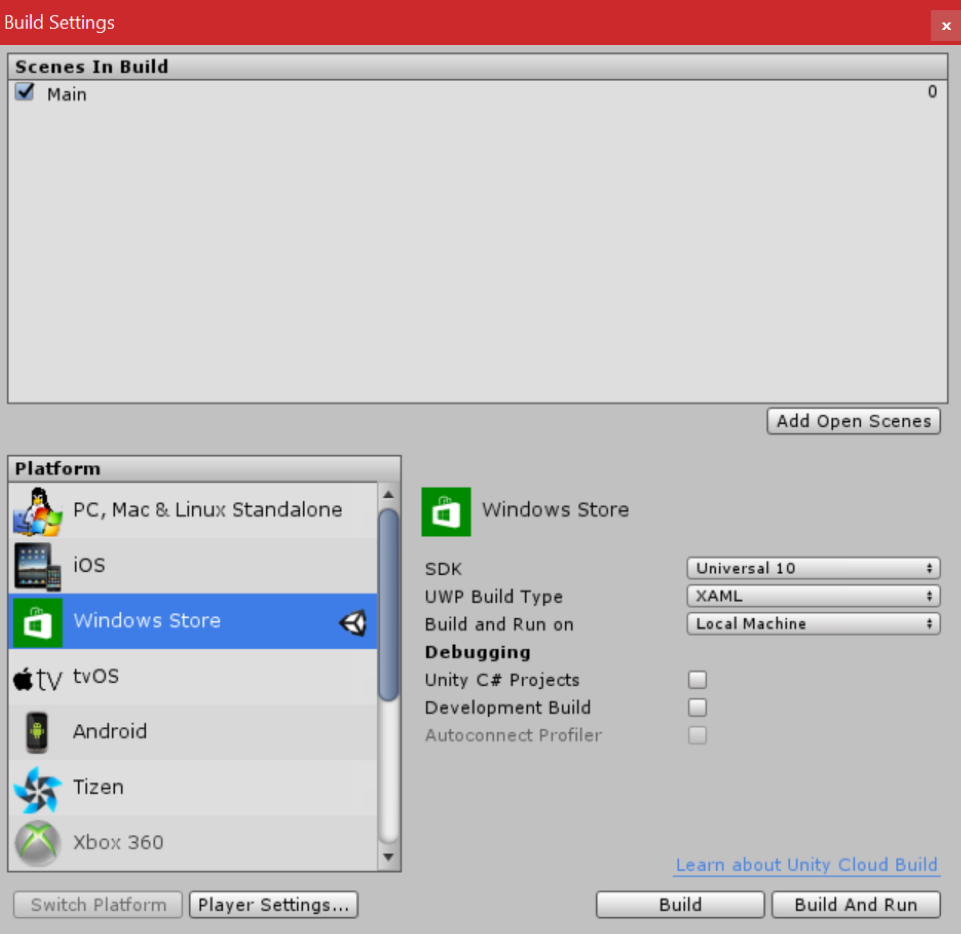
Windows Store is selected, the SDK is set to Windows 10 and the UWP Build Type is set to XAML since we want to add XAML and features on top of this.
Once exported, it will generate a normal UWP package that can run on any Windows 10 device, including Xbox. The generated UWP solution comes with three build configurations: Debug, Release and Master. The one you need to use when submitting your app to the store is the Master build.
4. Data, UWP and UI
The UI is developed using XAML and is placed on top of the SwapChain that renders the 3D content.
The weather data is then captured from a weather source and set using the functions we exposed in the WeatherController class, as well as bound using Data Binding to the XAML controls used for the UI.
Using XAML elements we define the layout of all the controls used for the UI using Grids, TextBlocks, Images for the weather icons and so on.
App Services
By implementing an app service in your UWP apps, you create an endpoint to which other apps on the same machine can call in to retrieve or provide data. The cool thing is that your app does not have to be running and it can be woken up in the background without having to load any UI. In Atmosphere, the weather service used by the application is made available through an app service so other apps, with only few lines of code, can consume the endpoint and get the current weather without needing to know how to communicate with the weather service.
1. Creating app service
There are two things that you as a developer need to do to expose an app service. First, you need to declare that your app exposes an app service by adding these lines of code in your app manifest:
[code lang=”xml”]
<uap:Extension Category="windows.appService">
<uap:AppService Name="com.atomosphere.weather" />
</uap:Extension>
[/code]
The AppService name (in this case com.atmosphere.weather) is what other apps will use to call into the app service. In addition, they will need to know your app package family name (found under Packaging in the manifest UI).
Second, you need to override the OnBackgroundActivated method in App.xaml.cs. This method will be called when another app accesses the app service, and it’s where we can get a reference to the app service connection that we can use to send and receive messages from/to the caller method in App.xaml.cs. This method will be called when another app accesses the app service, and it’s where we can get a reference to the app service connection that we can use to send and receive messages from/to the caller.
[code lang=”csharp”]
protected override void OnBackgroundActivated(BackgroundActivatedEventArgs args)
{
base.OnBackgroundActivated(args);
// Get a deferral so that the service isn’t terminated.
this.backgroundTaskDeferral = args.TaskInstance.GetDeferral();
// Associate a cancellation handler with the background task.
args.TaskInstance.Canceled += OnTaskCanceled;
// Retrieve the app service connection and set up a listener for incoming app service requests.
var details = args.TaskInstance.TriggerDetails as AppServiceTriggerDetails;
appServiceconnection = details.AppServiceConnection;
appServiceconnection.RequestReceived += OnRequestReceived;
appServiceconnection.ServiceClosed += AppServiceconnection_ServiceClosed;
}
[/code]
All messages are passed as ValueSet, essentially a key and value map that can be used to implement your custom protocol. The only command that our app currently accepts is the CurrentWeather and it returns a ValueSet that contains the current Temperature. The full code is here.
[code lang=”csharp”]
private async void OnRequestReceived(AppServiceConnection sender, AppServiceRequestReceivedEventArgs args)
{
var messageDeferral = args.GetDeferral();
ValueSet message = args.Request.Message;
ValueSet returnData = new ValueSet();
if (message.ContainsKey("Command"))
{
string command = message["Command"] as string;
// … //
}
else
{
returnData.Add("Status", "Fail: Missing command");
}
await args.Request.SendResponseAsync(returnData); // Return the data to the caller.
messageDeferral.Complete();
}
[/code]
2. Consuming the app service
Calling into the app service allows other developers to use functionality that is part of your app and runs in the context of your app. To illustrate this, we used Fourth Coffee, the news app experience from the previous blog post, to implement the app service from Atmosphere and display the current weather on the home page. The code below comes from the app source code which is already available on the GitHub repository.
Apps can easily check to see if an app service is available by calling the FindAppServiceProvidesAsync method, which returns all app services with the name provided. Optionally, your app could also ask the user to install a specific app from the store, if not installed already, which returns all app services with the name provided. Optionally, your app could also ask the user to install a specific app from the store, if not installed already.
[code]
var services = await AppServiceCatalog.FindAppServiceProvidersAsync("com.atmosphere.weather");
[/code]
Calling into the service requires the creation of a new AppServiceConnection and configuring it with the app service name and app package family name. Once the service is created, the channel can be opened and you can start sending messages in the form of ValueSet, then await a response. This is what it looks like in Fourth Coffee:
[code]
service = new AppServiceConnection();
service.AppServiceName = "com.atomosphere.weather";
service.PackageFamilyName = "WeahterCastPoly_pzq3xp76mxafg";
await service.OpenAsync();
var message = new ValueSet();
message.Add("Command", "CurrentWeather");
var response = await service.SendMessageAsync(message);
// use result
[/code]
To call into the app service from another app, there are two things that developers must know about the app providing the app service: (1) the name of the app service, and (2) the package family name.
There are multiple ways to make the transfer of this information easier for developers who will be accessing your app service.
If your app service will be accessed by multiple app developers, you should consider creating a small library that developers can use within their apps without having to know anything about the app service. The library should wrap around your protocol and implement the calls to your service by including the app service name and package family name.
Alternately, an app service can be made discoverable through the use of App Extensions, which we will cover in the next section.
App Extensions
Creating an ecosystem of apps would not be possible without having some way for these apps to communicate and extend themselves. With the Windows 10 Anniversary Update, developers can now open up their apps so other developers can write extensions that provide functionality not otherwise available in the host app. The extensions themselves are just other UWP apps that can be downloaded from the store the same way and can work as standalone apps.
Getting started is really straightforward. First the host application, in this case Atmosphere, declares that it is an extension host and defines the name in the manifest:
[code lang=”xml”]
<uap3:Extension Category="windows.appExtensionHost">
<uap3:AppExtensionHost>
<uap3:Name>Atmosphere</uap3:Name>
</uap3:AppExtensionHost>
</uap3:Extension>
[/code]
The extension can then define itself as an extension in its own manifest by providing the same name as the host:
[code lang=”xml”]
<uap3:Extension Category="windows.appExtension">
<uap3:AppExtension Name="Atmosphere"
Id="Sounds"
Description="Adds additional sound features to the Atmosphere compatible apps"
DisplayName="Atmosphere Sounds"
PublicFolder="Sounds">
</uap3:AppExtension>
</uap3:Extension>
[/code]
For both of these, make sure you have the namespace definition for UAP-3 and that it is added to the IgnorableNamespaces at the top of the manifest:
[code]
xmlns:uap3=http://schemas.microsoft.com/appx/manifest/uap/windows10/3
[/code]
To use extensions in the host app, first you will need to open the AppExtensionCatalog for the name you defined in the manifest (e.g. Atmosphere) and subscribe to events for when other extensions are installed. This allows you to install extensions even when your app is running:for the name you defined in the manifest (e.g. Atmosphere) and subscribe to events for when other extensions are installed. This allows you to install extensions even when your app is running:
[code]
_catalog = AppExtensionCatalog.Open("Atmosphere");
_catalog.PackageInstalled += _catalog_PackageInstalled;
[/code]
Once the AppExtensionCatalog is open, iterating over every extension installed can be done using the FindAllAsync() command.
[code lang=”csharp”]
foreach (var extension in await _catalog.FindAllAsync())
{
// use extension
}
[/code]
In general, there are two ways that an extension can help extend the functionality: by providing an app service, and by providing data files in the public folder.
1. AppService
First, the extension provider can expose an app service that provides functionality for other developers to take advantage of in their apps. The extension can then provide the endpoint information as part of the properties, and it can be accessed by the host as described in the previous section. To illustrate this, Atmosphere provides an extension for Fourth Coffee where the app service is defined and can be used by Fourth Coffee even without Fourth Coffee knowing the name of the service or the package family name.
To provide the name of the app service, the extension can add custom properties to the extension definition in the manifest:
[code lang=”xml”]
<uap3:Extension Category="windows.appExtension">
<uap3:AppExtension Name="FourthCoffee"
Id="weather"
Description="Describes com.atmosphere.weather app service"
DisplayName="Atmosphere"
PublicFolder="Public">
<uap3:Properties>
<Service>com.atmosphere.weather</Service>
</uap3:Properties>
</uap3:AppExtension>
</uap3:Extension>
[/code]
In this case, we added a new property called Service that includes the service name. In Fourth Coffee, we can then use the extension to read the properties and discover the name of the app service. In addition, the extension already provides the package family name to be used. You can see the code in Fourth Coffee here:
[code lang=”csharp”]
var properties = await extension.GetExtensionPropertiesAsync() as PropertySet;
if (properties != null && properties.ContainsKey("Service"))
{
PropertySet service = properties["Service"] as PropertySet;
var serviceName = service["#text"].ToString();
var packageName = extension.Package.Id.FamilyName;
Weather = await WeatherService.GetWeather(serviceName, packageName);
}
[/code]
2. Public folder
Second, the extension provider can host data files that can be made available to the host to use. This allows assets to be shipped separately from the main app and extended over time through extensions. Other developers creating extensions for your app can also create assets that can be used within your app. Atmosphere has the ability to play sounds depending on what the current weather is, using sounds found in extensions provided by other developers. To see this in action, install the Atmosphere Music Extension app found in the same solution as Atmosphere. You will notice that Atmosphere will pick up the extension immediately and start playing the sounds.
Calling the GetPublicFolderAsync method on an extension allows you to get a StorageFolder that points to data files the extension has made available to your app. Here is the code from Atmosphere:
[code]
var folder = await extension.GetPublicFolderAsync();
var files = await folder.GetFilesAsync();
_soundFiles = files.Where(i => i.Name.EndsWith(".mp3"));
[/code]
Until next time…
…check out the app source on our official GitHub repository, read through some of the resources provided, watch the event if you missed it, and let us know what you think through the comments below or on twitter. if you missed it, and let us know what you think through the comments below or on twitter.
Next week we will release another app experience and go in-depth on how to develop cross-platform applications by sharing code with Xamarin. We will also cover how to enable background audio in your applications so the music can continue playing while the user is playing a game (or staying up late to finish up this blog post).
Until then, happy coding!
Resources
- App Extensibility: Build and Ecosystem of Apps (video from //build/ 2016)
- Channel 9 demo: Creating UWP Apps for Xbox with Unity
- Create and consume an app service and How to convert it to run in the same process
- Get Unity
- Learn the basics of Unity
Previous Xbox Series Posts
- Tailoring your app for Xbox and the TV
Get started now – download Visual Studio.
The Windows team would love to hear your feedback. Please keep the feedback coming using our Windows Developer UserVoice site. If you have a direct bug, please use the Windows Feedback tool built directly into Windows 10.