Web-to-app linking allows you to drive user engagement by associating your app with a website. When users open a link to your website, instead of opening the browser, your app is launched. If your app is not installed, your website is opened in the browser as usual. By implementing this feature, you can achieve greater app engagement from your users while also offering them a richer experience. For example, this could help address situations where your users may not get the best experience through the browser (e.g. on mobile devices or on desktop PCs where the app is more full-featured that the website).
To enable web-to-app linking you will need:
- A JSON file that declares the association between your app (Package Family Name) and your website
- This JSON file needs to be placed in the root of the host (website) or in the “.well-known” subfolder
- To register for AppUriHandlers in your app’s manifest
- To modify the protocol activation in your app’s logic to handle web URIs as well
To show how this feature can be integrated with your apps and websites, we will use the following scenario:
You are a developer that is passionate about Narwhals. You have a website—narwhalfacts.azurewebsites.net—as well as an app—NarwhalFacts —and you would like to create a tight association between them. In doing so, users can click a link to your content and be launched in the app instead of the browser. This gives the user the added benefits of the native app, like being able to view the content, even while offline. Furthermore, you have made significant investments in the app and created a beautiful and enjoyable experience that you want all of your users to enjoy.
Step 1: Open and run the NarwhalFacts App in Visual Studio
First download the source code for Narwhal Facts from the following location:
https://github.com/project-rome/AppUriHandlers/tree/master/NarwhalFacts
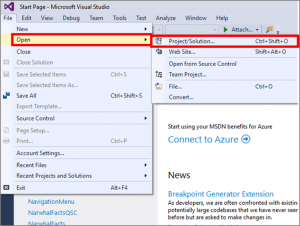
Next, launch Visual Studio 2015 from the Start menu. Then, go to Open → Project/Solution…:
Go to the folder that contains NarwhalFacts’ source code and open the NarwhalFacts.sln Visual Studio solution file.
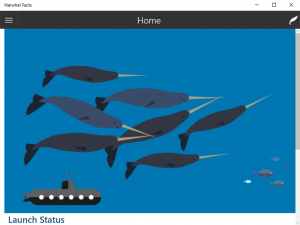
When the solution opens, run the app on the local machine:
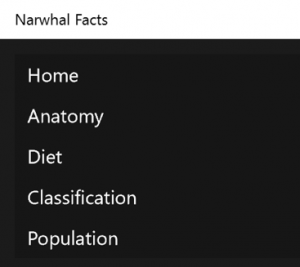
You will see the home page and a menu icon on the left. Select the icon to see the many pages of narwhal content the app offers.
Step 2: View the mirrored content on the web
Copy the following link:
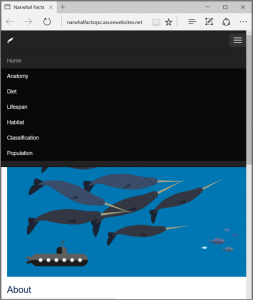
http://narwhalfacts.azurewebsites.net/
Paste it into your browser’s address bar and navigate to it. Notice how the content on the web is almost identical to the content offered in the app.
Step 3: Register to handle http and https links in the app manifest
In order to utilize web-to-app links, your app needs to identify the URIs for the websites it would like to handle. This is accomplished by adding an extension registration for Windows.appUriHandler in your app’s manifest file, Package.appxmanifest.
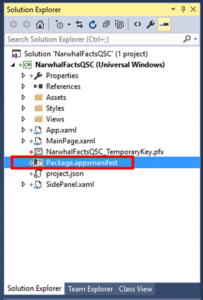
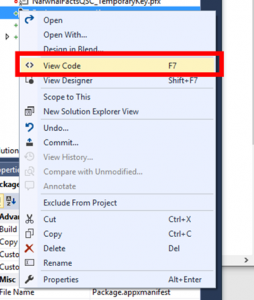
In the Solution Explorer in Visual Studio, right-click Package.appxmanifest and select View Code.
Notice the code in between the Application tags in the app manifest:
[code lang=”xml”]
<Applications>
…
<Extensions>
<uap3:Extension Category="windows.appUriHandler">
<uap3:AppUriHandler>
<uap3:Host Name="narwhalfacts.azurewebsites.net" />
</uap3:AppUriHandler>
</uap3:Extension>
</Extensions>
</Application>
</Applications>
[/code]
The above code tells the system that you would like to register to handle links from the specified host. If your website has multiple addresses like m.example.com, www.example.com, and example.com then you will need a separate host listed for each.
You might notice that this is similar to a custom protocol registration with windows.protocol. Registering for app linking is very similar to custom protocol schemes with the added bonus that the links will fall back gracefully to the browser if your app isn’t installed.
Step 4: Verify that your app is associated with your website with a JSON file on the host web server
To ensure only your app can open content to your website, you must also include your Package Family Name in a JSON file located in the web server root or at the well-known directory on the domain. This signifies your website giving consent for the listed apps to open your content. You can find the Package Family Name in the Packages section of the app manifest designer.
Go to the JSON directory in the NarwhalFacts source code and open the JSON file named windows-app-web-link.
Important
The JSON file should not have a .json file suffix.
Once the file is open, observe the contents in the file:
[code lang=”csharp”]
[{
"packageFamilyName": "NarwhalFacts_9jmtgj1pbbz6e",
"paths": [ "*" ],
"excludePaths" : [ "/habitat*", "/lifespan*" ]
}]
[/code]
Wildcards
The example above demonstrates the use of wildcards. Wildcards allow you to support a wide variety of links with just a few lines of code, similar to regular expressions. Web to app linking supports two wildcards in the JSON file:
| Wildcard | Description |
| * | Represents any substring |
| ? | Represents a single character |
For instance, the example above will support all paths that start with narwhalfacts.azurewebsites.net except those that include “/habitat” and “/lifespan”. So narwhalfacts.azurewebsites.net/diet.html will be supported, but narwhalfacts.azurewebsites.net/habitat.html, will not.
Excluded paths
To provide the best experience for your users, make sure that online only content is excluded from the supported paths in this JSON file. For example, “/habitat” and “/lifespan” are excluded in the example above. Wildcards are supported in the excluded paths as well. Also, excluded paths take precedence over paths.
Multiple apps
[code lang=”csharp”]
[{
"packageFamilyName": "NarwhalFacts_9jmtgj1pbbz6e",
"paths": [ "*" ],
"excludePaths" : [ "/habitat*", "/lifespan*" ]
},
{
"packageFamilyName": "NarwhalAppTwo_32js90j1p9jmtg",
"paths": [ "/example*", "/links*" ]
}]
[/code]
If you have two apps that you would like to link to your website, just list both of the application Package Family Names in your windows-app-web-link file. Both apps can be supported with the user making the choice of which is the default link if both are installed. Made the wrong choice at first? Users can change their mind in Settings > Apps for Websites later.
Step 5: Handle links on Activation to deep link to content
Go to App.xaml.cs and notice the code in the OnActivated method:
[code lang=”csharp”]
Go to App.xaml.cs and notice the code in the OnActivated method:
protected override void OnActivated(IActivatedEventArgs e)
{
Frame rootFrame = Window.Current.Content as Frame;
if (rootFrame == null)
{
// Create a Frame to act as the navigation context and navigate to the first page
rootFrame = new Frame();
rootFrame.NavigationFailed += OnNavigationFailed;
Window.Current.Content = rootFrame;
}
Type deepLinkPageType = typeof(MainPage);
if (e.Kind == ActivationKind.Protocol)
{
var protocolArgs = (ProtocolActivatedEventArgs)e;
switch (protocolArgs.Uri.AbsolutePath)
{
case "/":
break;
case "/index.html":
break;
case "/classification.html":
deepLinkPageType = typeof(ClassificationPage);
break;
case "/diet.html":
deepLinkPageType = typeof(DietPage);
break;
case "/anatomy.html":
deepLinkPageType = typeof(AnatomyPage);
break;
case "/population.html":
deepLinkPageType = typeof(PopulationPage);
break;
}
}
if (rootFrame.Content == null)
{
// Default navigation
rootFrame.Navigate(deepLinkPageType, e);
}
// Ensure the current window is active
Window.Current.Activate();
}
[/code]
Don’t Forget!:
Make sure to replace the final if statement logic in the existing code with:
rootFrame.Navigate(deepLinkPageType, e);
This is the final step in enabling deep linking to your app from http and https links, let’s see it in action!
Step 6: Test it out!
Press Play to run your application to verify that it launches successfully.
Observe that the application is running, if you run into issues, double check the code in steps 3 and 5.
Because our path logic is in OnActivated, close the NarwhalFacts application so that we can see if the app is activated when you click a link!
Copy the following link
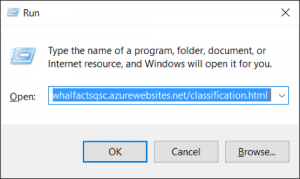
http://narwhalfacts.azurewebsites.net/classification.html
Remember to make sure the NarwhalFacts app is closed and press Windows Key + R to open the Run application and paste (Control + V) the link in the window. You should see your app launch instead of the web browser!
If you would like to see how the protocol activation logic works. Set a breakpoint by clicking on the grey bar to the left of the switch statement in your OnActivated event.
By clicking links you should see that the app launches instead of the browser! This will drive users to your app experience instead of the web experience when one is available.
Additionally, you can test your app by launching it from another app using the LaunchUriAsync API. You can use this API to test on phones as well. The Association Launching sample is another great resource to learn more about LaunchUriAsync.
Note: Starting with the Windows 10 Creators update, supported links clicked in Edge will launch the corresponding app. Supported links clicked in other browsers (e.g. Internet Explorer, etc.), will keep you in the browsing experience.
Local validation tool
You can test the configuration of your app and website by running the App host registration verifier tool which is available in:
%windir%\system32\AppHostRegistrationVerifier.exe
Test the configuration of your app and website by running this tool with the following parameters:
AppHostRegistrationVerifier.exe hostname packagefamilyname filepath
- Hostname: Your website (e.g. microsoft.com)
- Package Family Name (PFN): Your app’s PFN
- File path: The JSON file for local validation (e.g. C:\SomeFolder\windows-app-web-link)
Note: If the tool does not return anything, validation will work on that file when uploaded. If there is an error code, it will not work.
Registry key for path validation
Additionally, by enabling the following registry key you can force path matching for side-loaded apps (as part of local validation):
HKCU\Software\Classes\LocalSettings\Software\Microsoft\Windows\CurrentVersion\
AppModel\SystemAppData\YourApp\AppUriHandlers
- Keyname: ForceValidation
- Value: 1
AppUriHandlers tips:
- Make sure to only specify links that your app can handle.
- List all of the hosts that you will support. Note that www.example.com and example.com are different hosts.
- Users can choose which app they prefer to handle websites in Settings -> Apps for Websites.
- Your JSON file must be uploaded to an https server.
- If you need to change the paths that you wish to support, you can republish your JSON file without republishing your app. Users will see the changes in 1-8 days.
- All sideloaded apps with AppUriHandlers will have validated links for the host on install. You do not need to have a JSON file uploaded to test the feature.
- This feature works whenever your app is a UWP app launched with LaunchUriAsync or a classic Windows application launched with ShellExecuteEx. If the URI corresponds to a registered App URI handler, the app will be launched instead of the browser.
See also:
By Juan Sebastian Oviedo, Kyle Conroy, Sanjai Ganesh Jeenagiri (special thanks to Jill Bender)
Download Visual Studio to get started.
The Windows team would love to hear your feedback. Please keep the feedback coming using our Windows Developer UserVoice site. If you have a direct bug, please use the Windows Feedback tool built directly into Windows 10.

