Whether its files and documents, your media or complete control of your system one of the advantages of a connected world is that there are many ways to get to what you want from where you want. I wanted to cover several techniques you can take advantage of to easily ‘phone home’ to your systems or data when you are out of the house.
Anywhere access
First, if access to your files, especially docs and photos, is what you are after you can’t beat SkyDrive for easy access and sharing from anywhere. This is the way to go in many cases and even though I use all the techniques I cover below I use SkyDrive too. It works great from Windows Phone too! You can find great tips on using SkyDrive here.
Media Streaming
If it’s your media library you need to access while you are away from home then Remote Media Streaming, a feature of Windows 7, is a great way to do that. It’s easy to configure so you can get to your music, videos and even recorded TV remotely using Windows Media Player. Pete Brown did a great post a while ago covering exactly how to set this up. If you haven’t tried this out you should give it a try.
A full remote access solution in a box
If you want a comprehensive approach then Windows Home Server is really the way to go for remote access to files, documents, media and your systems. Windows Home Server represents the deluxe solution by allowing you and other people you permit to remotely access your data as well as Remote Desktop to multiple systems on your home network. It’s easy to set up, handles the configuration of your firewall and provides you with a domain name putting together all the pieces right from the control panel. You can find more on WHS remote access features here.
Letting Remote Desktop out of the house
The perfect complement to Remote Media Streaming is what I call ‘the do it yourself approach to Remote Desktop over the Internet’. With Windows 7 Professional or Ultimate Edition you can use Remote Desktop to get to your system from across the room or around the world. From across the room is simple, but the around the world part requires a little configuration. I’ve used this setup for a long time and it comes in handy quite a bit. To get it working three things are needed:
1. Enable Remote Desktop
2. Allow Remote Desktop traffic through your firewall
3. Make your system discoverable on the Internet
Enable Remote Desktop
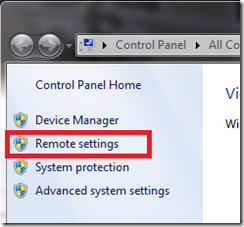
To enable Remote Desktop or to check to see if it enabled already, open Control Panel and then System then on the left choose “Remote Settings”.
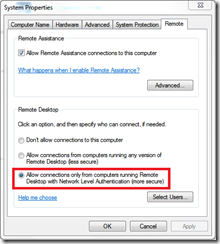
If you will be using only Windows 7 or Windows Vista to access your home system then you should choose the bottom option which requires NLA. You can find further explanation of these options and how to determine if your Remote Desktop client supports NLA here. Click the “Select Users” box and make sure to only grant permissions to the accounts you will use remotely. Minimizing the number of accounts with access and using strong passwords on your accounts are a must. Making this machine available on the Internet removes a significant layer of security and you shouldn’t take this lightly.
Allow Remote Desktop traffic through your router to your system
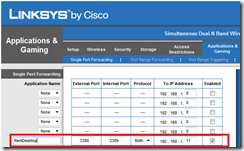
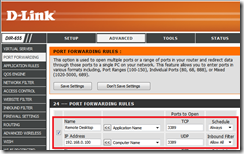
By default the firewall in your router almost certainly blocks the ports needed for Remote Desktop access. For the sake of this explanation we’ll assume you want to enable just one system on your home network for access via the Internet. In this case you’ll want to forward port 3389, both TCP and UDP, to the correct machine on your local network. The IP address for this machine in your local network should be configured so it does not change. This is so that the port forwarding always forwards traffic to the correct system. You can accomplish this via a DHCP reservation on your router or by using a static IP address for the system.
This is bit tricky to cover here in detail here as different routers accomplish these things differently. My Linksys port forwarding looks like this:
And on a D-Link router it looks like this
Make your system discoverable on the Internet
Perhaps the biggest single inconvenience to this solution is that when the IP address you get at home from your ISP changes and most will at some point, you will not be able to get to your machine remotely without checking to see what the new address is. This is something that will need to be done via your local network at home which defeats the purpose of our work here!
There are good solutions to this problem though such as TZO.com, Dyn.com and No-IP.com among others. These services will maintain a DNS name for your home network and keep it up to date so you can always reach it remotely. Most offer a free version of their service. I actually use No-IP.com but there are many that will work.
Once you’ve got Remote Desktop enabled, try it out locally on your home network then give it a shot from a friend’s house. You’ll find the Remote Desktop Connection available under Accessories on the Start Menu or just run mstsc.exe. For computer name provide the fully qualified domain name of your home system as you configured it with your DNS service.
Other considerations
Security is important when making any system available on the Internet. As I mention above, only enable the account(s) that you need to have access and put strong passwords on them. In addition to those accounts all members of the administrators group will have access so tighten those passwords up too. You should also consider changing the name of the Administrator account.
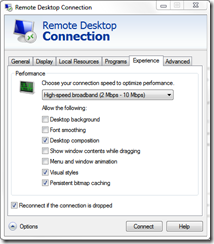
An important factor for all of the above techniques is bandwidth. A lot of broadband connections these days have pretty good upstream bandwidth. Enough that you can expect to stream some music and video without any problems. Remote Desktop can be configured to work very well even over low bandwidth connections. You can tweak the settings for remote desktop from the client on the Experience tab to give you the best performance.
If you’ve got any questions or anything to add let me know here or follow up over in the Windows Experts Community.

