AMD CrossFire is a technology that allows the GPUs from multiple AMD graphics adapters to be used together so that graphics performance can be multiplied on your PC. If you want to push consumer AMD graphics to the limit, you can use up to four AMD 7970 graphics cards together with CrossFire to create an awesomely powerful gaming PC. CrossFire technology allows applications such as DirectX 11 games to tap into the power of multiple GPUs simultaneously for increased performance. Performance gains can be seen without any extra coding effort—but even more can be had if developers tune for multi-GPU configurations. While CrossFire is supported for both AMD consumer and professional products, in this blog post we’ll focus on the consumer side of CrossFire technology running with Windows 8.
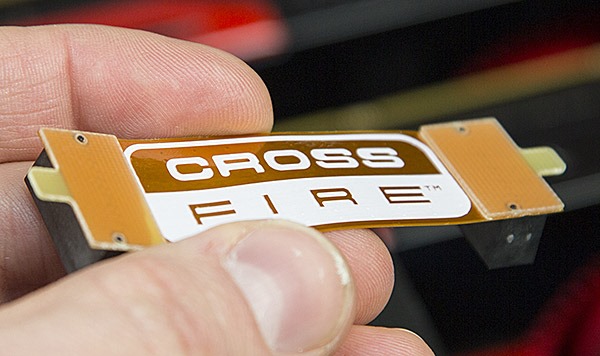
The CrossFire bridge makes it possible for multiple AMD cards to work together seamlessly
AMD CrossFire is a great option when you want to have the most powerful AMD graphics setup possible, and/or when you want to have the ability to upgrade your graphics capabilities over time. With CrossFire you can start with a single AMD graphics card and add another compatible card at a later time. The graphics cards don’t even have to be the same in order to take advantage of CrossFire. Here’s a chart that outlines the current AMD CrossFire compatibility matrix:
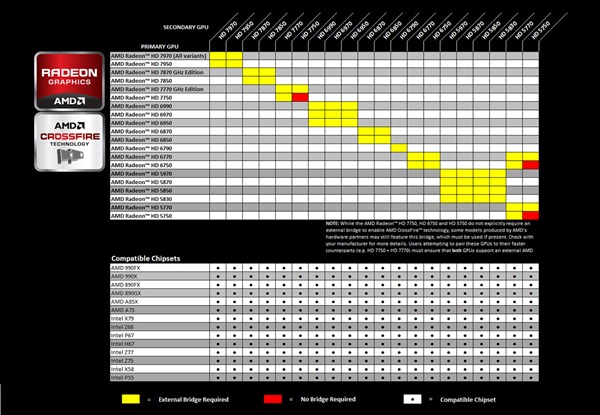
AMD CrossFire compatibility chart – courtesy AMD – click to enlarge
As you can see in the chart, different graphics cards within the same family are supported by CrossFire which gives greater flexibility when upgrading to a CrossFire setup.
So how does CrossFire work? AMD CrossFire uses a single card to perform rendering, and one or more cards for distributed DirectX offload. GPU-compute workloads (OpenCL, or C++ AMP tasks, for example) can scale with extra GPUs, but these tasks won’t leverage CrossFire technology like DirectX tasks do.
The following diagram shows the most extreme AMD CrossFire configuration that’s possible today (quad 7970):
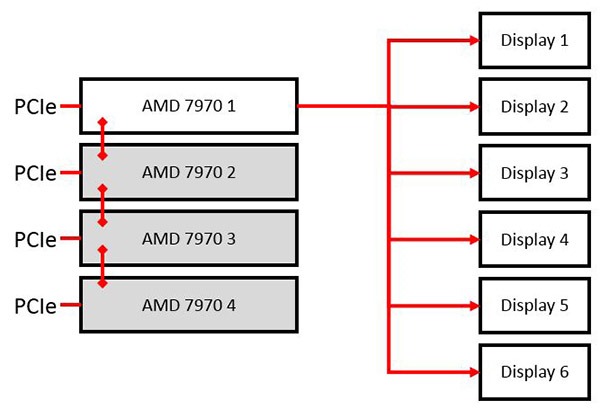
Extreme 4-card 6-display AMD CrossFire setup
With CrossFire, up to four cards can be used together, with a single graphics card used for output. In this diagram you can see how this extreme setup would be configured. On the right-hand side we see the maximum number of displays connected:
- Diplays 1,2 – via Mini DisplayPort 1 to dual-link DVI
- Diplays 3,4 – via Mini DisplayPort 2 to dual-link DVI
- Display 5 – DVI
- Display 6 – HDMI (1.4a supported)
We can also see on the left-hand side how three extra cards (gray) share the graphics workload, while a single card (white) actually renders the combined output to the displays. The red left-hand links between each card represent the CrossFire bridge connectors. Because the CrossFire bridge carries the primary data stream between the compute offload cards and the rendering card, the PCIe bus doesn’t get swamped with data. By preserving PCIe bandwidth, CrossFire plays well with other cards in the system.
All this sounds great on paper, but I’d rather talk about real-world results when it comes to quantifying the relevant performance gains. In order to provide some first-hand data, I took the AMD 7970-equipped Windows 8 system that I’ve used for previous blog posts (see here, and here), and added a second 7970 in CrossFire configuration.
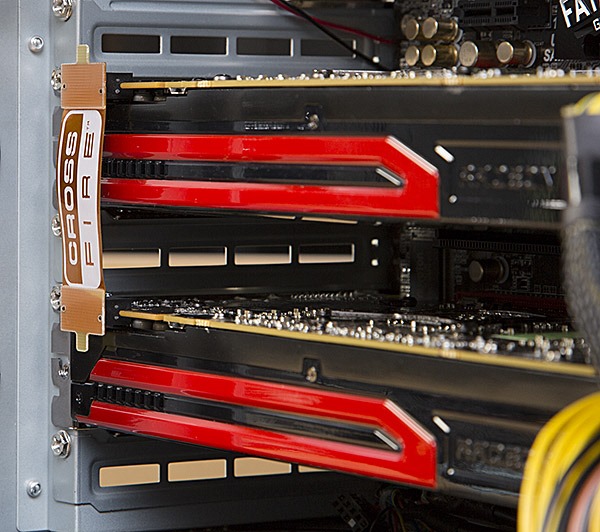
What’s better than an AMD 7970? Two AMD 7970 cards in CrossFire!
Here’s how a CrossFire two-card install is performed:
- Power down the system, access internals, identify two open PCIe slots (use top two full-size PCIe slots if possible)
- Plug in the graphics cards into adjacent full-size PCIe slots
- Plug in PCIe power connectors
- Attach the CrossFire bridge between the two cards
- Connect displays to one graphics card (I used top-most card)
Before you install graphics cards, it’s a good idea to make sure that your PSU can supply sufficient wattage to safely power all of the cards that you plan on using.
Here are some PSU guidelines for those of you wanting to run one or more 7970 graphics cards:
- One 7970: 500W minimum
- Two 7970s: 750W minimum
- Three 7970s: 1000W minimum
- Four 7970s: 1250W minimum
You’re now ready to boot into Windows and check your configuration:
- Boot into Windows
- Open AMD Vision Engine Control Center
- Check CrossFire configuration (in performance group) – enable if needed
- Setup Eyefinity display groups if needed
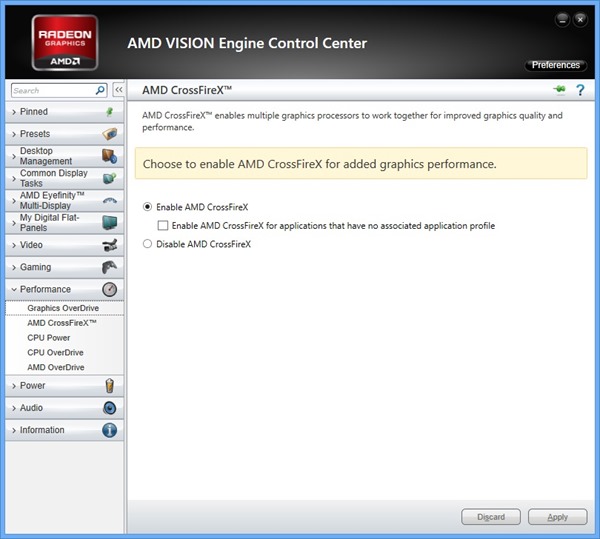
CrossFire settings in AMD Vision Engine Control Center (click to enlarge)
That’s all I had to do in order to get CrossFire setup on my AMD gaming system. Let’s see how this setup does with a DirectX 11 game!
In order to test CrossFire performance, I ran Dirt3 with a 3×1 Eyefinity display group setup (3 x 1920×1800 @ 60 Hz). I used maxed-out graphics settings in Dirt3 and captured FPS numbers for both the single 7970 configuration and the dual CrossFire-enabled 7970 configuration. The key metric for these tests is the performance scaling factor with CrossFire. With two cards, an ideal scaling factor would be 2.0X (twice the FPS with CrossFire compared to the single-card setup). Let’s see what happened.

Dirt 3 screenshot with max settings at 5760×1080

Side-by-Side FPS values: Single-7970 (left) and Dual-7970 CrossFire (right)
Pretty impressive result! If we calculate the scaling factor we get:
(CrossFire FPS) / (non-CrossFire FPS) = 88/45 = 1.96X
That’s extremely close to the ideal scaling factor of 2.0X! You can see just how far this technology has come since it was introduced in 2005. In early implementations, a scaling factor of 1.5X would have been typical. With a scaling factor of nearly 2.0X for a two-card setup like this one, a CrossFire upgrade makes a lot of sense.
While these tests were not scientific, they did tell me what I needed to know: AMD graphics with CrossFire scales extremely well, and enables big performance gains in DirectX 11 games on Windows 8. There’s definitely a lot more to explore here with CrossFire and Eyefinity- and if you have ideas of what you’d like to see, please leave a comment!
Stay up to date, follow me on Twitter!
