Virtual Reality (VR) is not entirely new. Various forms of computer-based VR systems have been in existence since the 1980s. What is new is the emergence of VR technology that is suitable and affordable for the everyday consumer. Oculus VR is pioneering in the world of affordable VR. Believe it or not, you can buy a fully functional developer kit called Oculus Rift for just $300.00 that can be used to try out VR experiences and develop games and other apps that use VR technology. In this article I’ll share my experiences with the Oculus Development Kit and SDK, Oculus-supported DirectX games, and also discuss the underlying sensor technology that makes these new experiences possible.
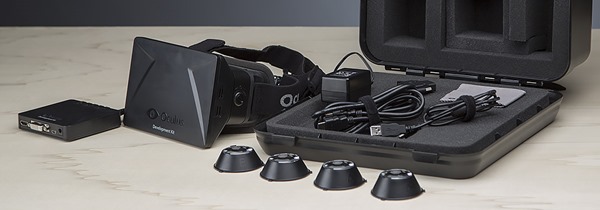
The Oculus VR Development Kit includes everything you need to get started with Oculus VR (click/tap to enlarge)
Getting Setup with the Oculus Rift Development Kit
The Oculus Rift Development Kit is a complete virtual reality hardware setup that works with the Oculus SDK (available here) which is a free download. The Oculus Rift Development Kit includes the following:
- Oculus Rift headset and control box
- Three sets of lenses (uncorrected and two levels of nearsighted correction)
- 6’ HDMI cable
- 3’ USB cable
- Power adapter
- DVI/HDMI adapter
- Lens cleaning cloth
- Foam padded hard case
The team at Oculus VR has done a great job of including everything you’ll need to get started with based on the most common PC configurations. I had no trouble running Oculus Rift on my Surface Pro 2 and on my HP Z820 with NVIDIA GeForce GTX 780 Ti graphics card.
Here’s what I did to get things up and running:
- Download the Oculus SDK
- Plug the power cable into the Oculus Rift control box
- Plug the USB cable and DVI cable into the PC
- Power up Oculus Rift (there’s a power button)
- Check screen resolution settings (duplicate displays, 1280×800 resolution)
- Run the Configuration Utility and World Demo (included in SDK)
Everything worked smoothly, and you get instant satisfaction by running the Oculus World Demo which allows you to “look around” in a virtual room. The first time you try Oculus, you’ll experience something truly unique and exciting. It may take a few minutes to get used to the “feeling”, but for most people it becomes a natural experience quickly.
While the Oculus World Demo is cool, what I really wanted to try out was one of the DirectX PC games that has native Oculus Rift support. There are actually quite a few DirectX PC games that integrate with Oculus Rift, and you can find a complete list on Wikipedia here.
PC Gaming with Oculus Rift
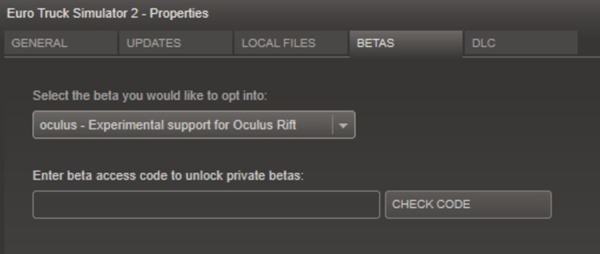
When I saw that Euro Truck Simulator 2 on the beta supported games list, I knew I had to give it a try. I love trucks and thought that being able to look around naturally when driving and maneuvering a semi-truck would be a great way to experience PC gaming with Oculus Rift. After installing and running Euro Truck Simulator 2 in “conventional” mode, I enlisted in the public beta for oculus support on Steam:
Selecting the proper beta version for Oculus Rift support
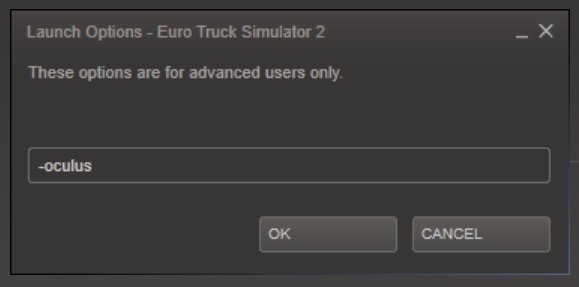
When you do this, Steam will install an update which unlocks the Oculus Rift integration for Euro Truck Simulator 2. After the update installs, there’s one additional configuration step that’s required: launching the game with the “-oculus” parameter. Because this parameter is supported, you can easily launch this beta version of Euro Truck Simulator 2 in Oculus mode, or in conventional mode depending on how you want to play it.
Parameter required to launch Euro Truck Simulator 2 in Oculus mode
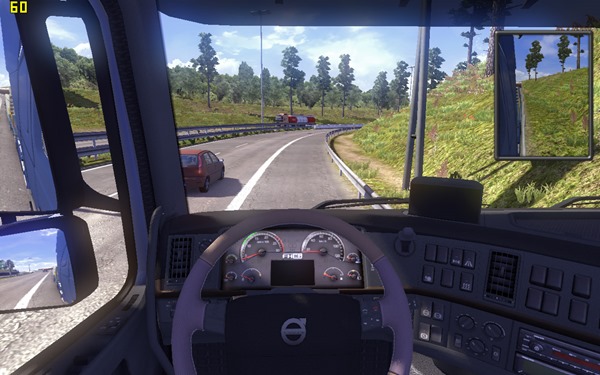
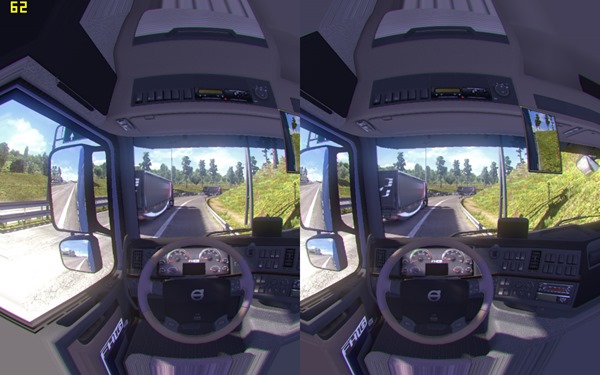
Since I had setup Oculus Rift and tested it with the demo app, I was ready to experience a new kind of driving simulation. I launched Euro Truck Simulator 2 and started a game session. The game is presented in 2D until you actually start driving. At that point, you’ll see the stereo view and can put on the Oculus Rift headset. The following is a comparison of the conventional 2D view and the Oculus view in Euro Truck Simulator 2:
2D view in Euro Truck Simulator 2 at 1280×800 resolution (click/tap to enlarge)
3D view in Euro Truck Simulator at 640×800 per eye (click/tap to enlarge)
In the following video I’ll share my experiences with Oculus Rift and Euro Truck Simulator 2. It’s a good thing I don’t drive like this in real life!
Note: The video screencapture footage for this video was acquired with an NVIDIA GeForce GTX 780 Ti graphics card and NVIDIA’s new ShadowPlay technology which I’ll be blogging about more in future posts.
I had a lot of fun with Oculus and Euro Truck Simulator 2 and I’m looking forward to trying out more DirectX games with Oculus Rift. There are so many different ways to use this technology and I’m curious to evaluate how different games take advantage of it. PC games and simulations are definitely going to get even more interesting in the next few years!
Oculus SDK and Sensor Technology
Since I have a background in sensor technology (some resources here, here, and here), I have been curious about the motion tracking sensor technology in Oculus Rift. My initial impression of the head tracking in Oculus Rift was “wow, this is really good”. Oculus was able to track my head position and motions very fluidly and responsively. How is this possible you ask? Oculus Rift uses a combination of sensor inputs from the integrated 3D accelerometer, 3D gyro, and 3D magnetometer to calculate head position and motion. This sensor technology is called “sensor fusion” and is very similar to the motion sensing technology found in today’s high-end phones and tablets.
I wanted to see what the data inputs and outputs looked like while wearing the Oculus Rift headset so I decided to play around with the Oculus SDK. It was time to dust off my C++ skills and fire up Visual Studio 2013!
Rather than re-invent the wheel, I decided to look at the turn-key samples that are included with the Oculus SDK 0.2.5. I found a sample called “Sensor Box Text” in the Oculus SDK that looked like just what I needed. I decided to log sensor data to a simple .CSV text file so that I could open it in Excel and use graphs to visualize the data. I found a place in the code that gets run each time the scene is rendered – the perfect place to add some sensor data logging! The sample already initialized an object that is used to access sensor data, so all I needed to do was to extract the data into some local variables, and then stream the data to a text file each time the scene is rendered. Here’s the code that I added to access and log sensor data:
|
// Access the oculus sensor data from the sensor fusion object // Output the sensor data to the text file |
It took about an hour and a half total to install Visual Studio 2013, read through the samples, create a CSV data format, run the modified sample, and create graphs in Excel. This is a great testament to the intuitive nature of the Oculus SDK and samples. Things don’t always go this fast!
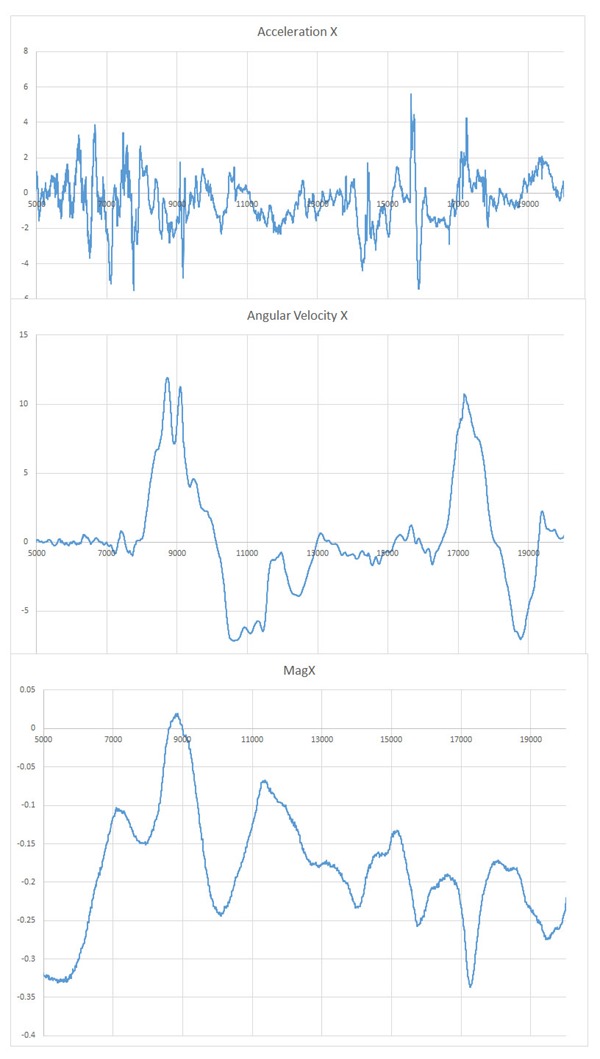
Here’s what the raw data from the sensors looks like when the Oculus Rift headset is rolled about the three principal axes:
Raw sensor outputs from Oculus Rift (click/tap to enlarge)
The jagged lines illustrate how noisy the data from these sensors is before it’s processed. It turns out each sensor is used for a very specific purpose, and each sensor has “strengths” and “weaknesses”. The accelerometer is used to calculate a “down vector” that points towards the center of the earth. The magnetometer is used in conjunction with the accelerometer to calculate a “magnetic North” vector. With these two sensors it’s actually possible to determine the 3D spatial position and motion, but with some limitations. First, accelerometers are inherently noisy which means accelerometer data requires filtering in order to make it “steady”. When filtered, the data is much smoother, but this smoothing comes at the cost of less responsiveness. The second issue is interference that is encountered with magnetometer data. The environment surrounding the magnetometer can temporarily interfere with the magnetometer which means the data cannot be used for a period of time. The addition of the gyro sensor provides a solution to these issues. The gyro sensor measures angular velocity (rotational speed). This addition of a gyro sensor adds both the responsiveness lacking from filtered accelerometer data and stability that’s lacking from the magnetometer data. By looking at one of the outputs from sensor fusion, we can see the difference:
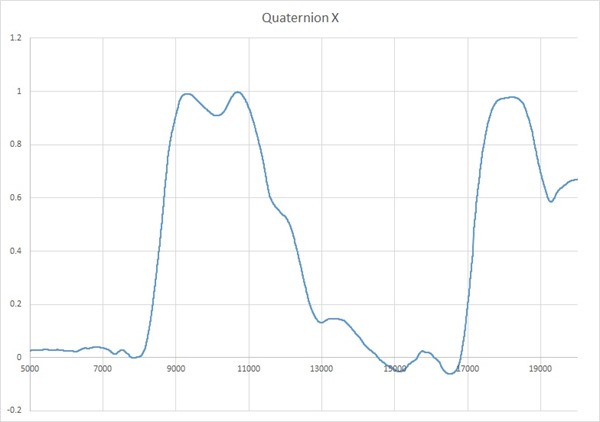
Quaternion data as output by the Oculus Rift (same data set as above graphs, click/tap to enlarge)
The data in the graph above is one of the components of an output vector that is used to unambiguously represent the 3D spatial position of the Oculus Rift sensor. You can see by looking at the graph that this data is not jagged like the raw sensor data. With sensor fusion motion and position can be calculated at runtime with both accuracy and responsiveness.
The engineering team at Oculus VR have posted an article that explains the requirements for head tracking in VR and how they designed a custom sensor solution for Oculus VR with about 2.0 millisecond latency (that’s fast). If you are interested to read more about how these sensors work and integrate with VR experiences it’s definitely worth a read.
I feel like I’m just getting started with Oculus VR, and with such an easy to use SDK, I may have to do more software development with it. The hardest thing is deciding between all the ideas I have for apps, and all of the cool DirectX games and demos to try. I can’t wait for the future of PC gaming!
Find me on twitter! @GavinGear

