This post was written by Microsoft MVP Rob Miles.
—–
This week we’re featuring guest blog posts from some of the members of our Microsoft developer MVP program. Microsoft MVPs are passionate, expert community leaders who share their real-world knowledge and experience building solutions with Microsoft platforms.
Pavel Yosifovish, CTO at CodeValue; Can Bilgin, Senior Solutions Architect at CompuSight Corp.; and Rob Miles, a university lecturer, have all recently had experience implementing universal Windows apps, so we thought it would be especially useful to showcase the things they’ve learned and how they’ve been able to leverage much of the same code to deliver experiences across multiple device types.
The other two guest blogs in this series can be found here and here.
The spike shown above is what happened to my blog traffic when I made post with the title “I’m Giving up on Windows Phone Development.” As lots of people found out when they visited my site, what I really meant was “I’m moving to Universal Apps.”
I’ve been writing Windows Phone apps since before there was a Windows Phone. I was one of the first folks to download the SDK when it first came out and, thanks to my involvement with the Jumpstart sessions, one of the first developers to get his hands on a real device. I firmly believe that I wrote the first ever application for Windows Phone that involved cheese. And now I can target Windows Phone and Windows tablet at the same time, with the same solution. Double cheese for no extra effort.
All my apps from now on are going to be universal ones, built for both the Windows Phone and Windows platforms. In this article I’m going to describe the journey I’ve had as I made the change, highlighting the most important differences from previous platforms. We’ll take a look at the broader issues of writing for two distinct platforms at the same time, and also consider some of the lower level details that might trip you up.
Phones and cars
Think what happens when you rent a car. You sit in the driving seat looking at a bunch of controls. Some of them, steering wheel, pedals etc., are exactly where you would expect them to be. Others, the lights, the radio and the wipers are not quite where you remember them. Moving to a universal app is just like this. Pretty much all of the important stuff is where you would expect it to be. C#, MainPage.xaml, Visual Studio etc., all are present and correct. But there are some bits that are different and, in pretty much every case I’ve found, better.
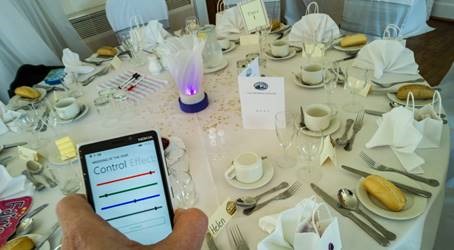
This is the wedding lights in place and being controlled by a Windows Phone
The first app I “universalized” was the Light Control app that I built for my daughter’s wedding. I thought this would be quite a “gnarly” thing to migrate as it made use of the Bluetooth capabilities of the phone to remotely control a bunch of table lights, but it turned out to be pretty easy. Along the way I learned a few things that you might find useful.
The windows screen is big
This is the first thing I noticed when I moved my app onto Windows 8.1 is that the screen does get a lot bigger. A lot.
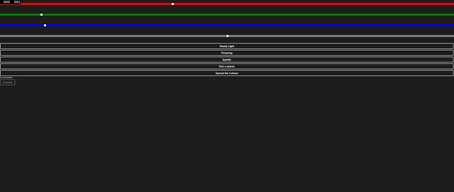
The user interface worked fine but it wasn’t the easiest to use.
Above you can see the user interface of the initial Windows version of my universal app. There are sliders for the colour selection and buttons for each of the commands that you can use to control the lights. I made this version of the user interface by simply cutting the XAML out of the original Windows Phone app and pasting it straight into the MainPage.xaml file for my universal project. Not the best plan as it turned out, but it did work, which was nice.
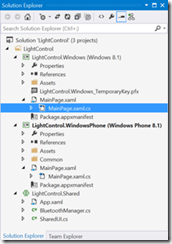
You can see that there are two MainPage.xaml files, one in each project.
The good news is that you can create two completely separate user interfaces using the best design for each platform and reuse as much or as little of the XAML as you fancy. As you can see above, a universal solution is actually three projects: one for each platform plus a third for the shared stuff. I’ve got two single page apps and a shared project which contains two shared classes, a BluetoothManager class which actually does the interaction with the lights and a shared UI class of which more later.
I must admit that I’m still coming to terms with all the lovely screen space I now have for my apps. When you are writing for a phone you are spreading your user interactions over a number of small screens, in a Windows app you can often have everything on the screen at once, whether this is a good idea or not. But you also need to remember that there is a wide variation in screen sizes and resolutions on your target devices, and so the more automatic you make your layout the better. I’m a big fan of using the Grid and StackPanel containers to make nothing absolute, and I advise you to get this way too. The old Windows Phone 7 days of having just a single screen resolution are well behind us and apps need to be designed to reflect this.
Making universal apps is easy
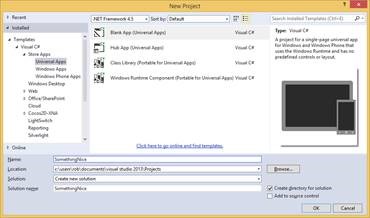
You create a universal app as you would any other
You make a universal app in the same way as you make any other app, by selecting the project type when you make a new Project. When you do this you get a solution that looks like the one above, with three projects.
The startup project is the one that actually runs when you execute the project
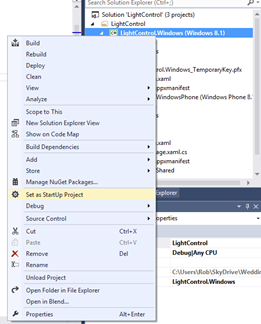
When you want to debug one of your versions (Windows Phone or Windows) you just right click on the project in Solution Explorer and then select Set as Startup Project from the context menu. Then, when you run the program that is the one you will get. Note that Visual Studio will build the entire solution to do this though, so if your Windows Phone version won’t compile you can’t run the Windows one.
You can use partial classes to reuse your UI code
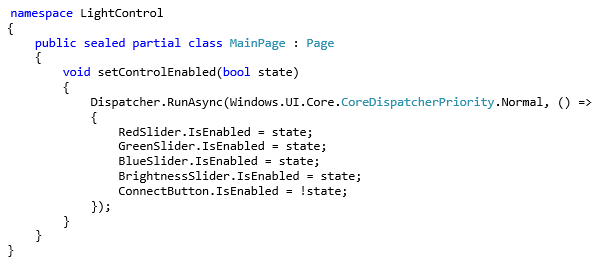
One of my pet peeves is writing the same piece of code more than once. In the Wedding Lights app I have a method that is called to enable or disable the user interface in response to changes in the status of the Bluetooth connection. The method is supplied with a flag which it uses to the buttons and sliders on and off, depending on whether the program can contact the lights or not. I need this method in both the Windows and the Windows Phone versions of MainWindow.xaml.cs, the code behind my main page, but I really don’t want to write it twice.
It turns out that I don’t have to. I can use a C# trick called a partial class to let me put most of the user interface code in a shared file. C# lets you design a single class over a number of source files. Each part of the class is marked as a partial class.
This is what the content of the SharedUI file in the shared project looks like. The SharedUI file also contains all of the user interface event handlers (I’m just showing the one method above), greatly reducing the size of code that is specific to each applications and meaning that I only have to write each method once.
The basic page puts your Windows Phone pages back to how they used to be
When you make a universal app you find that the Windows Phone pages that are created by the template don’t look the same. The familiar top line and large friendly page title have been replaced by a completely empty screen. When I made my Windows Phone user interface for the universal version I found that MainPage.xaml had lost the application and program titles.
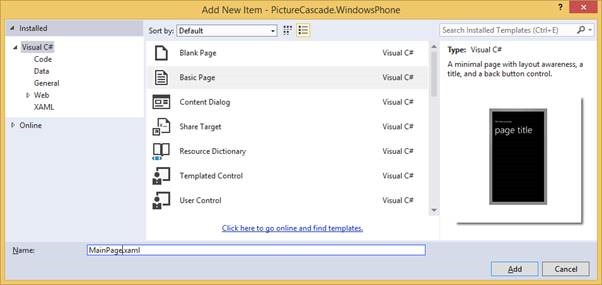
However I was able to get back to the old school page design by deleting the MainPage.xaml page provided when the solution was created and replacing it with a new Basic Page called MainPage.xaml.
Making a basic page
This turned out to be a good thing to irrespective of any design considerations, in that a Basic Page also contains some useful helper methods that a program can use to get control when users navigate between the pages in an app. When you add a Basic Page to your project you will be asked if you want to add these helper classes to your project.
Each project has its own manifest details
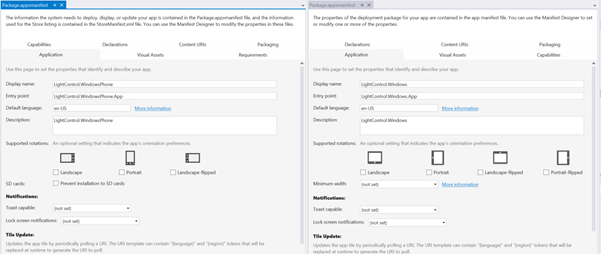
I noticed this when I started setting up the capabilities for my app. I had to add some elements to the Package.appxmanifest file in the solution to enable my app to use Bluetooth. I had to do this twice, once for the Windows project and once for the Windows Phone one.
These are the two manifest files side by side
Make sure you do this for capabilities that you need too, otherwise you will have a few minutes of complete confusion, just like I did when it didn’t work on the phone.
Learning to use the await and async keywords (and loving them)
In older versions of Windows Phone the pattern for using resources was based on things firing events when they had done something for you. If you wanted the contents of a web page you would create a request, connect a method (or a lambda expression) to an event, and then fire off the request. Then, when the action completed your method was called and your program could process the result. This was messy, but it was how we did things.
Now C# has the fantastic await keyword and everything has changed (but in a good way). Some of the new Windows Phone 8 libraries already make use of await, but you could still use the older ones. However, when you move to a universal app all these older versions go away, and you need to use await.
I needed to use await to set up the Bluetooth connection used by the Wedding Lights application. The app uses a Bluetooth serial connection to pass commands to the lights and the Bluetooth drivers are built using await.
We can take a look at how await works by considering the situation where you want to write into a file. In Windows Phone 7 you would write something like this:
This code writes a string into a named file in isolated storage. Everything happens synchronously. If you were writing 10,000 lines of data the action might take a while. If the method above was called in a button click event handler the user would notice that the button was unresponsive for the time it took the writing to finish, which is not good. If you wanted to create a responsive program you’d have to fire off a thread to do the writing. This would allow the button event handler to complete and return to the user.
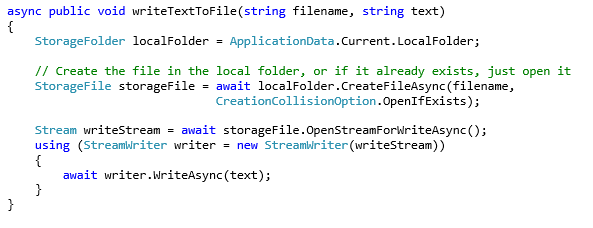
In a universal app, using the Windows Runtime APIs, you do this to write a file:
Note the await keywords sprinkled around the text and the keyword async in front of the whole method. The await keywords are in front of actions which might take a while, creating a file, opening a stream and writing data. So, what does await do?
To understand this we have to delve a bit deeper into the way the asynchronous methods work. The method OpenStreamForWriteAsync doesn’t actually return a stream, it returns a Task that will return a stream when the task completes. I could write this statement to get hold of that task:
The variable t now refers to the Task that is fetching the stream for the program. This task is engaged in finding and opening the file. However, at some point it might hit an action that will take some time, perhaps it must wait for the filesystem to complete a transaction. At this point the OpenStreamForWriteAsync method will return a task reference to the caller method, which can then get on with other things. In other words, this form of call of OpenStreamForWriteAsync does not block the caller.
Eventually the program will reach a point where it needs to use the output stream, at which point the await keyword is used to tell the compiler that the method needs to transfer execution back into the OpenStreamForWriteAsync method until the result of the call is available.
So, await means “wait until the method has produced the result”. If we didn’t have await there would be no way of stopping the method from trying to write into the file before the stream has been created. The code in the method above doesn’t have anything it could do while the stream is being opened, and so it uses the action await directly on the Task the method returns.
The use of asynchronous methods and the await keyword provides a very neat way that we stop method calls from blocking until we really want the result back, but this doesn’t quite explain how we can use it to create responsive user interfaces. At the moment it looks like our new version of writeTextToFile will only return when writing to the file has completed because the await keyword makes sure that everything happens in the correct sequence before the method finishes.
However, there is one more thing that we need to know, and that concerns the async keyword at the start of the writeTextToFile method. When a method is modified by this keyword it should contain at least one await. The method will run until the first await instruction and then return to the caller of the method at that point. So the writeTextToFile method will return as soon as it starts creating the file. The threading mechanism carefully preserves and propagates exceptions that might be thrown as the file is written, and your program can respond to these appropriately. Breakpoints that you place inside the code are also managed correctly, so that the sequence of statements can be properly debugged.
Of course this cleverness doesn’t protect you from bad things happening if you get your timings wrong. Just because the writeTextToFile has returned doesn’t mean that the file has been written, just that the writing process has been started, so you need to write your code with an awareness of this (I’ll return to this in a moment).
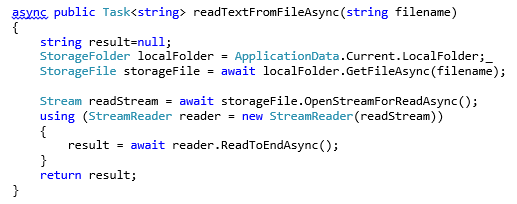
If you want to make a method that returns a result and can be used asynchronously this turns out to be easy.
This is an asynchronous version of a method that reads text from a file. It returns a Task that produces a string, and this result can be used in an await construction.
Once you get your head around how this all works you find yourself writing code that looks a lot like a “straight line” program, but it is actually properly threaded and non-blocking to the caller, which is great. However, you do need to be a bit careful to make proper use of await.
To see what I mean, consider the following:
If the method doSomething is asynchronous then it will return from the await and then proceed on to the call of the processResultFromDoSomething method immediately, perhaps before the work in doSomething has been completed. To stop this from happening the doSomething method should return something which can be awaited before the call of the next method, just like the methods above.
The wait cursor is different
The Wedding Lights needed a way of telling the user that they were waiting for the phone to establish a Bluetooth connection to lights. So I needed a “wait cursor”.
Windows Phone users will be used to the four dots that move across the top of the display to indicate that a program is busy and “will be right back”. In a universal app these have been replaced by a rotating “progress ring” in the middle of the screen. You can get one of these on a page by adding it to the XAML in it:
It turns out to be as easy to use as the moving dots and it works on both platforms.
The messagebox has changed
Just about every app needs to tell the user a message every now and then. The Wedding Lights application needed to deliver the bad news that the Bluetooth connection couldn’t be set up.
In Windows Phone apps of days gone by you could pop up a quick message to a user by using the MessageBox class:
The displayMessage method above uses a MessageDialog to display an arbitrary message to the user. Note that because the message is displayed using a ShowAsync method your program can use the await mechanism with it. The displayMessage method above will return immediately, not when the user acknowledges the message. If you want the program to do something only after the message has been shown you must put the statement directly after the await in the displayMessage method.
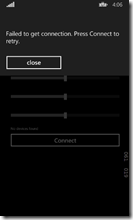
The code you use is the same, but the appearance on the target is quite different.
Creating tasks is different, but you might not need to do it so much
It is considered very bad practice to perform potentially long running actions in the middle of user interface events. When the user presses a button on the Wedding Lights app the program often needs to send a Bluetooth message to the lights to perform the requested action. This transmission may take some time and the user interface must not be blocked while it takes place.
One way to address this is to create a Thread which will perform the requested transfer. Previous versions of Windows Phone used the Threading namespace. Universal apps don’t work like this. If you want to fire off a thread to perform a task in the background the best way is to grab a thread from the thread pool:
The code snippet is from the Bluetooth driver code in the Wedding Lights program. It fires off a thread that will run the doSendbytes method. You might think that this is not a particularly good example, in that I could get this kind of behaviour much more easily by using the async/await keywords. You would be right, and you might like to consider just how you would do that.
Displaying messages from background threads is not quite the same
As with older versions of Windows Phone, background threads running in Universal apps are not allowed to access the display directly. However, the mechanism that you use to dispatch a thread in the context of the display has changed slightly, and looks rather like the task creation code that you have just seen above.
The snippet above is a method I use in the Wedding Lights application to display a status string. It fires off a thread in the context of the display that sets the text in a TextBlock to the message that I want to show the user. The method above lives in my MainPage.xaml.cs and lets my Bluetooth manager tell the user when the status of the connection changes.
Universal apps are the future
When I began the conversion of the Wedding Light program to a universal application I was expecting it to be a lot more difficult than it was. I set aside a few hours and, half an hour into the process I had the program running on both platforms. In the end I managed to take the entire Windows Phone user interface over into the universal application and reuse pretty much all the code, just making the changes you see above.
I strongly believe that the future lies with universal apps. I think that the current version of Visual Studio 2013 is a step on the road (at the moment you still have to submit your completed solutions to each marketplace in turn – that will surely change at some point). It is well worth spending some time taking a popular Windows Phone 7 application and moving it into the universal space. The extra room that you get for your user interface is really quite liberating.
And if you are starting off writing a brand new application you really should start off with a universal application. It greatly expands the number of potential customers you will have.

