

Pushpins
Everyone is familiar with the iconic image from TV procedurals of a police detective gazing intently at a wall map covered with pushpins and pieces of colored string connecting all the dots. Sooner or later we all know the detective will figure out where the bad guy / bag of money / ticking time bomb is located simply by staring hard enough. This TV trope is compelling because it is a perfect mirror of how our brains work – human brains constantly evaluate random pieces of visual information in order to find patterns and meaning.
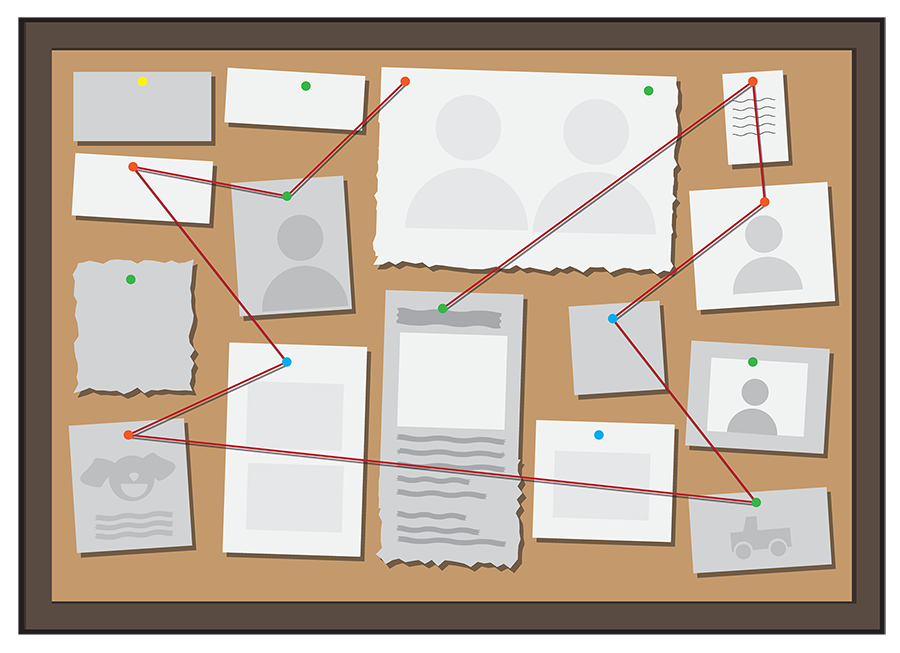
Pushpins in a mapping app are compelling in the same way. They provide you with a tool to draw your user’s attention to interesting visual patterns. In the UWP MapControl, the pushpin analog is called a MapIcon. You can use it just to indicate a “You Are Here” in your app, or to build a symbol legend of interesting nearby attractions, much like a mall directory. To add one to a map, you just need a geopoint and a title.
[code language=”csharp”]
var pushpin = new MapIcon();
// assign pushpin geoposition
pushpin.Location = new Geopoint(new BasicGeoposition()
{
Latitude = 51.178840,
Longitude = -1.826189
});
// assign pushpin title
pushpin.Title = "Here’s something interesting!";
// make sure pushpin always appears
pushpin.CollisionBehaviorDesired = MapElementCollisionBehavior.RemainVisible;
// set pushpin bottom center over geoposition
pushpin.NormalizedAnchorPoint = new Point(0.5, 1.0);
// put pushpin on the map
this.myMap.MapElements.Add(pushpin);
[/code]
Pushpins have a default image that can sometimes be hidden by labels or other elements. You can set the CollisionBehaviorDesired property to RemainVisible in order to prevent this. By default, the top left corner of the image will appear over the MapIcon’s geoposition. You can shift this by giving the NormalizedAnchorPoint x and y values of 0 to 1 (it is set to 0, 0 if unassigned).
While a pushpin, as shown above, can be useful, the MapIcon becomes most interesting when you use it to reveal hidden patterns on a map. For example, how many coffee shops are there in a one-mile radius around your user? Where do UFO sightings tend to cluster in a map of the United States? What is the distribution of medieval castles in the south of France? Each of these patterns tells a story that makes maps, and your app, a source of fascination rather than just something utilitarian.
You can use custom images to replace the default one in order to give you app more personality and to make your maps more relevant. The image must be smaller than 2048 by 2048 pixels.
The pushpin above marks Stonehenge on the Salisbury Plain in England. You can change the MapIcon image using the RandomAccessStreamReference class to point to one of your choosing.
[code language=”csharp”]
// set pushpin title
pushpin.Title = "Stonehenge";
// add custom Stonehenge image
var myImageUri = new Uri("ms-appx:///Assets/upright.png");
pushpin.Image = RandomAccessStreamReference.CreateFromUri(myImageUri);
[/code]
Connecting the pushpins
The standard TV detective map introduced earlier traditionally has lines between the pushpins that emphasize and draw out patterns. You can do the same thing in the MapControl by using the MapPolyline class. As you might expect, the MapPolyline requires geocoordinates to anchor the polyline. It also allows you to choose the color, thickness, and style of the line. Then, as with the pushpins, you have to add the polyline you create to your map’s MapElements.
[code language=”csharp”]
// create Stonehenge geoposition
var locStonehenge = new BasicGeoposition()
{
Latitude = 51.178840,
Longitude = -1.826189
};
// create Swinside circle geoposition
var locSwinside = new BasicGeoposition()
{
Latitude = 54.282490,
Longitude = -3.273860
};
// instantiate mappolyline
var polyline = new MapPolyline();
// add geopsitions to path
polyline.Path = new Geopath(new List<BasicGeoposition>() {locStonehenge, locSwinside});
//set appearance of connector line
polyline.StrokeColor = Colors.OrangeRed;
polyline.StrokeThickness = 2;
polyline.StrokeDashed = true;
// add to map
this.myMap.MapElements.Add(polyline);
[/code]
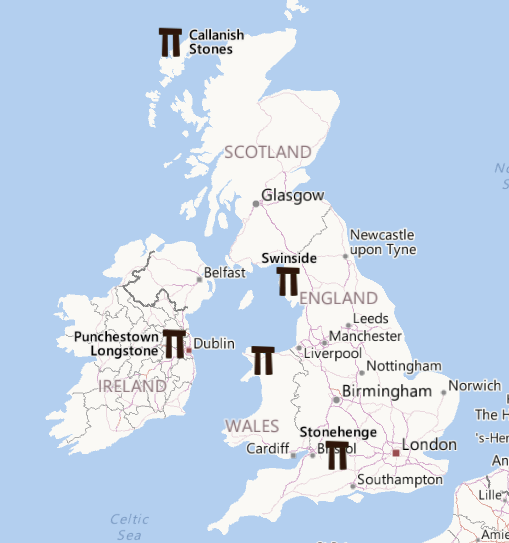
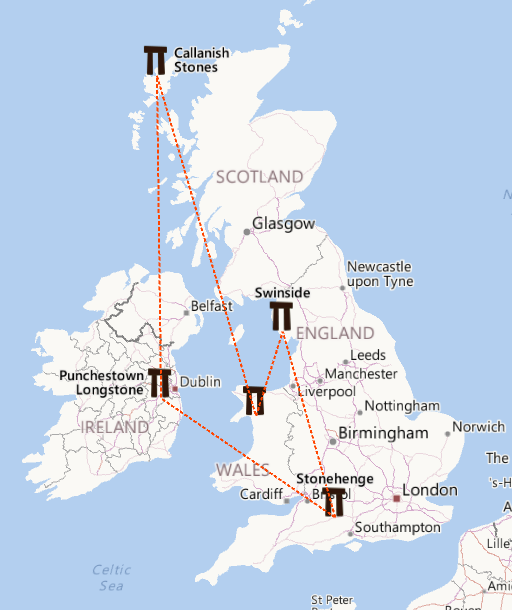
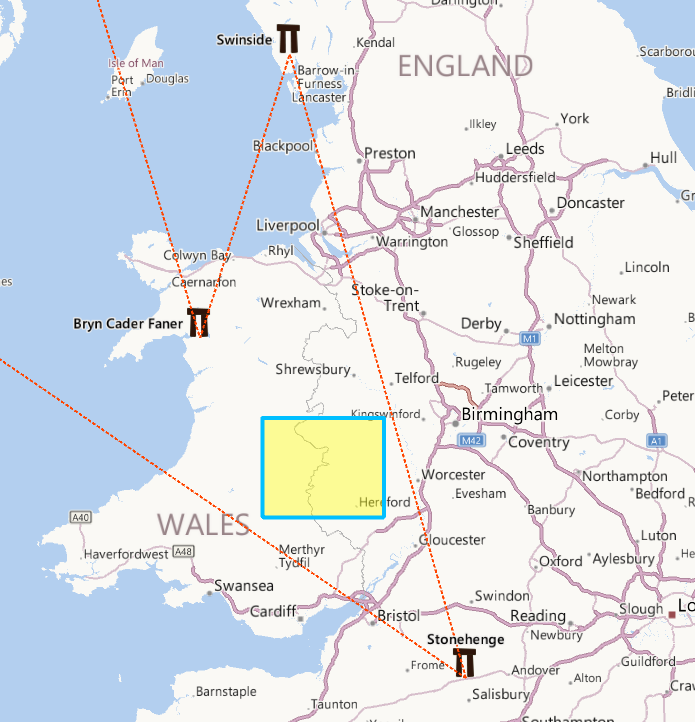
You can go a step further and add multiple locations to the Geopath to create a more evocative set of connectors. In the picture below, all the Neolithic sites are added to the list.
Adding shapes to your map
The MapPolygon class lets you add shapes to your map in the same way the MapPolyline class lets you add lines. The difference is mainly that a polygon can have a fill color. For fun, let’s draw a shape roughly in the middle of the three stone circles farthest south.
[code language=”csharp”]
// instantiate mappolygon
var polygon = new MapPolygon();
// set appearance
polygon.StrokeColor = Colors.DeepSkyBlue;
polygon.FillColor = Color.FromArgb(100,255,255,0);
polygon.StrokeThickness = 4;
//create path
polygon.Path = new Geopath(new List<BasicGeoposition>()
{
new BasicGeoposition() {Latitude=52.5, Longitude=-3.5 },
new BasicGeoposition() {Latitude=52.5, Longitude=-2.5 },
new BasicGeoposition() {Latitude=52, Longitude=-2.5 },
new BasicGeoposition() {Latitude=52, Longitude=-3.5 },
});
// add to map
this.myMap.MapElements.Add(polygon);
[/code]
What is interesting about the MapPolygon is that you are basically just drawing shapes the way you would with a Cartesian coordinate system. The difference, of course, is that the vertexes in this case can have a global scale stretching hundreds of miles.
Adding XAML elements to your map
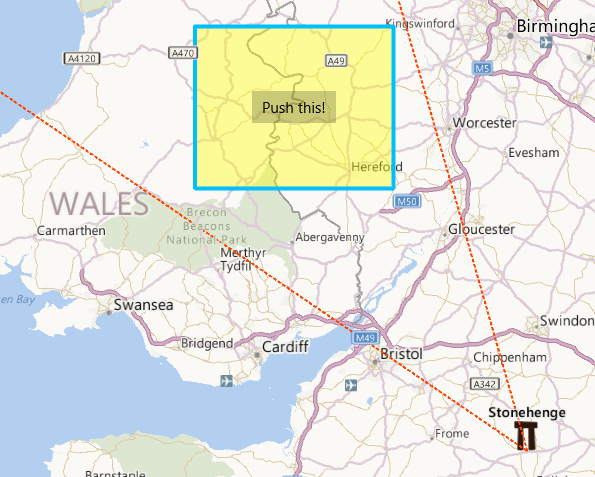
Finally, you can also treat the MapControl like a sort of canvas and add XAML elements to your map’s Children collection. You then use attached properties to adjust the XAML element once it has been added to the visual hierarchy.
[code language=”csharp”]
// create new button
var button = new Button();
button.Content = "Push this!";
this.myMap.Children.Add(button);
// assign geoposition
var position = new Geopoint(new BasicGeoposition()
{
Latitude = 52.25,
Longitude = -3.0
});
MapControl.SetLocation(button, position);
// center button over geoposition
MapControl.SetNormalizedAnchorPoint(button, new Point(0.5, 0.5));
[/code]
Don’t use lots of XAML elements if you don’t have to, though. They add some performance overhead, so only use them when you require rich styling or interactivity.
Wrapping Up
The MapControl is an extremely powerful and versatile class. While the earlier posts in this series showed you how to use it in relatively familiar ways, this post went further and showed you how to create a unique mapping app that is specific to your goals, interests, needs of your users.
Having nearly full control of how maps are rendered has even encouraged some developers to use the MapControl for purposes other than actual mapping, such as recreating the map-based board game Risk. One innovative developer even used the Kinect to scan a 3D model of his own head which he could then place anywhere in the world—sort of like a transportable Mount Rushmore.
The UWP MapControl class and location services offer you advanced images of the world to use as a playground. Take advantage of the inherently fascinating character of images of the earth to build mapping apps and beyond. Help people to see things in these maps that they wouldn’t otherwise be able to without you.