

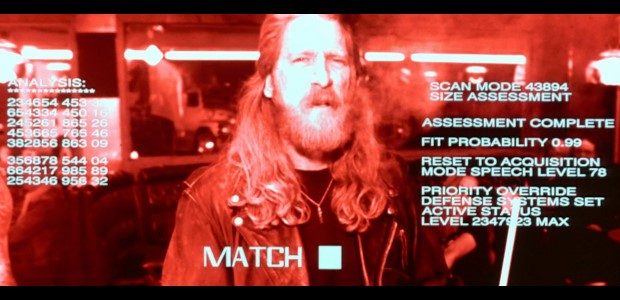
James Cameron’s 1984 film The Terminator introduced many science-fiction idioms we now take for granted. One of the most persistent is the thermal head-up-display (HUD) shot that allows the audience to see the world through the eyes of Arnold Schwarzenegger’s T-800 character. In design circles, it is one of the classic user interfaces that fans frequently try to recreate both as a learning tool and as a challenge.
In today’s post, you’ll learn how to recreate this iconic interface for the HoloLens. To sweeten the task, you’ll also hook up this interface to Microsoft Cognitive Services to perform an analysis of objects in the room, face detection and even some Optical Character Recognition (OCR).
While on the surface this exercise is intended to just be fun, there is a deeper level. Today, most computing is done in 2D. We sit fixed at our desks and stare at rectangular screens. All of our input devices, our furniture and even our office spaces are designed to help us work around 2D computing. All of this will change over the next decade.
Modern computing will eventually be overtaken by both 3D interfaces and 1-dimensional interfaces. 3D interfaces are the next generation of mixed reality devices that we are all so excited about. 1D interfaces, driven by advances in AI research, are overtaking our standard forms of computing more quietly, but just as certainly.
By speaking or looking in a certain direction, we provide inputs to AI systems in the cloud that can quickly analyze our world and provide useful information. When 1D and 3D are combined—as you are going to do in this walkthrough—a profoundly new type of experience is created that may one day lead to virtual personal assistants that will help us to navigate our world and our lives.
The first step happens to be figuring out how to recreate the T-800 thermal HUD display.
Recreating the UI
Start by creating a new 3D project in Unity and call it “Terminator Vision.” Create a new scene called “main.” Add the HoloToolkit unity package to your app. You can download the package from the HoloToolkit project’s GitHub repository. This guide uses HoloToolkit-Unity-v1.5.5.0.unitypackage. In the Unity IDE, select the Assets tab. Then click on Import Package -> Custom Package and find the download location of the HoloTookit to import it into the scene. In the menu for your Unity IDE, click on HoloToolkit -> Configure to set up your project to target HoloLens.
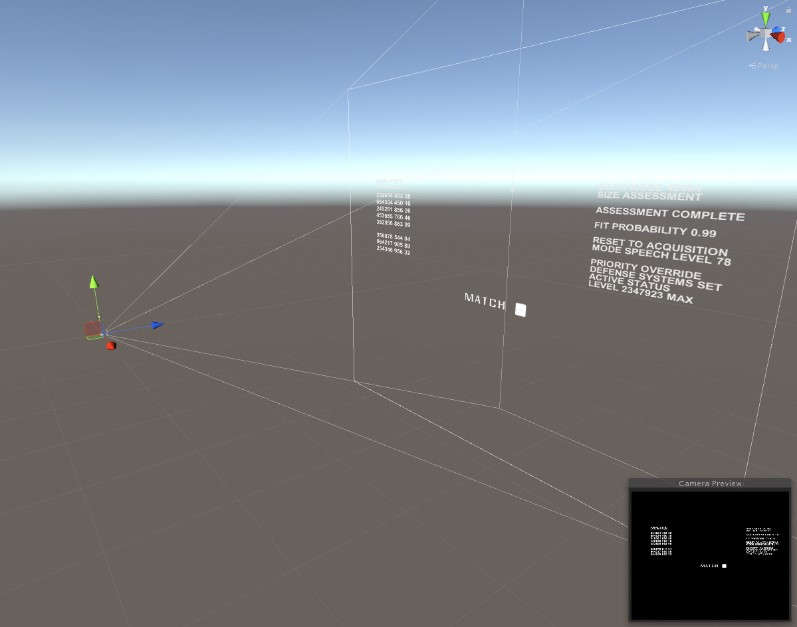
Once your project and your scene are properly configured, the first thing to add is a Canvas object to the scene to use as a surface to write on. In the hierarchy window, right-click on your “main” scene and select GameObject -> UI -> Canvas from the context menu to add it. Name your Canvas “HUD.”
The HUD also needs some text, so the next step is to add a few text regions to the HUD. In the hierarchy view, right-click on your HUD and add four Text objects by selecting UI -> Text. Call them BottomCenterText, MiddleRightText, MiddleLeftText and MiddleCenterText. Add some text to help you match the UI to the UI from the Terminator movie. For the MiddleRightText add:
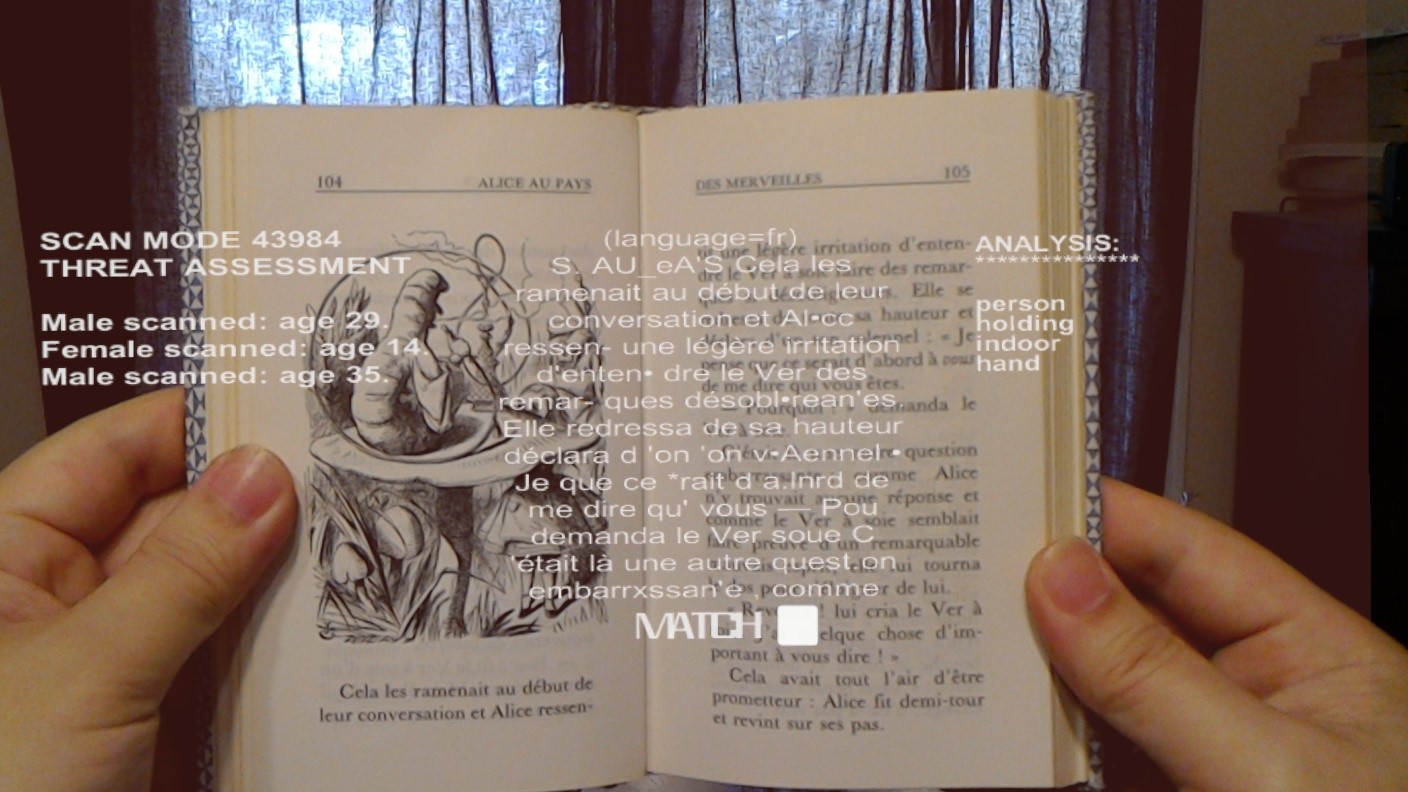
SCAN MODE 43984
SIZE ASSESSMENT
ASSESSMENT COMPLETE
FIT PROBABILITY 0.99
RESET TO ACQUISITION
MODE SPEECH LEVEL 78
PRIORITY OVERRIDE
DEFENSE SYSTEMS SET
ACTIVE STATUS
LEVEL 2347923 MAX
For the MiddleLeftText object, add:
ANALYSIS:
***************
234654 453 38
654334 450 16
245261 856 26
453665 766 46
382856 863 09
356878 544 04
664217 985 89
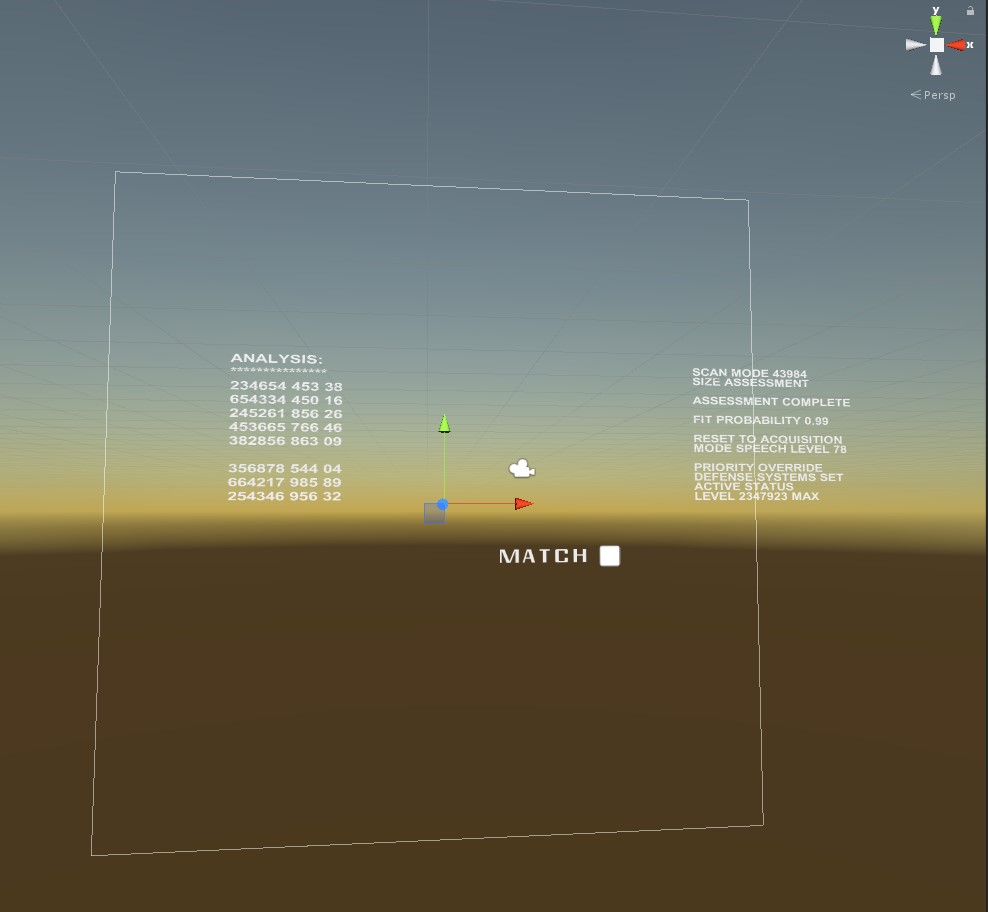
For the BottomCenterText, just write “MATCH.” In the scene panel, adjust these Text objects around your HUD until they match with screenshots from the Terminator movie. MiddleCenterText can be left blank for now. You’re going to use it later for surfacing debug messages.
Getting the fonts and colors right are also important – and there are lots of online discussions around identifying exactly what these are. Most of the text in the HUD is probably Helvetica. By default, Unity in Windows assigns Arial, which is close enough. Set the font color to an off-white (236, 236, 236, 255), font-style to bold, and the font size to 20.
The font used for the “MATCH” caption at the bottom of the HUD is apparently known as Heinlein. It was also used for the movie titles. Since this font isn’t easy to find, you can use another font created to emulate the Heinlein font called Modern Vision, which you can find by searching for it on internet. To use this font in your project, create a new folder called Fonts under your Assets folder. Download the custom font you want to use and drag the TTF file into your Fonts folder. Once this is done, you can simply drag your custom font into the Font field of BottomCenterText or click on the target symbol next to the value field for the font to bring up a selection window. Also, increase the font size for “MATCH” to 32 since the text is a bit bigger than other text in the HUD.
In the screenshots, the word “MATCH” has a white square placed to its right. To emulate this square, create a new InputField (UI -> Input Field) under the HUD object and name it “Square.” Remove the default text, resize it and position it until it matches the screenshots.
Locking the HUD into place
By default, the Canvas will be locked to your world space. You want it to be locked to the screen, however, as it is in the Terminator movies.
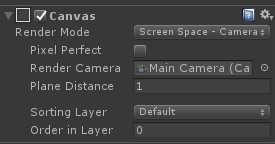
To configure a camera-locked view, select the Canvas and examine its properties in the Inspector window. Go to the Render Mode field of your HUD Canvas and select Screen Space – Camera in the drop down menu. Next, drag the Main Camera from your hierarchy view into the Render Camera field of the Canvas. This tells the canvas which camera perspective it is locked to.

The Plane Distance for your HUD is initially set to one meter. This is how far away the HUD will be from your face in the Terminator Vision mixed reality app. Because HoloLens is stereoscopic, adjusting the view for each eye, this is actually a bit close for comfort. The current focal distance for HoloLens is two meters, so we should set the plane distance at least that far away.
For convenience, set Plane Distance to 100. All of the content associated with your HUD object will automatically scale so it fills up the same amount of your visual field.
It should be noted that locking visual content to the camera, known as head-locking, is generally discouraged in mixed reality design as it can cause visual comfort. Instead, using body-locked content that tags along with the player is the recommended way to create mixed reality HUDs and menus. For the sake of verisimilitude, however, you’re going to break that rule this time.
La vie en rose
Terminator view is supposed to use heat vision. It places a red hue on everything in the scene. In order to create this effect, you are going to play a bit with shaders.
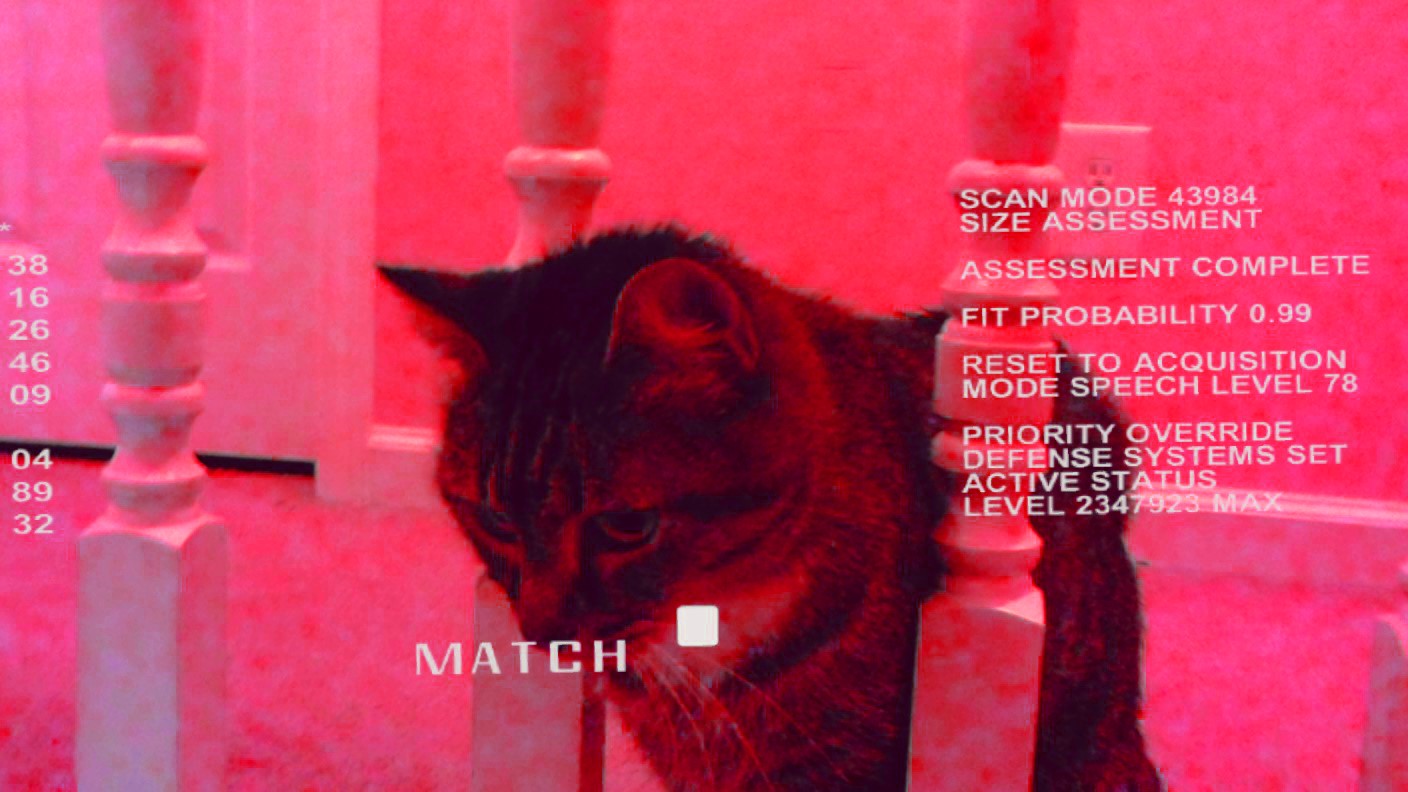
A shader is a highly optimized algorithm that you apply to an image to change it. If you’ve ever worked with any sort of photo-imaging software, then you are already familiar with shader effects like blurring. To create the heat vision colorization effect, you would configure a shader that adds a transparent red distortion to your scene.
If this were a virtual reality experience, in which the world is occluded, you would apply your shader to the camera using the RenderWithShader method. This method takes a shader and applies it to any game object you look at. In a holographic experience, however, this wouldn’t work since you also want to apply the distortion to real-life objects.
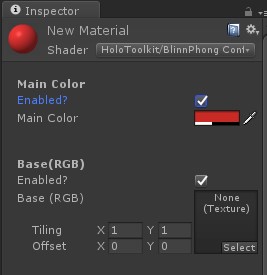
In the Unity toolbar, select Assets -> Create -> Material to make a new material object. In the Shader field, click on the drop-down menu and find HoloToolkit -> Lambertian Configurable Transparent. The shaders that come with the HoloToolkit are typically much more performant in HoloLens apps and should be preferred. The Lambertian Configurable Transparent shader will let you select a red to apply; (200, 43, 38) seems to work well, but you should choose the color values that look good to you.
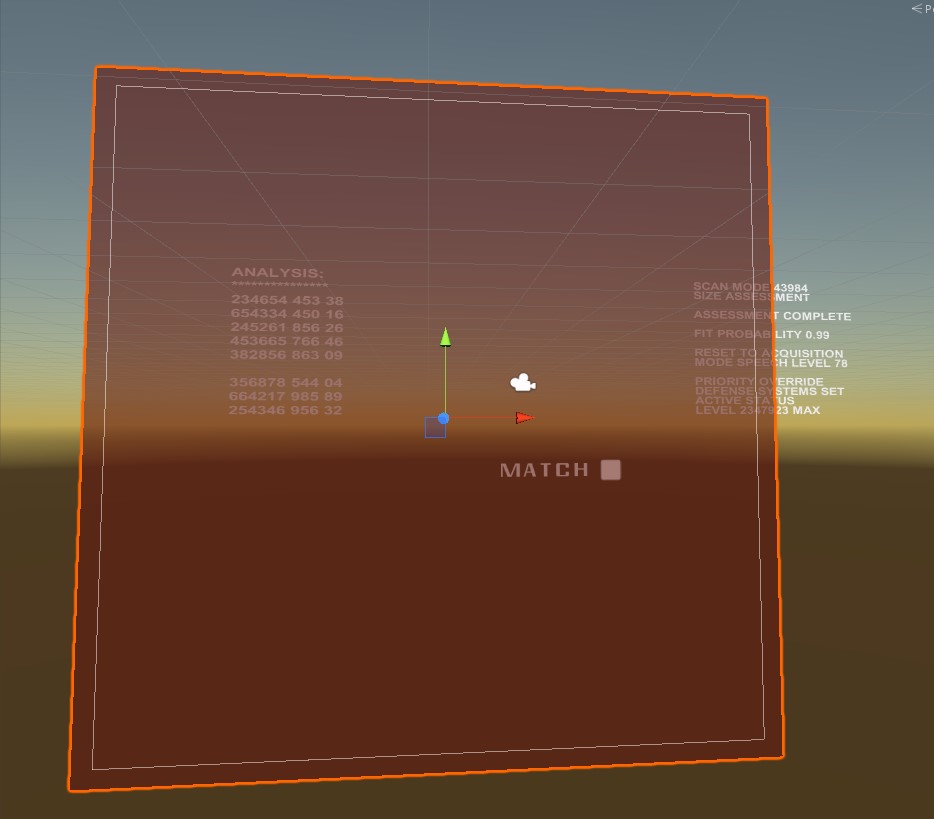
Add a new plane (3D Object -> Plane) to your HUD object and call it “Thermal.” Then drag your new material with the configured Lambertian shader onto the Thermal plane. Set the Rotation of your plane to 270 and set the Scale to 100, 1, 100 so it fills up the view.
Finally, because you don’t want the red colorization to affect your text, set the Z position of each of your Text objects to -10. This will pull the text out in front of your HUD a little so it stands out from the heat vision effect.
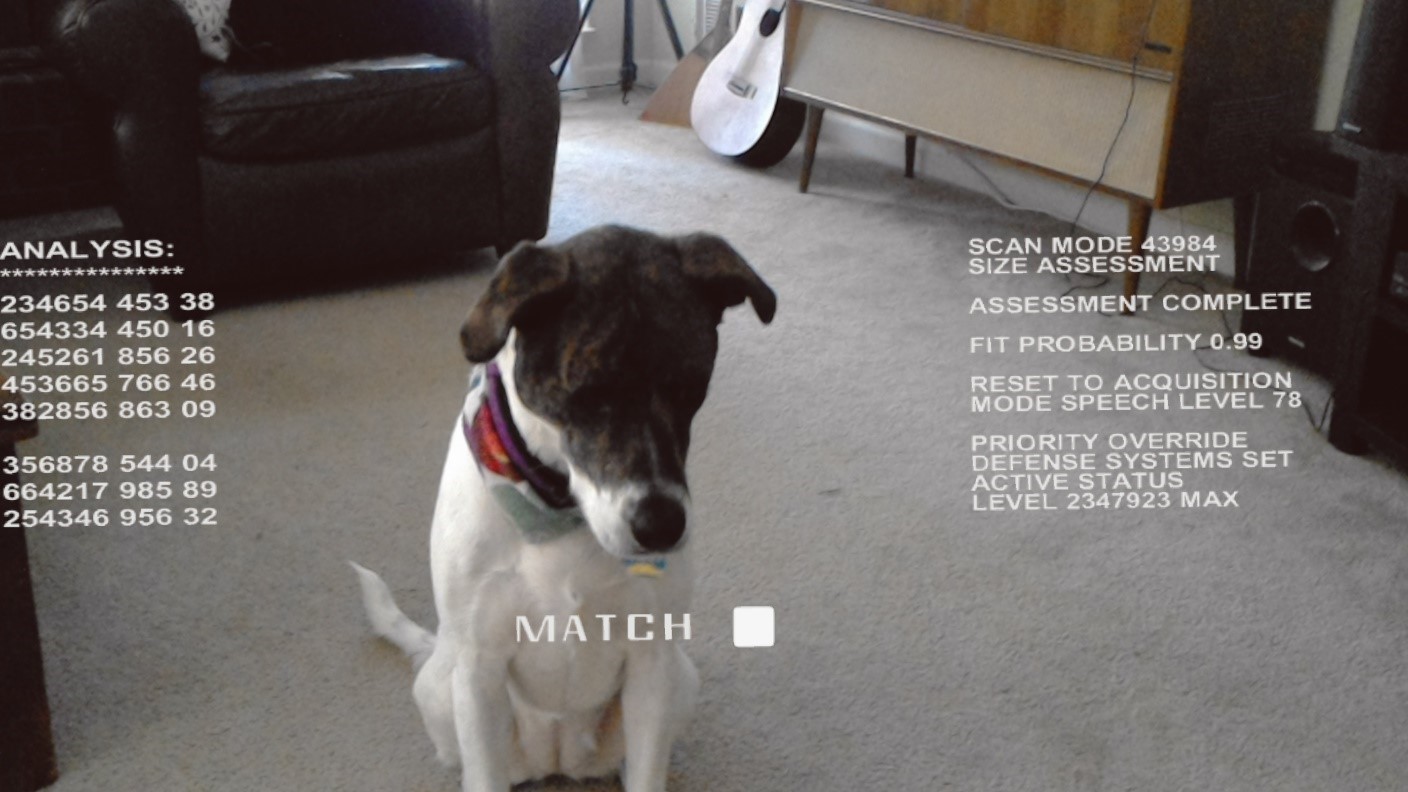
Deploy your project to a device or the emulator to see how your Terminator Vision is looking.
Making the text dynamic
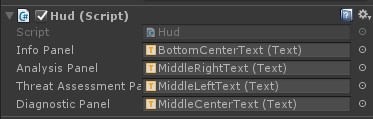
To hook up the HUD to Cognitive Services, first orchestrate a way to make the text dynamic. Select your HUD object. Then, in the Inspector window, click on Add Component -> New Script and name your script “Hud.”
Double-click Hud.cs to edit your script in Visual Studio. At the top of your script, create four public fields that will hold references to the Text objects in your project. Save your changes.
[code]
public Text InfoPanel;
public Text AnalysisPanel;
public Text ThreatAssessmentPanel;
public Text DiagnosticPanel;
[/code]
If you look at the Hud component in the Inspector, you should now see four new fields that you can set. Drag the HUD Text objects into these fields, like so.
In the Start method, add some default text so you know the dynamic text is working.
[code lang=”csharp”]
void Start()
{
AnalysisPanel.text = "ANALYSIS:n**************ntestntestntest";
ThreatAssessmentPanel.text = "SCAN MODE XXXXXnINITIALIZE";
InfoPanel.text = "CONNECTING";
//…
}
[/code]
When you deploy and run the Terminator Vision app, the default text should be overwritten with the new text you assign in Start. Now set up a System.Threading.Timer to determine how often you will scan the room for analysis. The Timer class measures time in milliseconds. The first parameter you pass to it is a callback method. In the code shown below, you will call the Tick method every 30 seconds. The Tick method, in turn, will call a new method named AnalyzeScene, which will be responsible for taking a photo of whatever the Terminator sees in front of him using the built-in color camera, known as the locatable camera, and sending it to Cognitive Services for further analysis.
[code lang=”csharp”]
System.Threading.Timer _timer;
void Start()
{
//…
int secondsInterval = 30;
_timer = new System.Threading.Timer(Tick, null, 0, secondsInterval * 1000);
}
private void Tick(object state)
{
AnalyzeScene();
}
[/code]
Unity accesses the locatable camera in the same way it would normally access any webcam. This involves a series of calls to create the photo capture instance, configure it, take a picture and save it to the device. Along the way, you can also add Terminator-style messages to send to the HUD in order to indicate progress.
[code lang=”csharp”]
void AnalyzeScene()
{
InfoPanel.text = "CALCULATION PENDING";
PhotoCapture.CreateAsync(false, OnPhotoCaptureCreated);
}
PhotoCapture _photoCaptureObject = null;
void OnPhotoCaptureCreated(PhotoCapture captureObject)
{
_photoCaptureObject = captureObject;
Resolution cameraResolution = PhotoCapture.SupportedResolutions.OrderByDescending((res) => res.width * res.height).First();
CameraParameters c = new CameraParameters();
c.hologramOpacity = 0.0f;
c.cameraResolutionWidth = cameraResolution.width;
c.cameraResolutionHeight = cameraResolution.height;
c.pixelFormat = CapturePixelFormat.BGRA32;
captureObject.StartPhotoModeAsync(c, OnPhotoModeStarted);
}
private void OnPhotoModeStarted(PhotoCapture.PhotoCaptureResult result)
{
if (result.success)
{
string filename = string.Format(@"terminator_analysis.jpg");
string filePath = System.IO.Path.Combine(Application.persistentDataPath, filename);
_photoCaptureObject.TakePhotoAsync(filePath, PhotoCaptureFileOutputFormat.JPG, OnCapturedPhotoToDisk);
}
else
{
DiagnosticPanel.text = "DIAGNOSTICn**************nnUnable to start photo mode.";
InfoPanel.text = "ABORT";
}
}
[/code]
If the photo is successfully taken and saved, you will grab it, serialize it as an array of bytes and send it to Cognitive Services to retrieve an array of tags that describe the room as well. Finally, you will dispose of the photo capture object.
[code lang=”csharp”]
void OnCapturedPhotoToDisk(PhotoCapture.PhotoCaptureResult result)
{
if (result.success)
{
string filename = string.Format(@"terminator_analysis.jpg");
string filePath = System.IO.Path.Combine(Application.persistentDataPath, filename);
byte[] image = File.ReadAllBytes(filePath);
GetTagsAndFaces(image);
ReadWords(image);
}
else
{
DiagnosticPanel.text = "DIAGNOSTICn**************nnFailed to save Photo to disk.";
InfoPanel.text = "ABORT";
}
_photoCaptureObject.StopPhotoModeAsync(OnStoppedPhotoMode);
}
void OnStoppedPhotoMode(PhotoCapture.PhotoCaptureResult result)
{
_photoCaptureObject.Dispose();
_photoCaptureObject = null;
}
[/code]
In order to make a REST call, you will need to use the Unity WWW object. You also need to wrap the call in a Unity coroutine in order to make the call non-blocking. You can also get a free Subscription Key to use the Microsoft Cognitive Services APIs just by signing up.
[code lang=”csharp”]
string _subscriptionKey = "b1e514eYourKeyGoesHere718c5";
string _computerVisionEndpoint = "https://westus.api.cognitive.microsoft.com/vision/v1.0/analyze?visualFeatures=Tags,Faces";
public void GetTagsAndFaces(byte[] image)
{
coroutine = RunComputerVision(image);
StartCoroutine(coroutine);
}
IEnumerator RunComputerVision(byte[] image)
{
var headers = new Dictionary<string, string>() {
{ "Ocp-Apim-Subscription-Key", _subscriptionKey },
{ "Content-Type", "application/octet-stream" }
};
WWW www = new WWW(_computerVisionEndpoint, image, headers);
yield return www;
List<string> tags = new List<string>();
var jsonResults = www.text;
var myObject = JsonUtility.FromJson<AnalysisResult>(jsonResults);
foreach (var tag in myObject.tags)
{
tags.Add(tag.name);
}
AnalysisPanel.text = "ANALYSIS:n***************nn" + string.Join("n", tags.ToArray());
List<string> faces = new List<string>();
foreach (var face in myObject.faces)
{
faces.Add(string.Format("{0} scanned: age {1}.", face.gender, face.age));
}
if (faces.Count > 0)
{
InfoPanel.text = "MATCH";
}
else
{
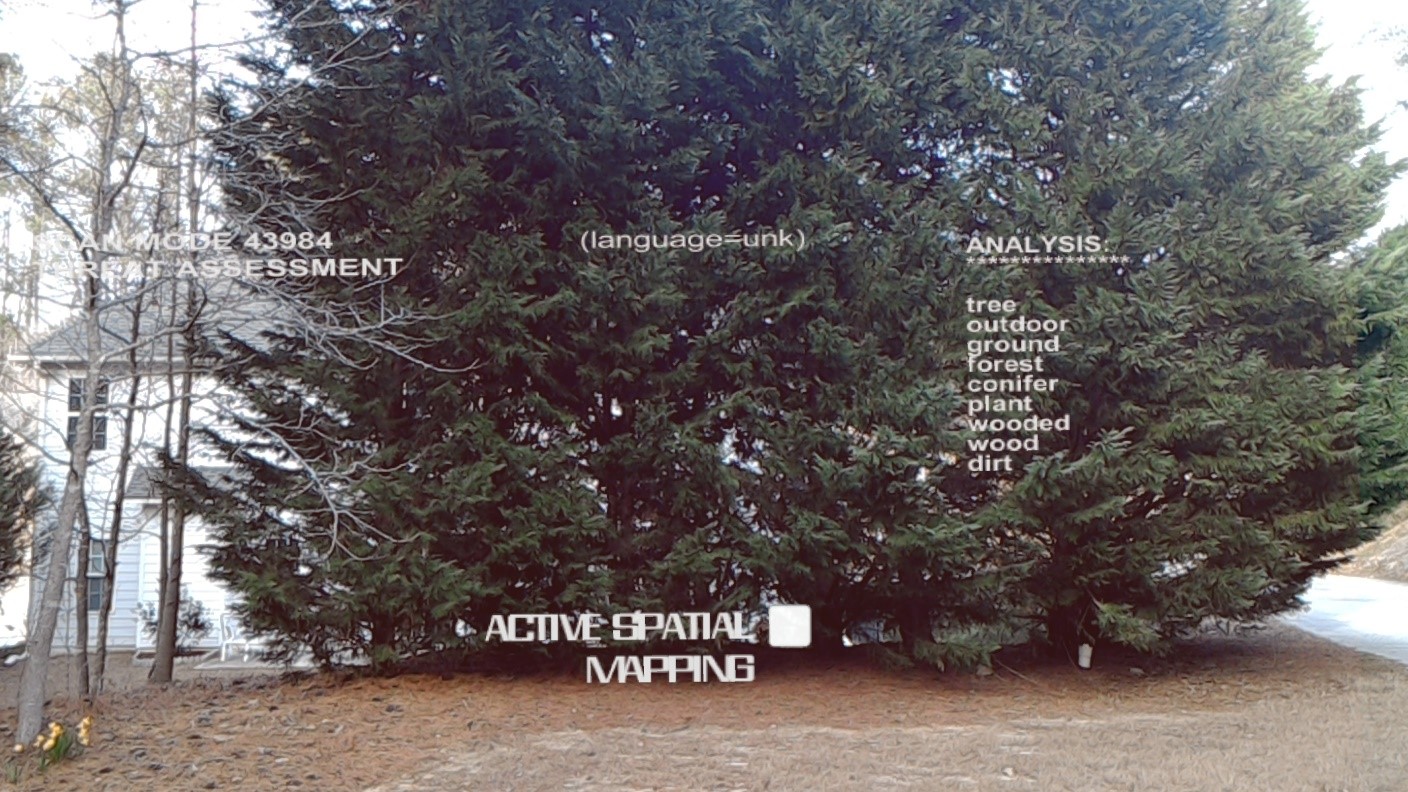
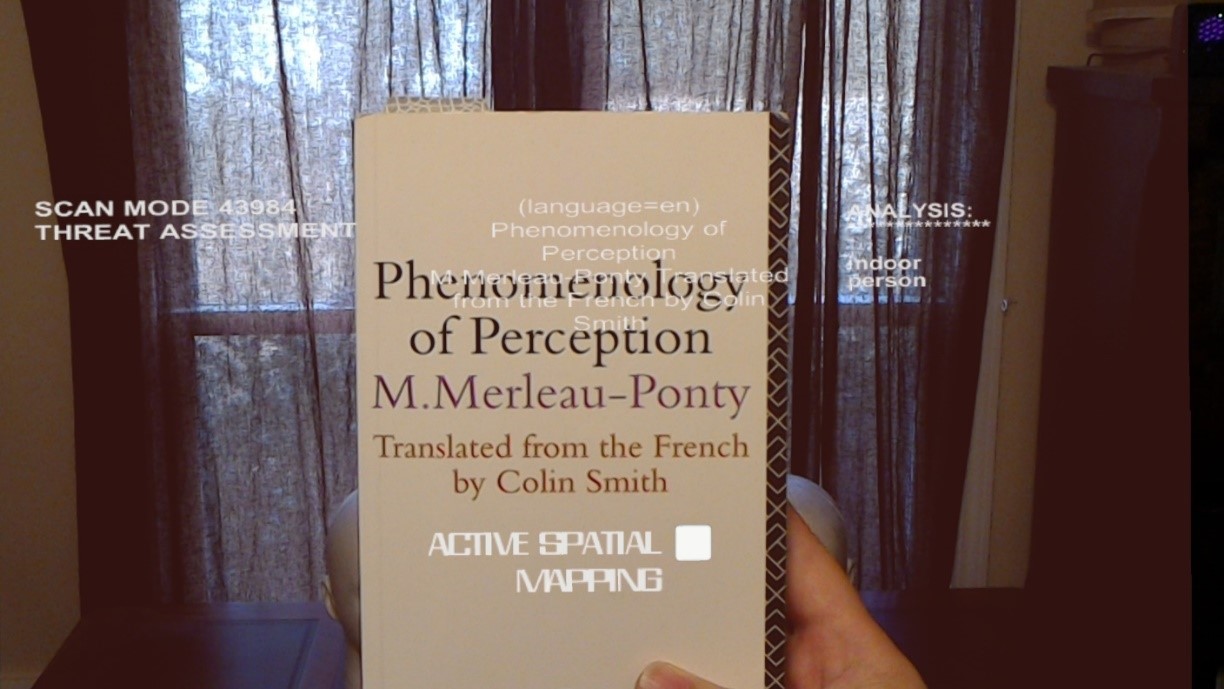
InfoPanel.text = "ACTIVE SPATIAL MAPPING";
}
ThreatAssessmentPanel.text = "SCAN MODE 43984nTHREAT ASSESSMENTnn" + string.Join("n", faces.ToArray());
}
[/code]
The Computer Vision tagging feature is a way to detect objects in a photo. It can also be used in an application like this one to do on-the-fly object recognition.
When the JSON data is returned from the call to cognitive services, you can use the JsonUtility to deserialize the data into an object called AnalysisResult, shown below.
[code lang=”csharp”]
public class AnalysisResult
{
public Tag[] tags;
public Face[] faces;
}
[Serializable]
public class Tag
{
public double confidence;
public string hint;
public string name;
}
[Serializable]
public class Face
{
public int age;
public FaceRectangle facerectangle;
public string gender;
}
[Serializable]
public class FaceRectangle
{
public int height;
public int left;
public int top;
public int width;
}
[/code]
One thing to be aware of when you use JsonUtility is that it only works with fields and not with properties. If your object classes have getters and setters, JsonUtility won’t know what to do with them.
When you run the app now, it should update the HUD every 30 seconds with information about your room.
To make the app even more functional, you can add OCR capabilities.
[code lang=”csharp”]
string _ocrEndpoint = "https://westus.api.cognitive.microsoft.com/vision/v1.0/ocr";
public void ReadWords(byte[] image)
{
coroutine = Read(image);
StartCoroutine(coroutine);
}
IEnumerator Read(byte[] image)
{
var headers = new Dictionary<string, string>() {
{ "Ocp-Apim-Subscription-Key", _subscriptionKey },
{ "Content-Type", "application/octet-stream" }
};
WWW www = new WWW(_ocrEndpoint, image, headers);
yield return www;
List<string> words = new List<string>();
var jsonResults = www.text;
var myObject = JsonUtility.FromJson<OcrResults>(jsonResults);
foreach (var region in myObject.regions)
foreach (var line in region.lines)
foreach (var word in line.words)
{
words.Add(word.text);
}
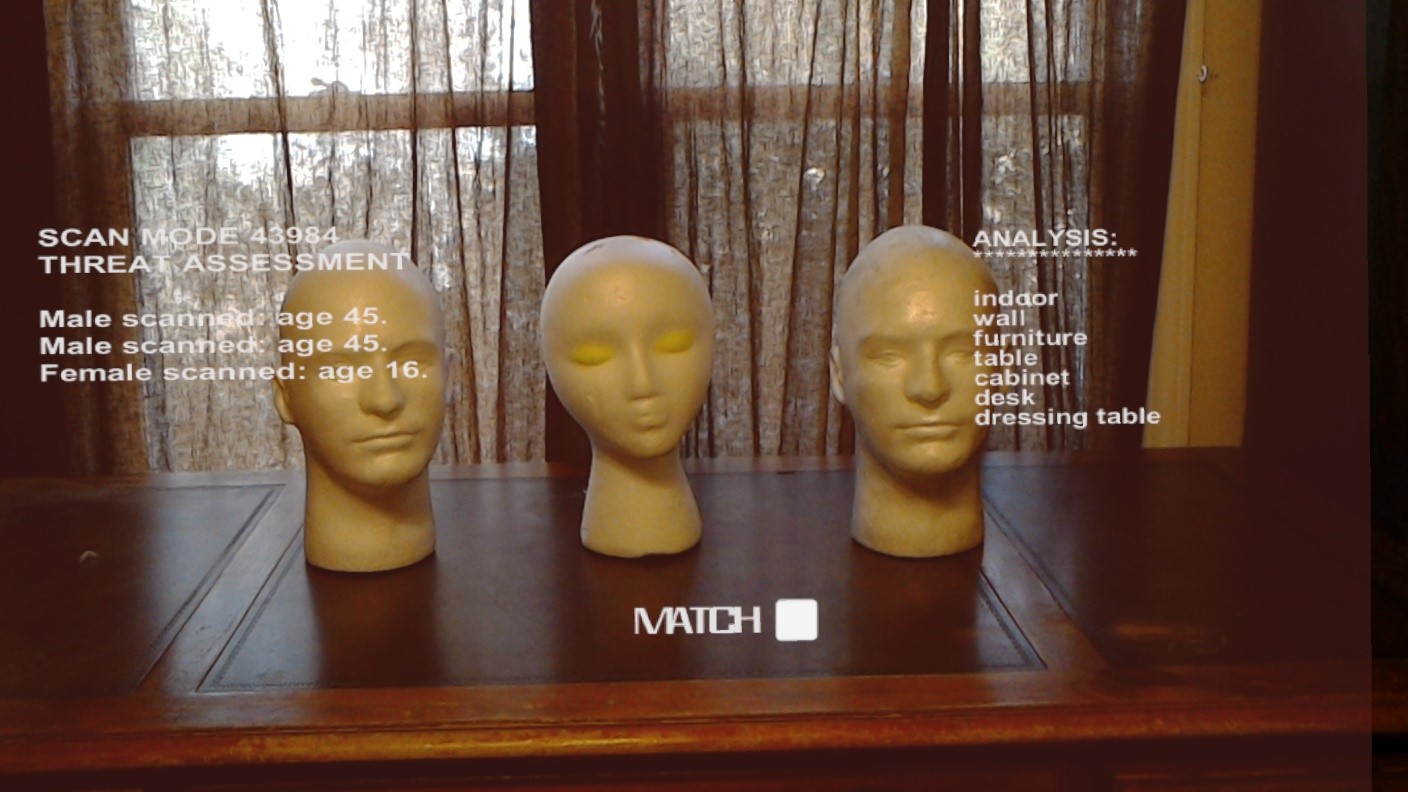
string textToRead = string.Join(" ", words.ToArray());
if (myObject.language != "unk")
{
DiagnosticPanel.text = "(language=" + myObject.language + ")n" + textToRead;
}
}
[/code]
This service will pick up any words it finds and redisplay them for the Terminator.
It will also attempt to determine the original language of any words that it finds, which in turn can be used for further analysis.
Conclusion
In this post, you discovered how to recreate a cool visual effect from an iconic sci-fi movie. You also found out how to call Microsoft Cognitive Services from Unity in order to make a richer recreation.
You can extend the capabilities of the Terminator Vision app even further by taking the text you find through OCR and calling Cognitive Services to translate it into another language using the Translator API. You could then use the Bing Speech API to read the text back to you in both the original language and the translated language. This, however, goes beyond the original goal of recreating the Terminator Vision scenario from the 1984 James Cameron film and starts sliding into the world of personal assistants, which is another topic for another time.
View the source code for Terminator Vision on Github here.
Thanks to James Ashley for hosting the community-driven HoloLens Challenge – the seventh edition inspired us to build this out!