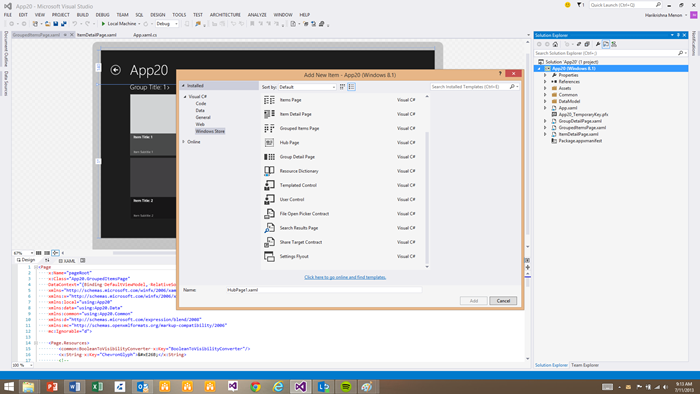
Both Visual Studio 2012 and Visual Studio 2013 Preview contain a number of project and item templates designed to help you author Windows Store apps. We provide a set of templates that showcase the top Windows design patterns; however, these are meant to serve as guides and starting places for those who wish to use a pattern similar to the one expressed in the template. They’re not the only options!
In Visual Studio 2013 Preview, the default XAML templates have been redesigned to take advantage of new features introduced in Windows 8.1 Preview. As part of the redesign, we focused on two major areas: incorporating your feedback and simplifying the templates to make it easier for apps to consume them. In this blog post, we’ll describe these changes and also talk about how to upgrade your app to target Windows 8.1 Preview.
Template changes
Navigation and Process Lifetime Management (PLM)
The Windows Store project templates targeting Windows 8 had two classes that handled navigation and Process Lifetime Management (PLM): SuspensionManager and LayoutAwarePage. The new project templates continue to use SuspensionManager with no changes, but they no longer use LayoutAwarePage. Despite what its name implies, LayoutAwarePage was much more than a component used for layout-awareness. It also contained the default view model, handled navigation, and maintained state for PLM. In this release, we’ve split those features apart into separate components, building a more customizable model rather than requiring the entire kitchen sink.
While PLM is still handled by SuspensionManager, we’ve added the new NavigationHelper class, which wraps the use of SuspensionManager.
Data model changes
The data model in the Windows 8 templates used statically defined data that was hard-coded in the SampleDataSource constructor. While this file is simply a sample data source, we decided to make the data model more closely resemble a data source you might actually use in a live production app. The SampleDataSource now asynchronously reads statically defined data from a JSON file included in the project. This could very easily be changed to read data from any source that returns JSON data. You can also modify the data classes, or remove them and author your own, to match the schema of your own data.
View model and data binding
In the Windows 8 project templates, LayoutAwarePage had a default view model that was used to store data for each page. This view model has now been moved locally to each page (defined in the code-behind for every page). While the type is currently an ObservableDictionary, feel free to build your own class and use a strongly typed view model instead!
Styles and data templates
While the Windows 8 project templates shipped a Resource Dictionary named StandardStyles, the new project templates no longer include this file. Many of these standard styles have been moved into Windows 8.1 Preview itself and we no longer need to include them in every project! This includes frequently used styles such as TextButtonStyle, and BasicTextStyle (renamed to BaseTextBlockStyle), and many others; a full list of the styles can be found later in this post.
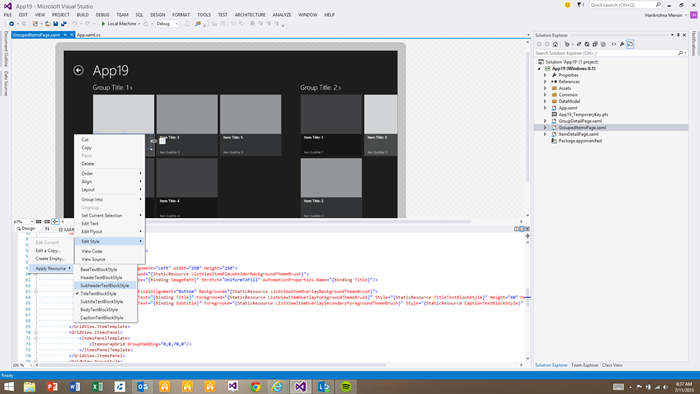
We’ve also updated the tooling in Visual Studio to help you identify and find these styles. When you use IntelliSense or a context menu to select a style, you’ll now see all available styles, including those in the platform. This image shows how you can apply a resource to a text block by right-clicking on an element on the artboard.
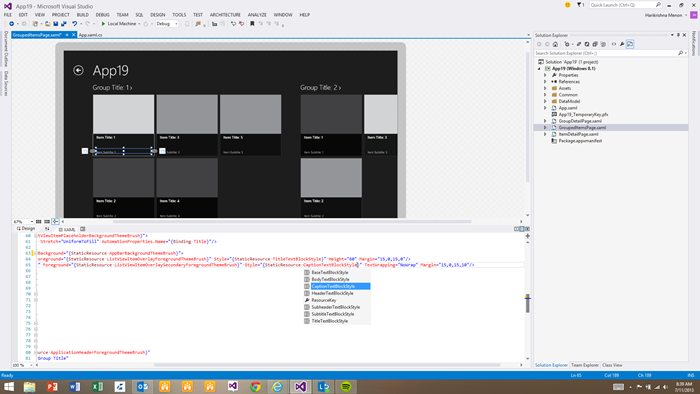
This image shows how when you invoke IntelliSense when typing in the XAML editor it brings up a list of all available resources.
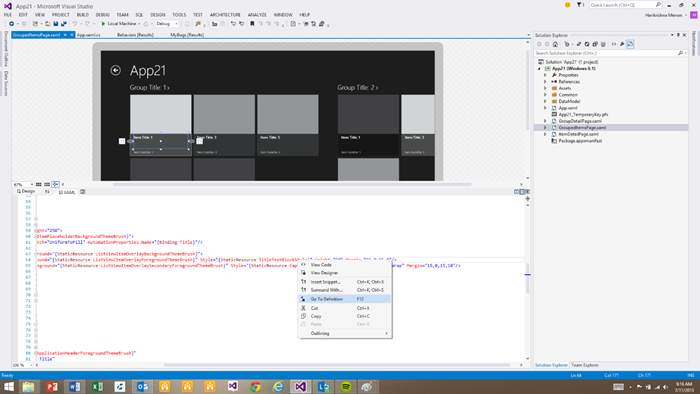
To find the properties that are actually set in a style, you can right-click the style and select Go To Definition. This opens the file, in the platform where it’s defined, in a provisional tab. The Go To Definition command appears on the context menu when right-clicking a resource in the XAML editor.
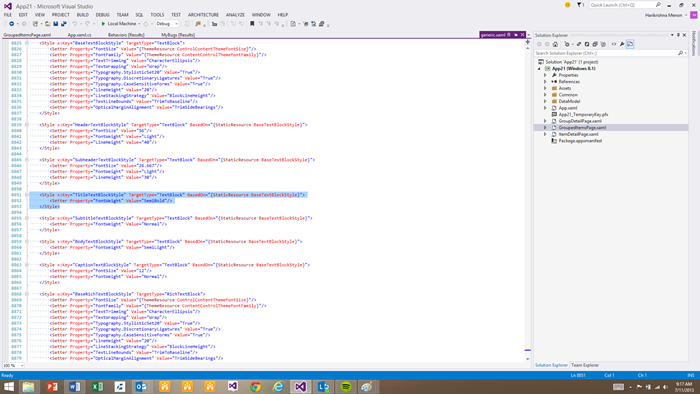
Generic.xaml is opened in a provisional tab, with the selected style scrolled into view.
In addition to styles, StandardStyles also contained a few data templates. Since these data templates were only used on a few pages, we’ve moved the templates directly into each of those pages. This benefits app performance by not loading in unnecessary components prematurely, and also makes it easier to manage data bindings, as the data templates may change depending on your own custom data models.
UI and view states
The concept of view states has changed in Windows 8.1 Preview, as seen in our earlier discussion of Beautiful apps at any size on any screen. With the ability to resize apps to almost any arbitrary size, developers will need to design their views to account for this. Some may choose to simply auto-flow their layout with minimal changes, while others may want to make more deliberate changes. The new project templates have been designed to be as simple as possible while allowing for additional view states to be added. The Split Page and the File Open Picker Contract are the only pages that require layout changes; these two pages will listen for Window.SizeChanged events and react appropriately.
Pages and item templates
Building Windows Store apps in XAML for Windows 8.1 Preview is very similar to building Windows Store apps in XAML for Windows 8. The Grid, Split, and Hub project templates all contain multiple pages, and we still provide these pages as individual item templates that can be added to any Windows Store XAML app targeting Windows 8.1 Preview. Additional Items such as the Settings Flyout and Hub Page can be added to the project with the Add New Item.
Two new item templates have been added for Windows 8.1 Preview: the Hub Page and the Settings Flyout. The Item Detail Page has been simplified, as it will contain information specific to your data model, so we’ve removed the RichTextColumns control from the templates. If you find you still need it, you can always add it back in from your Windows 8 project.
Retargeting to Windows 8.1 Preview
Many developers have already created apps using the Windows 8 templates and want to be able to migrate them to target Windows 8.1 Preview without having to start from scratch with a new template. As it turns out, there is very little that you have to do to upgrade the template code in your app:
- Follow the guidance for retargeting your app.
- Open LayoutAwarePage and change the DetermineVisualState method to no longer rely on the ApplicationViewState and instead be dependent on the window size. For instance, you could return VerticalLayout when your app window width is less than 500px and HorizontalLayout when it’s greater than 500px. As this method is virtual, it is designed to be overridden in each page when needed (as it’s done on the SplitPage). You can override this on any page if your layouts and visual states differ. Just make sure to rename the visual states on each of your pages to match these new strings.
And that is the only template-generated code that you need to modify! Your app may take advantage of additional features that have changed, or you may wish to leverage some of the new features in Windows 8.1 Preview; see the retargeting guidance for more info about how to do that. It’s also important to note that adding additional item templates will rely on the new components as defined above, rather than the old ones (such as LayoutAwarePage). These components have all been designed to work with each other, so it is perfectly acceptable to leave some pages relying on the old components (LayoutAwarePage & StandardStyles) and others on the new components (NavigationHelper).
However, if you’d like to remove the dependencies on the old components, here are the specific changes that you will have to make. To illustrate these changes, I’ll use the XAML and code-behind generated from the Basic Page Item template.
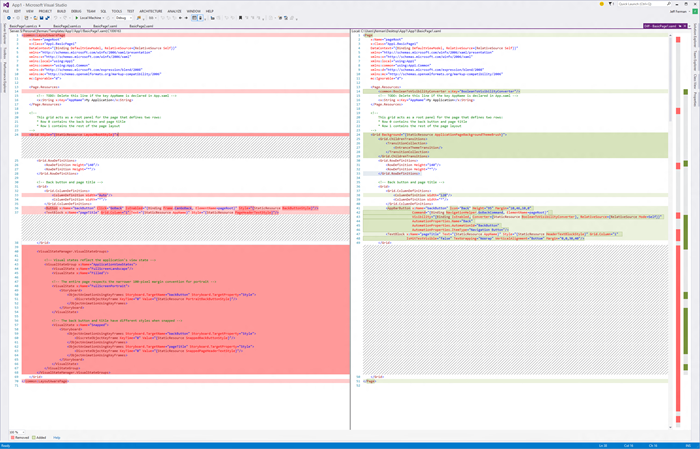
BasicPage.xaml
There are a few changes to call out here in the difference between the two templates.
- The page no longer inherits from LayoutAwarePage.
- The ApplicationViewState Visual State Group no longer exists.
- The LayoutRootStyle and the BackButtonStyle no longer exist.
- The BackButton now uses an AppBarButton rather than a Button, and is bound to a command rather than using a Click event.
This image shows differences between the markup generated from the Basic Page Item template in Visual Studio 2012 and Visual Studio 2013 Preview.
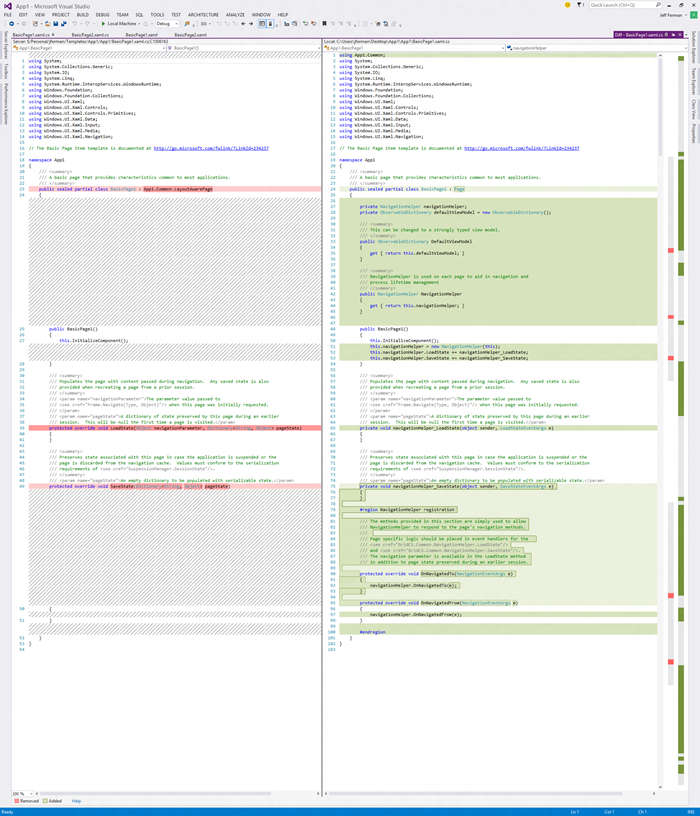
BasicPage.xaml.cs (code-behind for BasicPage.xaml – also applicable for VB and C++)
There are a few changes to call out here in the difference between the two templates.
- The page no longer inherits from LayoutAwarePage.
- The template now has two properties: NavigationHelper and DefaultViewModel.
- NavigationHelper replaces the navigation functionality in LayoutAwarePage.
- DefaultViewModel used to be defined in LayoutAwarePage and is now defined locally.
- The constructor creates NavigationHelper and hooks up two events: LoadState and SaveState.
- LoadState and SaveState are no longer overridden methods, but are now hooked up to events.
- LoadStateEventArgs contains both the navigationParameter and the pageState.
- SaveStateEventArgs contains the pageState.
- Instead of LayoutAwarePage overriding OnNavigatedTo and OnNavigatedFrom, this is done in each page. These two methods should not be modified, as they simply allow the NavigationHelper to hook up to the page’s navigation calls.
Differences between the code generated from the Basic Page Item template in Visual Studio 2012 and Visual Studio 2013 Preview.
StandardStyles.xaml
This file has been removed. All the styles that are still utilized in the new project and item templates have been replaced with styles built into Windows 8.1 Preview. The data templates have been moved locally to the pages that use them.
|
Style name in Windows 8 |
Style name in Windows 8.1 Preview |
Changes |
|
BasicRichTextStyle |
BaseRichTextBlockStyle |
|
|
BaselineRichTextStyle |
BaseRichTextBlockStyle |
|
|
ItemRichTextStyle |
BaseRichTextBlockStyle |
|
|
BodyRichTextStyle |
BodyRichTextBlockStyle |
|
|
BasicTextStyle |
BaseTextBlockStyle |
|
|
BaselineTextStyle |
BaseTextBlockStyle |
|
|
HeaderTextStyle |
HeaderTextBlockStyle |
|
|
SubheaderTextStyle |
SubheaderTextBlockStyle |
|
|
TitleTextStyle |
TitleTextBlockStyle |
|
|
SubtitleTextStyle |
SubtitleTextBlockStyle |
|
|
ItemTextStyle |
BaseTextBlockStyle |
|
|
BodyTextStyle |
BodyTextBlockStyle |
|
|
CaptionTextStyle |
CaptionTextBlockStyle |
|
|
GroupHeaderTextStyle |
SubheaderTextBlockStyle |
|
|
TextButtonStyle |
TextBlockButtonStyle |
|
|
TextPrimaryButtonStyle |
TextBlockButtonStyle |
|
|
TextSecondaryButtonStyle |
TextBlockButtonStyle |
|
|
TextRadioButtonStyle |
TextBlockButtonStyle |
|
|
AppBarButtonStyle |
|
|
|
AppBarButtonStyles |
|
|
|
PageHeaderTextStyle |
HeaderTextBlockStyle |
|
|
PageSubheaderTextStyle |
HeaderTextBlockStyle |
|
|
SnappedPageHeaderTextStyle |
HeaderTextBlockStyle |
|
|
BackButtonStyle |
|
|
|
PortraitBackButtonStyle |
|
|
|
SnappedBackButtonStyle |
|
|
|
HorizontalScrollViewerStyle |
|
|
|
VerticalScrolLViewerStyle |
|
|
|
LayoutRootStyle |
|
|
*Note: Render transforms are no longer used for baseline alignment. Two new properties are used instead (TextLineBounds and OpticalMarginAlignment). This may require you to make minor adjustments to your XAML to ensure that placement is correct, depending on your layout.
|
DataTemplates in StandardStyles (Windows 8) |
Update in Windows 8.1 Preview |
|
Standard250x250ItemTemplate Standard500x130ItemTemplate Standard500x130ItemTemplate Standard130ItemTemplate Standard80ItemTemplate StandardSmallIcon300x70ItemTemplate StandardSmallIcon70ItemTemplate StandardFileWithTooltip190x130ItemTemplate |
These data templates are no longer shared in the project & item templates. As these data templates are specific for the sample data model that ships in the templates, we now define them locally in each page where they are used. This provides additional clarity on where the data bindings are located and allows you to easily change these to map the schema of your data model. |
Debugging upgrade issues
When you upgrade a project, VS automatically modifies both your project file as well as the app manifest. During upgrade, the following changes will occur:
- In the project file (eg. csproj)
- The TargetPlatformVersion will be set to 8.
- The MinimumStudioVersion will be set to 12
- The VisualStudioVersion will be set to 12.0
- The OSMinVersion and OSMaxVersionTested will be updated to 6.3.0
- A new manifest namespace will be added (m2) and the SplashScreen and VisualElements defined in the Application object will now derive from that namespace
If your project does not build after you upgrade, it’s possible that the target’s path included a hardcoded VisualStudioVersion. You can detect this by looking for the following line at the bottom of your project file:
<Import Project="$(MSBuildExtensionsPath)MicrosoftWindowsXamlv11Microsoft.Windows.UI.Xaml.CSharp.targets" />
Note the hardcoded v11. To correct this, change v11 to v$(VisualStudioVersion):
<Import Project="$(MSBuildExtensionsPath)MicrosoftWindowsXamlv$(VisualStudioVersion)Microsoft.Windows.UI.Xaml.CSharp.targets" />
That’s all folks!
As always, we want to hear your suggestions or feature ideas/improvements. Please add your suggestions to UserVoice or vote on suggestions from other users. And please let us know if you run into any questions or problems when retargeting your app to Windows 8.1 Preview.
Enjoy the new templates!
Jeffrey Ferman – Program Manager, Visual Studio & Blend

