

This post was authored by Eric Schmidt, Content Developer 2, Xbox Developer Content
Microsoft recently sponsored a team to complete in the “Build for Good” LEGO® MINDSTORMS® Robo Competition, a team that represented the Xboxbrand. I had the distinct honor of working on this team of developers, testers, and one business manager to create a pretty awesome exhibit.
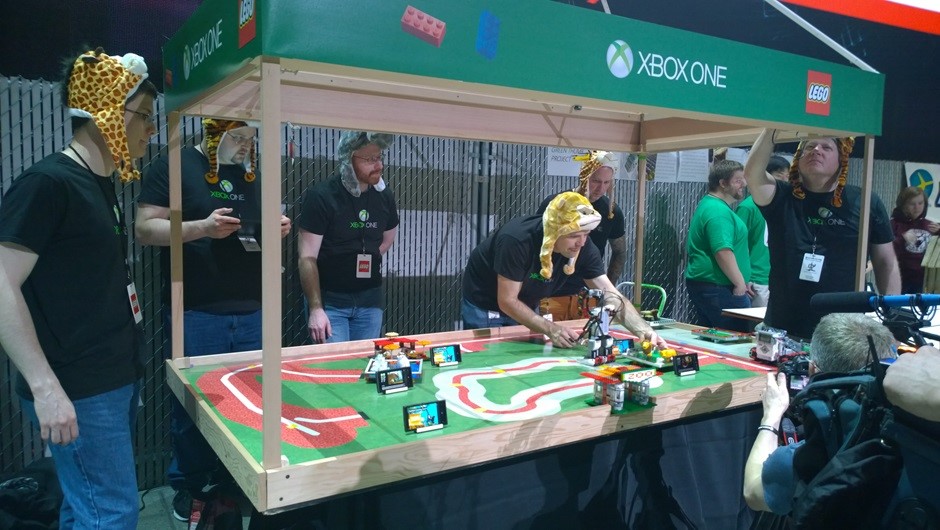
Team Xbox, wearing distinctive Zoo Tycoon themed hats.
The Team Xbox exhibit ambitiously connected three LEGO MINDSTORMS EV3 robots, five Windows Phones, and a Surface Pro tablet into an integrated system. The exhibit created a real-life version of the Zoo Tycoonvideo game from Microsoft Studios that used LEGO bricks and robots instead of people. Using a Windows Runtime app (that is, an app that runs on the Windows Runtime APIs, like a Windows Store app) on the Surface, a “player” built a zoo, exhibit-by-exhibit, by making selections in the app. When the player added a new animal exhibit to the zoo – a polar bear, for example – the app sent a simple Bluetooth message to one robot that delivered an exhibit (made of LEGO bricks). That robot then sent a simple message back to the app that the exhibit was delivered. The app next sent another message to a second robot to deliver (by airlift!) an animal to the exhibit. Finally, after the exhibit and animal were securely in place, the app alerted a third robot to feed the animal.
Each of the robots executed code written using the LEGO® MINDSTORMS® EV3 Software. The code listened for messages from the app and then reacted in a specific way.
From the app’s perspective, it connected three separate and distinct Bluetooth-enabled devices to which it sent various messages. The difficulty lay in establishing the Bluetooth connection with each robot and then sending and receiving messages. To accomplish this, the app used several of the Windows Runtime APIs designed for interacting with devices – including the Windows.Devices.Bluetooth.Rfcommnamespace introduced in Windows 8.1 and Windows Phone 8.1.
In this blog post, I’ll provide step-by-step instructions for how you can talk to a MINDSTORMS robot from a Windows Runtime app. I’ll show you how to build a very simple app that sends and receives messages from an EV3 robot. I’ll focus on the specific Windows Runtime APIs we used to connect to the robots, so I’ll be glossing over a lot of the basics about building a Windows Runtime app using HTML, CSS, and JavaScript. If you need to learn more about the fundamentals, see Create your first Windows Store app using JavaScript on MSDN.
On the other hand, keep in mind that this blog post provides more explicit instructions around managing project files in a Visual Studio solution than we normally provide in our posts. I know that many of the loyal readers of our blog are professional developers who are deeply familiar with the basics of Visual Studio. For you, I encourage you to skip ahead to some of the details about connecting to Bluetooth devices from a Windows Runtime app.
Get the hardware and software
Before I get any further, I assume that you’ve already got the required devices and software for this process. I’m using Visual Studio Express 2013 for Windows, running on Windows 8.1, to write my code. I’m connecting to a MINDSTORMS EV3 Intelligent Brick (the ‘brain’ of the robot) that has been updated with the 1.03H firmware version of the EV3 operating system. (It’s easiest to update the firmware from the MINDSTORMS EV3 Software.)
IMPORTANT: Your EV3 Intelligent Brick needs to be paired and connected at least once to your Windows PC before they will be able to receive and send messages to each other. This can be a tricky process:
- On the settings page for the EV3 Intelligent Brick, make sure that Bluetooth is turned on. When you select the Bluetooth option from the screen, ensure that Visibility and Bluetooth are selected. Also, make sure that iPhone/iPad/iPod are not selected.
- Pair the EV3 Intelligent Brick and your Windows PC.
- From the Start screen, type Devices and Printers, and then select Devices and Printers. In the Control Panel, on the Devices and Printers page, click Add a device. In the list, find the name of your EV3 Intelligent Brick (if you haven’t changed it in the EV3 Software, the name will be ‘EV3’) and then follow the on-screen instructions.
- t this point, you’ll be prompted on the EV3 Intelligent Brick to acknowledge the connection with your PC and to accept a passcode. On the PC, you’ll be asked to supply this passcode.
- Make sure you remember your brick’s name!This becomes important later on when you try to connect to the brick.
- Now you can connect to the brick from your PC. You can do this with a single click from the EV3 Software.
- Open Devices and Printers again. If your brick and PC are paired, the brick will show up in the “Unspecified” category under its own name. (You may see it twice if you connected to the brick previously by USB. Select the entry that has the details ‘Bluetooth Peripheral Device’.) Right-click the device and select Properties. In the device Properties window, go to the Services tab and ensure that Serial Port (SPP) ‘Serial Port’ is selected. Apply any changes and close the settings dialog box.
- Make sure that the EV3 Software is not connected to your brick by Bluetooth when you attempt to connect to the brick from your app. This can block the Window Runtime app from connecting to the EV3 brick.
For more info about how to troubleshoot Bluetooth connectivity problems, download the EV3 Bluetooth guide.
Write the EV3 listening and receiving code
To demonstrate sending and receiving messages, the brick runs a simple listening program written using the MINDSTORMS EV3 Software. A picture of the program running on the robot is shown below.
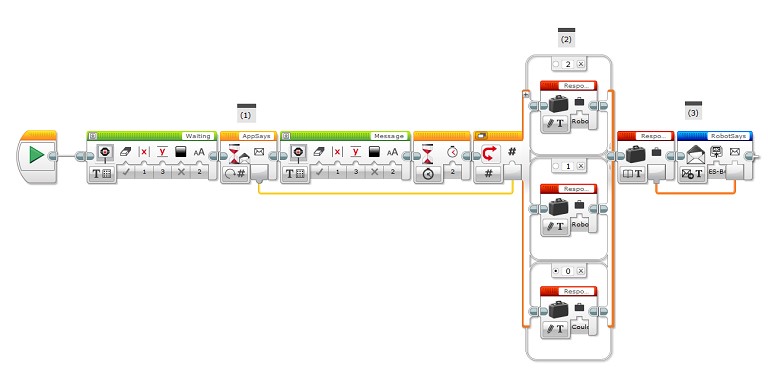
Here’s a brief description of how the program on the EV3 robot works:
- The program waits until it receives a message from the app titled “AppSays” (using a Wait block). The value of the message sent by the app is interpreted as a floating point number. The screen on the brick briefly displays an acknowledgement that it received a message.
- Next is a simple switch-case statement (a Switch block). If the robot receives a 1 or 2 from the app, it creates a variable called “Response” that says “Robot got [number].” If the robot receives any other number – or cannot decipher the message that it receives – it updates the “Response” variable to say “Could not decipher.”
- The robot then sends a message back to the app titled “RobotSays” with the value provided by the “Response” variable (a Messaging block).
After I create and download this program to my EV3 brick, I can close the MINDSTORMS EV3 Software and start to build the Windows Runtime app.
Create the user interface for the Windows Runtime app
Before I start writing more code, I’ll take a quick inventory of the features I need to build for this simple Windows Runtime app. The app has to be able to do a few things programmatically:
- It needs to establish a connection to the brick. (For Team Xbox, the code needed to be extensible so that the app could connect to three bricks.)
- It needs to convert a user-generated message into the message protocol that the EV3 brick can understand.
- It needs to listen for and decode incoming messages from the brick.
In this blog post, I’ll design an app so that the code for each feature can be individually tested. Because the Team Xbox app was largely written using JavaScript, I’ll write this simple app in JavaScript. Of course, the WinRT APIs that I use are also available to other languages, so you could recreate this app in C#, Visual Basic, or C++ (and use the same code in a Windows Phone app). (In fact, you might find that creating the message to send to the robot is easier in a more strongly-typed language. If you feel bold, I encourage you to abstract the messaging part of the solution into a Windows Runtime component.)
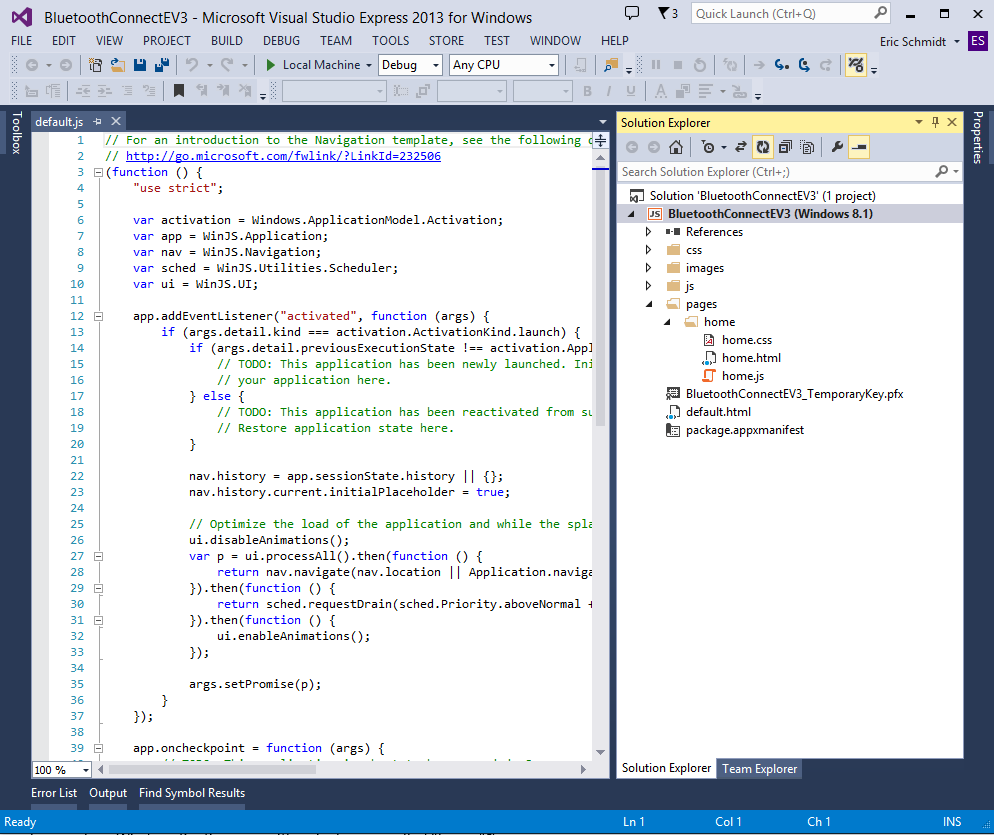
After opening Visual Studio 2013 Express for Windows, I click File, New Project. In the New Project dialog box, I expand Installed, Templates, JavaScript, Store Apps. In the list of templates, select Navigation App. (This may be titled Navigation App (Windows) if you’ve downloaded Visual Studio 2013 Update 2.) Now I have a clean Windows Runtime app with a single page called “home” as shown in the project structure below:
Because this app needs access to the PC’s proximity features, we need to declare this capability in the app’s manifest. We also need to declare access to the specific Bluetooth device. In Solution Explorer, right-click the file titled ‘package.appxmanifest’ and select View Code. In the code for the app manifest, find the Capabilities element and add the following XML:
<DeviceCapability Name="proximity" />
<m2:DeviceCapability Name="bluetooth.rfcomm">
<m2:Device Id="any">
<m2:Function Type="name:serialPort" />
</m2:Device>
</m2:DeviceCapability>
Next, I’m going to create a simple user interface for the app. In Solution Explorer, open up /pages/home/home.html. In the section with the role ‘main’, replace the content with the following HTML markup:
<!–Send messages to the robot.
This section remains disabled until a connection has been made. –>
<!-- Send Messages to the robot. This section remains disabled until a connection has been made-->
<div>
<h2>Send message</h2><br /><br />
<div>
<div><input type="number" class="number-input" placeholder="Type a
number"/></div>
<div><button class="send-message" disabled="disabled">Send
message</button></div>
<div class="output"></div>
</div>
</div><br /><br />
<!--Connect to the robot and register messages that are received.
<div>
<h2>Connection info</h2><br /><br />
<div><button class="connect-robot">Connect to
robot</button></div><br />
<div>
Message history
<div class="messages"></div>
</div>
</div>
This HTML creates a two buttons (Connect to robot and Send message) and a number input box. The Send message button starts out disabled – once the app has connected to the robot, the button becomes enabled again. Under the Connect to robot button is a container div for displaying the messages received from the robot.
Next, I’ll open the /pages/home/home.js and add code to react to events raised by the HTML page, especially the buttons. Replace the template code in home.js with the following code:
(function () {
"use strict";
var myRobot;

    WinJS.UI.Pages.define("/pages/home/home.html", {
        ready: function (element, options) {

// A simple utility function to write output to the HTML page.
function logOutput(title, message) {
var output = element.querySelector('.messages');
                output.innerHTML += new Date().toLocaleTimeString() + " " +
                    title + ": " + message + "</br/>";
            }

// Add an event handler to the button that connects to the robot.
            element.querySelector('.connect-robot').addEventListener("click",
function (evt) {
                    evt.target.setAttribute("disabled", "disabled");

// The call to connectToRobot is asynchronous,
// so we continue our work in the done method of
// returned promise.
                    Robot.connectToRobotAsync().done(function (rbt) {
                        myRobot = rbt;
                        logOutput("Connection", "Connected to robot.")

                        element.querySelector('.send-message').removeAttribute('disabled');

// Add an event handler to the robot's reportReceived event.
                        myRobot.reportReceived = function (report) {
                            logOutput(report.title, report.value);
                        }
                    });
                });

// Add event handler to the button that sends a message to the robot.
            element.querySelector('.send-message').addEventListener("click",
function () {
var number = element.querySelector('.number-input').value;

if (!isNaN(number)) {
                        myRobot.sendMessage("AppSays", number);
                        element.querySelector('.output').innerHTML = "Message sent.<br/>";
                    }
else {
                        element.querySelector('.output').innerHTML =
"Make sure that you entered a number.<br/>";
                    }
                });
        }
    });
})();
In this code, I create a new Robot object, store a reference to that object and then send messages to robot when the user clicks the Send message button. When messages are received from the robot, there is a simple utility function (logOutput) that displays the message in the UI of the app.
Write the code to interact with the robot
Now I can begin to write the JavaScript code that talks to the EV3 robot. I’ll start by adding a new JavaScript file called “Robot.js” to the solution. (In Solution Explorer, right click the ‘js’ folder, choose Add, New JavaScript File. In the Add New Item dialog box, name the file “Robot.js” and click Add.) Before I continue, I’ll add a reference to the new JavaScript file to my default.html file.
<script src="/js/Robot.js"></script>
Robot.js is initially empty, so I’ll add the following code to the file to give it some shape.
(function () {
"use strict";

var robotName = "EV3"; // Replace with your device’s name.

// Create aliases for the Windows Runtime namespaces that we need.
var bluetooth = Windows.Devices.Bluetooth;
var devices = Windows.Devices.Enumeration;
var sockets = Windows.Networking.Sockets;
var streams = Windows.Storage.Streams;
var crypto = Windows.Security.Cryptography;

// Gets a connection to a specifically named EV3 brick. This code can be
// customized to connect to multiple EV3 bricks.
function connectToRobotAsync() {
// Implementation details …
    }

    WinJS.Namespace.define("Robot", {
        connectToRobotAsync: connectToRobotAsync
    });
})();
I’ve used WinJS.Namespace.defineto expose the connectToRobotAsync function. You notice that I’ve declared a robotName variable in this module that identifies the robot I’ll connect to. I could have instead passed the name to the connectToRobotAsync function, which would be necessary if I wanted to connect to more than one robot.
I need to use several Windows Runtime APIs to connect to the robot and send data to it. Rather than use the fully-qualified names for each namespace, you see that I’ve given them short aliases that are referenced by variables inside the scope of the anonymous function. This is a common practice in JavaScript to avoid typing out the full identifiers for APIs each time.
Here now is the implementation of the connectToRobotAsync function:
// Gets a connection to a specifically named EV3 brick. This code can
// be customized to connect to multiple EV3 bricks.
function connectToRobotAsync() {
var selector =
        bluetooth.Rfcomm.RfcommDeviceService.getDeviceSelector(
        bluetooth.Rfcomm.RfcommServiceId.serialPort);
    selector += " AND System.ItemNameDisplay:="" + robotName + """;

return devices.DeviceInformation.findAllAsync(selector, null).
    then(function (devices) {

var device = devices[0];
return bluetooth.Rfcomm.RfcommDeviceService.fromIdAsync(device.id);
    }).
    then(function (result) {

var service = result;
var socket = new sockets.StreamSocket();
var promises = [];

if (service.connectionHostName && service.connectionServiceName) {
            promises.push(socket.connectAsync(
                service.connectionHostName,
                service.connectionServiceName));
            promises.push(WinJS.Promise.as(socket));

return WinJS.Promise.join(promises);
        }
    }).
    done(function (result) {

if (!Array.isArray(result)) {
return result;
        }

return WinJS.Promise.as(new Robot(robotName, result[1]));
    });
}
There’s a lot to unpack in this code block, so I’ll take it step by step. Notice first that the code is set up as a series of asynchronous calls, each one returning a Promise object. Each code block – contained in the calls to then and done – returns a Promise object the represents the work performed by the asynchronous call. To perform the work in sequence, I add my code to the then method of the Promise object returned by the previous block of code.
Before I continue, I need an easy way to select my connected Bluetooth device (in this case, my robot) out of all the devices connected to my machine. To do this, I call the Windows.Devices.Bluetooth.Rfcomm.RfcommDeviceService.getDeviceSelector method. This returns an Advanced Query Syntax (AQS) string that defines the parameters for a query that will select my robot. The AQS selector string will look something like the following:
System.Devices.InterfaceClassGuid:="{B142FC3E-FA4E-460B-8ABC-072B628B3C70}" AND
System.DeviceInterface.Bluetooth.ServiceGuid:="{00001101-0000-1000-8000-00805F9B34FB}"
AND System.Devices.InterfaceEnabled:=System.StructuredQueryType.Boolean#True AND
System.ItemNameDisplay:="EV3"
Next, look at the first asynchronous call, the call to Windows.Devices.Enumeration.DeviceInformation.findAllAsync. This returns all the devices (as a DeviceInformationCollection object) that satisfy the query defined by the selector string. In this case, it should return a collection with just a single DeviceInformationobject – my robot.
NOTE: You need to pass in a second argument to the call to DeviceInformation.findAllAsync. Otherwise, you’ll get a collection of ALL the devices that connect to the PC using a serial port. Of course, you can modify the AQS selector string to return difference sized collections of devices. If, for instance, you wanted to get all the Bluetooth devices connected to the machine, you could use the same query string as shown above (but leave out the final AND clause).
Next, I call the Windows.Devices.Bluetooth.Rfcomm.RfcommDeviceService.fromIdAsync method for the DeviceInformation object that represents my robot. This will return the Windows.Devices.Bluetooth.Rfcomm.RfcommDeviceService that represents the connection to my robot. I can retrieve the RfcommDeviceService from the result argument passed into my call to then.
With the RfcommDeviceService in hand, now I create a new StreamSocket object and connect to my robot using the Windows.Networking.Sockets.StreamSocket.connectAsync method. The StreamSocket object represents an open ‘channel’ between my PC and the robot: I can send messages to and receive messages from the robot over the StreamSocket. When I send messages to my robot, I’ll write to the output stream exposed by the StreamSocket. To receive messages from the robot, I listen to changes from the data received from the input stream of the StreamSocket.
When the StreamSocket.connectAsync returns successfully, I now have an open channel to talk to the robot. The Promise object returned by the StreamSocket.connectAsync method is empty, so I need to keep a reference to that StreamSocket outside of that code block. Rather than storing the StreamSocket in a variable in a higher lexical scope, I wrap it in a promise and use WinJS.Promise.join to combine it with the promises returned from the call to StreamSocket.connectAsync. Once the joined promises return, the StreamSocket will be contained in one of the results.
Because I need this StreamSocket to communicate with my robot, I pass it into the constructor for my custom Robot class. The final code block, the call to done, returns a new Robot object to the code that calls Robot.connectToRobotAsync.
The following code shows the definition of the Robot class:
// A class that contains information about a robot.
function Robot(name, socket) {
this.name = name;

this._connection = socket;
this._reader = new streams.DataReader(socket.inputStream)
this._reader.byteOrder = streams.ByteOrder.littleEndian;

this.sendMessage = function (title, value) {
if (this._connection) {
var message = new Message(title, value);
var messageBuffer = message.messageBuffer;

this._connection.outputStream.writeAsync(messageBuffer);
        }
else {
throw new WinJS.ErrorFromName("Connection",
"No connection to brick; can't write a message.")
        }
    }

this.reportReceived = null;

// Start listening loop.
    pollResults();

var that = this;

function pollResults() {
        that._reader.loadAsync(2).then(function () {
var size = that._reader.readInt16();

            that._reader.loadAsync(size).then(function (data) {
var dataArray = new Uint8Array(data);
                that._reader.readBytes(dataArray);
var message = Message.parseMessage(dataArray);

if (that.reportReceived) {
                    that.reportReceived(message);
                }
                setTimeout(pollResults, 500);
            });
        });
    }
}
Again there’s a lot I could discuss here, but I’ll focus only on a couple of items. First, note that the Robot class takes the robot’s name and the StreamSocket that connects my PC to the robot as parameters for the constructor method. When I create a new Robot object, I store a reference to the StreamSocket in the object, in addition to its name. You’ll also note that I create a new Windows.Storage.Streams.DataReader object when the object is initialized – I’ll need this to read the messages the robot sends back to me. The streams emitted by the robot use the Little Endiansystem for organizing individual bytes within a multiple-byte datum of information.
The Robot class exposes one public method, sendMessage, and one public event, reportReceived. The sendMessage method has two parameters, title and value, which it uses to create a new Message object. (I’ll examine the Message class in a moment.) After creating a new Message object, the sendMessage method writes the message as a buffer to the output stream of the StreamSocket, using the Windows.Storage.Streams.IOutputStream.writeAsyncmethod.
The reportReceived event allows external code to add an event listener to respond when the robot sends a message back to the PC. Once I’ve created a new Robot object, I can assign a function to this event (property) and it will be called when the PC receives the message.
The pollResults method waits to load data from the input stream from the StreamSocket connection (via the DataReader object). The constructor function for the Robot class both defines the pollResults function and invokes it, which starts the process of waiting for messages from the robot. When invoked, the pollResults function attempts to read two bytes of data from the input stream provided by the StreamSocket, using the DataReader.loadAsync method. While the input stream is empty (no data has been sent from the robot), the method waits, returning control to other code. Once some data has been sent, it is loaded into the DataReader and then read as bytes into a typed array. The resulting array is passed as an argument to the Message.parseMessage function, which returns a Message object. After the message from the robot has been decoded, the reportReceived event handler is called, passing in the new Message object as an argument.
This brings me to the Message class, which is shown in the following code.
// A class that can encode / decode messages to the robot.
function Message(title, val, array) {
this.title = title;
this.value = val;
this.messageArray = array || encodeMessage(title, val);
this.messageBuffer = crypto.CryptographicBuffer.createFromByteArray(new Uint8Array(this.messageArray));

// Encodes a message as a byte array.
function encodeMessage(title, val) {
function encodeString(str) {
var byteArray = [];
for (var i = 0; i < str.length; i++) {
if (str.charCodeAt(i) <= 0x7F) {
                    byteArray.push(str.charCodeAt(i));
                }
            }
return byteArray;
        };

var floatsAsBytes = {
"1": [4, 0, 0, 0, 128, 63],
"2": [4, 0, 0, 0, 0, 64]
        };

var header = [1, 0, 129, 158];
var titleFieldRaw = encodeString(title);
        titleFieldRaw.push(0);
var titleSizeField = Number(titleFieldRaw.length);
var valueField = floatsAsBytes[val.toString()];

var payload = header.concat(titleSizeField, titleFieldRaw, valueField);
var rawMessageArray = [Number(payload.length), 0].concat(payload);

return rawMessageArray;
    }
}
The Message class needs to support two separate scenarios:
- It needs to convert title/message pairs to a byte array that’s sent to the robot.
- It needs to contain title/message pairs decoded from data received from the robot.
To address both of these scenarios, the constructor function for the Message class takes three parameters: title, val, and an optional parameter, array. The title and val parameters are pretty straightforward – they are the title and message of the message that I’m going to send to or have received from the robot. The arrayparameter supports the second scenario – when I receive a message from the robot, the data will already be processed as an array through the decoding process. So, I don’t need to create a new array from the title and value when the Message object is instantiated – I can just pass in the array that I already have and store it in the Message object. I’ll discuss the process of decoding a message later, when I talk about the Message.parseMessage function.
You see that the Message object exposes four members: title, value, messageArray, and messageBuffer. The title and value properties store the title and val parameters passed into the constructor and allow me to convert the messages into a specifically-ordered byte array. The messageArray property stores that byte array, which can be created using the internal encodeMessage function. (As mentioned earlier, for received messages the messageArray property stores the decoded array.) The messageBuffer property stores a Windows.Storage.Streams.IBuffer object, which is what actually gets written to the output stream sent to the robot. I use the Windows.Security.Cryptography.CrytographicBuffer.createFromByteArray method to create the Buffer object from the byte array.
So you’re probably wondering: how does the message from my PC get encoded so that the robot can understand it? Well, there’s a very specific protocol that the EV3 brick expects from messages it receives. If you send a message to the EV3 without following the protocol (or with a poorly formed message), the EV3 will receive the message but won’t register it as a message in a Wait block of Messaging block. Each message needs to contain a title (Message title in the EV3 Software) and a message (Message in the Ev3 Software). The title provided in the message must match the Mailbox title field of the Wait block in the EV3 program running on the brick – if they don’t match, the robot ignores the message.
The protocol for a message sent to and received from the EV3 brick follows. I’ll provide the values both as hex values and (where possible) UTF-8 character codes or values. (Here I need to acknowledge the tremendous debt I owe to the EV3Messenger sample on CodePlex and Hans Odenthal’s blog post, Sending messages from a PC application in C# to the Lego EV3.)
- The number of bytes in the message, followed by a 0 (0x0) terminator.
- A “header” of sorts that always contains the same data:
- The number of messages being sent. This will always be 1 (0x1).
- A 0 (0x0) terminator.
- The type of message, which is always 124 (0x81).
- A system command, which is always 159 (0x9E).
- The size of the message title, in bytes.
- The message title, with each letter in the title represented as a UTF-8 encoded value, followed by a 0 (0x0) terminator.
- The message size, as a single byte, followed by a 0 (0x0) terminator.
- The message as a series of bytes. The message can be text (a varying number of bytes), a floating point number (16-bit or 4 bytes), or a simple Boolean (1 byte).
Taking my example of a message that has the title “AppSays” and a message with a Single floating point number (1) to the robot, the byte array looks like the following chart. (Recall that the Wait block in the EV3 program is listening for a message titled “AppSays”.)
| Index in the array | Value | Section | Description |
| 0 | 0x13 (19) | Bytes in the message | The size of the message does not take into account the first two bytes. |
| 1 | 0x0 (0) | A zero terminator. | |
| 2 | 0x1 (1) | Header | The number of messages being sent. |
| 3 | 0x0 (0) | Header | A zero terminator. |
| 4 | 0x81 (124) | Header | The type of message – always 124 (0x81). |
| 5 | 0x9E (159) | Header | System command – always 159 (0x9E). |
| 6 | 0x8 (8) | Title size | The number of bytes in the message title, including the zero terminator. |
| 7 | 0x41 (65) | Title | The first letter of the title in UTF-8 encoding, an upper-case ‘A’. |
| 8 | 0x70 (112) | ‘p’ | |
| 9 | 0x70 (112) | ‘p’ | |
| 10 | 0x53 (83) | ‘S’ | |
| 11 | 0x61 (97) | ‘a’ | |
| 12 | 0x79 (121) | ‘y’ | |
| 13 | 0x73 (115) | ‘s’ | |
| 14 | 0x0 (0) | A zero terminator | |
| 15 | 0x4 (4) | Message size | The size of the message, in bytes. I’m sending a 16-bit floating point number (a Single), so the message is 4 bytes. |
| 16 | 0x0 (0) | A zero terminator | |
| 17 | 0x0 (0) | Message | The start of the message. In this case, the floating point number ‘1.0’ expressed as 4 byte values. |
| 18 | 0x0 (0) | Message header bytes 2 for floating point value 1.0 | |
| 19 | 0x80 (128) | Message header bytes 3 for floating point value 1.0 | |
| 20 | 0x3F (63) | Message header bytes 4 for floating point value 1.0 |
TIP: If you’re sending a numerical value to your robot but the robot can’t decipher it, make sure you’re sending a floating point number and not an integer. The Message and Wait blocks in the EV3 Software only accept numerical values that are floating-point numbers.
The messages that the EV3 sends back to the PC follow the same protocol. So, decoding them is simply a matter of using the protocol to convert the received message back into text (and other things). The function Message.parseMessage, which does the decoding, is shown below.
// Decode a message sent from the robot into a Message object.
Message.parseMessage = function (message) {
function decodeMessage(message) {
var str = '';
for (var i = 0; i < message.length; i++) {
var currentCharHex = message[i];
            str += String.fromCharCode(currentCharHex);
        }
return str;
    }

var titleSize = message[4];
var titleByteArray = message.subarray(5, 4 + titleSize);
var title = decodeMessage(titleByteArray);

var valueStartNum = 4 + titleSize + 1;
var valueSize = message[valueStartNum];
var valueByteArray = Uint8Array(message.subarray(valueStartNum + 2, valueStartNum + valueSize + 1));
var value = decodeMessage(valueByteArray);

return new Message(title, value, message);
}
This function takes a data array and converts it to a Message object. I only need to know where the characters for the title and the message begin in the data array – from there I use the length to get out the full strings. The first thing I do in this function is get the size of the title string, which will always be at the 6th index in the array. (In my code above I access the 4thindex in the array because the pollResult function in the Robot object reads and discards the first two bytes of data sent by the robot.)
Once I have the size of the title, it becomes a relatively trivial mathematical process of selecting sub-arrays in the data and converting them into strings. In JavaScript, I use the String.fromCharCodefunction to decode individual characters. Once the title and value have been converted to strings, I create a new Message object that is then returned to the calling code.
(As some of you will probably notice, this function only handles the decoding of strings – Booleans and numeric messages from the robot won’t be deciphered correctly using this code.)
Now that I’ve covered the code for sending and receiving messages between a PC and an EV3 robot, let’s test the code out.
Test the app
Before running and testing the Windows Runtime app, you’ll want to start the program on the EV3 brick. I highly recommend that you download the code to the brick, close all instances of the EV3 Software on your PC, and then run the program directly on the brick.
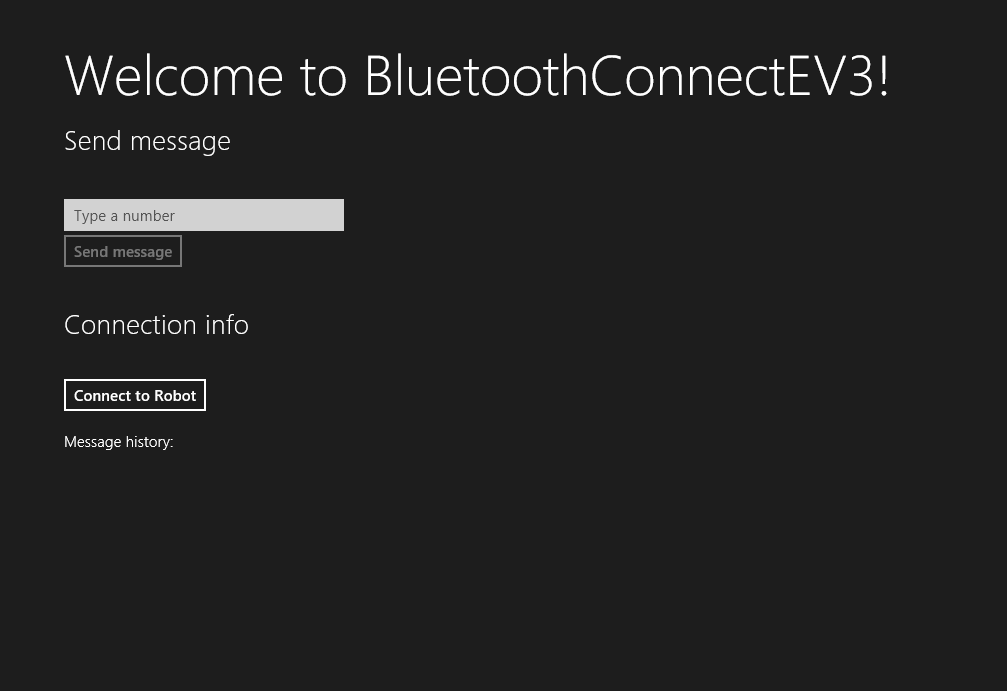
With the EV3 program running, run the Windows Store app code from Visual Studio Express (press F5). The user interface for the app should look similar to this:
TIP: When you first test connecting to the brick from your app, you’ll be prompted as to whether you want to allow the app to access your brick. Click Allow to continue.
To ensure that the code is working correctly, try the following steps:
- Click Connect to Robot to initiate the connection between the app and the robot.
A message will appear under Message history after the app has connected and the Send messagebutton will become enabled. - Enter a number, 1 or 2, into the text box provided and then click Send message.
You should see a new message appear under Message history that includes the time, the title “RobotSays” and a message indicating what value the robot received. If you want to perform an extended test, I suggest that you convert the EV3 program provided above into a MyBlock and then place a copy of that MyBlock within a Loop block. That way you can try out multiple different values.
Other resources
You might be wondering if there’s an easier way to accomplish all this. Well, the good news is that there are a couple of CodePlex projects designed to help you communicate with the LEGO MINDSTORMS EV3 brick over Bluetooth:
- LEGO MINDSTORMS EV3 API. This project includes a Windows Runtime component (.winmd file) that can be added to a Windows Runtime project (Windows, Windows Phone, and universal Windows apps), a library for Windows Phone apps built with Silverlight, and a library that can be used in a Win32 application. This library is very powerful and provides a significant range of functionality. You can use it to read sensor values, run motors, even play sounds or read files on the EV3 brick. However, it won’t allow you to connect to multiple EV3 bricks from a Windows Runtime app.
- EV3Messenger. This Win32 project (a simple Windows Forms application) allows you to connect directly to a specific EV3 brick by specifying the serial port assigned to the brick. If you have more than one brick connected to your PC, you need only specify different serial ports to connect to each / all of them. One of the best parts of this project is that the message protocol for the EV3 brick is broken down into a very readable table. Also, the project contains some C# code that can be reused to encode and decode messages from a Windows Runtime app (with some slight modifications). The only drawback is that the connection code for this app uses the System.IO.Ports namespace, which you can’t use in a Windows Runtime app or in a Windows Runtime component.
Unfortunately, neither of these libraries supply both of two key features that Team Xbox needed. We wanted to have the form factor of a Windows Runtime app, but we needed to send messages to and receive messages from multiple (in our case, three) EV3 bricks. We produced some code that was heavily influenced by the two CodePlex projects mentioned earlier, but tailored for our needs. The “secret sauce” lies in the Robot.connectToRobotAsync function. As I mentioned previously, it can be easily modified to accept a unique name for an EV3 brick and the same function can be called repeatedly at runtime (allowing us to connect to more than one block during one app session).
All in all, Team Xbox had a blast building Lego robots and writing the code to talk to them. Our goal was to inspire more people – particularly young adults – to engage and explore the world of science, technology, engineering, and mathematics. I think we achieved our goal; furthermore, I hope that this blog post will help you build a Windows Runtime app that talks to an EV3 robot … or whatever other Bluetooth-enabled device you’re working with.
Thank you for reading and keep on developing apps!