

SQLite version 3.11.2 is shipping with the Windows 10 Anniversary edition as part of the Universal Windows Platform (UWP) and is recommended for all UWP local data storage needs. This represents the first time an open source, third-party library, such as SQLite, has shipped as part of the SDK.
SQLite has become a popular database for mobile apps because…
- It’s self-contained. It is just a code library without any additional dependencies. Unlike most databases, once you have referenced the SQLite library, you don’t need to do any further configuration.
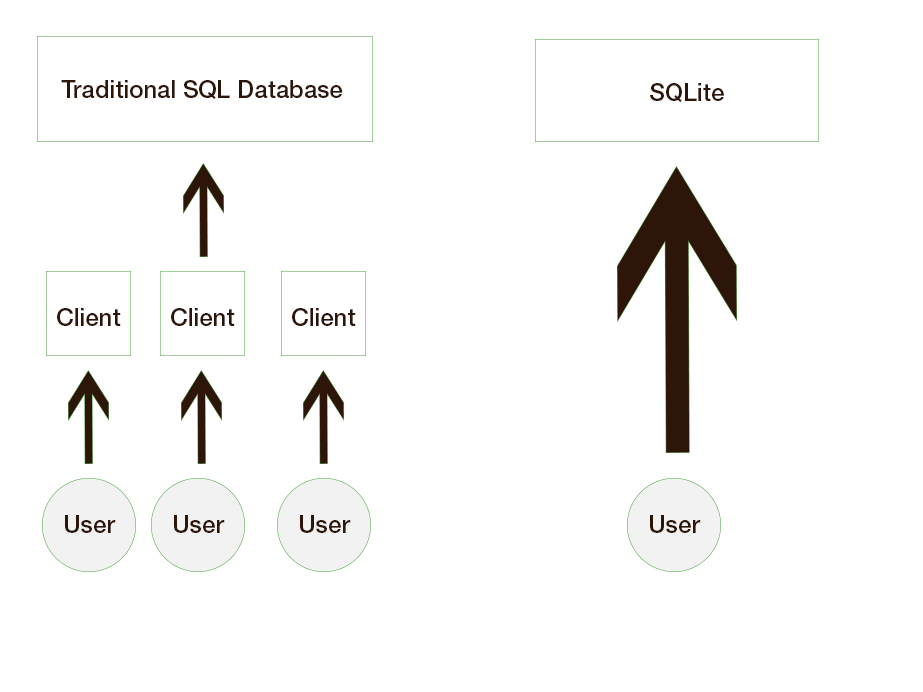
- It has no database server. The client and the server run in the same process.
- It has no license model. The creators put it in the public domain, so you can use and distribute it via your product with no strings attached.
- It doesn’t support multiple users. It’s a storage system that has just one user and one database instance.
- It is cross-platform and cross-architecture. It works well on the full range of devices in the Windows 10 family and is already a go-to solution for developers on other platforms. In other words, SQLite takes architecture and compatibility out of the data access layer equation for migrating your app to UWP.
In this post, we will touch on why SQLite works well on mobile platforms, discuss various ways you can consume SQLite in your C++ and C# UWAs, and look at some of the data developer tools our developer community has built.
SQLite API overview
SQLite databases can be created, updated, and deleted with the SQLite C APIs (we’ll also look at using C# to work with SQLite in the next section). Details of the SQLite C API can be found at the SQLite.org page.
To gain a sound understanding of how SQLite works, work backwards from the main task of the SQL database, which is to evaluate SQL statements. There are two objects to keep in mind:
There are six interfaces to perform database operations on these objects. All of SQLite’s power is delivered by these six interfaces. That’s it.
These sets of APIs give developers tremendous control over storing, retrieving, and manipulating data in a SQLite database with granular result codes. For instance, a prepare statement can return an OK, an error, or an indication of misuse, allowing the developer to take a specific action based on each of these specific return codes. Often, developers might feel that they want to develop for the general case. In this circumstance, an ORM might be a more convenient way to go instead of using the vanilla C API.
Entity Framework Core: An Object Relation Mapper (ORM) for UWP apps
Object Relational Mappers (ORMs) allow developers to use strongly typed, domain-specific objects to work with relational data. Since Entity Framework has been a big hit with the .NET community, the team has created Entity Framework Core (EF Core), which can talk to SQLite via the SQLite ADO.NET provider for UWP. You can use it in UWP apps written in C#.

For developers tasked with migrating enterprise apps to UWP, EF Core enables you to literally copy code over with only minor changes to the database context class. For developers starting an app from scratch, EF Core can save you time and simplify your code by abstracting out the specific database calls.
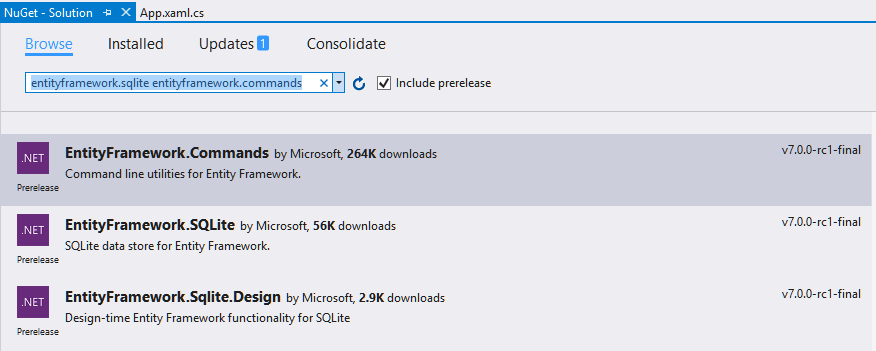
To get started with EF, open your solution in Visual Studio and go to Tools -> NuGet Package Manager -> Package Manager Console. From there, run…
[code language=”csharp”]
Install-Package EntityFramework.SQLite –Pre
[/code]
You will also want to get the commands. To do so, run…
[code language=”csharp”]
Install-Package EntityFramework.Commands –Pre
[/code]
Alternatively, you can also use the Nuget Package Manager to install the EntityFramework.SQLite and EntityFramework.Commands packages. Just be sure to select the Include prerelease checkbox.
From here, we’ll use the example of a sensor data collection app. The app samples and displays current ambient temperature and humidity data from sensors placed around the home. The app also features a setup experience to add additional sensors from the app. We can get the end-to-end data layer working with four steps:
- Create a data model.
- Create a database file.
- Bind the UI and the data model.
- Integrate the UI with the database.
First, we’ll create a new file that contains the database context and entity classes that define our sensor data model. Let’s call this model.cs.
When creating a database context, we can specify the database type we wish to use (SQLite for our purposes).
[code language=”csharp”]
using Microsoft.Data.Entity;
using System.Collections.Generic;
namespace EFGetStarted.UWP
{
public class SensorContext : DbContext
{
public DbSet<Sensor> Sensors { get; set; }
public DbSet<Ambience> AmbientDataSample { get; set; }
protected override void OnConfiguring(DbContextOptionsBuilder optionsBuilder)
{
optionsBuilder.UseSqlite("Filename=Sensors.db");
}
protected override void OnModelCreating(ModelBuilder modelBuilder)
{
// Make SensorId required
modelBuilder.Entity<Sensor>()
.Property(b => b.SensorId)
.IsRequired();
// Make TimeStamp required
modelBuilder.Entity<Ambience>()
.Property(b => b.AmbienceId)
.IsRequired();
}
}
// These classes can be declared in individual files. Shown here for simplicity.
public class Sensor
{
public Guid SensorId { get; set; }
public string Location { get; set; }
public List<Ambience> CurrentAmbientData { get; set; }
}
public class Ambience
{
public int AmbienceId { get; set; }
public int TimeStamp { get; set; }
public int Temp { get; set; }
public int Humidity { get; set; }
}
}
[/code]
Next, we create a database at app launch time by adding the highlighted code to App.xaml.cs.
[code language=”csharp”]
public App()
{
Microsoft.ApplicationInsights.WindowsAppInitializer.InitializeAsync(
Microsoft.ApplicationInsights.WindowsCollectors.Metadata |
Microsoft.ApplicationInsights.WindowsCollectors.Session);
this.InitializeComponent();
this.Suspending += OnSuspending;
// Before running the app for the first time, follow these steps:
// 1- Build -> Build the Project
// 2- Tools –> NuGet Package Manager –> Package Manager Console
// 3- Run "Add-Migration MyFirstMigration" to scaffold a migration to create the initial set of tables for your model
// See here for more information https://docs.efproject.net/en/latest/platforms/uwp/getting-started.html#create-your-database
using (var database = new SensorContext())
{
database.Database.Migrate();
}
}
[/code]
Now we bind the data models to the UI in MainPage.xaml.
[code language=”csharp”]
<Page
x:Class="EFGetStarted.UWP.MainPage"
xmlns="http://schemas.microsoft.com/winfx/2006/xaml/presentation"
xmlns:x="http://schemas.microsoft.com/winfx/2006/xaml"
xmlns:local="using:EFGetStarted.UWP"
xmlns:d="http://schemas.microsoft.com/expression/blend/2008"
xmlns:mc="http://schemas.openxmlformats.org/markup-compatibility/2006"
mc:Ignorable="d"
Loaded="Page_Loaded">
<Grid Background="{ThemeResource ApplicationPageBackgroundThemeBrush}">
<StackPanel>
<TextBox PlaceholderText="Add a sensor"/>
<Button Content="Update Database" Click="Add_Click"/>
<ListView Name="Sensors">
<ListView.ItemTemplate>
<DataTemplate>
<TextBlock Text="{Binding Location}" />
</DataTemplate>
</ListView.ItemTemplate>
</ListView>
</StackPanel>
</Grid>
</Page>
[/code]
Finally, we are ready to update our data based on user interaction. Specifically, we’ll hook-up the sensor addition experience in MainPage.xaml.cs.
[code language=”csharp”]
public MainPage()
{
this.InitializeComponent();
Loaded += MainPage_Loaded;
}
private void MainPage_Loaded(object sender, RoutedEventArgs e)
{
using (var database = new SensorContext())
{
Sensors.ItemsSource = database.Sensors.ToList();
}
}
private void Add_Click(object sender, RoutedEventArgs e)
{
using (var database = new SensorContext())
{
var sensor = new Sensor
{
SensorId = Guid.NewGuid(),
Location = $"Room1 {DateTime.Now}"
};
// Note how only two lines of code update and save changes to
// the data source and how there’s no reference to ‘SQLite’
database.Sensors.Add(sensor);
database.SaveChanges();
//Update the ItemsSource of the ListView
Sensors.ItemsSource = database.Sensors.ToList();
}
}
[/code]
Research data collection and analysis
Tablets and phones are increasingly being used as data collection devices. A health app, like Fitbit, is essentially a data collection and analysis app for time series data collected from the wearable. A simpler example may be a survey app that collects responses from research participants via tablet or phone.
A client/server model database solution requires the developer to set up a cloud service. This might be overkill if all that is needed is a table of data for analysis in Excel. The data collection app can upload the single SQLite database file to a cloud storage location, like OneDrive, or maybe even email it to the analysts. Analysts can then use the SQLite Command Line tool (also shipped in Windows) to convert the SQLite database file to a CSV file for processing in Excel.
Note: It is also possible to use Python or R scripts to access the database file directly.
Exporting a SQLite database to CSV is as simple as launching the SQLite command line tool and entering:
[code language=”csharp”]
sqlite> .header on
sqlite> .mode csv
sqlite> .once c:/docs/researchData/participant101.csv
sqlite> SELECT * FROM sqliteTableFromParticipant101;
[/code]
What about tooling?
With more than half a million downloads, @ErikEJ’s SQLCE/SQLite Toolbox deserves a special mention. The tool scans the solution for SQLite files and automatically adds them to the Toolbox. It also provides a simple UI to explore all database objects and script out schemas. Import/Export features allow users to port a SQL Server database to SQLite and vice versa. Check out this Channel 9 video to learn more.
Wrapping up
We have philosophized about what makes a great data access layer and how SQLite can help get you closer to that utopia, and we have ended with information on how to ship your own SQLite and a note about tooling. To learn more, get step-by-step instructions, or review platform support details, you can check out the UWP How-To for Data Access.