

First of all, we want to highlight the latest update to the Desktop App Converter, which now has support for auto detecting shell extensions from your desktop app and declaring them in the AppXManifest of the app package. We continue to monitor your feedback to improve the Desktop App Converter in future releases.
There are three main phases to using the Desktop Bridge to bring forward your desktop app:
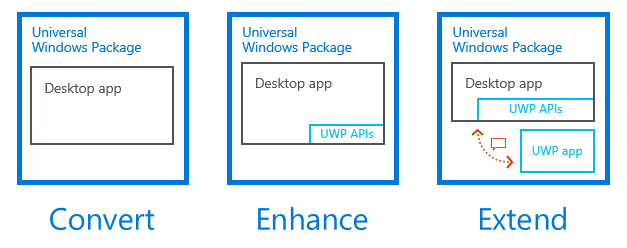
- Convert your existing desktop app, which continues to run exactly as it did before, with the added benefit of using the universal Windows packaging model to deliver the app to users
- Enhance your existing codebase with UWP API calls to implement new functionality, such as Live Tiles, notifications and roaming app data
- Extend your existing codebase with a new App Container process, which can be used to add things like XAML UI and app services, while still being able to use your existing desktop app’s functionality through two-way communication between the App Container process and the desktop app process
After the third phase, you can continue to migrate more code to the App Container process over time, resulting in a UWP app that can reach all Windows 10 devices.
In this blog, we’re going to cover the approach for each of these three phases, including some tips and limitations for each phase and how to optimize for those.
Convert – what will work out of the box?
Once you’ve completed the conversion with the Desktop App Converter, your desktop app will be deployed via an the universal Windows packaging model. This means the installation, uninstallation and update process for your app gets streamlined without having to write your own installer. The most common question we get about this phase is: “What changes do I need to make to my app to get it to work?” The good news is that, for the most part, you won’t need to make very many changes at all. Virtually all of the existing Win32/.NET/COM APIs will work just as they always have. There are however, a few unsupported scenarios and a few gotchas. So let’s go over some of those:
Gotcha #1: Writing to HKEY_LOCAL_MACHINE
While your app can write to the HKEY_CURRENT_USER and HKEY_CLASSES_ROOT hives in the registry, it cannot write to HKEY_LOCAL_MACHINE, even if it has been run with elevated permissions. Also, all registry writes made by your app, after conversion, are encapsulated in a “registry.dat” private hive and are not visible to processes that originate from outside of your package.
Gotcha #2: Modifying files in the install directory
Once your app is deployed, the files that are part of the app package are laid down on disk in a locked down location. Only the system has access to write to the files in this directory. If your app needs to make changes to any of the files that it originally deployed, you will need to adjust the code to copy those files out to either the %appdata% or %localappdata% directory, and make changes to/read from the copy.
Gotcha #3: Your app CAN talk to drivers and NT Services
It just can’t install them. One of the most common misconceptions about the Desktop Bridge is that the lack of install support for drivers and NT Services means that desktop apps using the bridge won’t be able to use the APIs to communicate with them. We are happy to say that you won’t need to change your code here – for example, you can continue to freely send IOCTL commands to drivers.
Gotcha #4: In-process loading of packaged binaries by external processes
We want to ensure that your desktop app can be cleanly uninstalled, leaving nothing behind on the user’s machine. Also, no one likes having to reboot their machine in order to update an app. To ensure Windows can accomplish these objectives, it needs to be able to fully terminate all processes associated with your app prior to any servicing operation. Since Windows controls the lifetime of every process spawned from your app’s package, this is very straightforward. However, if there is a process that doesn’t originate from your app’s package that holds a handle open to a file, for example, Windows won’t be able to remove that file as part of uninstall. And since that process’s lifetime is not managed by Windows, it can’t easily terminate it without risking data loss.
To mitigate this problem, there is a block in place which ensures that all binaries that are shipped in an app package cannot be loaded in-process to a process that doesn’t originate in the same package. This means that any DLLs which ship in your package cannot be loaded in-proc outside of the package, you cannot specify in-proc COM objects meant for use by processes outside the package, etc.
Out-of-process activations work just fine, and shouldn’t require code change.
Other limitations
Check out the Desktop Bridge documentation and scroll down to the “Preparing your desktop app for conversion to UWP” section for details on a few more changes you might have to make to your app as part of using the Desktop Bridge. We are working on removing as many of these limitations as possible.
Enhance – what UWP APIs can I call from my desktop app?
One of the great benefits of using the Desktop Bridge is that you can start to make use of the new functionality available to UWP apps right out of the gate. UWP apps have access to a host of new APIs that provide best-in-class support for thousands of scenarios across all of Windows.
Since there are so many APIs, it’s difficult to provide an exhaustive list of which APIs work from a desktop app in the desktop process. Instead, we will provide you with the API namespaces where a large majority of the provided APIs work as normal. Note that there are APIs that exist in namespaces, which are not on this list that will work, as well as APIs that are in these namespaces which may not work.
API namespaces most likely to work
- Windows.ApplicationModel
- Windows.Globalization
- Windows.Networking
- Windows.UI.Notifications
- Windows.Foundation.Diagnostics
- Windows.Web
- Windows.Storage
- Windows.Data
- Windows.Graphics.Imaging
- Windows.Security
- Windows.UI.Input
- Windows.Media
- Windows.Graphics.Printing3D
- Windows.Services
Enhance – what types of UWP APIs won’t work?
There are two classes of UWP APIs that won’t work correctly when called directly from an existing desktop app converted with the Desktop Bridge.
APIs that require modern UI elements
Firstly, any UWP APIs that display UI elements are not likely to work properly. This is because UWP apps have a fundamentally different UI model than desktop apps (CoreWindow vs HWND). An example of this type of API is in the Windows.ApplicationModel.DataTransfer.ShareTarget namespace. The ShareTarget APIs are used when a user wants to share content from one app to another. The “Target” is the recipient of the content.
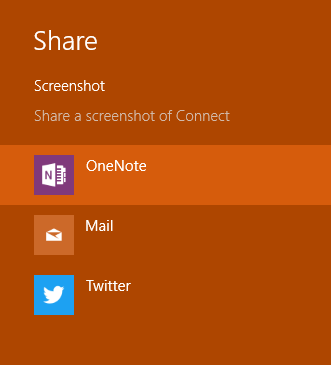
Once the user chooses the Target, it is activated under a ShareTarget-specific context and loaded into a special UI frame. Desktop apps cannot be activated in this way, and therefore these APIs are not supported in an existing desktop app converted with the bridge. However, the ShareSource APIs work just fine, since providing the content to be shared does not require any special UI affordances.
APIs that inspect or utilize the execution environment
Secondly, UWP apps execute in a different environment than desktop apps – even desktop apps using the bridge. There are a number of APIs that ask about this environment, or utilize it in some way, that will only work in UWP apps. An example is the Windows.System.AppMemoryReport class, which contains APIs that return data about app resource usage. A number of Windows Store related APIs, APIs dealing with user data and device enumeration APIs also function differently for UWP apps, and will not work from the desktop process.
API namespaces most likely NOT to work
As above, this is not a complete list, and there may be APIs in these namespaces that will work fine. We are committed to shrinking this list as quickly as we can and appreciate your feedback on which APIs you would like to see enabled.
- Windows.ApplicationModel.LockScreen
- Windows.ApplicationModel.SocialInfo
- Windows.ApplicationModel.UserDataAccounts
- Windows.Devices.Enumeration
- Windows.Devices.PointOfService
- Windows.Gaming.Input*
- Windows.Graphics.Printing*
- Windows.Networking.Proximity
- Windows.Networking.XboxLive
- Windows.UI.*
- Windows.ApplicationModel.Resources.Management
- Windows.ApplicationModel.Store
- Windows.Devices.Custom
- Windows.Devices.Geolocation
- Windows.Foundation.Diagnostics
- Windows.Gaming.XboxLive.Storage
- Windows.Media.Effects
- Windows.Networking.Vpn
- Windows.Storage.Search
- Windows.Web.Http.Diagnostics
Enhance – How do I call UWP APIs from my Desktop App?
The first step in calling these APIs is to make sure that the proper “WinMD” files are added as references to your desktop app’s project in Visual Studio. WinMD is short for Windows Metadata, and adding references to WinMD files expands the scope of APIs that are seen in a given project. For this example, we’ll show you how to add the “Windows.winmd” file to your project in order to use some functionality from the “Windows.Storage” namespace.
First, right click on “References” in your project, and go to “Add Reference…”.
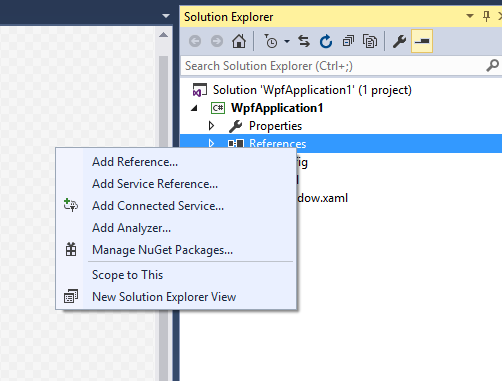
You’ll see a list of available references, but the WinMD files containing WinRT APIs are not listed by default for desktop apps, so you’ll need to browse for them by clicking on the “Browse” button.
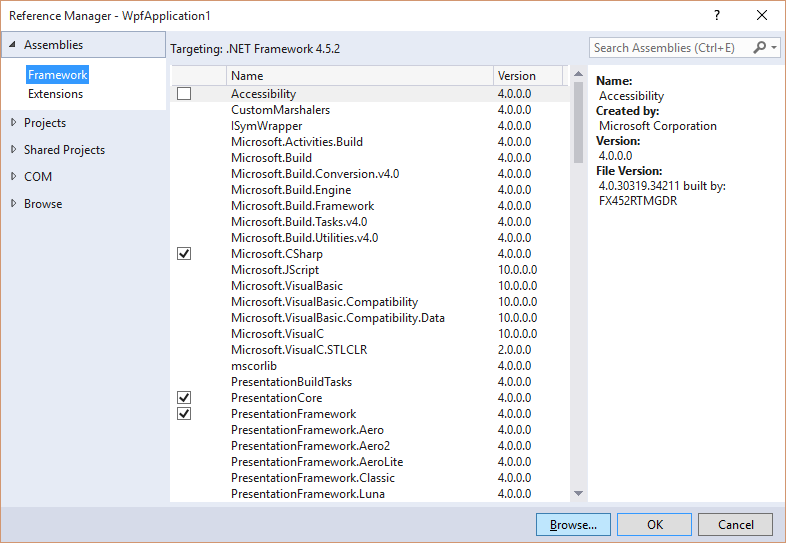
Make sure to set the file type filter to “All Files (*.*)” or the .winmd files will not be visible.

Navigate to the directory where the WinMD file is located (more on this later), and click Add. Then just add the appropriate directive (e.g. using Windows.Storage;) and call the API as normal:
[code lang=”csharp”]
using Windows.Storage;
[…]
if (ApplicationData.Current.LocalSettings.Values.ContainsKey("Status")) {
ApplicationData.Current.LocalSettings.Values["Status"] = Program.CurrentStatus;
}
else {
ApplicationData.Current.LocalSettings.Values.Add("Status", Program.CurrentStatus);
}
[/code]
Where are these WinMD files located?
There are three directories to check when you’re looking for a WinMD:
- %SystemRoot%\System32\WinMetadata
- Then there are two sub-directories under the MSSDK install location. For 64-bit machines, this is typically in %programfiles(x86)%\Windows Kits\10\
- %programfiles(x86)%\Windows Kits\10\References
- %programfiles(x86)%\Windows Kits\10\UnionMetadata
- This folder only contains “Windows.winmd”
You can identify which WinMD file you need by looking up the API you want to call on the Windows Dev Center and looking for the file under the “Requirements” section.
Extend – adding an App Container process
To reach the ultimate end-goal of making your app available to users on all 350+ million Windows 10 devices, including phones, Xbox and HoloLens, you will need to migrate your code to be able to fully run in an App Container process. The Desktop Bridge enables you to gradually migrate the code over, while retaining a fully functional app along the way.
The way this is enabled is by providing the capability for both a desktop process and an App Container process to be present in the app package, while having the ability to communicate between them using AppServices. This also is a way to work around the limitations described earlier regarding UWP APIs that won’t work from existing desktop app code.
Because this process is a little more involved, we encourage you to check out the sample in our GitHub repository on AppServices to learn more about the implementation and communication mechanisms involved.
Activation of the desktop process from the App Container process, and vice versa, is also made possible by adding the App Container process to the app package. To launch the App Container process to the foreground (displaying UI) from the desktop process, use the IApplicationActivationManager interface. To achieve the same result without UI, the AppServiceConnection class can be used. In turn, to launch the desktop process from the App Container process, use the FullTrustProcessLauncher class.
Wrapping up
That’s all for now, stay tuned for more posts in the future and check out the links below for more info on how to move your desktop app forward using the Desktop Bridge!
As you explore the Desktop Bridge, be sure to make suggestions on UserVoice and ask questions and report bugs in the MSDN Forum. We look forward to hearing from you!
MSDN and Channel9 Content
- Desktop Bridge on the Windows Dev Center
- Build 2016 breakout session – Bringing Existing Desktop Applications to the Universal Windows Platform by John Sheehan, Peyman Zanjani
- Build 2016 pre-record session – Bringing Desktop Apps to the UWP Using Desktop App Converter by David Tepper, Avneet Singh
- Channel 9 Live interview – John Sheehan, David Tepper, Stefan Wick
Download Visual Studio to get started.
Written by David Tepper, Senior Program Manager for the Desktop Bridge