

A New Input Paradigm in Windows – The Surface Dial
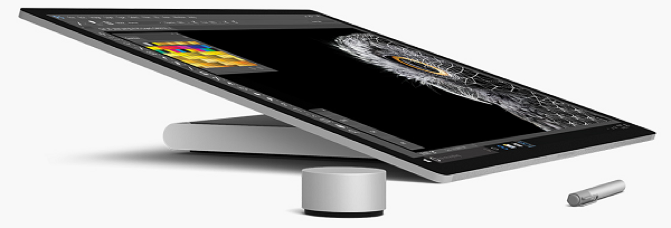
The Surface Dial introduces a new paradigm for input in Windows. The Surface Dial is a new category of input device, which we refer to as a radial controller, and is a revolutionary new tool for the creative process. With tools and shortcuts at your fingertips, the Surface Dial allows you to remain focused on what matters most. You can manipulate images, adjust volume, change color hues and much more, all with simple gestures. With the Surface Dial in one hand and Surface Pen in the other, the creative process is made more productive and more enjoyable. Additionally, you can place your Surface Dial directly on the screen of the Surface Studio and have favorite tools – like a color picker or ruler – at hand and easily accessible on your digital drafting table.
When paired over Bluetooth with a Windows 10 Anniversary Update PC, the Surface Dial delivers a breadth of new experiences to users and opens a world of possibilities. The goal of this blog is to walk you through how you can build your own experiences on the Surface Dial in your application.
Introducing the Radial Controller
For Windows, the Surface Dial represents a totally new type of input device in the system, which we refer to as a radial controller. To go along with this brand-new type of input, Windows has delivered an integrated experience that makes it easier and faster for users to customize and do the things they love – all with a turn of the Dial.
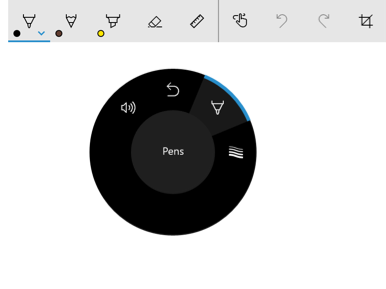
The Surface Dial has a simple set of gestures: It can be rotated, it can be pressed like a button and it can be placed on the screen of the Surface Studio. These gestures are instantly familiar to users and easy to learn. When you press and hold the Surface Dial, a menu experience shows up that presents a selection of tools that can be controlled. These tools offer a variety of functions designed to improve the user’s workflow and keep them immersed in their creativity – from scrolling and zooming, changing volume and controlling media playback, undo and redo, custom keyboard shortcuts and more. It also integrates further with a broad and growing set of in-box and 3rd party apps, unlocking new tools when used with the Windows Ink Workspace, Office, Maps, Groove Music, Sketchable, Bluebeam Revu, Moho 12, Drawboard PDF and more. With the Surface Dial, unlocking new functions for users across every Windows app, they’ll be excited to explore how the Dial can help them in their favorite apps. With the extensibility available through the Windows universal platform, it’s easy for your app to bring that delightful Surface Dial experience they’re searching for!
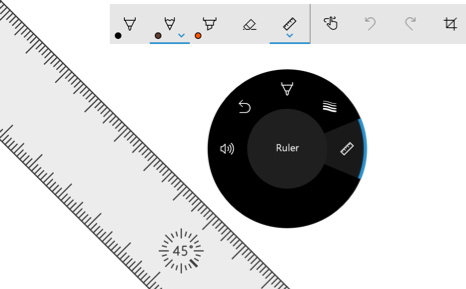
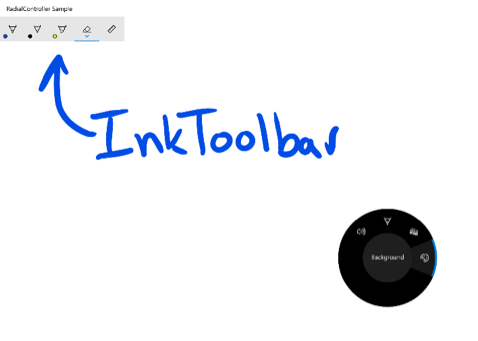
The first and simplest way to add value with Surface Dial is to use Windows inbox components that come with the Surface Dial integration built-in. For developers who leverage the Windows Ink platform to give their users the power to write, draw, and create with their pen, the InkCanvas and InkToolbar XAML controls populate the Surface Dial’s menu with new tools, allowing users to quickly modify the attributes of their ink, change the thickness of their ink as they write and control the on-screen ruler. This gives you the same great Surface Dial integration available in the Sketchpad and Screen Sketch apps in the Windows Ink Workspace.
For media players, integrating with the SystemMediaTransportControls will give the same ability to pause, play and skip tracks with the Dial as Groove Music and Spotify.
For developers who want to go beyond the default integration built into the system and create something truly unique, Windows makes it easy for you to add your own tools to this menu through the RadialController platform. The RadialController universal APIs allow you to build your own custom tools for the Surface Dial’s menu and handle Dial input from both Universal Windows Platform apps and classic Win32 apps. You have the option to respond to the button and rotation input available on all Windows devices, or go one step further and build immersive UI experiences for when the Surface Dial is used on-screen on the Surface Studio.
Let’s start by looking at what it takes to build a custom tool experience for the Surface Dial!
Building a Custom Tool for the Surface Dial
Custom tools for the Surface Dial are the best way to deliver a deep and engaging Dial experience for your users. Since a custom tool is personal to your application’s needs, you can identify the shortcuts and functions that matter most to the user and put it right at the user’s fingertips. By optimizing the user’s workflow and integrating with the app’s UI, your custom tool can help the user stay engaged and feel more productive as they work, play, or create with Dial.
To start creating a custom tool for the Surface Dial, the first step is to create an instance of the RadialController interface used to represent the device and interact with the Surface Dial’s menu for the lifetime of your application. Through your instance of the RadialController, you can access the RadialControllerMenu, which gives you the ability to add and remove your own application-specific tools in the Surface Dial’s menu. The RadialController also gives you access to all the input events for the Surface Dial, allowing you to create compelling experiences for your custom tool.
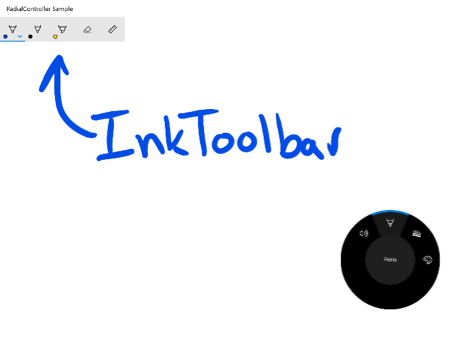
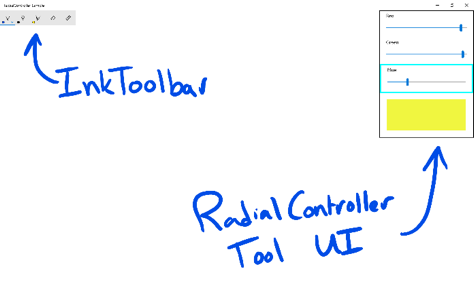
Let’s take a look at building a custom tool inside a sample application. Here we’ll start with a simple inking application using the InkCanvas and InkToolbar controls, which already provide Surface Dial integration for modifying inking attributes and the ruler.
[code lang=”xml”]
<Grid x:Name="Container"
Background="{ThemeResource ApplicationPageBackgroundThemeBrush}">
<Grid x:Name="CanvasGrid">
<InkCanvas x:Name="myCanvas"/>
<InkToolbar x:Name="myToolbar"
VerticalAlignment="Top"
TargetInkCanvas="{x:Bind myCanvas}" />
</Grid>
<StackPanel x:Name="ToolPanel"
HorizontalAlignment="Right"
VerticalAlignment="Top"
Orientation="Vertical"
Width="300"
Background="White"
BorderBrush="Black"
BorderThickness="2">
<StackPanel>
<TextBlock Text="Red" Margin="20,5,20,5"/>
<Slider x:Name="RValue"
LargeChange="1"
Maximum="255"
Margin="20,5,20,5"/>
</StackPanel>
<StackPanel>
<TextBlock Text="Green" Margin="20,5,20,5"/>
<Slider x:Name="GValue"
LargeChange="1"
Maximum="255"
Margin="20,5,20,5"/>
</StackPanel>
<StackPanel>
<TextBlock Text="Blue" Margin="20,5,20,5"/>
<Slider x:Name="BValue"
LargeChange="1"
Maximum="255"
Margin="20,5,20,5"/>
</StackPanel>
<StackPanel>
<Grid x:Name="Preview"
Height="100" Width="250"
Margin="0,20,0,20"/>
</StackPanel>
</StackPanel>
</Grid>
[/code]
Now, let’s add deeper integration with the RadialController APIs and have the Surface Dial control the color of our background. We’ll start by adding a custom tool to the menu:
[code lang=”csharp”]
RadialController myController;
public MainPage()
{
this.InitializeComponent();
UpdatePreview();
highlightedItem = RValue;
//Hide our custom tool’s UI until it is activated by the Dial
ToolPanel.Visibility = Visibility.Collapsed;
// Create a reference to the RadialController.
myController = RadialController.CreateForCurrentView();
// Create a menu item for the custom tool.
RadialControllerMenuItem myItem =
RadialControllerMenuItem.CreateFromKnownIcon("Background", RadialControllerMenuKnownIcon.InkColor);
//Add the custom tool’s menu item to the menu
myController.Menu.Items.Add(myItem);
//Create a handler for when the menu item is selected
myItem.Invoked += MyItem_Invoked;
//Create handlers for button and rotational input
myController.RotationChanged += MyController_RotationChanged;
myController.ButtonClicked += MyController_ButtonClicked;
//Remove Scroll/Zoom/Undo tools as app doesn’t support them
RadialControllerConfiguration config = RadialControllerConfiguration.GetForCurrentView();
config.SetDefaultMenuItems(new RadialControllerSystemMenuItemKind[] { RadialControllerSystemMenuItemKind.Volume });
…
}
#region Handling RadialController Input
private void MyItem_Invoked(RadialControllerMenuItem sender, object args)
{
//Make RGB panel visible when the custom menu item is invoked
ToolPanel.Visibility = Visibility.Visible;
}
[/code]
The RadialController API provides simple events for handling the input coming from the Dial, from button click, to rotation to the on-screen position. In the previous snippet, we set event handlers for the RotationChanged and ButtonClicked input events from the Surface Dial. Using these events, we can have the input from the Dial modify the red, green, or blue values of our background:
[code lang=”csharp”]
Slider selectedItem = null;
FrameworkElement highlightedItem = null;
private void MyController_ButtonClicked(RadialController sender, RadialControllerButtonClickedEventArgs args)
{
if(highlightedItem == Preview)
{
//Click on the Preview, update the background
UpdateBackground();
}
else if (selectedItem != null)
{
//Click on a selected slider, unselect the slider
selectedItem = null;
UpdateHighlight(highlightedItem);
//decrease sensitivity to make it more comfortable to navigate between items
myController.RotationResolutionInDegrees = 10;
}
else if (selectedItem == null)
{
//No selection, select a slider
UpdateSelection(highlightedItem as Slider);
//increase sensitivity to make it easier to change slider value
myController.RotationResolutionInDegrees = 1;
}
}
private void MyController_RotationChanged(RadialController sender, RadialControllerRotationChangedEventArgs args)
{
if (selectedItem != null)
{
//Change the value on the slider
selectedItem.Value += args.RotationDeltaInDegrees;
UpdatePreview();
}
else if(args.RotationDeltaInDegrees > 0)
{
//Rotation is to the right, change the highlighted item accordingly
if (highlightedItem == RValue)
{
UpdateHighlight(GValue);
}
else if (highlightedItem == GValue)
{
UpdateHighlight(BValue);
}
else if (highlightedItem == BValue)
{
UpdateHighlight(Preview);
}
}
else if (args.RotationDeltaInDegrees < 0)
{
//Rotation is to the left, change the highlighted item accordingly
if (highlightedItem == GValue)
{
UpdateHighlight(RValue);
}
else if (highlightedItem == BValue)
{
UpdateHighlight(GValue);
}
else if (highlightedItem == Preview)
{
UpdateHighlight(BValue);
}
}
}
private void UpdateHighlight(FrameworkElement element)
{
StackPanel parent;
//Remove highlight state from previous element
if (highlightedItem != null)
{
parent = highlightedItem.Parent as StackPanel;
parent.BorderThickness = new Thickness(0);
}
//Update highlight state for new element
highlightedItem = element;
parent = highlightedItem.Parent as StackPanel;
parent.BorderBrush = new SolidColorBrush(Windows.UI.Colors.Black);
parent.BorderThickness = new Thickness(2);
}
private void UpdateSelection(Slider element)
{
selectedItem = element;
//Update selection state for selected slider
StackPanel parent = element.Parent as StackPanel;
parent.BorderBrush = new SolidColorBrush(Windows.UI.Colors.Cyan);
parent.BorderThickness = new Thickness(4);
}
private void UpdatePreview()
{
Windows.UI.Color selectedColor = new Windows.UI.Color();
selectedColor.A = 255;
selectedColor.R = (byte) RValue.Value;
selectedColor.G = (byte) GValue.Value;
selectedColor.B = (byte) BValue.Value;
Preview.Background = new SolidColorBrush(selectedColor);
}
private void UpdateBackground()
{
CanvasGrid.Background = Preview.Background;
}
[/code]
In addition to configuring how rotation interacts with the application, the RadialController APIs also give the ability to modify how rotation is delivered to your app and felt by the user. You can use the RotationResolutionInDegrees property to configure how fine the sensitivity or resolution is, and the UseAutomaticHapticFeedback property to set whether haptic feedback is enabled or disabled. In the previous example, setting the rotation to be more sensitive when changing one of the RGB values made much it easier to manipulate the slider. When not specified, the default value for rotational sensitivity is 10 degrees.
Handling On-Screen Input for Surface Studio
As we called out above, there are 2 modes which a radial controller device can be used in: off-screen and on-screen. When the Surface Dial is placed on the screen of the Surface Studio, the RadialController API gets the location and the bounds of the contact so that you can build richer and more immersive experiences for the user.
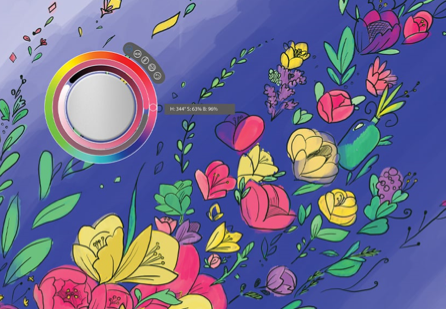
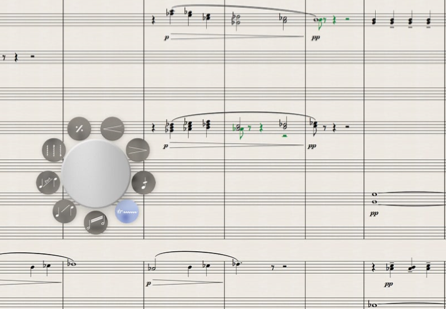
Using the Surface Dial’s on-screen position, you can build beautiful UI which centers around the Dial and gives the user richer information about the interactions that they can drive with the Dial. This allows the user to just focus on the control and placement of their hands and not have to worry about other additional menus or controls. As an example of this, take a look at the rich color palette developed by the engineers at Sketchable, or the quick insert menu developed by StaffPad which allows users to quickly add common musical notation markups.
Going one step further, you also can get context for the intent of the user’s interaction from the on-screen position which can help make your custom tools more compelling. You can see this in the way the Surface Dial guides and drives the on-screen ruler in the Windows Ink Workspace’s Sketchpad, and the engineers at Bluebeam and Drawboard take this same approach with their respective Split Zoom and Ruler features.
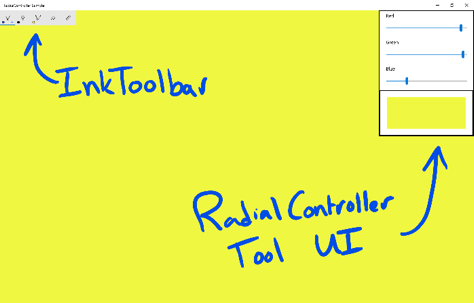
Working from the previous example, let’s take advantage of the on-screen position to make it easier for the user to see the results of their color change manipulations, and draw the relevant UI near our Surface Dial’s on-screen position instead of in the corner of the display. Using the ScreenContact* events, we can determine where the Surface Dial is and update our UI accordingly:
[code lang=”csharp”]
bool isRightHanded;
public MainPage()
{
…
//Query the user’s handedness
Windows.UI.ViewManagement.UISettings settings = new Windows.UI.ViewManagement.UISettings();
isRightHanded = settings.HandPreference == Windows.UI.ViewManagement.HandPreference.RightHanded;
//Create handlers for when RadialController provides an on-screen position
myController.ScreenContactStarted += MyController_ScreenContactStarted;
myController.ScreenContactContinued += MyController_ScreenContactContinued;
myController.ScreenContactEnded += MyController_ScreenContactEnded;
}
private void MyController_ScreenContactStarted(RadialController sender, RadialControllerScreenContactStartedEventArgs args)
{
UpdatePanelLocation(args.Contact);
}
private void MyController_ScreenContactContinued(RadialController sender, RadialControllerScreenContactContinuedEventArgs args)
{
UpdatePanelLocation(args.Contact);
}
private void MyController_ScreenContactEnded(RadialController sender, object args)
{
ResetPanelLocation();
}
private void UpdatePanelLocation(RadialControllerScreenContact contact)
{
//When an on-screen position is provided, apply a transform to the panel
TranslateTransform x = new TranslateTransform();
if (isRightHanded)
{
//Render to the right of the RadialController
x.X = contact.Position.X + contact.Bounds.Width / 2 + 50;
}
else
{
//Render to the left of the RadialController
x.X = contact.Position.X – contact.Bounds.Width / 2 – 50 – ToolPanel.Width;
}
x.Y = contact.Position.Y – 200;
ToolPanel.RenderTransform = x;
ToolPanel.HorizontalAlignment = HorizontalAlignment.Left;
}
private void ResetPanelLocation()
{
//When an on-screen position is not provided, clear the transform on the panel
ToolPanel.RenderTransform = null;
ToolPanel.HorizontalAlignment = HorizontalAlignment.Right;
}
[/code]
When dealing with on-screen input, it’s also important to be aware of whether your application has focus for Surface Dial input. When your application is minimized, another application is moved into the foreground, or the Surface Dial’s menu is opened, your application will lose focus for input and you’ll need to make sure your on-screen UI responds accordingly. On the other hand, when your app is brought into the foreground and focus is restored Surface Dial may already be on the screen of the Surface Studio, and a ScreenContactStarted event won’t be provided. Here’s an example of how to handle focus changes with Surface Dial:
[code lang=”csharp”]
public MainPage()
{
…
//Create handlers for when RadialController focus changes
myController.ControlAcquired += MyController_ControlAcquired;
myController.ControlLost += MyController_ControlLost;
}
private void MyController_ControlAcquired(RadialController sender, RadialControllerControlAcquiredEventArgs args)
{
//Ensure tool panel is rendered at the correct location when focus is gained
if (args.Contact != null)
{
UpdatePanelLocation(args.Contact);
}
ToolPanel.Visibility = Visibility.Visible;
}
private void MyController_ControlLost(RadialController sender, object args)
{
//Hide tool panel when focus is lost
ToolPanel.Visibility = Visibility.Collapsed;
ResetPanelLocation();
}
[/code]
Start Creating with Surface Dial
Using what you’ve learned so far about the RadialController APIs, you can now integrate the Surface Dial into your application, handle input and configure the system menu to meet your needs. You can build a huge range of delightful features for your users, ranging from simple modification of values and properties, to driving complex onscreen UI for Surface Dial users on the Surface Studio.
For more information on UX design and best practices with Dial, please consult our Surface Dial development overview, and you can find the full source code used in this project on GitHub.
Surface Dial and the RadialController platform is a new area of investment for Microsoft, and one of the keys to improving the platform and making it more flexible and powerful is getting feedback from our great community of developers! If you have any questions or comments while developing for the Surface Dial, please feel free to send them via email to [email protected].