

- Identity – The need for package or application identity to identify the caller, and an identifier to scope data and resources.
- Registration – The need for configuration of machine state during application deployment, which is required by the API and indexed by the package or application identity.
For packaged applications, Identity declared in the Appxmanifest.xml, and Registration is handled by the MSIX deployment pipeline based on the information in the AppxManifest.xml. This allows a simplified calling pattern for UWP APIs where the application code just uses an API. Compare this to a typical Win32 API that requires a register-use-unregister pattern for managing a callback.
We’ve heard your feedback, and in response we’re filling in the divide between Win32 apps and new Windows APIs & features so that you can take advantage of these new APIs & features and enhance your applications. As of Windows Build 10.0.19000.0 we’re introducing the following new AppModel concepts to provide your Win32 app with deeper integration into the OS:
- Sparse Package registration
Signed MSIX packages can be installed on Windows today but all content referenced in the package’s Appxmanifest.xml must be present inside the package. A ‘Sparse’ Package contains an AppxManifest.xml but unlike a regular/full package, the manifest can reference files outside its package in a predetermined ‘external location’. This allows applications that are not yet able to adopt complete MSIX packaging to gain Identity, configure state (Registration) as required by UWP APIs and then take advantage of these APIs.
- Package ‘External Location’
To support a Sparse Package, a package definition now has a new <allowExternalContent> element. This is what allows your package AppxManifest.xml to reference content outside its package, in a specific location on disk. For example, if your existing Win32 app installs content in C:\Program Files\MyWin32App\ , you can create a Sparse Package that declares the <allowExternalContent> element and during app installation or first run of your app, you can register the Sparse Package and declare C:\Program Files\MyWin32App\ as the external location your app will be using. This way you can continue deploying all your other app artifacts in the locations you do today while taking advantage of the Sparse Package.
- Win32 type RuntimeBehavior
To help with compatibility of your existing Win32 app when using a Sparse Package, the app can register to have its application process be run like a non-packaged Win32 app as much as possible. This differs from a fully packaged Win32 app in that it is not subject to filesystem + registry virtualization, lifetime management by the system and other runtime attributes of fully packaged applications. The main runtime similarity between such an app and a fully packaged app is the presence of app/package identity in the running process.
- Activation via CreateProcess
The activation path for UWP applications today ensures the app has PackageIdentity in its process token. This is used by UWP APIs to identify the caller and refer to later – either to perform a callback or to look up state that was configured during deployment. Because of this requirement, calling CreateProcess() on a UWP exe will fail as the CreateProcess() pipeline was not enlightened about Identity. In order to support Sparse Packages with an External Location, we leverage the classic Win32 application.manifest to provide Identity in CreateProcess() scenarios.
At their core, these features are about providing a foundation for non-packaged Win32 processes to use our latest APIs and features.
*Please note that these are still new and somewhat advanced development features that do not yet have full Visual Studio integration i.e. there are still some gaps in the end to end authoring experience such as having to create a Sparse Package outside of Visual Studio.
Demo App
We’ll be using a sample application making use of a Sparse Package to walk through the different aspects of Sparse Package authoring and usage. The demo app is located at https://aka.ms/sparsepkgsample
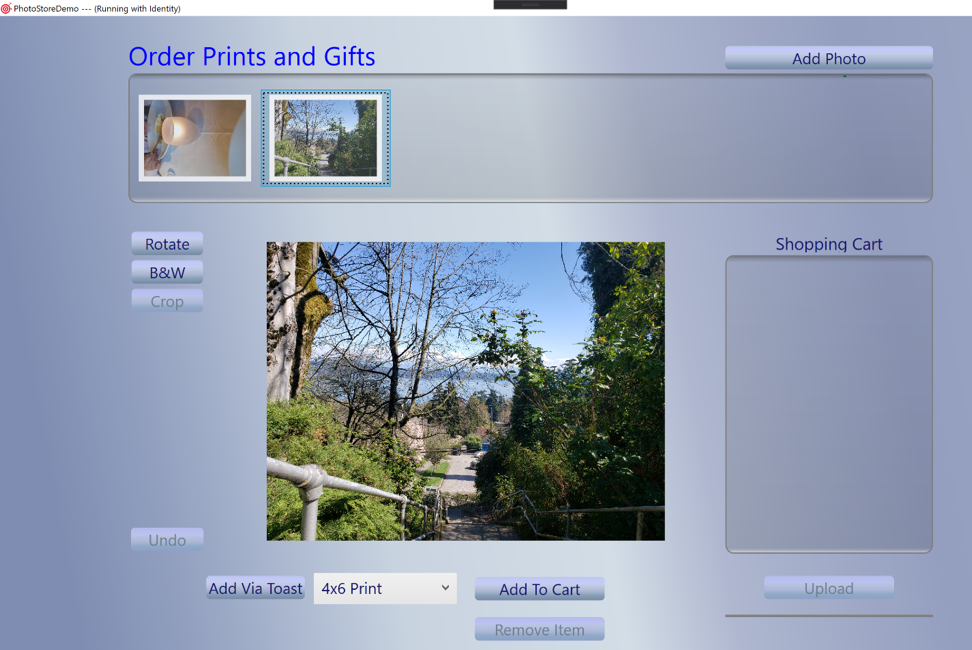
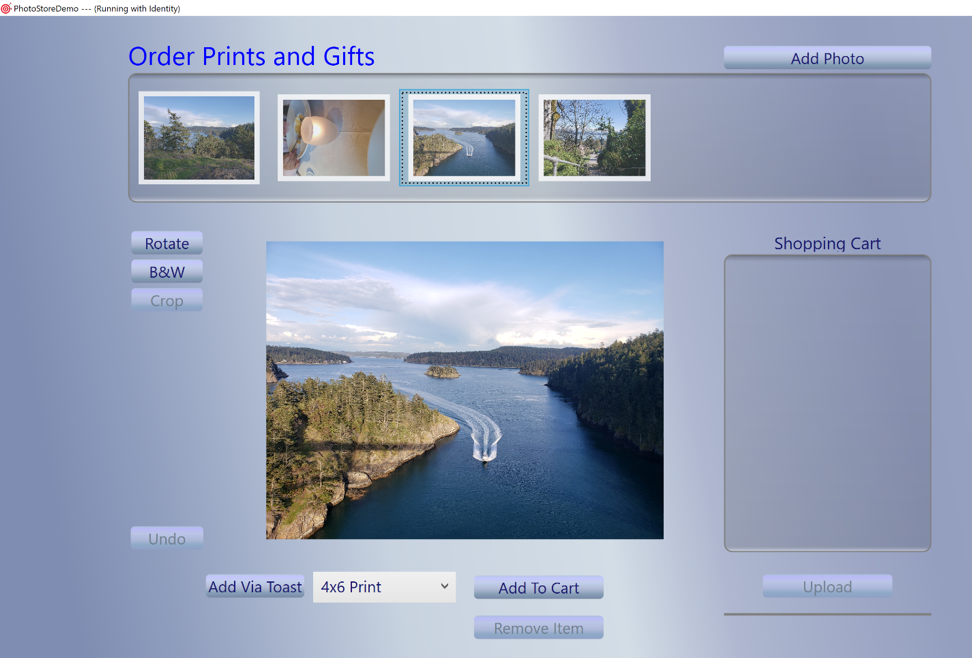
We have a non-packaged WPF application PhotoStoreDemo that stores and displays photos. In its purely non-packaged state, it can be challenging to take advantage of new Windows APIs and features. Our goal is to change this by creating a Sparse Package and continuing to use our previously existing Win32 app artifacts.
Anatomy of a Sparse Package
A Sparse Package must have an AppxManifest.xml and a minimal set of required visual assets in order to deploy.
[code lang=”xml”]
<Package
xmlns:uap10="http://schemas.microsoft.com/appx/manifest/uap/windows10/10"
IgnorableNamespaces="uap10">
<Identity Name="PhotoStoreDemo" Publisher="CN=Contoso" … />
<Properties>
…
<Logo>Assets\storelogo.png</Logo>
<uap10:AllowExternalContent>true</uap10:AllowExternalContent>
</Properties>
<Dependencies>
<TargetDeviceFamily Name="Windows.Desktop"
MinVersion="10.0.19000.0"
MaxVersionTested="10.0.19000.0" />
</Dependencies>
<Capabilities>
<rescap:Capability Name="runFullTrust" />
<rescap:Capability Name="unvirtualizedResources"/>
</Capabilities>
…
<Applications>
<Application Id="PhotoStoreDemo"
Executable="PhotoStoreDemo.exe"
uap10:TrustLevel="mediumIL"
uap10:RuntimeBehavior="win32App">
…
</Application>
</Applications>
</Package>
[/code]
Let’s use the AppxManifest.xml from our sample code above to look at the anatomy of a Sparse Package.
Package External Location
Firstly, the AppxManifest should declare the <AllowExternalContent> package property. This allows the manifest to reference content that is not located within the package. Any content referenced in the Sparse Package that isn’t located in the package directly should be in the ‘external’ location which is specified when the Sparse Package is registered. For example, if I declare my package’s external location to be C:\Program Files\MyDesktopApp\ during installation or at first run, the image storelogo.png defined for the <Logo> property should be installed at C:\Program Files\MyDesktopApp\Assets\storelogo.png and the main application executable PhotoStoreDemo.exe should be installed at C:\Program Files\MyDesktopApp\PhotoStoreDemo.exe. In addition, the MinVersion should be OS Build 10.0.19000.0 or greater, Sparse packages are currently not supported on OS versions earlier than this.
It’s important to note that unlike a fully packaged application, an app using a Sparse Package + ‘External Location’ is not fully managed by the OS at deployment, runtime and uninstall. As is the case with Win32 apps today, your application is responsible for install and uninstall of all its artifacts including the Sparse Package and any content in the ‘external location’. This also means your app doesn’t receive lifetime management and tamper protection that fully packaged apps receive from being installed in a locked down location on the System.
Win32 Runtime Behavior
The newly introduced TrustLevel=mediumIL and RuntimeBehavior=Win32App attributes in the <Application> element are used to declare that the application associated with this Sparse Package will run like a Win32 app, with no registry + filesystem virtualisation and other runtime changes.
Sparse Package Authoring
The steps required in authoring Sparse Package are:
- Create an AppxManifest.xml + Visual Assets and package them
- Sign the Sparse Package
- Create a classic Win32 application.manifest in your Win32 app
- Register the Sparse Package
Creating and Packaging an AppxManifest.xml + Visual Assets
The first step in creating a Sparse Package is generating the AppxManifest.xml. The AppxManifest needs to contain the properties listed above, you can use this template as a starting point. In addition to the AppxManifest you need to include the visual assets referenced in the manifest file. You can use the “Visual Assets” node in the package.manifest editor of the Visual Studio Application Packaging Project to generate the visual assets.
Once you have your AppxManifest.xml and visual assets, you can use App Packager (MakeAppx.exe) to create a Sparse Package. Because the Sparse package doesn’t contain all the files referenced in the AppxManifest.xml, you need to specify the /nv command.
Here is an example command to create a Sparse Package containing just an AppxManifest.xml from a VS Developer Command Prompt:
MakeAppx.exe pack /d <Path to directory with AppxManifest.xml> /p <Output Path>\mypackage.msix /nv
You can find more info on App packager (MakeAppx.exe) here.
Signing a Sparse package
To successfully install on a machine, your Sparse Package must be signed with a cert that is trusted on that machine. This is the case for regular MSIX packages today. You can create a new self-signed cert for development purposes and sign your Sparse Package using the SignTool available in the Windows SDK and MSIX Toolkit. You can also make use of the newly announced Device Guard Signing feature.
Here’s an example of how to sign a Sparse Package from a VS Developer Command Prompt using the Sign Tool:
SignTool.exe sign /fd SHA256 /a /f <path to cert>\mycert.pfx /p <cert password> <Path to Package>\mypackage.msix
Creating a classic Win32 application.manifest
To support CreateProcess() scenarios that do not go through the UWP activation pipeline, your app must use the classic Win32-style application.manifest to declare the identity attributes of your application under the new <msix> element. The values defined in the manifest are used determine your application’s identity when its executable is launched and must match those declared in your Sparse Package’s AppxManifest.xml.
[code lang=”xml”]
<?xml version="1.0" encoding="utf-8"?>
<assembly manifestVersion="1.0" xmlns="urn:schemas-microsoft-com:asm.v1">
<assemblyIdentity version="0.0.0.1" name="PhotoStoreDemo.app"/>
<msix xmlns="urn:schemas-microsoft-com:msix.v1"
publisher="CN=Contoso"
packageName="PhotoStoreDemo"
applicationId="PhotoStoreDemo"
/>
</assembly>
[/code]
packageName (above) corresponds to Name and publisher corresponds to Publisher in the <Identity> element of your Sparse package:
(Sparse Package)
[code lang=”xml”]
<Identity Name="PhotoStoreDemo" Publisher="CN=Contoso" … />
[/code]
applicationId corresponds to the Id attribute in the <Application> element for this app declared in the Sparse package:
(Sparse Package)
[code lang=”xml”]
Applications>
<Application Id="PhotoStoreDemo"…>
…
[/code]
To add a classic Win32 manifest to an existing project in Visual studio, from the application node right click | Add | New Item | Visual C# | Application Manifest File. The manifest file naming convention is that it must have the same name as your application’s .exe and have the .manifest extension, in this case I named it “PhotoStoreDemo.exe.manifest”.
Taking advantage of your app’s Sparse Package
As earlier mentioned, creating a Sparse Package for your application makes it easier for your Win32 app to deeply integrate with the OS and take advantage of features such as BackgroundTasks, Share, Notifications and Tiles. Let’s have a look at how our sample app runs and uses the Sparse Package to register as a Share Target and make use of UWP activation.
The workflow in our sample looks something like this:
- Declare our app as a Share Target in the Sparse Package AppxManifest.xml
- Register our app’s Sparse Package with the OS.
- Relaunch the app and handle activation types.
Example usage – Declaring your app as a Share Target in the Sparse Package AppxManifest.xml
Our sample app is registered as a Share Target by declaring the windows.ShareTarget Application Extension in the Sparse Package AppxManifest.xml:
[code lang=”xml”]
<Extensions>
<uap:Extension Category="windows.shareTarget">
<uap:ShareTarget Description="Send to PhotoStoreDemo">
<uap:SupportedFileTypes>
<uap:FileType>.jpg</uap:FileType>
<uap:FileType>.png</uap:FileType>
<uap:FileType>.gif</uap:FileType>
</uap:SupportedFileTypes>
<uap:DataFormat>StorageItems</uap:DataFormat>
<uap:DataFormat>Bitmap</uap:DataFormat>
</uap:ShareTarget>
</uap:Extension>
</Extensions>
[/code]
Registering a Sparse Package
To take advantage of a Sparse package, your application needs to register the signed package with the system. You can register the package during first run, or you can also register the package during installation of your other Win32 artifacts, if you’re using an installer such as an MSI. To install the package using an MSI you’d need to use Custom Actions. In our sample app, we register the Sparse package during first run. When our application is launched, we check if it’s running with Identity (identity or the lack thereof is a signal of whether the Sparse package has been registered/installed) if the app is not running with identity we then register the Sparse Package and restart the app. This is expected to take place only once at first run. To see how we’re determining if the app is running with identity, have a look at the ExecutionMode class and this post if you’d like more background.
This is what the code in our app looks like:
[code lang=”csharp”]
//if app isn’t running with identity, register its sparse package
if (!ExecutionMode.IsRunningWithIdentity())
{
string externalLocation = @"C:\<App_Install_location_root>\";
string sparsePkgPath = @"C:\<App_Install_location_root>\PhotoStoreDemo.msix";
//Attempt registration
if (registerSparsePackage(externalLocation, sparsePkgPath))
{
//Registration succeded, restart the app to run with identity
System.Diagnostics.Process.Start(Application.ResourceAssembly.Location, arguments: cmdArgs?.ToString());
}
else //Registration failed, run without identity
{
Debug.WriteLine("Package Registation failed, running WITHOUT Identity");
SingleInstanceManager wrapper = new SingleInstanceManager();
wrapper.Run(cmdArgs);
}
}
[/code]
And this is the registerSparsePackage method called above handling package registration:
[code lang=”csharp”]
Using Windows.Management.Deployment
…
private static bool registerSparsePackage(string externalLocation, string sparsePkgPath)
{
bool registration = false;
try
{
Uri externalUri = new Uri(externalLocation);
Uri packageUri = new Uri(sparsePkgPath);
PackageManager packageManager = new PackageManager();
//Set the externalLocation where your Win32 artifacts will be installed
//Anything not in the package but referenced by your AppxManifest.xml needs to to be under this location
var options = new AddPackageOptions();
options.ExternalLocationUri = externalUri;
Windows.Foundation.IAsyncOperationWithProgress<DeploymentResult, DeploymentProgress> deploymentOperation = packageManager.AddPackageByUriAsync(packageUri, options)
…
[/code]
To register the Sparse packages, you need to make use of the PackageManager AddPackageByUriAsync(packageUri, addPackageOptions) API. The API takes in the location of your signed Sparse Package as a URI and an AddPackageOptions object. You need to create an AddpackageOptions object and set the ExternalLocationUri property to the URI of the location where your Win32 artifacts (e.g. app executable) being referenced in the Sparse Package will be installed.
Handling App Activation
When our app is running, we check whether it was launched under UWP type activation e.g. a Share Event or Notification Event. If it was, we handle the activation event accordingly, otherwise, we handle the launch as a regular .exe launch such as double clicking the app .exe. Here’s a look at the code:
[code lang=”csharp”]
public static void Main(string[] cmdArgs)
{
…
//Handle Sparse Package based activation e.g Share target activation or clicking on a Tile
// Launching the .exe directly will have activationArgs == null
var activationArgs = AppInstance.GetActivatedEventArgs();
if (activationArgs != null)
{
switch (activationArgs.Kind)
{
case ActivationKind.Launch:
HandleLaunch(activationArgs as LaunchActivatedEventArgs);
break;
case ActivationKind.ToastNotification:
HandleToastNotification(activationArgs as ToastNotificationActivatedEventArgs);
break;
case ActivationKind.ShareTarget:
HandleShareAsync(activationArgs as ShareTargetActivatedEventArgs);
break;
default:
HandleLaunch(null);
break;
}
}
//This is a direct exe based launch e.g. double click.exe or desktop shortcut
else
{
SingleInstanceManager singleInstanceManager = new SingleInstanceManager();
singleInstanceManager.Run(cmdArgs);
}
}
}
[/code]
Running the Sample
To run the sample app at https://aka.ms/sparsepkgsample:
- Make sure your machine has Developer Mode turned on, and both your Windows Build and SDK versions are 10.0.19000.0 or later.
- Retarget the solution to the SDK version on your machine – Right click -> Retarget solution.
- Add a project reference to the Windows.winmd file at “C:\Program Files (x86)\Windows Kits\10\UnionMetadata\<SDK_Version>\Windows.winmd”
(Right click PhotoStoreDemo project | Add | Reference| Browse | All files | Windows.winmd) - Make sure the Sparse Package is signed by a trusted cert on your machine.
- You can sign using an existing cert or you can create a self-signed cert and trust it on your machine by double clicking | Install certificate | Local Machine | Place all certificates in the following store | Browse | Trusted People | Next | Finish
- Update, package and sign the unpackaged files in PhotoStoreDemoPkg. Open the AppxManifest.xml and update the Publisher value in the package <Identity> element to match the publisher value in your cert. *You will also need to make sure the Publisher value is updated in the classic Win32 app.manifest (PhotoStoreDemo.exe.manifest) to match the new value in the AppxManifest.xml.
- Follow the steps under “Creating and Packaging an AppxManifest.xml” and “Signing a Sparse Package” sections to package the files with App Packager (MakeAppx) and then sign them with the SignTool or Device Guard Signing.
- Once the Sparse Package is signed, in the main method (in Startup.cs) update the externalLocation value to match the output location of your VS Build binaries and the sparsePkgPath value to match the path to your signed Sparse Package.
- When you run the package, you should see the PhotoStoreDemo app launch with a “Running with Identity” tag in the top left corner. If registration of the package failed the tag will read “Desktop App” instead. If the package registration was successful and the app still launches without identity, try double checking to make sure the values in the <msix> element of the classic Win32 app.manifest (PhotoStoreDemo.exe.manifest) match the values in the <Identity> and <Application> element of your Sparse Package’s AppxManifest.xml.
Launching the app with identity:
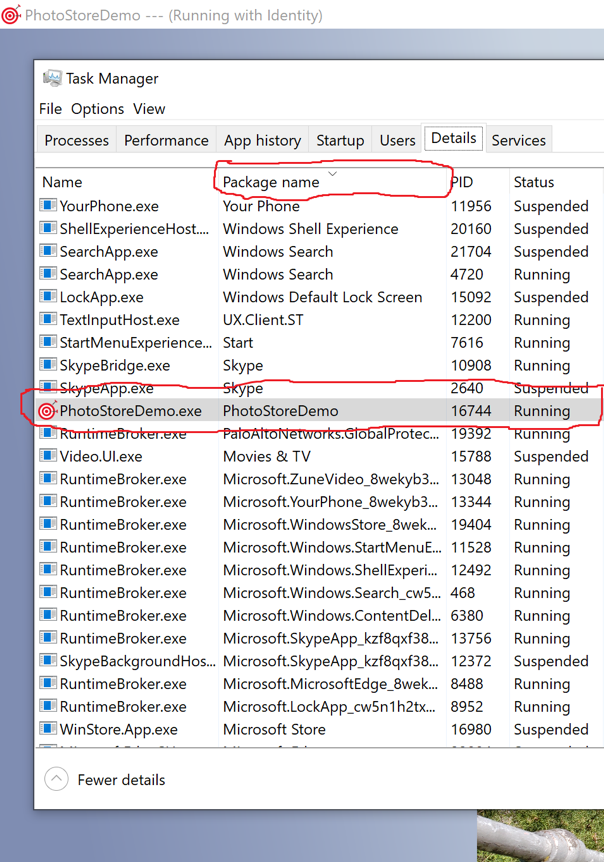
Checking the Details tab in Task Manager shows the app running with a Package Name PhotoStoreDemo which is an indicator that the app is running with our Sparse Package’s declared identity:
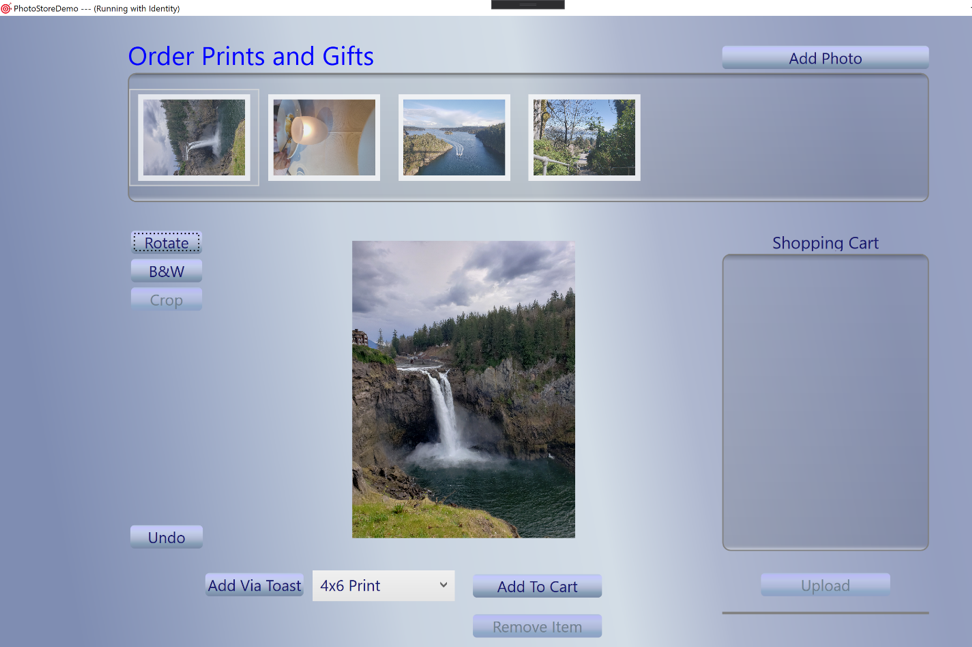
After my app has successfully registered the Sparse package, it shows up as a Share target when I right click on a .jpg/.png/.gif file:
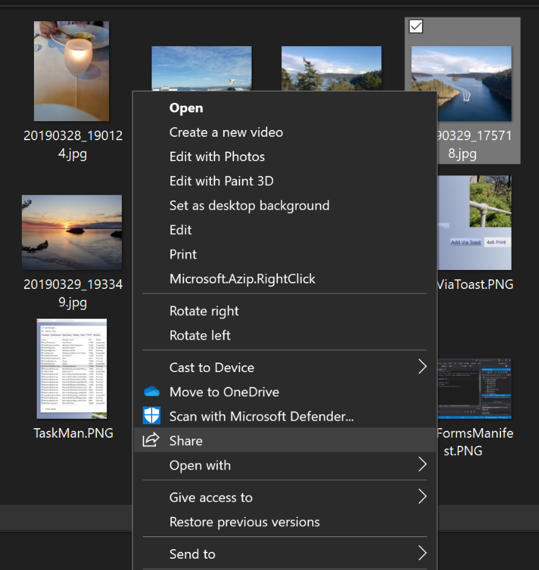
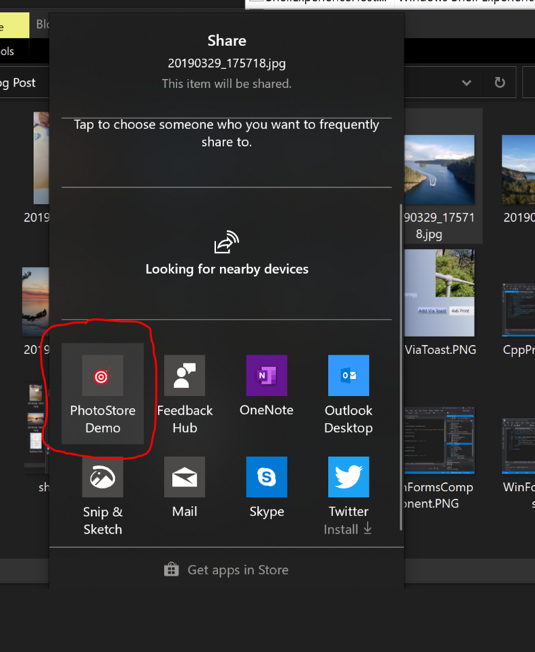
Selecting our app activates the app and adds the new image to the image store.
As a bonus, our sample handles toast notification activation in the HandleToastNotification() method in Startup.cs. Clicking the “Add Via Toast” button in the bottom left quadrant of the running app launches a toast message from the app.
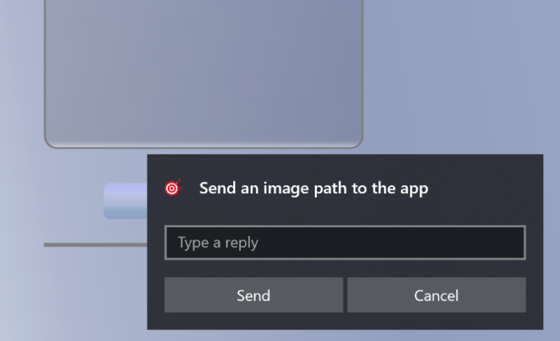
If you enter a full path to an image file, it should add the image file to the app’s photo store. If you close the app before responding to the toast, it will relaunch the app with the new image you specified in the path.
Uninstalling your Sparse Package
Unlike a fully packaged application that is uninstalled by the System when a user chooses to uninstall the app, a Sparse Package must be uninstalled by the application that registers it. The uninstall workflow of a Sparse Package points the user to the uninstaller of the application that registered the package and while uninstalling the Win32 artifacts of the app, the uninstaller must also remove the Sparse Package. This can be done using the PackageManager.RemovePackage..() APIs, you can find an example of an app using the APIs here.
Adding a Sparse Package to your existing Win32 app is a great way to give your application identity and add deeper integration with Windows APIs and features such as Notifications, BackgroundTasks, Live Tiles, Share and more. The main caveats are that unlike for fully packaged applications, your application does not receive tamper protection and installation in a locked down location. In addition, your app is not fully managed by the OS at deployment, runtime and uninstall – your application is responsible for install, lifetime management and uninstall of your Sparse Package, in the same way you are responsible for installing and managing your Win32 app artifacts.