A common thread we’ve seen in the feedback so far about Windows 8, on this blog or elsewhere, positive or negative, is that people using Windows 8 for the first time might need a little help getting their bearings. For me, the best way to get acquainted with a new operating system is a lot like the way I got acquainted with the moving parts in a lot of the gadgets I tinkered with (by which I mean my parents’ stuff that I broke) growing up: just start messing with it. I know other people, though, who like to read before beginning or read as they go. You might be able to relate to one of these styles, or you might be somewhere in between. Either way, I hope some of this info can help you use Windows 8 even more quickly and efficiently.
Where did the Start button go?

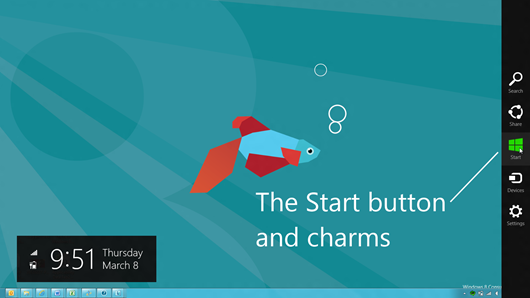
The Start button has been one of the best known images in Windows for over sixteen years now. I’ll admit, when I look in the corner of my screen and just see an icon for Outlook, it’s still a little jarring. And I’ve been using Windows 8 for months now. So where did the Start button go? The short answer: it’s still there, it’s just on the right, and it looks a little different now. Also, you can still use the Windows logo key if you’re using your keyboard.
But the question isn’t just where the Start button went. It’s also about how to do the things that were there before, which is a perfectly fair thing to ask. Let’s look at a few of the way Windows 8 helps you get things done.
The Search and Settings charms
I touched on these briefly in my post Introducing Windows 8 Consumer Preview, but there have been some more questions since then, and I didn’t go into depth at that point, so I wanted to look at the Search and Settings charms more thoroughly, since they relate most closely to navigation and getting around Windows.
Search (Windows logo key + Q)

Broadly speaking, there are two ways to use the Search charm. The first is to search from the Start screen, and the second is to search within apps. Let’s begin with the Start screen.
When you use the Search charm, the first view you’ll see is a list of all of the apps on your PC. That’s because by default, the search is set to Apps, and since you haven’t entered anything yet, all (or none) of the apps match your search criteria. As you begin typing, the view changes in real time to include only the things that match what you’ve entered. On the upper right are options to filter your search to Settings or Files, so you can quickly find what you need. The Settings filter (go straight to it with Windows logo + W) shows results for tasks (like “Change display settings”) as well the names of parts of Control Panel (like Windows Mobility Center), and the Files filter (Windows logo + F) contains further controls to narrow your search by file type.
Searching from the Start screen also lets me look at results for the same search in multiple apps quickly. So if I’m going to Tokyo on vacation (Hi, Tokyo! I miss you!), I can use the Search charm to easily read in Internet Explorer about the city and the best places to stay, use a travel app to check on airfare, and then obsessively check the weather every day until I leave. I just open Search and enter “Tokyo.” then I can click an app and see the results, and when I’ve read what I want to, I bring search up again, and since my search term is still there, I can just click another app and see what it gives me.
You can also use Search when you’re already in app. One of the comments on last week’s post asked how to search the Windows Store, since browsing through all the apps is a little cumbersome (and will only get more so as there are more and more apps in the Store). The Search charm works if you want to search the Store, but it does something even better: it gives you one place to do the same task every time you need to do it, in any app. Rather than going to a different place in each app to search, you can go the same place every time. To find a contact in the People or Mail apps, look at the city where I’m going on vacation (some day) in the Weather app, or even search the internet in Internet Explorer, I can do the same thing every time. You’ll notice that when you use the Search charm when you’re in an app, the results just go right to that app. Like before, you can jump right to the results from another app just by clicking its name.
Settings (Windows logo key + I)

The Settings charm contains several more things that were in the Windows 7 start menu. The very first thing that slowed me down the first time I tried Windows 8 was where to go when I wanted to restart my PC. The Settings charm has settings specific to the app you’re using – Accounts in the Mail app, for example, or Control Panel and Personalization in the Desktop. So like the Search charm, it gives you a consistent place to go to look at settings for any app.
The Settings charm also has a few commands that show up no matter what you’re doing. These include a few of the things you might have used in the Start menu in Windows 7.
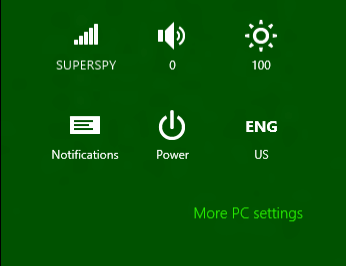
This is where you can go to view and change network properties (including airplane mode), control the system volume and screen brightness, change the language you type in, restart, sleep, shut down, and turn notifications on and off. There’s also a link to PC settings that shows up no matter where you are in Windows.
The app bar
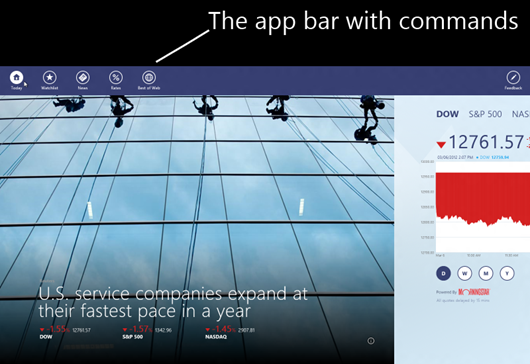
I mentioned using the app bar for pinning a moment ago, but it’s useful for lots more. The visual design we’ve used for Windows 8 emphasizes more of the content you want and less visual distraction. This doesn’t mean that all the commands you use are gone. It means that now, they can float over what you’re working on and then go away when you don’t need them anymore. Just right-click a tile or swipe down to select it, or right-click an empty space or swipe in from the bottom or top of your screen to bring up the app bar with commands for the context you’re in.
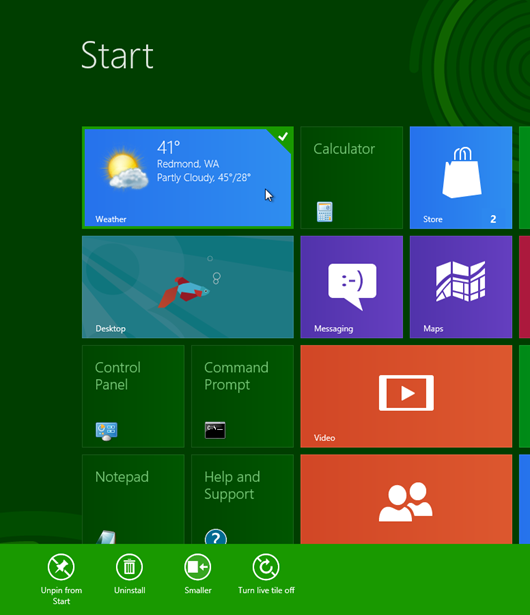
When you select a tile (swipe down or right-click), the app bar includes commands that pertain to that app. So you might see Open new Window for Internet Explorer, Open File Location for Windows Explorer, or Larger / Smaller for tiles that can be wide or square on the Start screen.
When you’re on the Start screen or in an app, swiping in from the top or bottom of the screen or right-clicking an empty space brings up the app bar with commands for that app (you can also use the Windows logo key + Z). This is where you can find the Accounts button in the Mail app, the News button in the Finance app, the Places button in the Weather app, and similar commands for most of the apps you use. Each app had its own set of options on the app bar, but you can get to the app bar the same way in every app.
You can use one of the commands, or just tap or click back in the main part of the app to dismiss the app bar.
Finding and pinning things
In Windows 7, you can find programs or files by just clicking Start and then typing. Results appeared quickly, and if you were after a program you knew you were going to use often, you could just right-click it and pin it to your Start menu or to the Windows Taskbar. In Windows 8, it’s pretty much the same thing. Click Start – you can also click the lower left if it’s more comfortable – or the Search charm, and just start typing. If you’re using touch, the Search charm will bring up the search bar, and tapping the search field will bring up the touch keyboard. If you’re already at the Start screen, you can right-click it or swipe in from the top or bottom to bring up the app bar (more on that in just a minute), and click to get a list of all the apps you have installed.
You can click (or tap) an app to go right to it, or if you want to pin a tile, just swipe down or right-click it for options, including Pin to Start. You can use the same steps to unpin something later if you decide you don’t need it on the Start screen anymore.
Commands for power users (nerds like us)
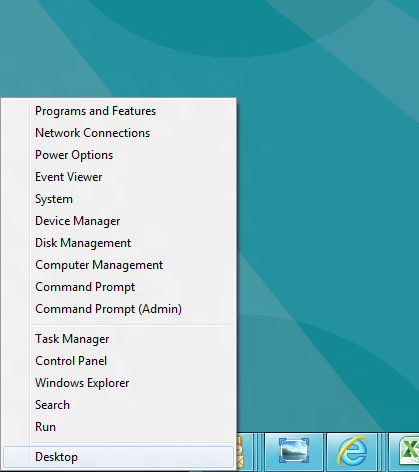
I mentioned the lower-left corner as another way to get to the Start screen, but it does another cool thing in Windows 8. If you’re using a mouse, you can right-click down in the corner to bring up a menu with quick links to some common administrative and power user tasks.
Switching and managing apps
In Windows 8, you’ll notice two kinds of apps. The first is the familiar windowed programs that run on the desktop. If you’ve used Windows 7, you’re probably pretty familiar with how to switch between them. For this kind of app, the taskbar works well for switching apps, so we’ve left it where it was. The other kind of app is the full-screen, immersive app designed for Windows 8. These are designed to be full-screen, with no distracting borders or buttons. (Like I mentioned a moment ago, the app bar floats over your apps and then disappears when you don’t need it anymore.) We’ve made a few quick and easy ways to switch between these apps and arrange them.
Swipe to go back or view the list
If you want to go back to the last Windows 8 app you were using, just swipe in from the left side of the screen or go to the upper-left corner with your mouse and drag in. The last thing you used will come back up full-screen, and whatever you were just using will tuck in behind it. You can keep swiping to go back further or, if you want to just jump right to an app, just swipe in from the left (or use your mouse), and then before you let go, swipe back out. You’ll get a list of thumbnails of previous apps, and you can click or tap to go right to the one you want.
In Windows 8, these full-screen apps don’t run at all when you’re not using them. For any app that’s inactive for more than a short time, Windows will save its state, capture a thumbnail (that’s what shows up in that list), and stop using memory and processing power for it. This makes everything run more quickly so you’ll never need to close a full-screen immersive app to improve performance. When you go back to an app, it just wakes up and picks back up right where you left off.
Snap it, move it, put it away
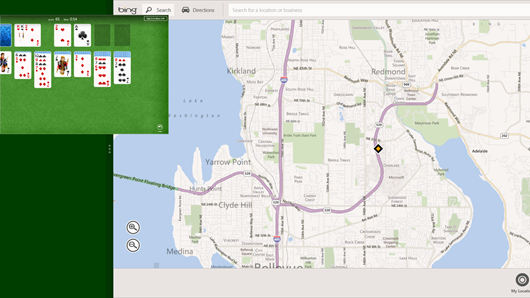
Using full-screen apps is pretty great. It gives you more of what you want to use and less space wasted by distractions. But when we were making Windows 8, we wanted a way to look at more than one thing at a time while still keeping the beauty of clean, efficient visuals. (And we didn’t see any examples out there that we loved.) By snapping apps to the side of the screen, you can keep working efficiently, but you can also keep other information close by. So if you want to keep your stock ticker up while you’re doing some work or reading the news, it’s pretty easy to do. Just drag an app in from the left, and instead of dropping it in the middle of your screen, hold it toward to the left side. You’ll see a preview of the new layout, like this:
You can drag it over to the right (to have the larger app on the left), or just drop right on the left to snap it there. And you can always drag the handle on the divider to the left or right to switch which app is larger, or drag the divider off the side of the screen to remove the snapped app from the view.
Take an app out of the list
Like I mentioned a minute ago, apps that are inactive will stop using memory quickly to help keep your PC running efficiently. But if you’re like me, you might be a little bit of a control freak and want to manage the size of your recent apps list. You can use Task Manager to stop the apps altogether, or PC settings to delete your recent apps history (under General), but if you want to take away one full-screen Windows 8 app at a time, you can just swipe in from the top (like bringing up the app bar) and keep right on going to take the whole app right off the bottom of the screen (with a mouse, just grab the top and drag). You can do the same thing from the recent apps list on the left of the screen. Just pull the app in like you would to snap it, but pull it all the way to the bottom instead.
Using your keyboard
When we first showed a demonstration of Windows 8 several months ago, it was clear very quickly how easy it is to use touch to get around Windows. But not everyone has touch hardware yet, and even as it gets more common, we want to make sure you can work exactly the way you want to with no compromises. One of the most efficient ways I work is with my keyboard. When I’m not using touch, I use my keyboard constantly. The more keyboard shortcuts I have, the happier and more productive I am. You might have noticed that I’ve put some keyboard shortcuts throughout the paragraphs above. Those are just the beginning.

The key I end up using the most is the Windows logo key. It works exactly like the Start button. Press it once and you’re at the Start screen. You can start something or search, or you can push the Start button again to go back to what you were doing before. (This is exactly how the Start button worked in Windows 7, too. Click once to see the Start menu, and again to put it away.) There are also a whole lot more shortcuts that use the Windows logo key. For example, you’re probably familiar with using Alt+Tab to cycle through apps you have running. You can still use Alt+Tab, but if you just want to cycle through full-screen Windows 8 apps, you can use the Windows logo key+Tab to go through the list using the thumbnails view.
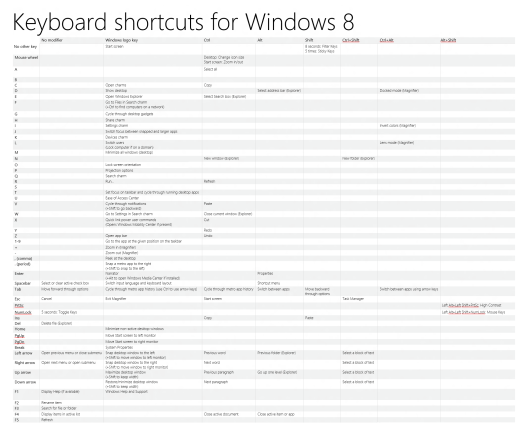
If you’re not using touch, keyboard shortcuts are another super fast and easy way to get around Windows. In fact, they do more in Windows 8 than they have in any other version of Windows. To help you out and keep you flying around Windows as fast as your fingers can carry you, I’ve put together this handy chart, and I made it big enough that you can print it out and hang it up somewhere if you want to. (Or you can just memorize it – your choice.) You shouldn’t consider it final (Windows 8 is still a work in progress) or completely comprehensive (you might find some goodies I’ve missed), but it should get you moving around Windows pretty well. Happy typing!
Click to view a larger image. For printing, download the PDF or download the XPS.
Try it all out
If it’s taken you some time to really get moving in Windows 8 or you felt like you were facing a learning curve, hopefully this has helped you out a little. I can honestly say that on my Windows 8 tablet and on my laptop with a trackpad (I don’t use an external mouse because it’s one more thing to carry around), I’m moving around Windows faster than ever. A little practice, and I bet you will to.
Kent Walter
Windows Team

