

Read Windows Ink 2: Digging Deeper with Ink and Pen
Read Windows Ink 3: Beyond Doodling
Using a pen and computer has an interesting history that goes farther back than you’d think. In 1888, the first patent for a “electric stylus device for capturing handwriting” was issued to Elisha Gray for the Telautograph. In fact, pen input was being used 20 years before mouse and GUI input with systems like the Styalator tablet demonstrated by Tim Diamond in the 1950s and the RAND tablet in the 1960s, both could recognize free hand writing and turn it into computer recognizable characters and words.
In 1992, Microsoft made its first major entrance into the pen input space with Windows for Pen Computing and also had the NCR tablet that ran Windows 3.1 with pen input as an option to interact with applications.
New ways to use Windows Ink
In the Windows 10 Anniversary Update, Inking (pen input) has taken front stage. Microsoft recently announced the Surface Studio. An All in One machine, designed to empower the creative process with a 28 inch, Pen enabled, PixelSense screen. With such a large working area for the Pen and the thin profile of the PC, the user can focus on what matters, the art.
In addition to having the work front and center, the user can now use new methods of input, such as the Surface Dial, to leverage your application’s inking features. As a developer, you can leverage the Radial Controller APIs to make accessing those inking features a natural and smooth experience for the user.
Let’s start exploring Windows Ink from two perspectives, the consumer and the developer.
User’s Perspective
On PC with stylus support, the Windows Ink Workspace is front and center in the system tray. For the consumer, this a highly convenient option to quickly access the applications in the Workspace; Sticky Notes, Sketchpad and Screensketch, as you see here:

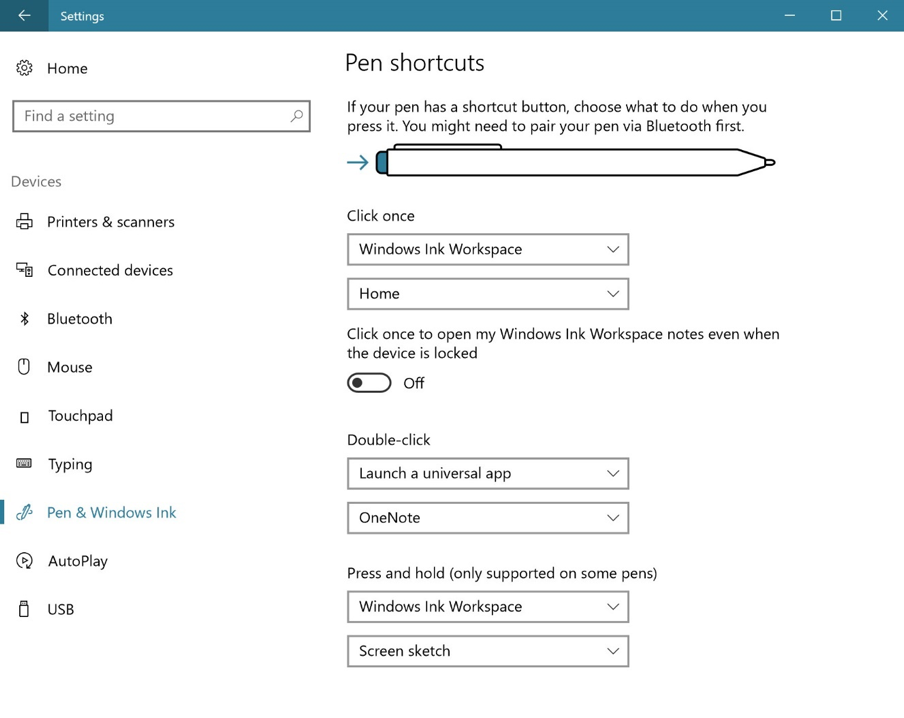
Depending on the PC’s pen you’re using, the pen can provide some natural interactions even for you start writing on the screen. Using a Surface Book as an example, the Surface Pen lets you quickly launch an application by clicking the pen’s eraser. One click, a double click or a click and hold can perform three different things. Which action is taken depends on what is set by the user, this option is highly configurable from the PC’s Pen Settings page, as seen here:
There are other settings you can configure to further customize your experience. Windows 10 already ignores when your palm is touching the screen while you’re writing, but you may want to completely ignore touch altogether. These options can be set on the same settings pane:

Ignoring touch input while using the pen is disabled by default because there are great simultaneous pen and touch scenarios. A good example of this would be the Windows Ink ruler! You can use one hand for the pen and the other hand to move the ruler on the screen.
Now that’s we’ve taken a high level look at the Windows 10 Anniversary Update’s inking features, let’s switch gears and take a look at it from a developer’s perspective.
Developer’s Perspective
Pen input and handwriting recognition traditionally has needed a specialized developer skillset. You would have to detect the strokes made to the canvas and use complex algorithms to determine what character was written. In the Windows 10 Anniversary Update SDK, this is no longer the case. You can add inking support to your application with just a couple lines of code.
Let’s make a small example that lets the user draw to an area of your UWP (Universal Windows Application) app. This example can be added to any UWP app that is using the Anniversary SDK.
To enable inking, you only need to add the following to your XAML.
[code lang=”xml”]
<InkCanvas x:Name="inkCanvas" />
[/code]
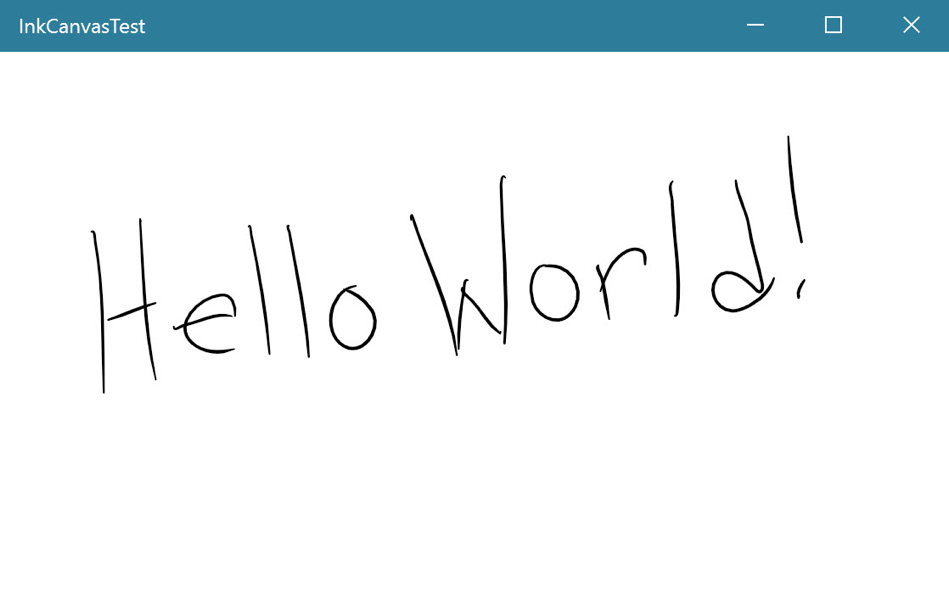
That’s it! Where you placed the InkCanvas UIElement is where the user can use a pen and draw on it with the default Ink settings. Here’s what it looks like at runtime after I’ve written a special message:
The InkCanvas built-in defaults makes it very easy to get started. However, what if you wanted to let the user change the color of the ink, or the thickness of the stroke? You can add this functionality quickly by adding an InkToolbar UIElement to your XAML. The only thing you need to do to wire it up, is tell it what InkCanvas is to be used for:
[code lang=”xml”]
<InkToolbar x:Name="inkToolbar" TargetInkCanvas="{x:Bind inkCanvas}" />
[/code]
Note: If you see a XAML designer error when you add the InkToolbar, you can safely ignore this as it is a known issue that is being worked on. Your code will run fine.
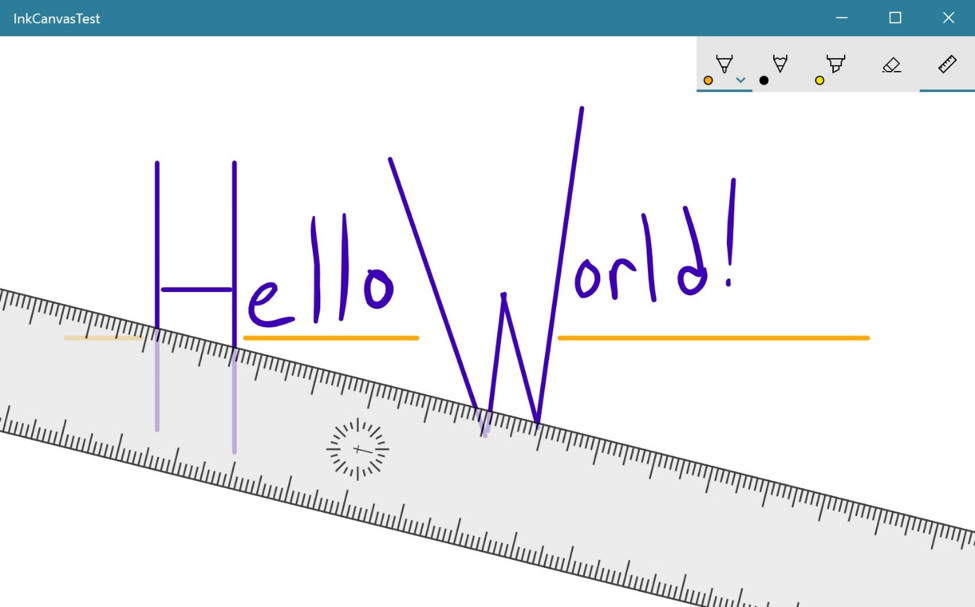
Let’s rerun our test app and see what this looks after using a couple of the InkToolbar’s default tools; the ruler and changing the ink color:
This is all you need to having inking enabled in the app, however you might want to save the user’s strokes so that they can be saved and reloaded at another time.
Saving and Loading Ink
You can embed the ink data within a GIF file so that you can save and load the user’s work. This is easily done using the InkPresenter, which is available as a read-only property of the InkCanvas.
Here’s an example of getting all the ink that’s on the canvas and saving it to a file:
[code lang=”csharp”]
private async Task SaveInkAsync()
{
if (inkCanvas.InkPresenter.StrokeContainer.GetStrokes().Count > 0)
{
// Select a StorageFile location and set some file attributes
var savePicker = new Windows.Storage.Pickers.FileSavePicker();
savePicker.SuggestedStartLocation = Windows.Storage.Pickers.PickerLocationId.PicturesLibrary;
savePicker.FileTypeChoices.Add("Gif with embedded ISF", new List<string> {".gif"});
var file = await savePicker.PickSaveFileAsync();
if (null != file)
{
using (IRandomAccessStream stream = await file.OpenAsync(FileAccessMode.ReadWrite))
{
// This single method will get all the strokes and save them to the file
await inkCanvas.InkPresenter.StrokeContainer.SaveAsync(stream);
}
}
}
}
[/code]
Then, the next time the user wants to load in an old drawing, or maybe you want to properly resume an application that was terminated, you only need to load that file back into the canvas. To do this, it’s just as easy as saving it:
[code lang=”csharp”]
private async Task LoadInkAsync()
{
// Open a file picker
var openPicker = new Windows.Storage.Pickers.FileOpenPicker();
openPicker.SuggestedStartLocation = Windows.Storage.Pickers.PickerLocationId.PicturesLibrary;
// filter files to show both gifs (with embedded isf) and isf (ink) files
openPicker.FileTypeFilter.Add(".gif");
openPicker.FileTypeFilter.Add(".isf");
var file = await openPicker.PickSingleFileAsync();
if (null != file)
{
using (var stream = await file.OpenSequentialReadAsync())
{
// Just like saving, it’s only one method to load the ink into the canvas
await inkCanvas.InkPresenter.StrokeContainer.LoadAsync(stream);
}
}
}
[/code]
To see this code, and many other demos, take a look at the SimpleInk demo from the official Universal Windows Platform examples Github page.
What’s next?
Getting started with Windows Ink is quick and easy. However, you can also create some highly customized inking applications. In the next Windows Ink series post, we’ll dig deeper into the InkPresenter, Pen Attributes, Custom Pens, Custom InkToolBar and explore a more complex ink data scenario that enables sharing and printing!
Resources