

Read Windows Ink 1: Introduction to Ink and Pen
Read Windows Ink 2: Digging Deeper with Ink and Pen
In the first post in this series, we took a quick look at Windows Ink using the InkCanvas and saw that it can be as simple as one line of code to add inking support to your application. In the second post, we show you how to customize the Ink experience in your app with InkToolbarCustomPen and InkToolbarCustomToolButton, in addition to the out-of-the box items like InkToolbarBallpointPenButton and InkToolbarPenConfigurationControl.
In both of those explorations, we stayed within the context of a drawing style application. In today’s post, we will look at how Windows Ink can be used to bring the natural input experience of using a pen to other types of applications and scenarios.
Pen input can be useful in a majority of applications that require some sort of user input. Here are a few examples of such a scenario:
- Healthcare: Doctors, nurses, mental health professionals
- A digital Patient Chart, allowing a medical professional to keep using the efficient natural note keeping of medical shorthand alongside accurate data entry.
- School: Teachers, students, and administrators
- A student could take an exam using Windows Ink on a digital exam and the teacher could mark up on that actual exam as if it were paper.
- Field services: Police, fire, utility engineers
- Detectives generally keep a small notepad with them to record investigative details. Using ink to input these details allows the notes to be digitally searchable, this allows for faster situational awareness and AI interpretation.
- Music: composers, musicians
- Writing notation digitally with a pen combines the world of natural input with the power of digital music processing
Let’s explore two of those possibilities: music and healthcare.
A Music Scenario
Music composition has traditionally been a pen and paper experience. You may or may not have paper with the music staves already printed on it, but in the end, the composer is the one who writes down the notes, key signatures, and other musical notation for a musician to play. Composers have been trained and have years of experience writing music on paper.
What if an application uses a digital pen and the screen as the main method for the composer to create music? The pen input would be a natural way to input the information, but also gain the advantages of having software process that information.
An example of this processing would be for validation of the musical notation; it would also offer a way for the music to be played back immediately after entering that information. There have been many programs in the past that allow for music notation to be entered and played back, but using a pen instead of a keyboard and mouse brings this to a new, natural, level.
A Healthcare Scenario
Healthcare professionals have long used pen and paper to record and convey important information. Sometimes this information is written using a medical shorthand on patient charts. This shorthand contains a lot of information in a smaller area so medical professionals can read a patient’s chart quickly.
However, we also have information that needs to fully written out, like a patient’s name or instructions to a patient for follow-up. This kind of information should be in the form of text clearly readable by anyone and usable for data entry.
We can fulfill both of these requirements with Windows Ink. For the notation and shorthand, we can record the ink strokes as we did previously in the sketching app examples. For the text entry, you can convert the ink using handwriting recognition.
Let’s make a small Medical Chart demo app to see how this is done.
Simple Doctor’s notes app
To show how you can implement enterprise features, let’s use Handwriting Recognition! You can easily get the user’s stroke as text using the InkCanvas and just a few lines of code. This is all built-into the SDK, no extraneous coding or specialized skillset required.
Let’s start with a File > New UWP app and on the MainPage, let’s make three Grid rows. The top two rows will contain two different InkCanvas objects and the last row is for a CommandBar with a save button.
The second row’s InkCanvas will be for the doctor’s handwritten using shorthand. It is more like a sketch app and is tied to an InkToolbar. The ink will be pressure-sensitive and can be further altered using the InkToolbar. You can go back to the last post in this series to see how to do this.
Here’s a quick sketch of what the page layout should be:

Now that we have a general page layout, let’s focus on the top InkCanvas first. This is the one we’ll use for handwriting recognition for the patient’s name. We want the ink to be plain and clear, so we don’t want an InkToolbar for this InkCanvas.
This code for this row is:
[code lang=”xml”]
<Grid Grid.Row="1"
<InkCanvas x:Name="NameInkCanvas" />
</Grid>
[/code]
Now let’s look at the second row’s InkCanvas. This is the one we want to have an InkToolbar for so the notes can have a rich ink experience. Here’s what that implementation looks like:
[code lang=”xml”]
<Grid>
<InkCanvas x:Name="NotesInkCanvas" />
<InkToolbar TargetInkCanvas="{x:Bind NotesInkCanvas}"
HorizontalAlignment="Right"
VerticalAlignment="Top" />
</Grid>
[/code]
There are a couple other little things we want to add, for example the TextBlock at the top of the page where the patient’s name would appear after the handwriting recognition is complete. Let’s take a look at the entire page with all the parts in place:
[code lang=”xml”]
<Grid Background="{ThemeResource ApplicationPageBackgroundThemeBrush}">
<Grid.RowDefinitions>
<RowDefinition />
<RowDefinition />
<RowDefinition Height="Auto" />
</Grid.RowDefinitions>
<!– Top row for handwriting recognition of the patient name –>
<Grid x:Name="PatientInfoGrid">
<Grid.RowDefinitions>
<RowDefinition Height="Auto" />
<RowDefinition />
<RowDefinition Height="Auto" />
</Grid.RowDefinitions>
<TextBlock x:Name="PatientNameTextBlock"
Text="Patient Name"
Style="{StaticResource TitleTextBlockStyle}"
HorizontalAlignment="Center" />
<Grid Grid.Row="1"
BorderThickness="2"
BorderBrush="#FF9F9F9F">
<InkCanvas x:Name="NameInkCanvas" />
</Grid>
<Button x:Name="RecognizeHandwritingButton"
Content="Write patient name in box above and click here to complete"
Click="RecognizeHandwritingButton_OnClick"
Grid.Row="2"
HorizontalAlignment="Center"
Margin="5" />
</Grid>
<!– Second row for the doctor’s notes –>
<Grid x:Name="NotesGrid"
Grid.Row="1">
<Grid.RowDefinitions>
<RowDefinition Height="Auto" />
<RowDefinition />
<RowDefinition Height="Auto" />
</Grid.RowDefinitions>
<TextBlock Text="Notes"
Style="{StaticResource SubtitleTextBlockStyle}"
HorizontalAlignment="Center" />
<Grid Grid.Row="1"
BorderThickness="2"
BorderBrush="#FF9F9F9F">
<InkCanvas x:Name="NotesInkCanvas" />
<InkToolbar TargetInkCanvas="{x:Bind NotesInkCanvas}"
HorizontalAlignment="Right"
VerticalAlignment="Top" />
</Grid>
</Grid>
<CommandBar Grid.Row="2">
<AppBarButton x:Name="SaveChartButton"
Icon="Save"
Label="Save Chart"
Click="SaveChartButton_OnClick"/>
</CommandBar>
</Grid>
[/code]
With the front end done, let’s look at the code-behind and examine the InkCanvas setup and button click event handlers. In the page constructor, we set up some inking attributes for both InkCanvases (put this code after InitializeComponent in the page constructor):
[code lang=”csharp”]
// Setup the top InkCanvas
NameInkCanvas.InkPresenter.InputDeviceTypes =
Windows.UI.Core.CoreInputDeviceTypes.Mouse |
Windows.UI.Core.CoreInputDeviceTypes.Pen;
NameInkCanvas.InkPresenter.UpdateDefaultDrawingAttributes(new InkDrawingAttributes
{
Color = Windows.UI.Colors.Black,
IgnorePressure = true,
FitToCurve = true
});
// Setup the doctor’s notes InkCanvas
NotesInkCanvas.InkPresenter.InputDeviceTypes =
Windows.UI.Core.CoreInputDeviceTypes.Mouse |
Windows.UI.Core.CoreInputDeviceTypes.Pen;
NotesInkCanvas.InkPresenter.UpdateDefaultDrawingAttributes(new InkDrawingAttributes
{
IgnorePressure = false,
FitToCurve = true
});
[/code]
To get the patient’s name into the chart, the healthcare worker writes the name in the top InkCanvas and presses the RecognizeHandwritingButton. That button’s click handler is where we do the recognition work. In order to perform handwriting recognition, we use the InkRecognizerContainer object.
[code]
var inkRecognizerContainer = new InkRecognizerContainer();
[/code]
With an instance of InkRecognizerContainer, we call RecognizeAsync and pass it the InkPresenter’s StrokeContainer and InkRecognitionResult — all to tell it to use all the ink strokes.
[code]
// Recognize all ink strokes on the ink canvas.
var recognitionResults = await inkRecognizerContainer.RecognizeAsync(
NameInkCanvas.InkPresenter.StrokeContainer,
InkRecognitionTarget.All);
[/code]
This will return a list of InkRecognitionResult which you can iterate over and call GetTextCandidates in each iteration. The result of GetTextCandidates is a list of strings that the recognition engine thinks best matches the ink strokes. Generally, the first result is the most accurate, but you can iterate over candidates to find the best match.
Here’s the implementation of the doctor’s note app; you can see that it just uses the first candidate to demonstrate the approach.
[code lang=”csharp”]
// Iterate through the recognition results, this will loop once for every word detected
foreach (var result in recognitionResults)
{
// Get all recognition candidates from each recognition result
var candidates = result.GetTextCandidates();
// For the purposes of this demo, we’ll use the first result
var recognizedName = candidates[0];
// Concatenate the results
str += recognizedName + " ";
}
[/code]
Here is the full event handler:
[code lang=”csharp”]
private async void RecognizeHandwritingButton_OnClick(object sender, RoutedEventArgs e)
{
// Get all strokes on the InkCanvas.
var currentStrokes = NameInkCanvas.InkPresenter.StrokeContainer.GetStrokes();
// Ensure an ink stroke is present.
if (currentStrokes.Count < 1)
{
await new MessageDialog("You have not written anything in the canvas area").ShowAsync();
return;
}
// Create a manager for the InkRecognizer object used in handwriting recognition.
var inkRecognizerContainer = new InkRecognizerContainer();
// inkRecognizerContainer is null if a recognition engine is not available.
if (inkRecognizerContainer == null)
{
await new MessageDialog("You must install handwriting recognition engine.").ShowAsync();
return;
}
// Recognize all ink strokes on the ink canvas.
var recognitionResults = await inkRecognizerContainer.RecognizeAsync(
NameInkCanvas.InkPresenter.StrokeContainer,
InkRecognitionTarget.All);
// Process and display the recognition results.
if (recognitionResults.Count < 1)
{
await new MessageDialog("No recognition results.").ShowAsync();
return;
}
var str = "";
// Iterate through the recognition results, this will loop once for every word detected
foreach (var result in recognitionResults)
{
// Get all recognition candidates from each recognition result
var candidates = result.GetTextCandidates();
// For the purposes of this demo, we’ll use the first result
var recognizedName = candidates[0];
// Concatenate the results
str += recognizedName + " ";
}
// Display the recognized name
PatientNameTextBlock.Text = str;
// Clear the ink canvas once recognition is complete.
NameInkCanvas.InkPresenter.StrokeContainer.Clear();
}
[/code]
Last, although we covered this in detail in the last post, let’s review how to save the doctor’s notes via InkCanvas ink strokes to a GIF file with embedded ink data:
[code lang=”csharp”]
private async void SaveChartButton_OnClick(object sender, RoutedEventArgs e)
{
// Get all strokes on the NotesInkCanvas.
var currentStrokes = NotesInkCanvas.InkPresenter.StrokeContainer.GetStrokes();
// Strokes present on ink canvas.
if (currentStrokes.Count > 0)
{
// Initialize the picker.
var savePicker = new FileSavePicker();
savePicker.SuggestedStartLocation = PickerLocationId.DocumentsLibrary;
savePicker.FileTypeChoices.Add("GIF with embedded ISF", new List<string>() { ".gif" });
savePicker.DefaultFileExtension = ".gif";
// We use the patient’s name to suggest a file name
savePicker.SuggestedFileName = $"{PatientNameTextBlock.Text} Chart";
// Show the file picker.
var file = await savePicker.PickSaveFileAsync();
if (file != null)
{
// Prevent updates to the file until updates are finalized with call to CompleteUpdatesAsync.
CachedFileManager.DeferUpdates(file);
// Open a file stream for writing
using (var stream = await file.OpenAsync(FileAccessMode.ReadWrite))
using (var outputStream = stream.GetOutputStreamAt(0))
{
await NotesInkCanvas.InkPresenter.StrokeContainer.SaveAsync(outputStream);
await outputStream.FlushAsync();
}
// Finalize write so other apps can update file.
var status = await CachedFileManager.CompleteUpdatesAsync(file);
if (status == FileUpdateStatus.Complete)
{
PatientNameTextBlock.Text += " (saved!)";
}
}
}
}
[/code]
Here’s what the app looks like at runtime:
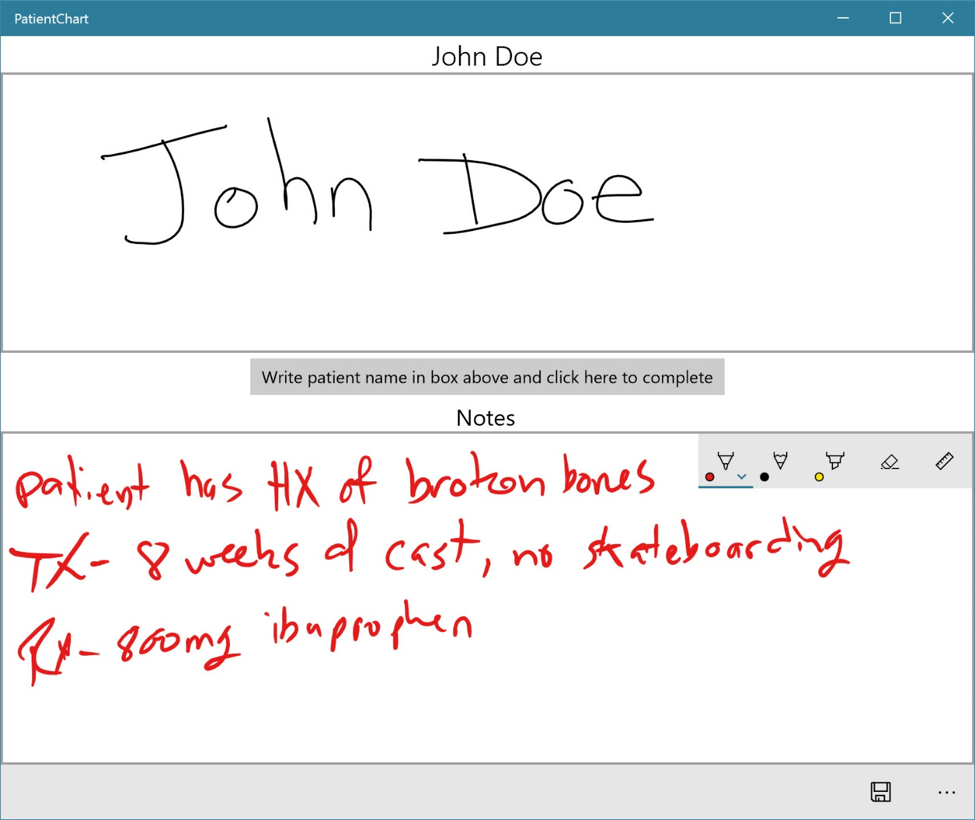
This is just a simple example of how to combine different uses of Windows Ink, but it demonstrates the usefulness of using Windows Ink in an enterprise scenario and that it’s much more than just a doodling tool.
The patient’s name was recognized and placed in the TextBlock at the top of the app and the doctor’s notes on the bottom can be saved to a file and reloaded exactly as it was written.
Here’s what the doctor’s notes file looks like in Windows File Explorer after it’s been saved. It’s a GIF but also has the embedded ink data that you can load back into the app as ink strokes.

What’s next?
Think about how you can add inking support to your next application applications. How can adding natural use input with a pen help your user enter data in a seamless and delightful manner? You can add Inking support with just a few lines of code and bring the Windows Ink experience to your users.
We look forward to the exciting app ideas and scenarios you create using Windows Ink. Let us know what you create by leaving us a comment below, sending us a tweet or post on our Facebook page.
Resources