

So here’s a question that generates a lot of confusion. Can PC software written in WPF, WinForms or MFC access the Windows 10 APIs used by the Universal Windows Platform (UWP)?
The answer is yes. There are some exceptions to this rule (and we’ll go over how to find them), but in general you can access the Windows 10 APIs. Or put a different way, there are no secret APIs being kept away from Windows developers.
How to access the Windows 10 APIs from WPF
You can access the Windows 10 APIs from a pre-existing WPF project. To do so, go to your Solution Explorer window and …
- Right click on References. Select “Add Reference…” from the context menu. On the left of the Reference Manager, choose Browse and find the following file: C:Program Files (x86)Windows Kits10UnionMetadatawinmd. Add it to your project as a reference. Note: You will need to change the filter to “All Files”.
- Right click on References. Select “Add Reference…” from the context menu. On the left of the Reference Manager, go to Browse and find the directory “C:Program Files (x86)Reference AssembliesMicrosoftFramework.NETCorev4.5”. Add System.Runtime.WindowsRuntime.dll to your project.
Let’s say I want to make my WPF application location aware by calling on the Geolocator class in the Windows 10 Windows.Devices.Geolocation API. I can now do this and even use the asynchronous pattern common in UWP. Classes and methods I commonly think of as UWP code are now interweaved with classes and methods from WPF. In the example show below, I take my latitude and longitude from Geolocator and display it in a WPF MessageBox.
[code lang=”csharp”]
private async void Button_Click(object sender, RoutedEventArgs e)
{
var locator = new Windows.Devices.Geolocation.Geolocator();
var location = await locator.GetGeopositionAsync();
var position = location.Coordinate.Point.Position;
var latlong = string.Format("lat:{0}, long:{1}", position.Latitude, position.Longitude);
var result = MessageBox.Show(latlong);
}
[/code]
How do I know which APIs are available?
As mentioned above, there are exceptions to the rule that Windows 10 APIs are accessible from PC software. The first big exception concerns XAML UI APIs. The XAML framework in UWP is different from the one in WPF and you really don’t want to be mixing them up, anyways.
The second set of APIs that you can’t use are ones that depend on an app’s package identity. UWP apps have package identities while PC software does not. Package identity information can be found in the app manifest file.
How do you determine which Windows 10 APIs require a package identity and which do not? The easiest way is to refer to this MSDN topic.
Unlocking even more APIs
There’s actually a way to provide PC software with a package identity. The Desktop Bridge lets you package PC software for deployment in the Windows Store. As part of this process, you create an app manifest file for it, effectively giving it a package identity.
[code lang=”xml”]
<?xml version="1.0" encoding="utf-8"?>
<Package xmlns="http://schemas.microsoft.com/appx/manifest/foundation/windows10"
xmlns:uap="http://schemas.microsoft.com/appx/manifest/uap/windows10"
<Identity Name="YOUR-APP-GUID-90cd-a7cdf2e0a180"
Publisher="CN=YOUR COMPANY"
Version="1.x.x.x" />
</Package>
[/code]
If you package your PC software for the Windows Store using Desktop Bridge, then most of the APIs you couldn’t previously use, because they require a package identity, will be available to you. APIs that depend on CoreWindow will still be a problem. However, once you have a desktop bridge package, you can add a UWP component (that runs in a separate app container process), and call literally any UWP API from there.
A quicker way to get at those Windows 10 APIs
But say you don’t want to deploy to the Windows Store at the moment and just want to use some of those Windows 10 APIs. How do you get to them from your app?
There’s a NuGet package for that. It’s called UwpDesktop and is written by Vladimir Postel and Lucian Wischik. If you want to examine the source code, it is maintained on GitHub.
For demonstration purposes, let’s build a console app based on a 2012 article by Scott Hanselman on using WinRT APIs (partly to show how much easier it is to do today). After creating a new desktop console application, insert the original code from 2012 into the Main method in Program.cs.
[code lang=”csharp”]
static void Main(string[] args)
{
LightSensor light = LightSensor.GetDefault();
if (light != null)
{
uint minReportInterval = light.MinimumReportInterval;
uint reportInterval = minReportInterval > 16 ? minReportInterval : 16;
light.ReportInterval = reportInterval;
light.ReadingChanged += (s, a) =>
{
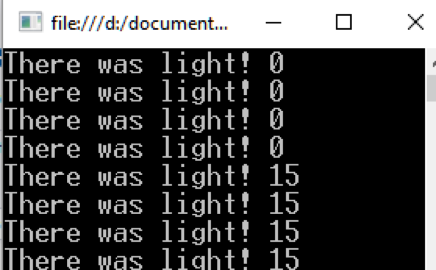
Console.WriteLine(String.Format("There was light! {0}", a.Reading.IlluminanceInLux));
};
}
while (Console.ReadLine() != "q") { }
}
[/code]
This code sadly will not compile because .NET 4.5 doesn’t know what the LightSensor class is, as shown below.
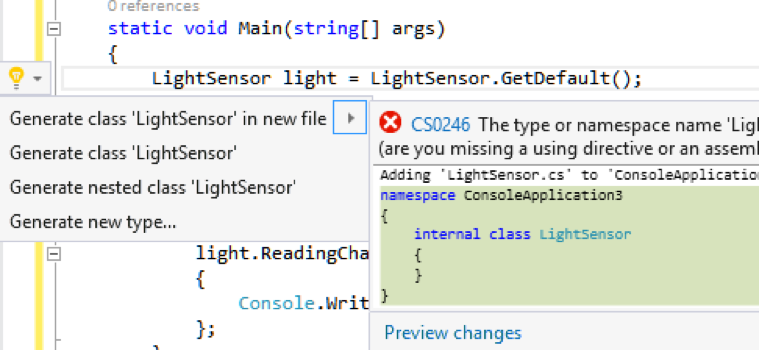
Here’s how we fix that. Install the UWPDesktop package to your project using the NuGet Package Manager.

Back in Program.cs, add the following using directive to the top of the file:
[code]
using Windows.Devices.Sensors;
[/code]
Next … well, actually that’s all it took. The app works now (assuming you have a light sensor attached to your computer).
And that’s the quick way to go about using Windows 10 APIs in a managed app.
How to access the Windows 10 APIs from C++
Calling Window 10 APIs isn’t just for managed code. You’ve also always been able to call them from C++ native apps.
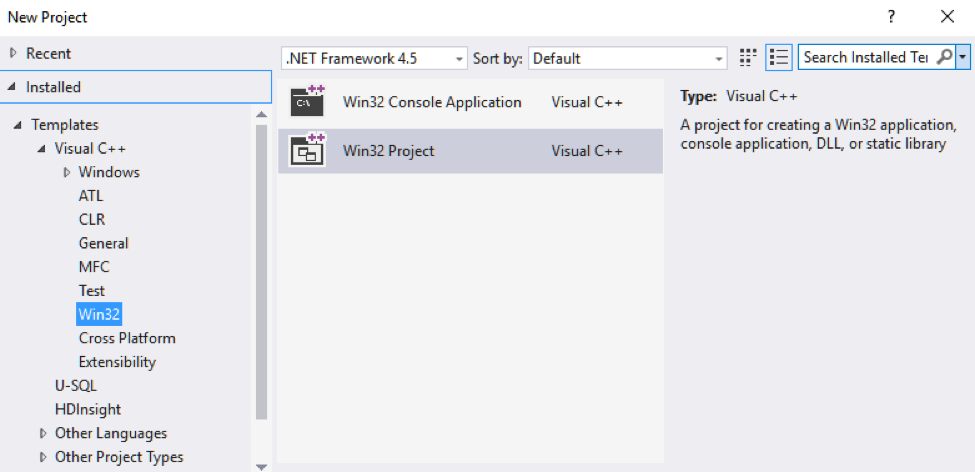
Start by creating a new C++ Win32 application project. Alternatively, open a pre-existing C++ windows application project. Right click on your project and select Properties to bring up the configuration window. There are just four steps required to configure your application to make Windows 10 API calls.
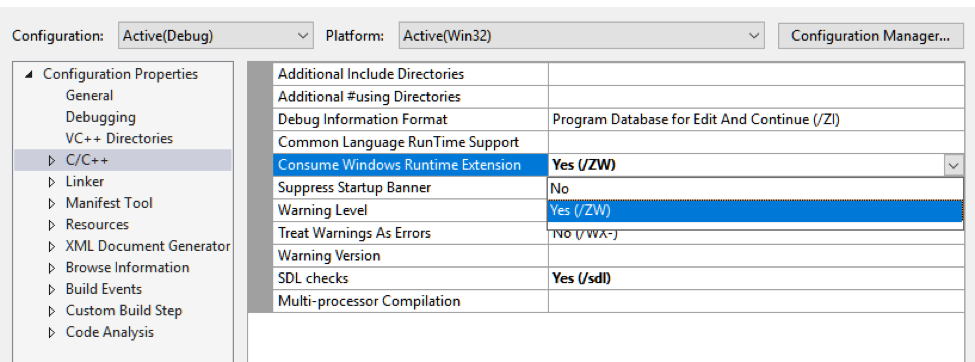
- Select the Configuration Properties > C/C++ > General node in the left pane. Set the Consume Windows Runtime Extension property to Yes.
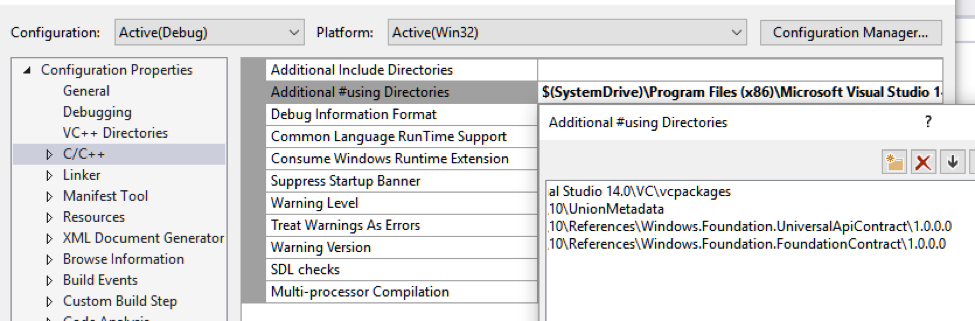
- In the same window, edit the Additional #using Directories property, adding the following entries:
- C:Program Files (x86)Microsoft Visual Studio 14.0VCvcpackages;
- C:Program Files (x86)Windows Kits10UnionMetadata;
- C:Program Files (x86)Windows Kits10ReferencesWindows.Foundation.UniversalApiContract1.0.0.0;
- C:Program Files (x86)Windows Kits10ReferencesWindows.Foundation.FoundationContract1.0.0.0;
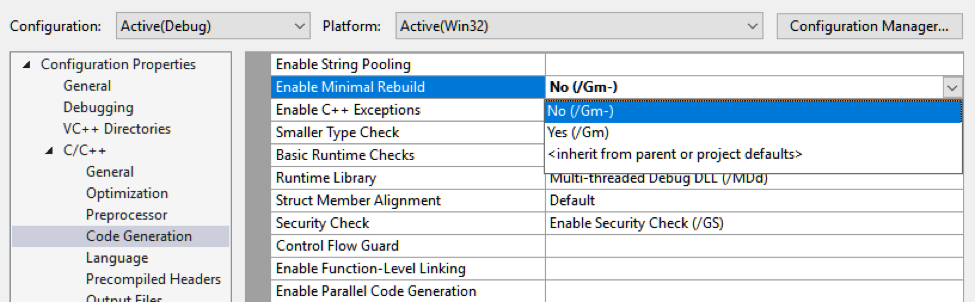
- Select the Configuration Properties > C/C++ > Code Generation node in the left pane. Set the Enable Minimal Rebuild property to No.
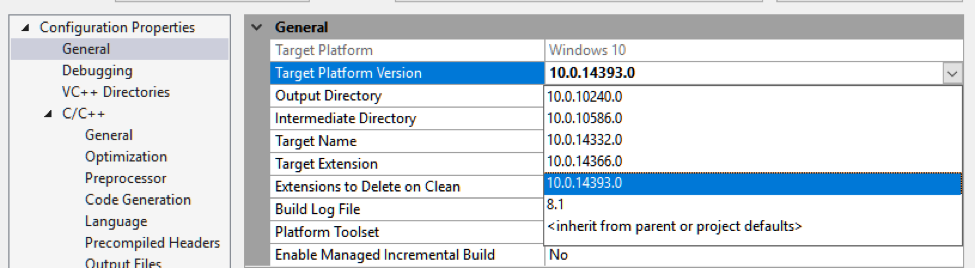
- Last of all, select the Configuration Properties > General node and pick your Target Windows 10 version. Click OK to save your configuration settings.
Now you can start calling Windows APIs. Let’s finish off this app with something easy – calling the Launcher API from the C++ menubar.

Add the following using directives to the top of your project’s main CPP file:
[code lang=”csharp”]
using namespace std;
using namespace Platform;
using namespace Windows::Foundation;
using namespace Windows::System;
Include the header ROApi.h in your stdafx.h file.
// C RunTime Header Files
#include <stdlib.h>
#include <malloc.h>
#include <memory.h>
#include <tchar.h>
// TODO: reference additional headers your program requires here
#include "ROApi.h"
Initialize Windows::Foundation in your program’s entry point.
int APIENTRY wWinMain(_In_ HINSTANCE hInstance,
_In_opt_ HINSTANCE hPrevInstance,
_In_ LPWSTR lpCmdLine,
_In_ int nCmdShow)
{
UNREFERENCED_PARAMETER(hPrevInstance);
UNREFERENCED_PARAMETER(lpCmdLine);
// TODO: Place code here.
Windows::Foundation::Initialize();
}
[/code]
Initialize Windows::Foundation in your program’s entry point.
[code lang=”csharp”]
int APIENTRY wWinMain(_In_ HINSTANCE hInstance,
_In_opt_ HINSTANCE hPrevInstance,
_In_ LPWSTR lpCmdLine,
_In_ int nCmdShow)
{
UNREFERENCED_PARAMETER(hPrevInstance);
UNREFERENCED_PARAMETER(lpCmdLine);
// TODO: Place code here.
Windows::Foundation::Initialize();
}
[/code]
By default the Help menu only has one entry for About, so you will need to add a new button. Define the button in your Resource.h file:
#define IDM_SETTINGS 106
Then edit the *.rc file to add a new button for settings, in order to launch the Windows 10 Settings app.
[code]
IDC_HELLOWORLDWIN32TOUWP MENU
BEGIN
POPUP "&File"
BEGIN
MENUITEM "E&xit", IDM_EXIT
END
POPUP "&Help"
BEGIN
// add settings item to help menu around Line 47
MENUITEM "&Settings …", IDM_SETTINGS
MENUITEM "&About …", IDM_ABOUT
END
END
[/code]
Finally, override the callbacks for the menubar buttons to make them call the Windows 10 Launcher instead of whatever they are supposed to do.
[code lang=”csharp”]
LRESULT CALLBACK WndProc(HWND hWnd, UINT message, WPARAM wParam, LPARAM lParam)
{
switch (message)
{
case WM_COMMAND:
{
int wmId = LOWORD(wParam);
// Parse the menu selections:
switch (wmId)
{
case IDM_SETTINGS:
Launcher::LaunchUriAsync(ref new Uri(L"ms-settings://"));
break;
case IDM_ABOUT:
Launcher::LaunchUriAsync(ref new Uri(L"https://blogs.windows.com/buildingapps//"));
break;
case IDM_EXIT:
DestroyWindow(hWnd);
break;
default:
return DefWindowProc(hWnd, message, wParam, lParam);
}
}
break;
}
}
[/code]
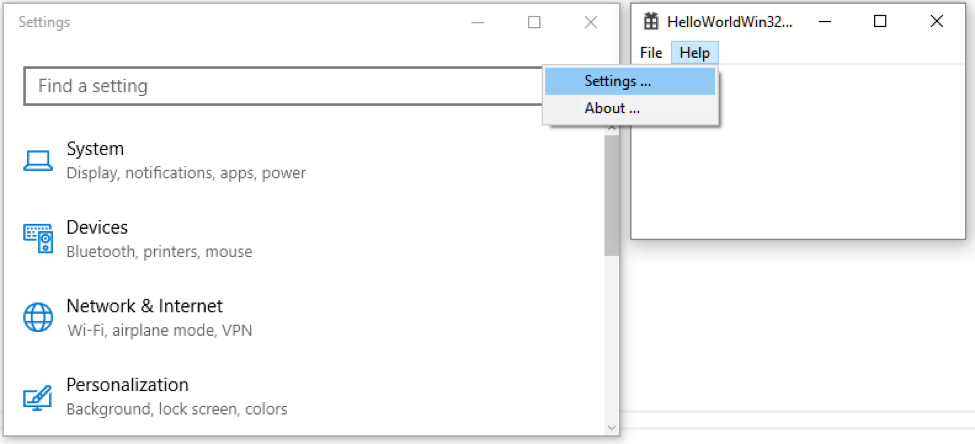
Clicking on Help > Settings will bring up the Windows 10 Settings app, while clicking on Help > About will bring you to this blog (one of my favorite places)!
Let’s go one level deeper. There are many C++ applications and games out there that use alternative build tools and alternative build processes. Many of them continue to target older versions of Windows because this is what their customers are using. How can these application developers gradually move over to the Windows 10 APIs without abandoning their Windows 7 clients?
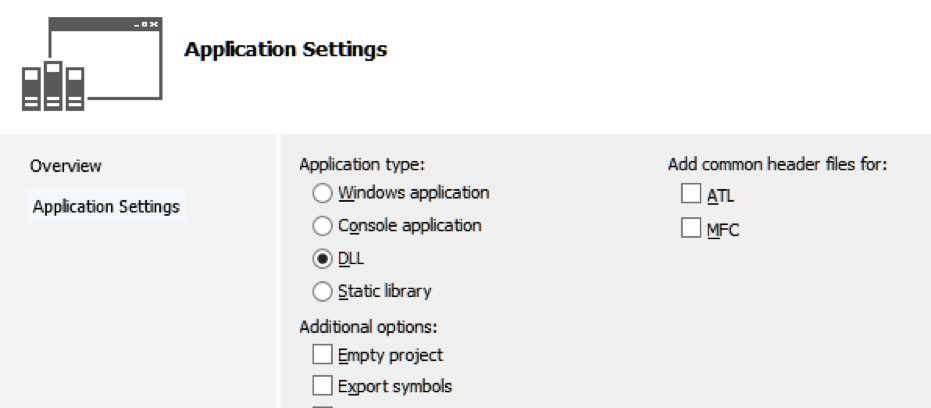
Reusing the same steps above for building a Windows executable, one could build a DLL to encapsulate any Windows 10 calls one might need, isolating them from the rest of the application. Let’s call this new DLL UWPFeatures.dll.
[code lang=”csharp”]
void Game::UpdateTile(int score, int hiScore)
{
HINSTANCE hinstLib;
UPDATETILE UpdateTileProc;
BOOL fFreeResult;
hinstLib = LoadLibrary(TEXT("UWPFeatures.dll"));
if (NULL != hinstLib)
{
UpdateTileProc = (UPDATETILE)GetProcAddress(hinstLib, "UpdateTile");
if (NULL != UpdateTileProc)
{
(UpdateTileProc)(score, hiScore);
}
fFreeResult = FreeLibrary(hinstLib);
}
}
[/code]
Then in the original application, method calls should check to see if the UWPFeatures.dll is packaged with the application (which will be true for Windows 10 installs). If it is present, it can be loaded dynamically and called. If it isn’t present, then the original call is made instead. This provides a quick pattern for not only accessing the Windows 10 APIs from pre-existing C++ games and applications, but also for doing it in a way that doesn’t require heavy reworking of the current base code.
Wrapping up
It has sometimes been claimed that Windows 10 has secret APIs that are only accessible through UWP apps. In this post, we demonstrated that this is not the case and also went over some of the ins and outs of using Windows 10 APIs in both managed and native desktop apps. You will find links below to even more reference materials on the subject.
Did you find this post helpful? Please let us know in the comments below—and also let us know if there’s anything else you’d like us to dig into for you about this topic.
Want to go a step further? Be sure to come back next week for our next blog, where we go into more detail about adding a UWP feature to your existing PC software with the Desktop Bridge.