


The Windows 10 Anniversary Update comes with a great set of enhancements to digital ink for both the user and developer. Along with gaining knowledge from general inking resources, you will finish this post knowing how to create a custom ruler with DirectInk.
There has been a lot of excitement and discussion around these features since they were first shown at //build/ 2016. Li-Chen’s “Closer Look at Windows Ink” post from April, and Pete’s recent “The Ink Canvas and Ruler: combining art and technology” both dive into some of those enhancements, including the new Windows Ink Workspace, Sticky Notes and Sketchpad.
For the developer, Pete’s post gets you started in adding ink to your app and you can go on a deeper dive with Scott and Xiao from the Windows Inking team in their //build/ 2016 session. Watch here: “Pen and Ink: Inking at the Speed of Thought”
That session included a discussion on how the new and greatly improved InkToolbar control is now a part of the platform, and how the bar for producing an inking experience has been lowered so that with “just 2 lines of markup” you can produce a very usable UI offering three different types of pen.
The snippet below wraps those “2 lines of markup” into a Grid container.
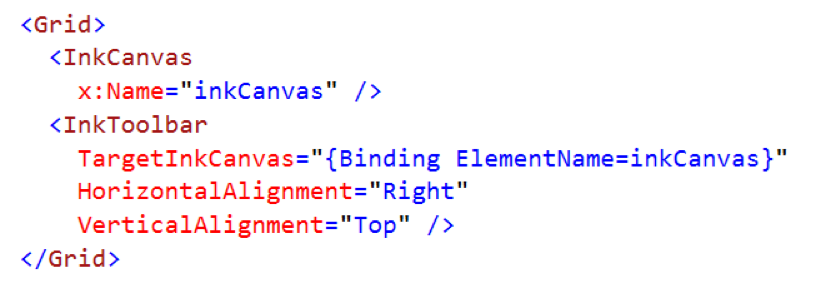
These pen types (ballpoint, pencil, highlighter) are then customizable in terms of color and size, as this image illustrates.
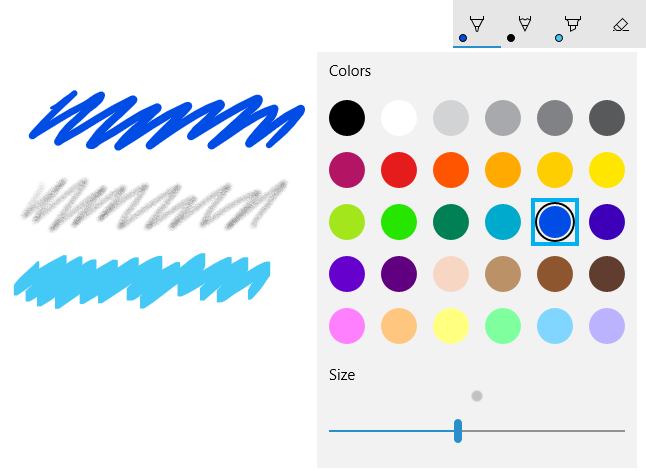
Those “2 lines of markup” also give you an eraser button, and the InkToolbar opens up its theming, standard controls, and the option for you as a developer to add your own controls.
This combination of InkToolbar and InkCanvas makes getting started with digital inking pretty easy with the Anniversary Update.
The Ruler

One of the most innovative and interesting things that the InkToolbar control does by default is to provide a button that enables the ruler, as shown below.
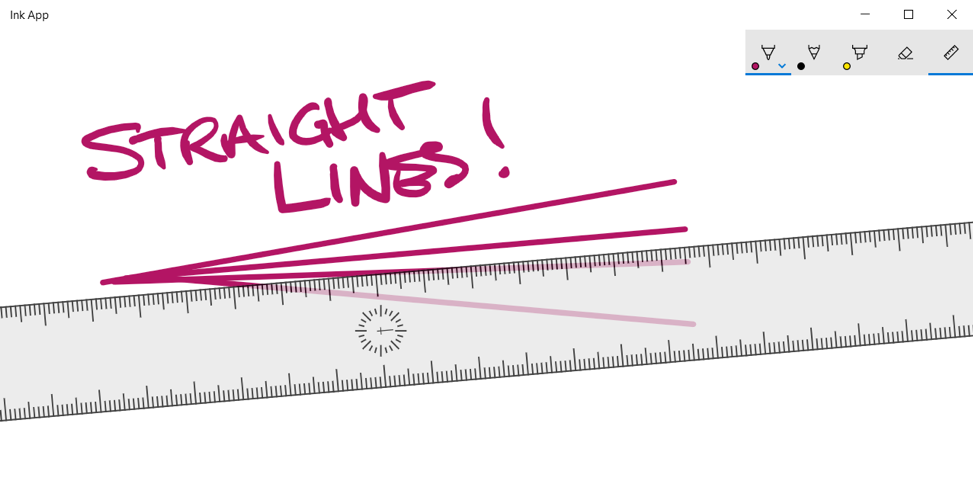
The platform provides for simultaneous touch and pen so that the user can manipulate the ruler with one hand while drawing with the other. It’s one of those things that has to be tried rather than explained, as there’s a specific feeling that comes from drawing with a virtual ruler for the first time.
Those who have previously used platform pieces like InkCanvas may wonder how this ruler is implemented as it’s new in the Anniversary Update and relies upon some additions to the DirectInk APIs.
One of the big advantages of DirectInk is that the software stack works closely with the hardware so ink can be smoothly captured from the digitizer and presented on the screen.
The documentation for DirectInk talks in terms of “wet” and “dry” ink; the input is processed on a low-latency background thread and rendered “wet” until the ink stroke is completed and picked up by the UI thread to be rendered “dry” onto the InkCanvas. For specialized scenarios where a developer needs complete control over the ink rendering, it is possible to implement “custom drying” and take over full responsibility of rendering dry ink in any way that the application needs to. There are samples of these techniques on GitHub using C# and Win2D and using C++ and Direct2D.
However, what was not previously possible was to add code to affect the drawing strokes a user generated as they were drawing “wet” ink onto the InkCanvas. With the Anniversary Update, that becomes possible and opens the door to custom implementations similar in nature to the ruler.
Custom Rulers – Simulating Graph Paper

I associate drawing with a ruler with being back at school and using graph paper to make it easy to draw boxes and lines. Let’s illustrate the basics of a custom ruler by using a surface that gives the appearance of graph paper.
With that in mind, I wrote a custom user control called GraphPaperUserControl; it is available from this GraphPaperControl GitHub repository.
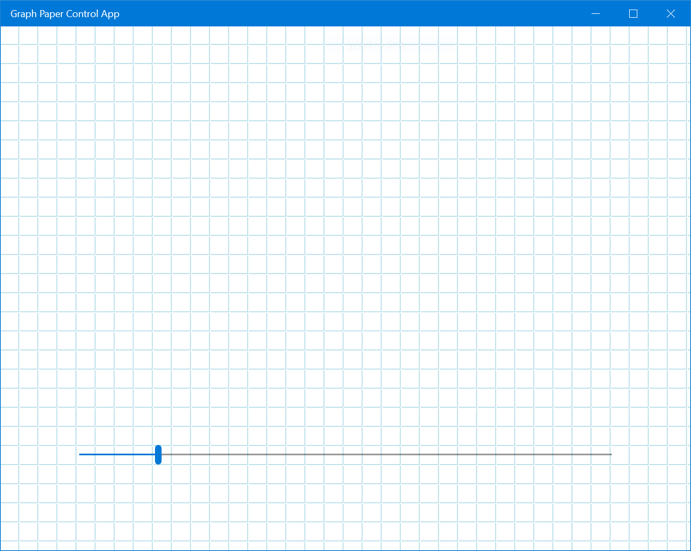
This control uses Win2D to tile its display surface with a light blue grid of a size that is controlled by the control’s single property, GridSize. The GitHub repository includes a simple test application which binds the GridSize property to the value of a Slider as shown in the diagram below.
I am going to use this control in a separate, Windows 10 Anniversary Update project, so I used Visual Studio and the New Project menu to create a “Blank App (Universal Windows)” in C# and then copied in the XAML and code-behind file for that GraphPaperUserControl and added a reference to the Win2D.uwp NuGet package.
I then made a simple, layered interface in my MainPage.xaml file using this control in combination with an InkCanvas and an InkToolbar, and a simple TextBlock to display one of three modes of operation.
[code lang=”xml”]
<Grid
Background="{ThemeResource ApplicationPageBackgroundThemeBrush}">
<ctrl:GraphPaperUserControl
xmlns:ctrl="using:GraphPaperControl.UserControls"
x:Name="graphPaper" />
<InkCanvas
x:Name="inkCanvas"
ManipulationDelta="OnInkCanvasManipulationDelta"
ManipulationMode="Scale"
Tapped="OnInkCanvasTapped" />
<InkToolbar
HorizontalAlignment="Right"
VerticalAlignment="Top"
TargetInkCanvas="{Binding ElementName=inkCanvas}" />
<TextBlock
x:Name="txtMode"
FontSize="18"
HorizontalAlignment="Left"
VerticalAlignment="Bottom"
Margin="48" />
</Grid>
[/code]
Note that the ManipulationDelta event is being handled here and that the ManipulationMode is set to Scale, meaning that the user can perform a “pinch to scale” gesture on the InkCanvas.
The accompanying code-behind below includes the event handler that changes the GridSize on the underlying GraphPaperUserControl in response to this gesture. It also includes a handler for the tapped event that checks for a touch event before toggling between one of three drawing modes – Freeform drawing, Snap to X and Snap to Y.
[code lang=”csharp”]
namespace InkArticleApp
{
using System;
using Windows.Devices.Input;
using Windows.UI.Xaml.Controls;
using Windows.UI.Xaml.Input;
public sealed partial class MainPage : Page
{
enum Mode
{
Freeform = 0,
SnapX = 1,
SnapY = 2
}
public MainPage()
{
this.InitializeComponent();
this.graphPaper.GridSize = BASE_GRID_SIZE;
this.currentScaleFactor = 1.0m;
this.currentMode = Mode.Freeform;
this.UpdateModeText();
}
void UpdateModeText() => this.txtMode.Text = this.currentMode.ToString();
void OnInkCanvasManipulationDelta(object sender, ManipulationDeltaRoutedEventArgs e)
{
var newScaleFactor = (decimal)e.Delta.Scale * this.currentScaleFactor;
if ((newScaleFactor <= MAX_SCALE_FACTOR) && (newScaleFactor >= MIN_SCALE_FACTOR))
{
this.currentScaleFactor = newScaleFactor;
var newGridSize = (int)(this.currentScaleFactor * BASE_GRID_SIZE);
if (newGridSize != this.graphPaper.GridSize)
{
this.graphPaper.GridSize = newGridSize;
}
}
}
void OnInkCanvasTapped(object sender, TappedRoutedEventArgs e)
{
if (e.PointerDeviceType == PointerDeviceType.Touch)
{
// Apologies for doing such a horrible thing to an enum.
this.currentMode =
(Mode)((((int)this.currentMode) + 1) % ((int)Mode.SnapY + 1));
this.UpdateModeText();
}
}
Mode currentMode;
decimal currentScaleFactor;
static readonly decimal MAX_SCALE_FACTOR = 8.0m;
static readonly decimal MIN_SCALE_FACTOR = 0.5m;
static readonly int BASE_GRID_SIZE = 20;
}
}
[/code]
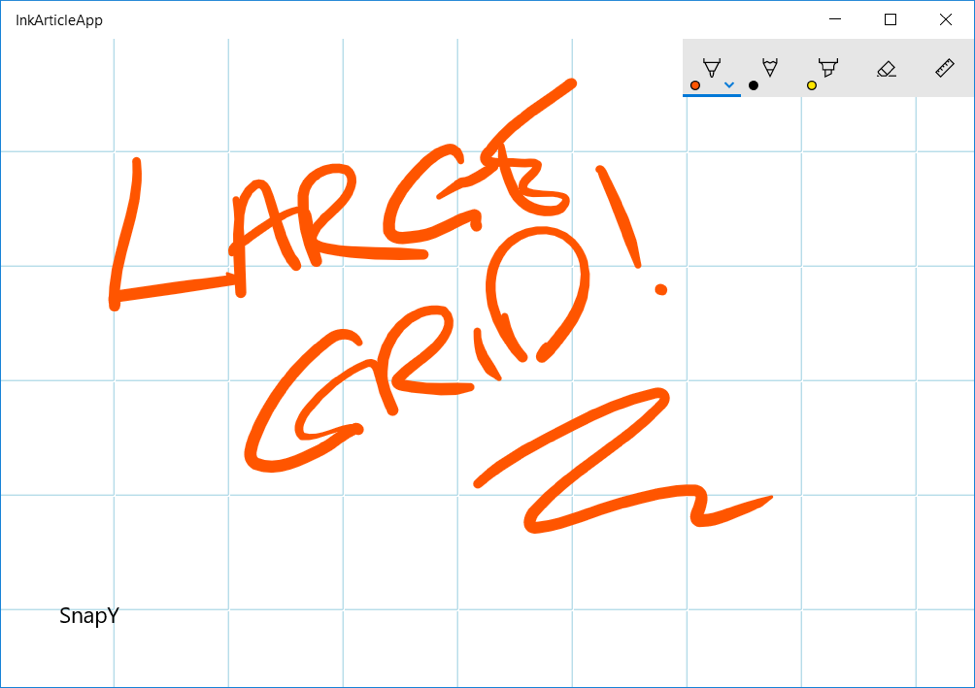
This UI presents graph paper “underneath” the InkCanvas, and the grid drawn on the graph paper can be resized by a pinch gesture and the drawing mode can be toggled by tapping. The screenshot below shows this in use. It’s key to note that handling these touch events does not alter the inking experience.
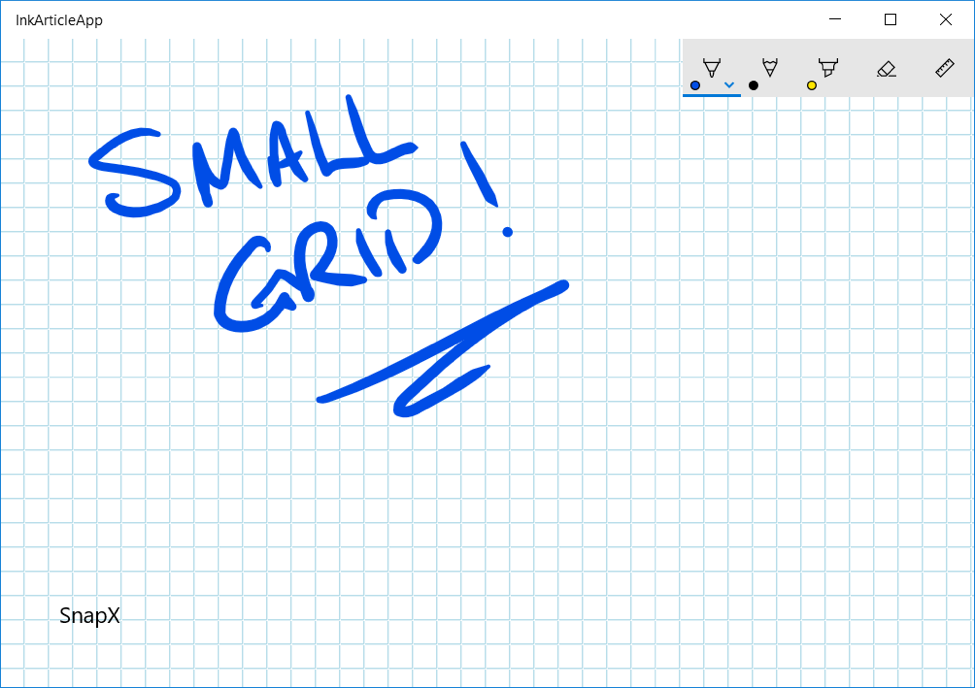
Snapping Ink to Grid Lines

The remaining piece of work in this small example is to snap “wet” ink to the grid lines as it is being drawn onto the InkCanvas in accordance with the drawing mode that the user has set by tapping on the canvas.
This involves handling new events in the Anniversary Update APIs presented by the class CoreWetStrokeUpdateSource from the namespace Windows.UI.Input.Inking.Core.
The CoreWetStrokeUpdateSource class provides a static factory method for construction; it takes the InkPresenter as its argument and then the returned object fires the set of “wet” ink events representing stroke start, continuing, stop, canceled and completed.
I added a Loaded handler to my page and handled only two of those events in my example.
[code lang=”csharp”]
/// <summary>
/// event handler for MainPage.Loaded
/// </summary>
void OnLoaded(object sender, Windows.UI.Xaml.RoutedEventArgs e)
{
// Added a member variable of type CoreWetStrokeUpdateSource called ‘wetUpdateSource’
this.wetUpdateSource = CoreWetStrokeUpdateSource.Create(this.inkCanvas.InkPresenter);
this.wetUpdateSource.WetStrokeStarting += OnStrokeStarting;
this.wetUpdateSource.WetStrokeContinuing += OnStrokeContinuing;
}
[/code]
These events are fired on the dedicated background input processing thread and, naturally, the intention would be to run as little code as possible to keep the inking experience smooth and fluid.
In my scenario, I handle the WetStrokeStarting event by looking at the first ink point produced and then (depending on the current drawing mode) storing the X or Y coordinate that any ink should be snapped to until the next ink stroke begins.
Note that the CoreWetStrokeUpdateEventArgs argument that is passed to the event handler is used here only for the NewInkPoints property but it does contain additional information including the PointerId. Also, the code presented here is more for illustration of the ideas than optimized for performance.
[code lang=”csharp”]
void OnStrokeStarting(CoreWetStrokeUpdateSource sender, CoreWetStrokeUpdateEventArgs args)
{
// I am assuming that we do get a first ink point.
InkPoint firstPoint = args.NewInkPoints.First();
// as the stroke is starting, reset our member variables which store
// which X or Y point we want to snap to.
this.snapX = this.snapY = null;
// now decide whether we need to set up a snap point for the X value or
// one for the Y value.
if (this.currentMode == Mode.SnapX)
{
this.snapX = this.NearestGridSizeMultiple(firstPoint.Position.X);
}
else if (this.currentMode == Mode.SnapY)
{
this.snapY = this.NearestGridSizeMultiple(firstPoint.Position.Y);
}
this.SnapPoints(args.NewInkPoints);
}
double? snapX;
double? snapY;
[/code]
This handler function makes use of the NearestGridSizeMultiple function to determine the X or Y value of the nearest grid line.
Returning to the earlier discussion around threading, note that the comment in the method below relates to the addition of a new member variable which keeps track of the current grid size of the graph paper even though the GraphPaperUserControl already stores this in its GridSize property.
[code lang=”csharp”]
double NearestGridSizeMultiple(double value)
{
// Note. I have added a new member variable ‘currentGridSize’ which I keep
// in sync with the GridSize of the GraphPaperUserControl.
// This is because this code runs on a non-UI thread so it cannot simply
// call into that property on the user control which has thread affinity.
var divisor = value / this.currentGridSize;
var fractional = divisor – Math.Floor(divisor);
if (fractional >= 0.5)
{
divisor = Math.Ceiling(divisor);
}
else
{
divisor = Math.Floor(divisor);
}
return (divisor * this.currentGridSize);
}
int currentGridSize;
[/code]
Lastly, the member function SnapPoints is invoked on the newly produced “wet” InkPoints so that the original values can be replaced with new values that are identical except their X or Y coordinates are snapped to the nearest grid lines if snap points have been determined.
[code lang=”csharp”]
void SnapPoints(IList<InkPoint> newInkPoints)
{
// do we need to do any snapping?
if (this.currentMode != Mode.Freeform)
{
for (int i = 0; i < newInkPoints.Count; i++)
{
if (this.snapX.HasValue)
{
// replace this point with the same point but with the X value snapped.
newInkPoints[i] = new InkPoint(
new Point(this.snapX.Value, newInkPoints[i].Position.Y),
newInkPoints[i].Pressure);
}
else if (this.snapY.HasValue)
{
// replace this point with the same point but with the Y value snapped.
newInkPoints[i] = new InkPoint(
new Point(newInkPoints[i].Position.X, this.snapY.Value),
newInkPoints[i].Pressure);
}
}
}
}
[/code]
That same member function is invoked from the event handler, which deals with the continuation of the “wet” ink stroke so the ink points produced can also be snapped.
[code lang=”csharp”]
void OnStrokeContinuing(CoreWetStrokeUpdateSource sender, CoreWetStrokeUpdateEventArgs args)
{
this.SnapPoints(args.NewInkPoints);
}
[/code]
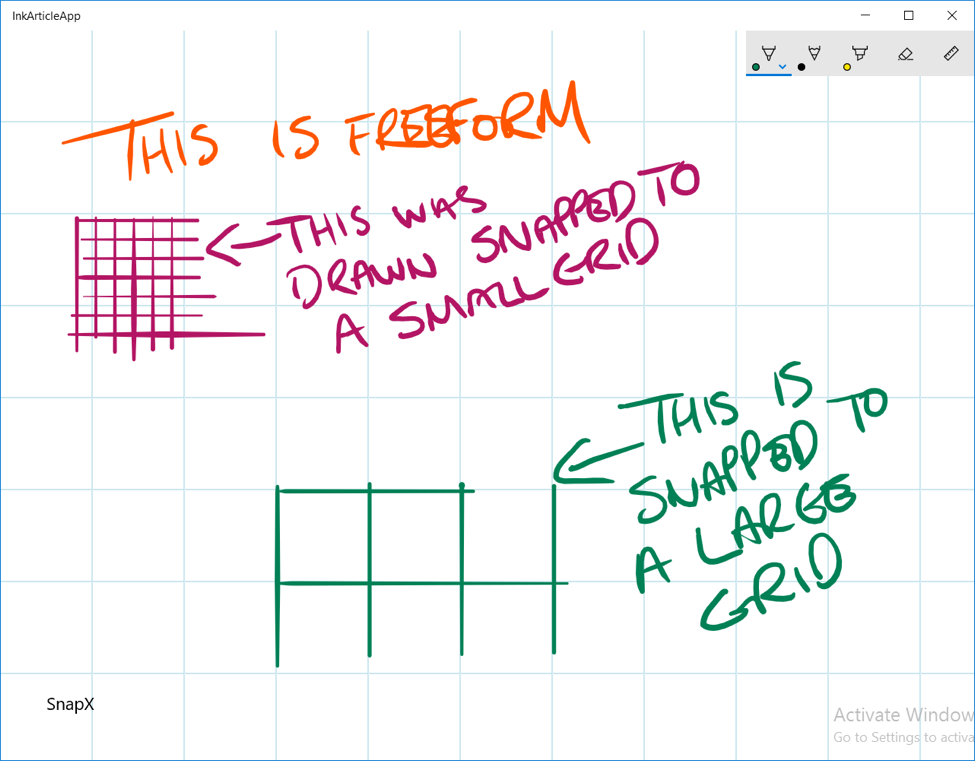
Those small pieces of code are enough to change the behavior of the ink as it is being drawn, as the screenshots below illustrate.
Wrapping Up
The full code for the article is present in this InkArticleApp GitHub repository for you to download and experiment with, and use as the basis for your own experiments.
The graph paper example here is a simple one but these new capabilities open up all kinds of scenarios for different shapes and sizes of rulers and stencils and perhaps more complex examples for particular types of diagramming. It’s not hard to imagine tools like Visio implementing custom rulers for diagramming buildings or network diagrams.
No doubt, you have your own scenarios that could benefit from digital ink and we look forward to seeing what you build.
Mike Taulty, Developer Evangelist, Microsoft UK
mtaulty.com
Twitter: @mtaulty
Interested in more capabilities with inking?
Check out this guide to pen and stylus interactions on MSDN: “Pen and stylus interactions in UWP apps”
And this recent episode of Channel9’s Context show, focusing on inking with lots of code demos:
Get started with Windows Visual Studio!