

We talked about it in our previous post: Visual Studio 2017 Update 4 makes it easy to modernize your app and make it store ready and today we want to describe the new capabilities in Visual Studio 2017 15.5 that enable new scenarios to the Windows application packaging project to take advantage of more Windows 10 features in your applications.
During this article we will cover three examples to highlight the new capabilities added to the packaging project to enable packaging for not only Win32 applications, but also UWP applications and components:
- Background execution using UWP background tasks.
- Windows Shell integration using the Share Target contract.
- Include Win32 code investments in your UWP app package.
The first two samples are existing WPF applications packaged as APPX with extended functionality implemented as UWP components. The first application adds background execution based on UWP background tasks, while the second app shows how to deeply integrate the application with the Windows 10 shell using a widely available feature as Share contracts. Finally, the last app is a UWP entry point that calls to a classic Win32 process that interop with Excel.
Note: Because the UWP components require to be compiled for a specific platform: x86 or x64, the Any CPU solution configuration will not work in any of these samples.
All samples are available in the GitHub repo Windows-Packaging-Samples. These samples require Visual Studio 2017 15.5 Preview 4 or greater, available to download from https://www.visualstudio.com/downloads.
1. WPF with Background Tasks
The Universal Windows Platform includes support for advanced background processing. Background tasks allow running code even when the app is suspended. Background tasks are intended for small work items that do not require user interaction, such as downloading mail, showing a toast notification for an incoming chat message or reacting to a change in a system condition.
To show how to use this feature from your Win32 applications, we are going to implement a small utility that will make an HTTP request to a URL configured by the user and will show the elapsed milliseconds in a Toast Notification.
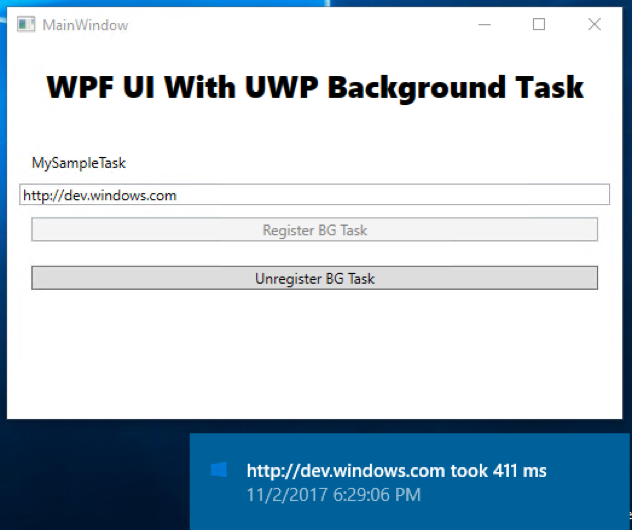
We will create a WPF application to allow the user to specify the URL to check and enable/disable the background task. The background task will be implemented as a Windows Runtime Component (WINMD). To be able to include this component in the package, we need to create a UWP application that uses the component, and finally add the WPF and UWP projects as references to the packaging project. Below is the list of steps needed.
You can find the complete source code of this sample in the GitHub repository, but if you want to create the sample from scratch here are the most important steps.
- Package your desktop application using the packaging project
- Add a Windows Runtime component to implement the background task
- Add a UWP application that reference the runtime component
- Add a reference to the UWP application from the packaging project
- Configure the Background task in the manifest
- Register the background task from the Desktop application
Once you completed steps 1 to 4, you should have a solution for projects as shown in the image below:
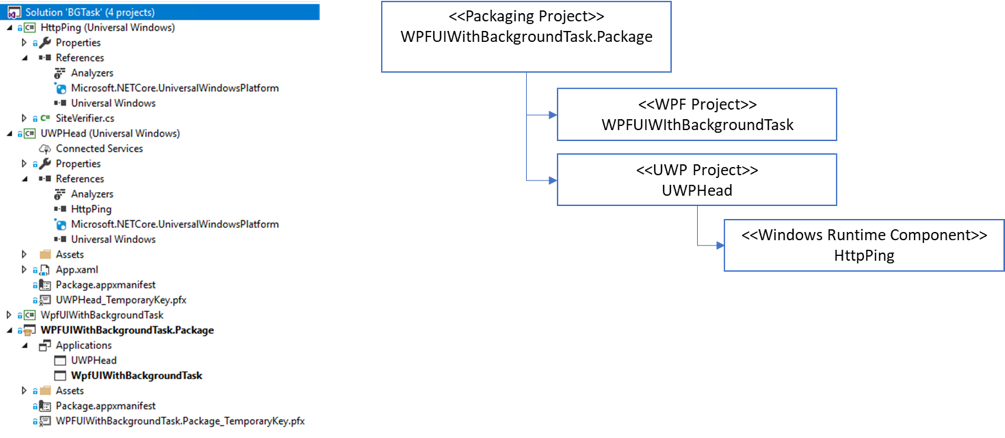
The packaging project references not only the WPF application, but also the UWP project. For this reason, the solution needs to be configured for a specific platform, since UWP is not available for Any CPU configurations.
Background Task implementation
The background task is a C# class that implements the IBackgroundTask interface. This interface defines the Run method that will be called when the system triggers the task.
[code lang=”csharp”]
public sealed class SiteVerifier : IBackgroundTask
{
public async void Run(IBackgroundTaskInstance taskInstance)
{
taskInstance.Canceled += TaskInstance_Canceled;
BackgroundTaskDeferral deferral = taskInstance.GetDeferral();
var msg = await MeasureRequestTime();
ShowToast(msg);
deferral.Complete();
}
private async Task<string> MeasureRequestTime()
{
string msg;
try
{
var url = ApplicationData.Current.LocalSettings.Values["UrlToVerify"] as string;
var http = new HttpClient();
Stopwatch clock = Stopwatch.StartNew();
var response = await http.GetAsync(new Uri(url));
response.EnsureSuccessStatusCode();
var elapsed = clock.ElapsedMilliseconds;
clock.Stop();
msg = $"{url} took {elapsed.ToString()} ms";
}
catch (Exception ex)
{
msg = ex.Message;
}
return msg;
}
[/code]
Note how we use the LocalSettings in ApplicationData to share information between the WPF application and the UWP background task.
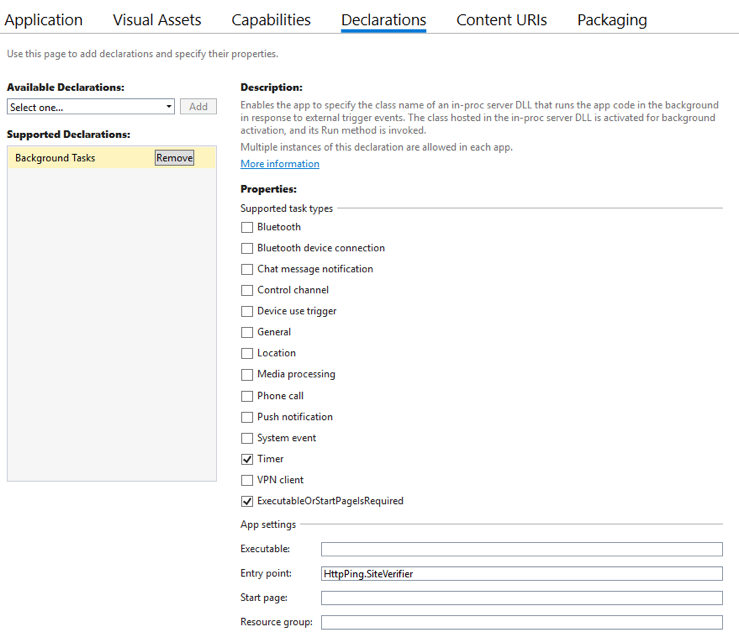
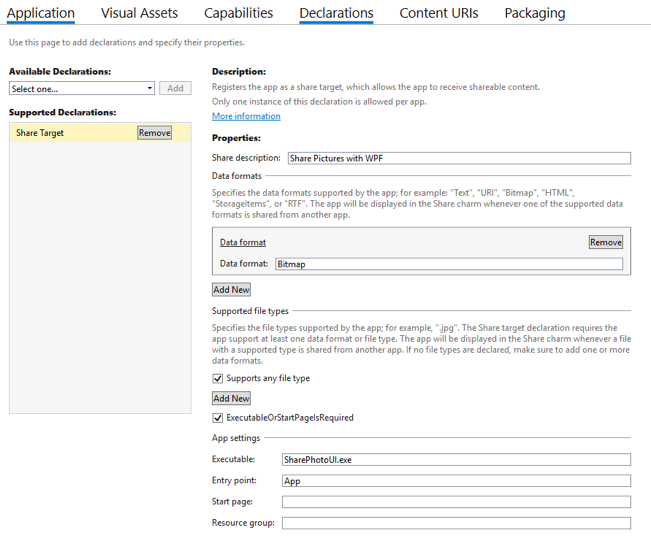
To configure the background task, you need to update the manifest using the manifest designer. Go to the declarations tab, add the background task and configure the entry point as the implementation.
To register the background task in the system, we need to call a Windows 10 API from the WPF application. This API is available in the Windows 10 SDK, and to use it from .NET we need to add the references explained here. Once you have access to the Windows 10 API you can use the BackgroundTaskRegistration class to configure the background task as shown in the code below:
[code lang=”csharp”]
public void RegisterBackgroundTask(String triggerName)
{
var current = BackgroundTaskRegistration.AllTasks
.Where(b => b.Value.Name == triggerName).FirstOrDefault().Value;
if (current is null)
{
BackgroundTaskBuilder builder = new BackgroundTaskBuilder();
builder.Name = triggerName;
builder.SetTrigger(new MaintenanceTrigger(15, false));
builder.TaskEntryPoint = "HttpPing.SiteVerifier";
builder.Register();
System.Diagnostics.Debug.WriteLine("BGTask registered:" + triggerName);
}
else
{
System.Diagnostics.Debug.WriteLine("Task already:" + triggerName);
}
}
[/code]
To register the background task, first we make sure the task has not been registered before, and then we use the BackgroundTaskBuilder to configure the name and the Trigger, in this case we are using the MainteinanceTrigger.
2. Register your application as Share Target
Share contracts is a Windows 10 feature that allows the sharing of information between two apps, the sender and the receiver. Thanks to the Desktop Bridge, we can register a UWP application as a Share receiver and then integrate with a Win32 application. Once the app is registered, it will be shown every time the user invokes a share operation as shown below:

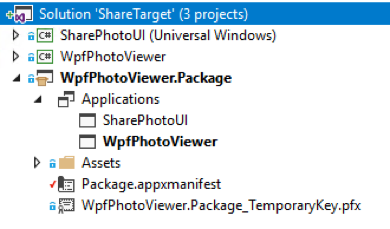
In this sample, we are extending a WPF application to become a share target where users can send images from other apps like the Photos app, Edge or even the Shell to our application. We are using the packaging project to include not only the WPF application, but also a UWP application that allows a UWP UI to receive events from the share target. Below you can see the solution explorer with the packaging project referencing the WPF and UWP projects.
The package needs to declare the Share Target, including the name of the UWP application:
When the application gets activated, it receives the share target information from the ShareOperation parameter as shown in the code snippet below:
[code lang=”csharp”]
protected async override void OnNavigatedTo(NavigationEventArgs e)
{
base.OnNavigatedTo(e);
operation = (ShareOperation)e.Parameter;
if (operation.Data.Contains(StandardDataFormats.StorageItems))
{
var items = await operation.Data.GetStorageItemsAsync();
file = items[0] as StorageFile;
IRandomAccessStreamWithContentType stream = await file.OpenReadAsync();
await this.Dispatcher.RunAsync(CoreDispatcherPriority.Normal, async () =>
{
BitmapImage image = new BitmapImage();
this.img.Source = image;
await image.SetSourceAsync(stream);
});
}
}
[/code]
Now every time the user shares a picture and selects our application, the Share UI application gets invoked and the UWP UI will be displayed.
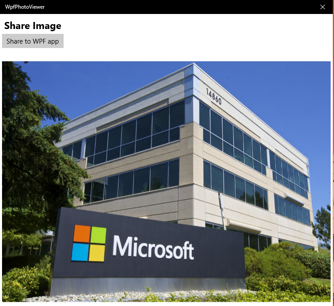
After clicking the “Share to WPF app” button, the UWP will process the event handler, and will copy the picture to the ApplicationData folder and run the Win32 application using the FullTrustProcessLauncher.
[code lang=”csharp”]
private async void ShareBtn_Click(object sender, RoutedEventArgs e)
{
await file.CopyAsync(ApplicationData.Current.LocalFolder);
operation.ReportCompleted();
await FullTrustProcessLauncher.LaunchFullTrustProcessForCurrentAppAsync();
}
[/code]
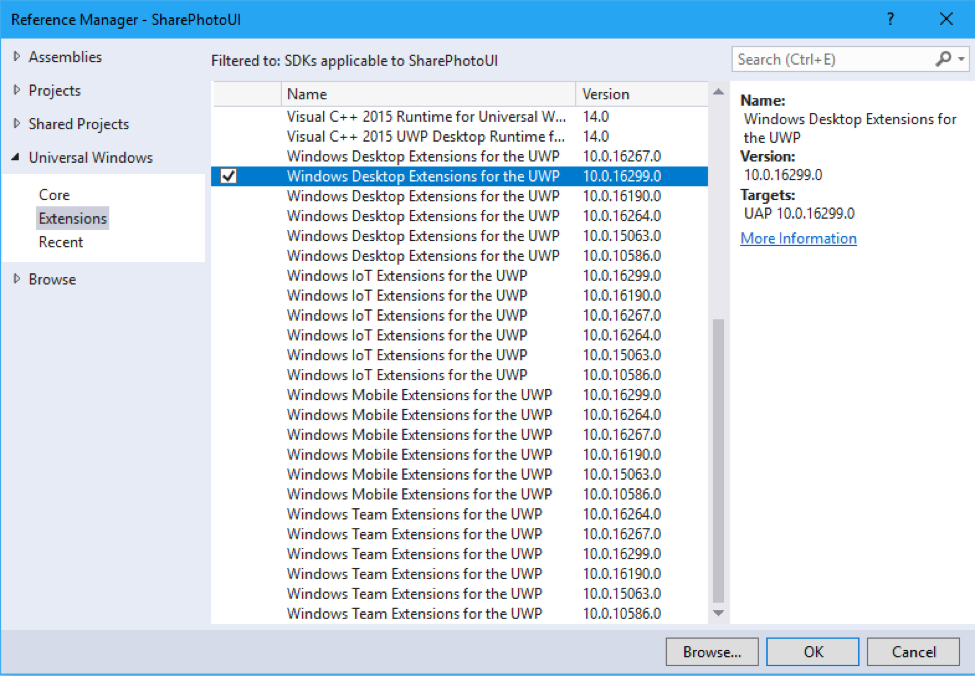
To use the FullTrustProcessLauncher we will use the Desktop extension to UWP, this extension is available as an SDK reference available in the Add References dialog of the UWP application:
And finally, register the desktop extension and the target executable in the manifest:
[code lang=”xml”]
<Package xmlns="http://schemas.microsoft.com/appx/manifest/foundation/windows10"
xmlns:mp="http://schemas.microsoft.com/appx/2014/phone/manifest"
xmlns:uap="http://schemas.microsoft.com/appx/manifest/uap/windows10"
xmlns:rescap="http://schemas.microsoft.com/appx/manifest/foundation/windows10/restrictedcapabilities"
xmlns:desktop="http://schemas.microsoft.com/appx/manifest/desktop/windows10"
IgnorableNamespaces="uap mp rescap desktop">
<… >
<desktop:Extension Category="windows.fullTrustProcess"
Executable="WPFPhotoViewer\WPFPhotoViewer.exe" />
<… >
[/code]
3. Enable Office interop from UWP application
One of the key features of the Desktop Bridge is the ability to include Win32 executables on your application package and run those as full trust process from a UWP application. Now, with the Windows Application Packaging project, you can create packages that contain both UWP and Win32 binaries.
Additionally, to the process launcher, the App Service extension will help you to establish a communication channel between your UWP application and the Win32 process.
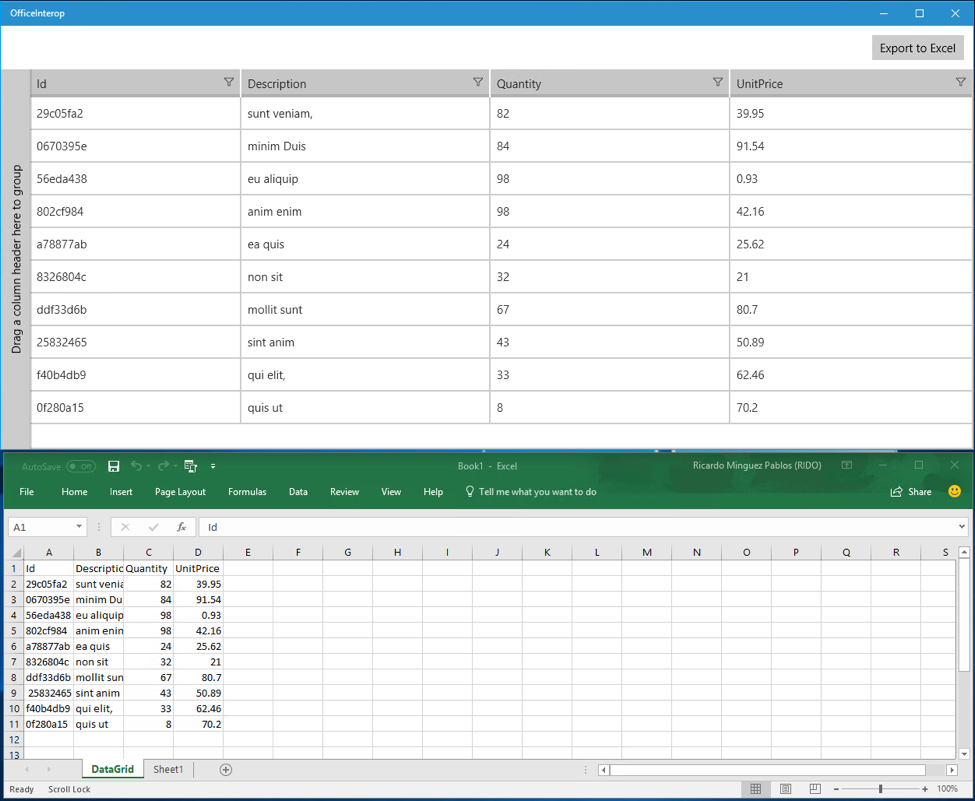
In this sample we are going to include a Win32 process (a command line application) to manage an Excel worksheet using office interop.
We start with a UWP application that uses the Telerik data grid to show some tabular data, and we will add button to export the same data to Excel as shown in the image below:
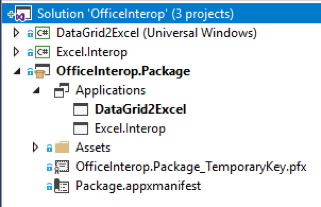
The solution explorer of this example looks very similar to our previous example, with three projects in the solution: The UWP application, the Win32 command line and the packaging project with a reference to both projects. However, note that in this case the Application entry point (shown in bold) is the UWP project:
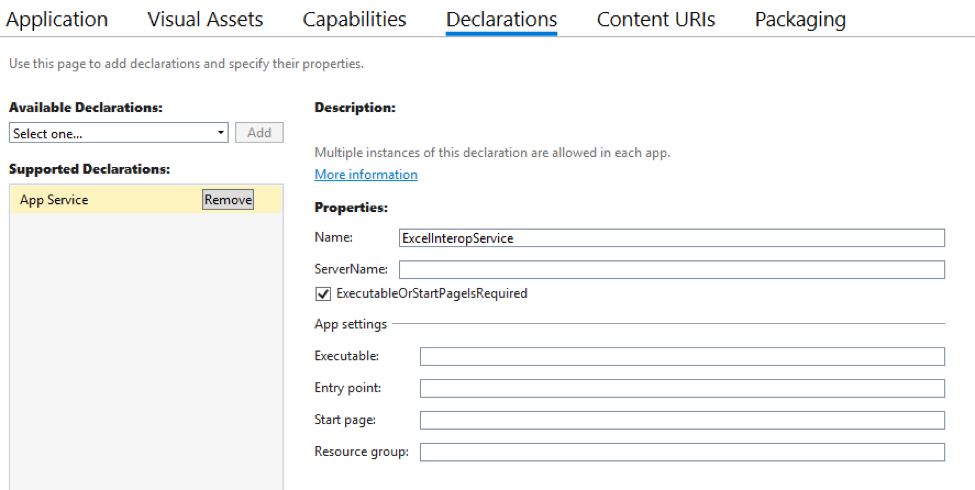
As we did in our previous example, we need to add a reference to the Desktop extension and register the full trust process in the manifest. But this time, we will also register the application service in the package manifest:
To open the communication channel in the Win32 process, we will add a reference to the Windows API as described here:
To establish the connection, we will use the AppServiceConnection class, where we need to specify the package family name of the application we want to connect with, and the event handlers we will use to process the incoming requests.
[code]
Connection = new AppServiceConnection();
connection.AppServiceName = "ExcelInteropService";
connection.PackageFamilyName = Windows.ApplicationModel.Package.Current.Id.FamilyName;
connection.RequestReceived += Connection_RequestReceived;
connection.ServiceClosed += Connection_ServiceClosed;
[/code]
Conclusion
The new features added to the packaging project in Visual Studio 2017 will help you to modernize your existing desktop applications to get the best from UWP and Win32 in the same package. This new project will help you to configure your package by using the manifest designer, debug your application in the context of the Desktop Bridge and finally, help to create the packages for store submission or sideloading. Here are some resources for more details:
- Desktop Bridge docs
- Desktop Bridge samples
- Windows Application Packaging project samples
- App Modernization video on Channel 9
Are you ready to submit your desktop application to the Microsoft Store? Let us know about it here, and we will help you through the process!