

XAML Islands is a technology that enables Windows developers to use new pieces of UI from the Universal Windows Platform (UWP) on their existing Win32 Applications, including Windows Forms and WPF technologies. This allows them to gradually modernize their apps at their own pace, making use of their current code as much as they want.
Background: How did we get here?
In 2012, with Windows 8, we introduced a new framework to modernize the Win32 APIs called Windows Runtime, with many new UI Controls. These UI Controls were part of the visual framework called XAML, which is part of the Windows Runtime. Back then, if you wanted to use any of these new XAML Controls, you would need to create a new App.
In the middle of 2015, with the introduction of Windows 10, UWP was born. The Universal Windows Platform (UWP) allows you to create apps that work across Windows devices (Xbox, Mobile, HoloLens, Desktop, etc).
In 2015 we announced Project Centennial, later Desktop Bridge, a set of tools that allowed developers to bring their existing apps (Win32) to the Microsoft Store (i.e. the new packaging system), so they could convert, for example, their MSI to an APPX. That was the first step on allowing even more apps to be delivered to customers in a safe and reliable way. Later on, we added even more capabilities to this bridge, allowing developers to enhance their apps leveraging some of the new Windows 10 APIs into their existing apps, like live tiles and notification on the new action center. But still, no new UI controls.
And now, at Build 2018, Kevin Gallo announced that Microsoft would be introducing a way for developers to use the new Windows 10 controls into their current WPF, Windows Forms and native Win32 apps, without fully migrating their apps to the Universal Windows Platform. That was branded as UWP XAML Islands, and it is huge! Now you can have your “Islands” of UWP controls wherever you want inside your WPF apps without rewriting thousands of lines of code.
Who is it for?
XAML Islands are intended for existing Win32 Apps that wants to improve their user experience by leveraging new UWP controls and behaviors but, due to effort or cost being prohibitive, are unable to do a full rewrite of the App. You could already leverage Windows 10 APIs, but up until XAML Islands, only non-UI related APIs.
If you are developing a new Windows App, a UWP App is probably the right approach.
How does it work?
Starting with the Windows 10 October 2018 Update (SDK 17763), we added a new SDK API that enables the scenario of XAML Islands.
NOTE: This feature is in a Preview state for the October 2018 Update, so we can get your feedback on our directions – there are important limitations and the feature is not yet ready for production code, but we would value your feedback highly to help inform our plans.
That means that Windows 10 now supports hosting UWP Controls inside the context of a Win32 Process. There are two new system APIs called WindowsXamlManager and DesktopWindowXamlSource.
- The WindowsXamlManager handles the UWP XAML Framework itself. Its only method, aside from Disposing, is InitializeForCurrentThread, which initializes the UWP XAML Framework inside the current thread of this non-UWP Win32 Desktop app, allowing it to create UWP UI in it.
- The DesktopWindowXamlSource is the actual instance of your Island content. It has a Content property which you (the developer) are responsible for instantiating and setting. This class also enables the developer to get and set the focus of that element.
The DesktopWindowXamlSource renders to and gets its input from an HWND. It needs to know to which other HWND it will attach the Island’s one, and you are responsible for sizing and positioning the parent’s HWND.
Simplifying, with an instance of the DesktopWindowXamlSource in place, you can attach it’s HWND to any parent HWND you want, from your native Win32 App. You don’t have to manually do that if you use the Windows Community Toolkit, because it already wraps these classes into an easy-to-use implementation, for WPF and WinForms.
In case you are not using the toolkit, or want to interop directly from raw Win32 code, you would need to cast the DesktopWindowXamlSource object (it’s an IInspectable, after all, UWP is an extension of COM – take a look at how to do that here) to a IDesktopWindowXamlSourceNative instance (which is a known COM type, just not exposed inside the SDK yet). This interface exposes the AttachToWindow method that takes an IntPtr that points to the parent HWND. By attaching it to a parent HWND, it would draw whichever UWP Control you instantiated.
The process is very similar to how you create a Win32 element inside WPF. Any framework that exposes HWND can host a XAML Island. So, in theory, you could have a Java or Delphi application hosting a Windows 10 UWP Control. This control can be anything from a simple Button to a fully featured custom control. All you need is a wrapper for that HWND object.
NuGets and dependencies
We don’t want you to have to worry about all these HWND details, especially if you are a WPF or WinForms developer that doesn’t normally need to speak in terms of HWNDs. That is a huge effort and we wanted to simplify that by exposing wrapper controls for the most common usages out there. We have thousands of apps that are using WPF and Windows Forms, which already handle HWND instances, so the current iteration of XAML Island is already exposing these wrapper classes for you. You can find their implementations inside the Windows Community Toolkit NuGet packages for Win32.
The easiest way to use an Island inside an app is to use the NuGet packages that we provide. The one you use depends on which framework you are using. The Windows Community Toolkit contains two control implementations that wrap the WindowsXamlManager and the DesktopWindowXamlSource for your convenient use, one for WPF and one for Windows Forms. These are the available packages:
- Microsoft.Toolkit.Wpf.UI.XamlHost – This package provides the WindowsXamlHost class for WPF.
- Microsoft.Toolkit.Wpf.UI.Controls – As of right now, this package provides wrapper classes for 1st party controls, such as the InkCanvas, InkToolbar, MapControl, and MediaPlayerElement, all for WPF.
- Microsoft.Toolkit.Forms.UI.XamlHost – This package provides the WindowsXamlHost class for Windows Forms.
- Microsoft.Toolkit.Forms.UI.Controls – As of right now, this package provides wrapper classes for 1st party controls, such as the InkCanvas, InkToolbar, MapControl, and MediaPlayerElement, all for Windows Forms.
Both Microsoft.Toolkit.Wpf.UI.Controls and Microsoft.Toolkit.Forms.UI.Controls have dependencies on their respective .XamlHost packages. They use the WindowsXamlHost control to wrap the 1st party UWP controls, which we’ll get into more details on the next blog post.
Integrating with XAML Islands using the Windows Community Toolkit
Now with the NuGet package in place, integrating with XAML Islands should be simple.
The implementation creates and manages the WindowsXamlManager and the DesktopWindowXamlSource instances for you inside a wrapper control called WindowsXamlHost (take a look at the implementation for WPF right here, and some of the calls inside the base class). It also handles the loading of UWP types for you (inside a special class called UWPTypeFactory), and the focus management, back and forth from the Island to the host control. All of that, for free!
For instance, if you are a WPF developer, all you need to do is create an instance of the WindowsXamlHost class and specify which UWP control you want to instantiate inside it. There are a few ways of doing that. The docs are extensive about it so I definitely recommend reading it.
NOTE: Make sure you follow the Enhance your desktop application for Windows 10, which describes how to use Windows 10 APIs on your Desktop Bridge Win32 App. Without this, you won’t be able to reference any Windows 10 API.
Now let’s reference the control in our Xaml (WPF). To create a reference of our WindowsXamlHost, we use the namespace Microsoft.Toolkit.Wpf.UI.XamlHost, so we need to add it to our namespaces inside the WPF’s XAML. At the first element of your Xaml component, add the following namespace:
xmlns:xamlhost=”clr-namespace:Microsoft.Toolkit.Wpf.UI.XamlHost;assembly=
Microsoft.Toolkit.Wpf.UI.XamlHost”
Now you can create objects from that namespace, and more specifically, the WindowsXamlHost. This is how the markup would look like:
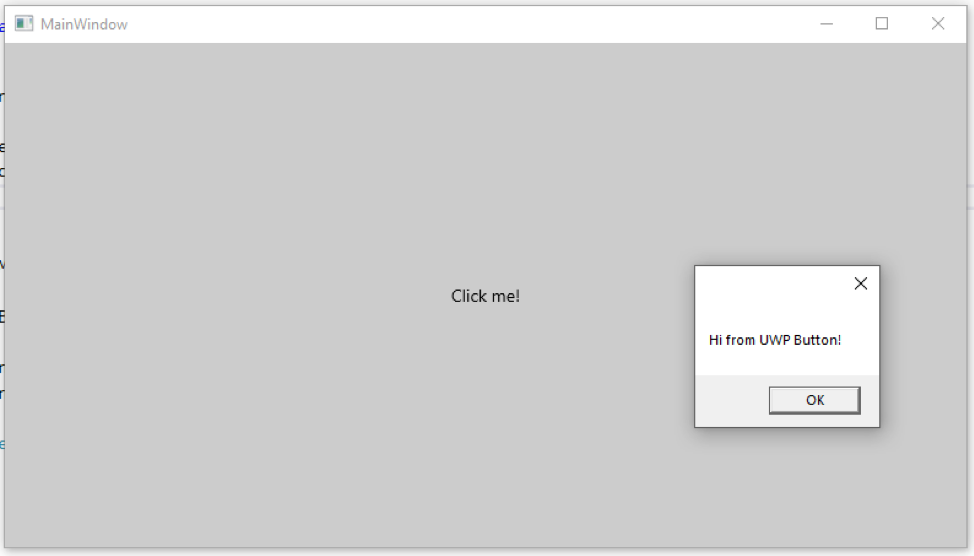
Just as a very, very simple – and not practical – example, you can create a UWP button, like this:
<Window
...
xmlns:xamlhost="clr-namespace:Microsoft.Toolkit.Wpf.UI.XamlHost;assembly=Microsoft.Toolkit.Wpf.UI.XamlHost">

<xamlhost:WindowsXamlHost x:Name="myUwpButton" InitialTypeName="Windows.UI.Xaml.Controls.Button" />
This is the simplest way for specifying the control we want inside our Island, which is setting the InitialTypeName property to the fully qualified name of the UWP control that you want to instantiate and render. Then you can just access it from your code behind.
Unfortunately, the UWP control will not be available right after the page’s InitializeComponent(). To be able to access its instance you need to wait until it fully loads so it is available for you to attach to its properties. There is an event on the control specifically for that, called ChildChanged:
myUwpButton.ChildChanged += MyUwpButton_ChildChanged;

...

private void MyUwpButton_ChildChanged(object sender, System.EventArgs e)
{
if (myUwpButton.Child is Windows.UI.Xaml.Controls.Button button)
{
button.Content = "Click me!";
button.Click += (s, args)=>
{
MessageBox.Show("Hi from UWP Button!");
};
}
}
NOTE: Be careful of the namespaces! You’ll probably have two Button classes, System.Windows.Controls.Button (the WPF one) and Windows.UI.Xaml.Controls.Button (the UWP one).
Again, this is just the simplest thing you can do with Xaml Island, but it is not the right way of doing it! A few bigger Islands is a better approach than many smaller ones. What you probably want is custom controls, which is going to be covered on our next blog post!
With this process, any Win32 App can use the newest UWP controls and adopt the Fluent Design System, regardless of your app model.
Binding
One of the most useful features of XAML is Binding. The Child property of the WindowsXamlHost instance will reference the UWP object. This object and your WPF or WinForms objects are running on the same process and on the exact same thread. This means that you could have a WPF TextBox and a UWP TextBox and bind their Text properties together.
<StackPanel>
< xamlhost:WindowsXamlHost InitialTypeName="Windows.UI.Xaml.Controls.TextBox" ChildChanged="MyUwpTextBox_ChildChanged" x:Name="myUwpTextBox"/>
<TextBox x:Name="myWpfTextBox"/>
</StackPanel>
And on your code behind:
private void MyUwpTextBox_ChildChanged(object sender, System.EventArgs e)
{
if (myUwpTextBox.Child is Windows.UI.Xaml.Controls.TextBox textBox)
{
textBox.SetBinding(Windows.UI.Xaml.Controls.TextBox.TextProperty, new Windows.UI.Xaml.Data.Binding
{
Source = myWpfTextBox,
Path = new Windows.UI.Xaml.PropertyPath("Text"),
Mode = Windows.UI.Xaml.Data.BindingMode.TwoWay,
UpdateSourceTrigger = Windows.UI.Xaml.Data.UpdateSourceTrigger.PropertyChanged
});
}
}
As you can see, I used the C# binding syntax instead of the syntax for binding inside the XAML – Text=”{Binding …}” – because we are not exposing the typed object, after all, the WindowsXamlHost is a control that just instantiates whatever fully qualified class you specify, so there are no bindable properties inside it. The Child property of the WindowsXamlHost is a Windows.UI.Xaml.UIElement, so we could only bind to the dependency properties exposed by that control. To solve this, we could create our own custom WPF control that inherits from WindowsXamlHost, sets the Child to the desired UWP TextBox and exposes the properties as bindable properties for the ones we want to bind to as needed. Here is an example for the Button class.
NOTE: You most likely don’t want/need to do that for every control you have. This process is for allowing a developer to expose it’s UWP control to be used in another context. Again, try to minimize the number of Islands you create. For use within your own App, try to create fewer and bigger Islands, instead of several small ones.
It’s worth noting that even though we are using a TwoWay binding, it is acting as OneWayToSource, so changes to the UWP TextBox are being reflected on the WPF TextBox, but not the other way around. That happens because the WPF TextBox defines it’s TextProperty dependency property as a System.Windows.DependencyProperty, and the UWP TextBox defines its TextProperty as a Windows.UI.Xaml.DependencyProperty. They are not the same type. In fact, the whole binding systems are different, meaning that the UWP binding system is not expecting that type and does not know what to do with it. The other way of doing this that works is if we bind both TextBoxes to a class that implements INotifyPropertyChanged (e.g. a view model). Yes, the good n’ old! If you want to check a full featured sample, take a look at this repository on GitHub.
Where are we?
This was the first blog post showing how we came to this point in time, and I tell you, it’s a great time to be a Windows Developer! Not only we welcome all developers, we also understand that your development investment is important and needs to be a long-term investment.
On the next blog post, we’ll clear things up, showing how to leverage the wrapped controls that we provide inside the Microsoft.Toolkit.Wpf.UI.Controls and Microsoft.Toolkit.Forms.UI.Controls NuGet packages, as well as the most compelling feature of Xaml Islands, hosting your custom controls inside your Win32 Apps.
Stay tuned for more and see you next time!